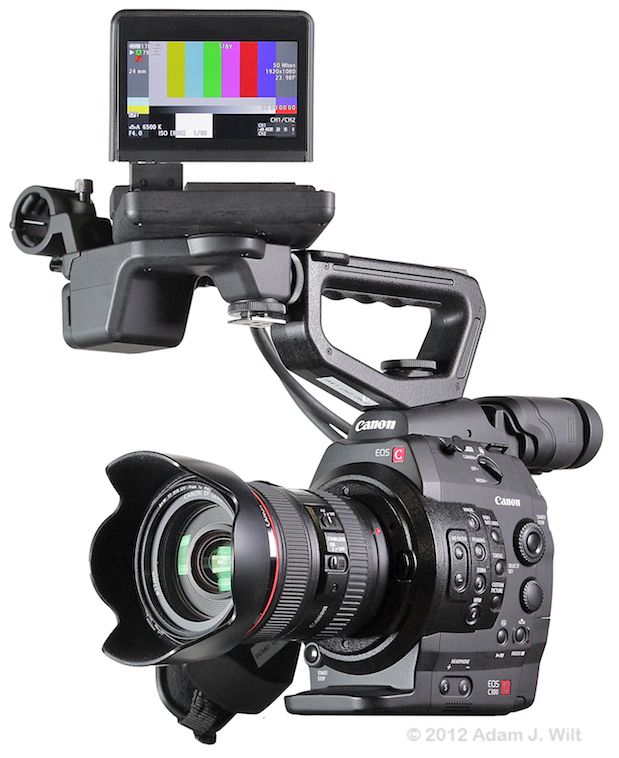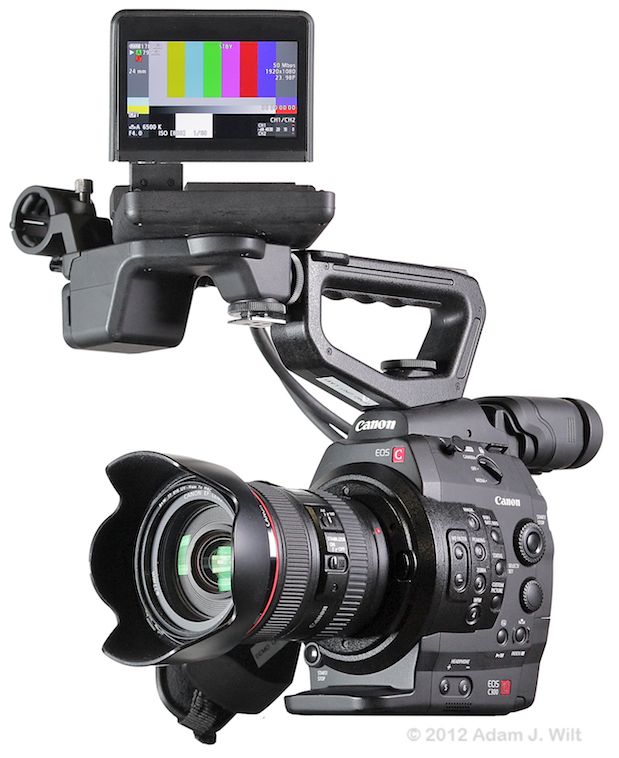
Canon C300 EF with Canon 24-105mm f/4 EF-L IS zoom.
The US$16,000 Canon EOS C300 looks like nothing else, and works like it, too: its ergonomics, controls, and menus are rules unto themselves. It’s a fearless re-imagining of how a large-single-sensor camera should be designed, held, and operated, but it doesn’t hurt that the C300 inherits the broadcaster-approved, edit-ready XF codec from Canon’s 1/3″ camcorders along with Canon’s usual looks-good-right-out-of-the-box image rendering. The camera renders crisp, clean images with 12+ stops of dynamic range, and the package handholds very well; overall, I’d rate this experiment as a success.
Canon kindly (and somewhat unexpectedly) made a C300 EF available to me for a week; I was embroiled in other deadline-driven work at the time so I didn’t have a chance to shoot with it for more than a couple of days. As a result, this review isn’t as experience-driven as I’d like, so it’s a “quick review” instead of a full writeup. Even so, I hope I’ve been able to cover the design, operational, and performance highlights of this unusual camera.
You might want to start with my Quick Look (with lots of pictures) from the C300’s Hollywood unveiling, and follow it up by viewing quite possibly the best camera review video ever: “Canon EOS C300 = Awesome”. Thus fortified, you can forge ahead for more detail.
Design
The C300 is a large-single-sensor, interchangeable-lens camcorder with a built-in, rear-mounted EVF. It comes with a removable and re-orientable handgrip; a removable top handle; and a “monitor unit” with a positionable LCD, a control panel, and dual XLR audio inputs. It records on dual CF cards.
The camera is taller than it is long, and longer than it is wide. A roughly cylindrical sensor block, finished in shiny black textured paint, is embedded in the vertically-oriented, matte gray body. Fit and finish are up to Canon’s usual standards (i.e., very good), with clearly-labeled controls and plenty of surface contouring to aid in tactile navigation.
The C300 camera body alone (no side or top handles, monitor unit, battery, or CF cards) weighs 3.2 pounds / 1430 g; that rises to 6 pounds / 2700 g with CF cards, battery, top handle, side grip and monitor unit. Add 0.4 pound / 200 g to those figures if you have the C300 PL.
Of course, you’ll need to add the weight of a lens if you want to shoot anything. Lenses range from 4.6 ounces / 130 g for the EF 40mm f/2.8 pancake to nearly two pounds / 805 g for the EF 24-70mm f/2.8L II, or more. The EF 24-105mm f/4L IS, a lens frequently used on the C300 (and seen in most of my images) is 23.6 ounces / 670 g.
PL lenses typically weigh more; 3-6 pounds for primes and 10 pounds for a zoom aren’t uncommon.
Photo Gallery
The C300 is an odd-looking beast, so I wound up with a larger-than-normal collection of beauty shots, the better to show the varying configurations the camera is capable of. Additionally, the C300 is available with either a Canon EF lens mount or a cine-lens PL mount; Jeff Regan of Shooting Star Video brought over a C300 PL so I could compare it to the C300 that Canon supplied.
The C300 EF was a demo unit out of the L.A. office that had seen some hard use, so you’ll see more cosmetic distress in the pictures than has been normal in previous reviews.
It’s not just Canon, either: recent loaners from Sony and Panasonic have also been demo units that had been ridden hard and put away wet, with surface scratches, missing or damaged parts, no recording media included (Panasonic even expects that reviewers will provide their own P2 cards, which aren’t exactly inexpensive items to have on hand), and randomly ramshackle packaging. Camera vendors are suffering through the global recession like everyone else, and the days of fresh-off-the-line brand-new review cameras are long gone.
This means that the “camera porn”—the glossy pin-up pix of shiny image-making hardware—is somewhat diminished: these models have blemishes! On the plus side, though, we’re more likely to see what bits ‘n’ pieces survive real-world abuse, like the handgrip bolt on the NEX-FS700 that still worked despite having half its handle broken off.
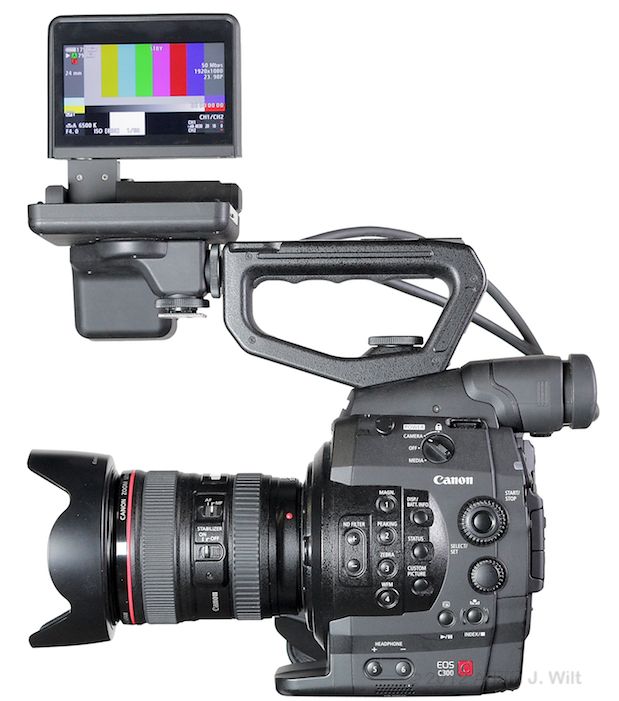
Left Side, monitor unit on front of handle, display flipped up.
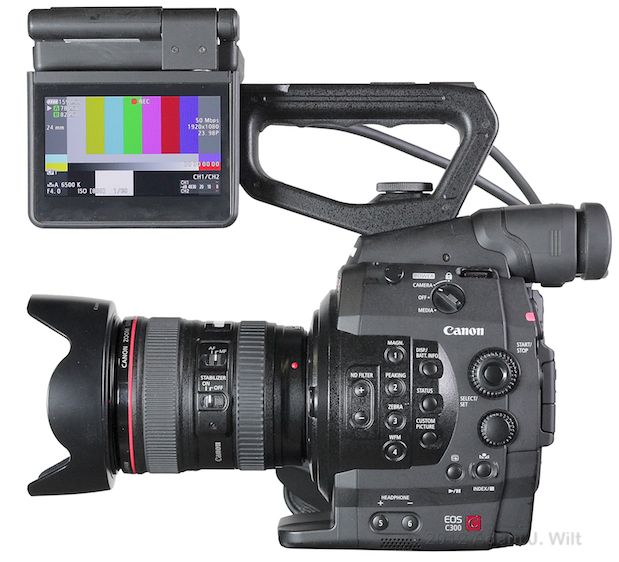
Left side, monitor unit on front of handle, display flipped down. Note illuminated tally lamp at rear.
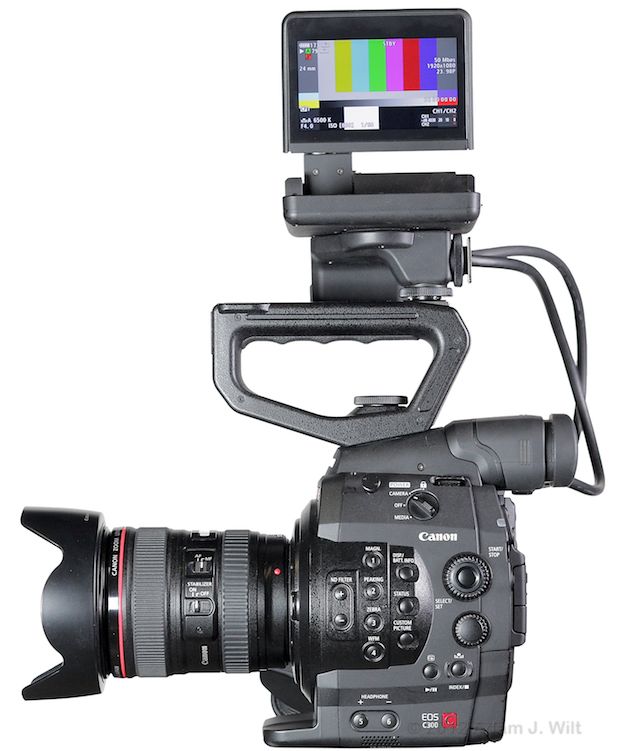
Left Side, monitor unit on top of handle, display flipped up.
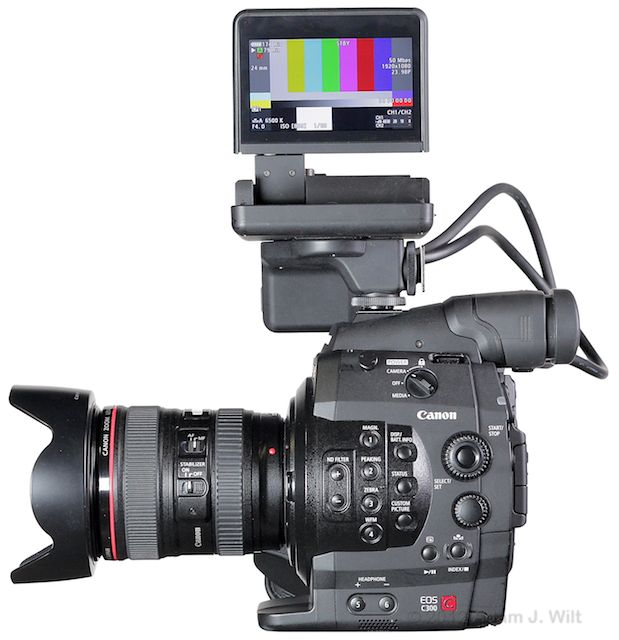
Left Side, monitor unit on body, display flipped up.
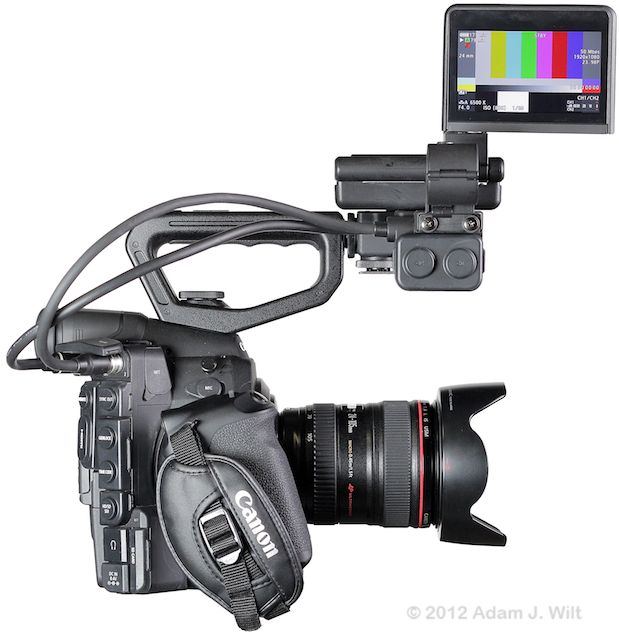
Right side, monitor unit on front of handle, display flipped up. XLR inputs (capped) at base of monitor unit.
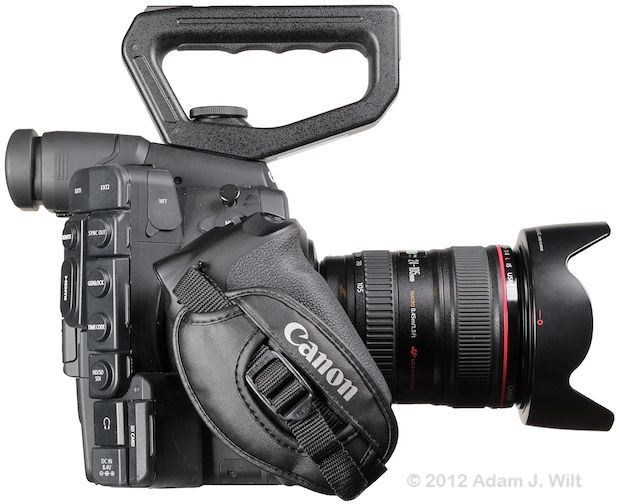
Right side with no monitor unit attached.
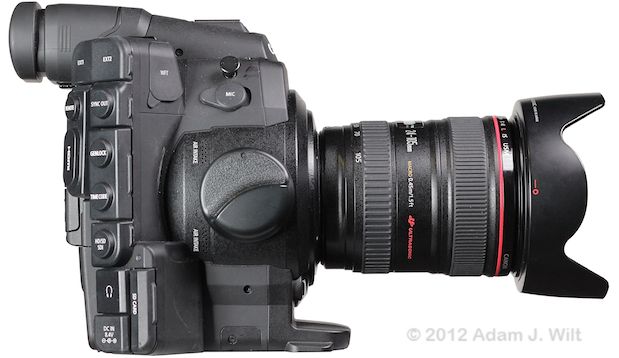
Right side, minimalist rig with thumb rest instead of handgrip.
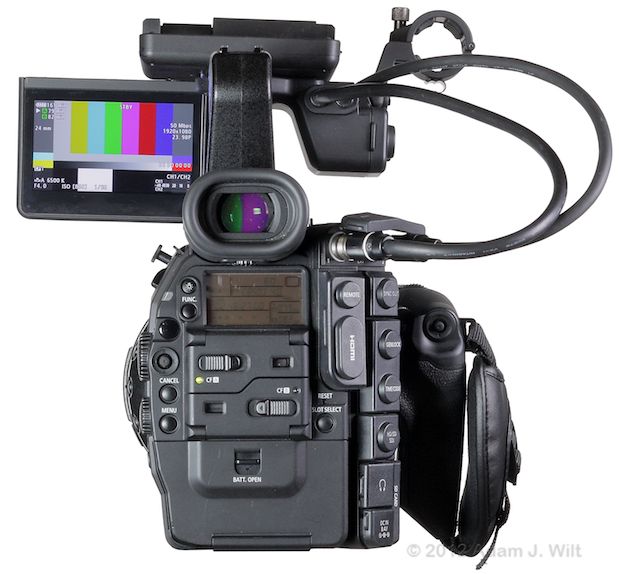
Rear view with monitor unit on front of handle, display flipped down.
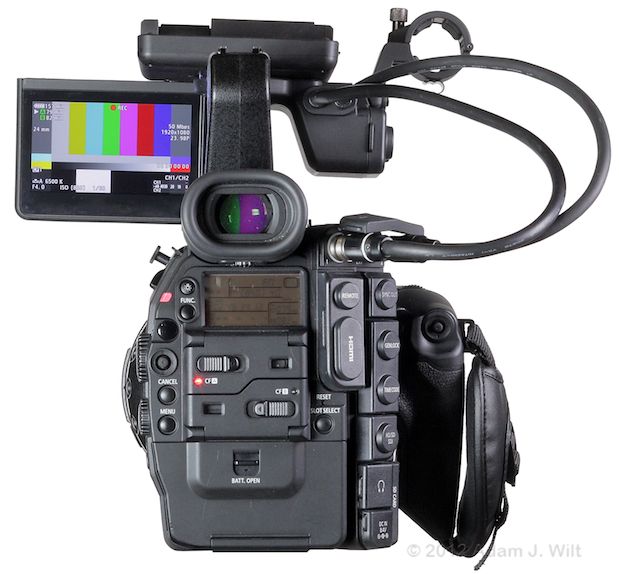
Camera in record: CF card 1’s LED and tally lamp illuminated red.
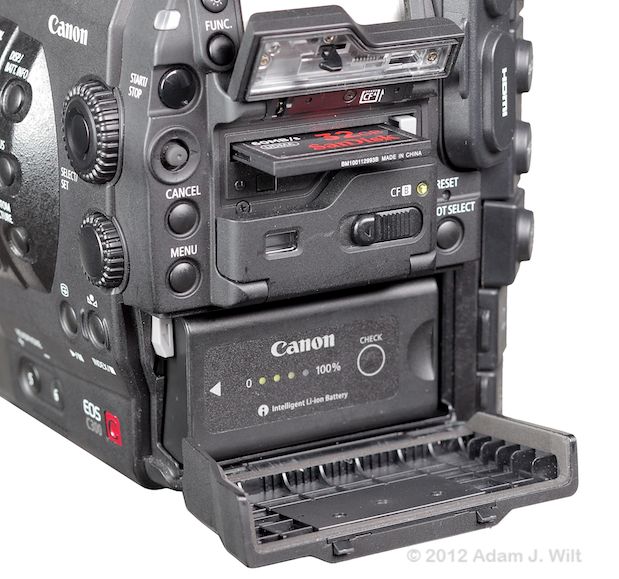
Cards can be swapped while rolling. Battery has its own state-of-charge gauge.
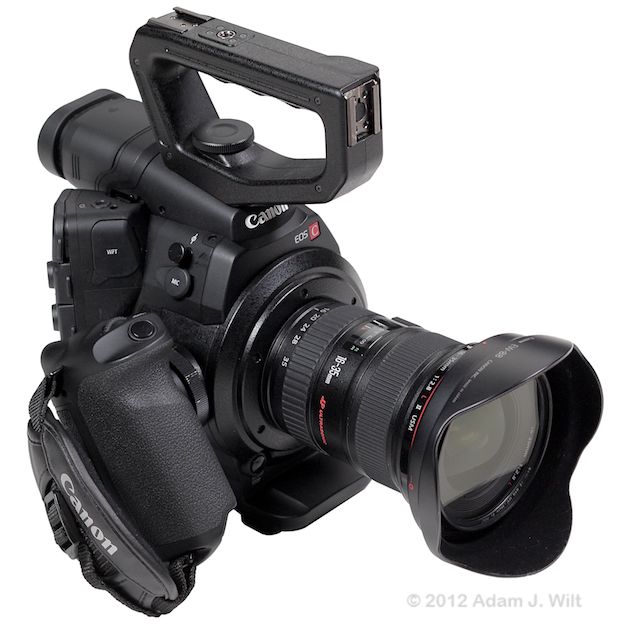
C300 EF handheld configuration with 16-35mm f/2.8 EF-L zoom.
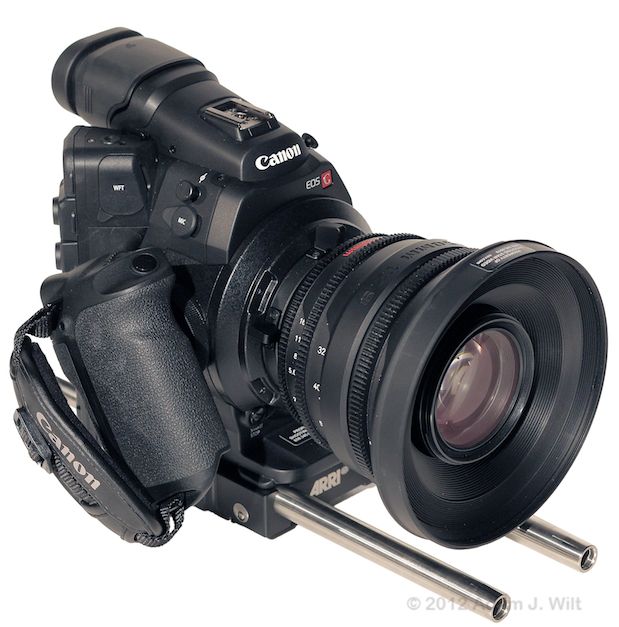
C300 PL handheld configuration with RED 17-50mm T2.0 zoom, Arri baseplate, 15mm rods.
Next: Design Details.
Left Side
Looking at the left side of the camera reveals an S-shape, with a broad support foot at the front and the EVF at the rear:
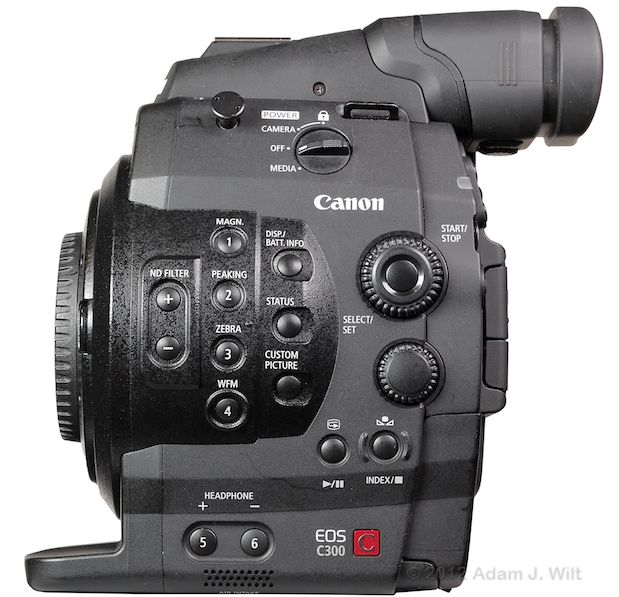
Left side, with six assignable controls.
At the top, there’s a focus hook (arguably more useful on the C300 PL than on the EF-mount C300, but then, one can always get Compact Primes in EF mount), and a rotary power switch. That switch selects between camera and media (playback) modes; additionally, there’s a lock position in camera mode that locks out all controls aside from the start/stop trigger, so that you can’t inadvertently press other buttons and change settings.
On the sensor block there are +/- buttons to change the ND filter setting (and there’s an emergency screwdriver override in case the ND drive motor fails, too). There are four positions: off and 2, 4, and 6 stops of ND filtration. Four assignable buttons (with sensible defaults) follow, then three buttons: two status-display selectors, and the CUSTOM PICTURE button used to choose different looks.
Aft of the sensor block we find two wheels: a SELECT dial with a central pushbutton, normally used to traverse menus and settings in a manner eerily reminiscent of the rear-panel selector wheel on Canon DSLRs; and a control dial usable for iris control (on the EF version) or ISO/gain setting (on both EF and PL models). Below the wheels, two pushbuttons provide record-review and one-push white-balance in camera mode, and play/pause and index marking in playback mode.
At the bottom, two assignable buttons default to headphone level control, and an air intake lets cooling breezes in to keep the sensor from overheating (hot air, driven by a very quiet fan, exits around the base of the pull-out EVF).
Rear
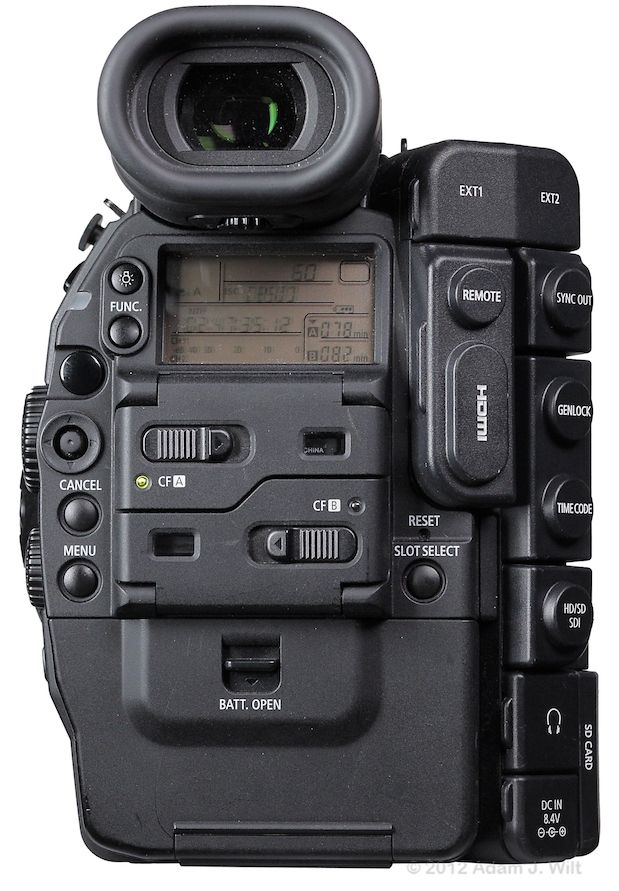
Rear panel, with doors closed.
An LCD status panel sits immediately below the EVF; it shows shooting status such as white balance setting, ISO, shutter speed, iris, battery level, time remaining on both CF cards, and audio levels. A backlight button triggers amber illumination, like the backlighting for the status panel on a Canon 5D Mk II.
The FUNC. button is the direct-setting function selector; it cycles through shutter speed, ISO/gain setting, and white-balance selection (and iris on the EF model when an EOS lens is attached), which you can then change with the side-mounted SELECT wheel or the four-way joysticks on the rear panel, monitor unit, or handgrip as you see fit: don’t let anyone ever say that Canon didn’t give you any choices.
Just to the left of the LCD panel there’s a wraparound tally LED, visible from the side as well as the rear. Below that there’s a shiny black START/STOP trigger, then a four-way joystick used for a variety of navigation operations, a menu-canceling button, and a menu-invoking button.
Dual CF card slot doors with card-loaded windows, bi-color status LEDs, and spring-loaded release levers occupy the center of the rear panel. Below them, a flip-down door covers the battery compartment.
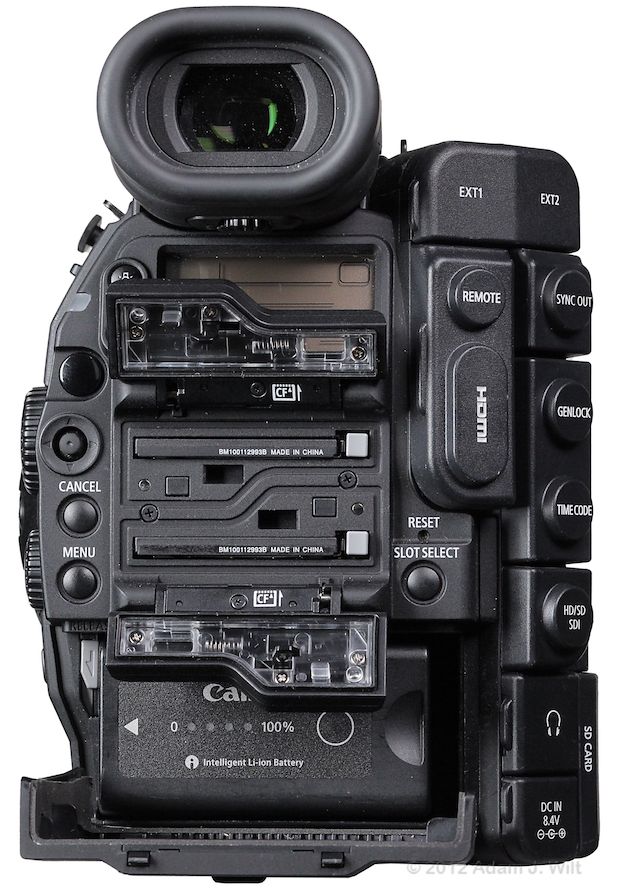
Rear panel, weather-sealed doors opened, cards and battery installed.
All the doors are weather-sealed with rubber gaskets. The battery door can be removed to allow installation of larger batteries, though doing so defeats the weather sealing.
A small RESET hole allows you to insert an unbent paper clip to reboot the camera’s brain should it be necessary, and a SLOT SELECT button lets you switch which CF card is in use.
Right Side
The right rear of the camera is a connector panel, angled out at 45 degrees so that cables clear both the face of the operator at the back of the camera and his or her hand in the side grip. There’s also another focus hook, a 3.5mm stereo MIC connector, a large circular mount for the handgrip (or a minimalist “thumb rest”), and two more air intakes.
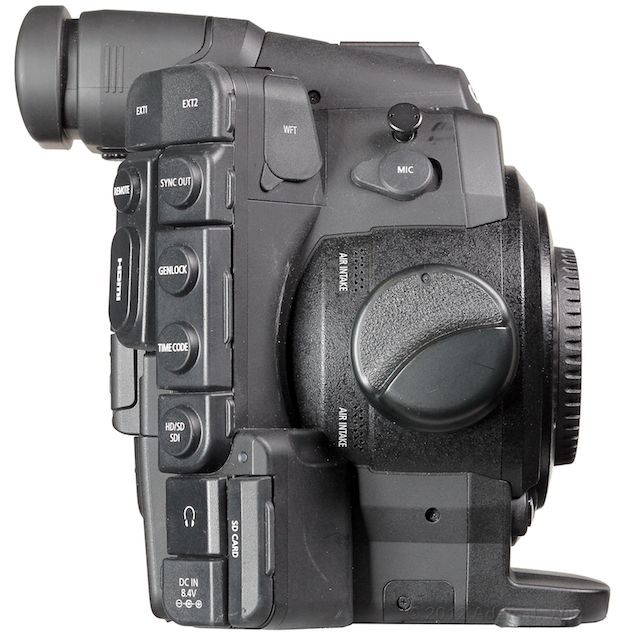
Right side, connector covers and thumb rest in place. Note air intakes.
At the very bottom you can see a darker-gray cover with a screw; pop it off to get to the emergency drive for the ND filter.
The two EXT connectors at the top are where the dual cables from the monitor unit plug in, carrying video and power to the LCD and XLRs and bringing control signals and balanced audio back. A REMOTE jack accepts a 2.5mm plug for “commercially available remotes”; I didn’t investigate this further.
On the front side a WFT port accepts a plug-in WiFi transmitter, letting you control the camera wirelessly through a web browser, complete with live viewing. I didn’t have the transmitter module to test, so I will say no more about this.
The camera has three video outputs: HDMI supplies SD or HD video depending on what the connected monitor tells it; SYNC OUT can be set to supply SD composite video, an HD analog component Y (luma) signal, tri-level HD sync, or SD blackburst sync; HD/SD SDI outputs digital component. All three outputs are available simultaneously.
TIMECODE can either send or receive LTC timecode signals. GENLOCK accepts either an SD analog blackburst signal or an HD analog signal with tri-level sync; oddly enough these are two of the formats available from the SYNC OUT terminal.
A 3.5mm headphone jack, DC IN port, and an SD card slot finish off the right rear panel. The SD slot is used for storing video-resolution stills and for transporting camera setup files.
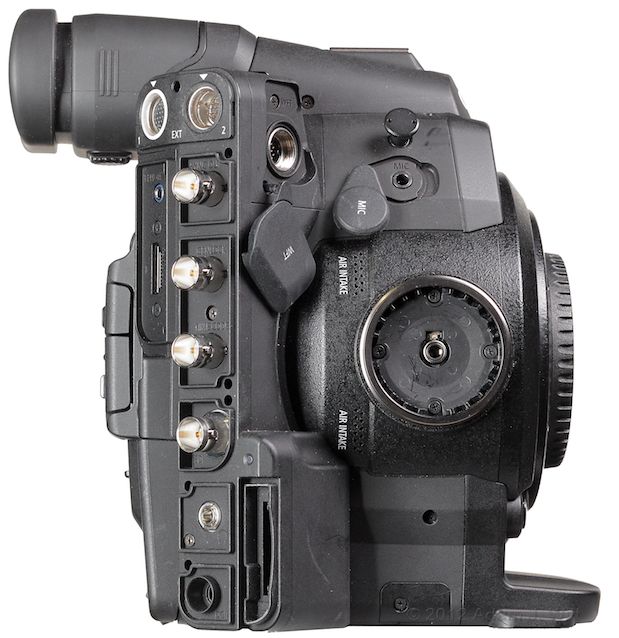
Right side: most connector covers can be removed.
Top
The C300’s body narrows towards the top, leaving just enough room for an accessory shoe and the pull-out EVF.
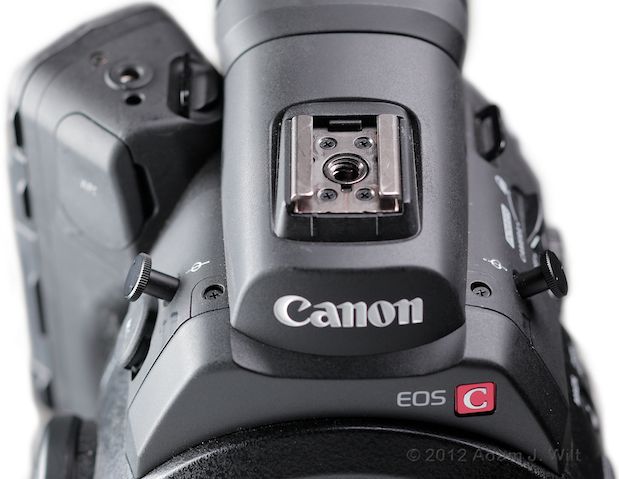
Robust accessory shoe with 1/4″ socket; two focus hooks.
The EVF pops out a bit, allowing it to be angled upwards.
Bottom
The underside of the CA300 has a forward-mounted tripod socket, intended to be roughly at the camera’s center of gravity once you’ve hung a lens on the lens mount.
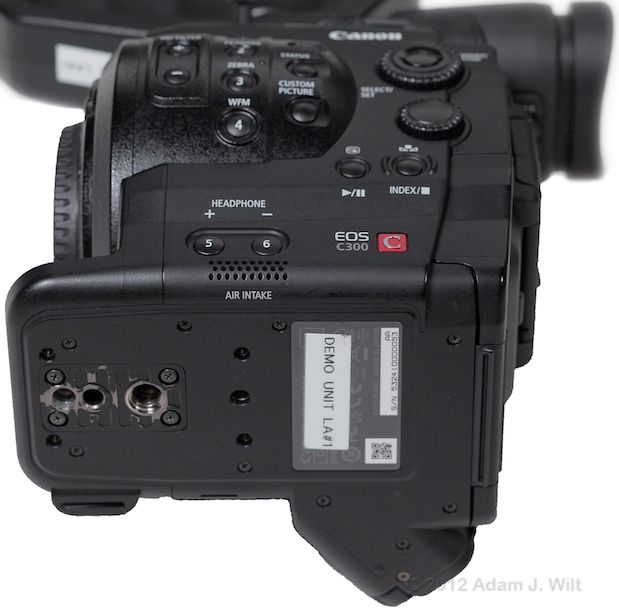
The C300’s underside. Tripod mount is swappable. Note air intake label.
Instead of having both 1/4 and 3/8″ sockets in line, the C300 comes with separate mounting plates for 1/4″ and 3/8″ sockets.
The Canon rep who delivered the C300 to me pointed out the labeling on the air intakes. Prototype C300s lacked these labels, and some operators covered up the intakes with tape, causing overheating. The labels are there to say, “don’t do that!”
Front
Not much to see here… or is there?
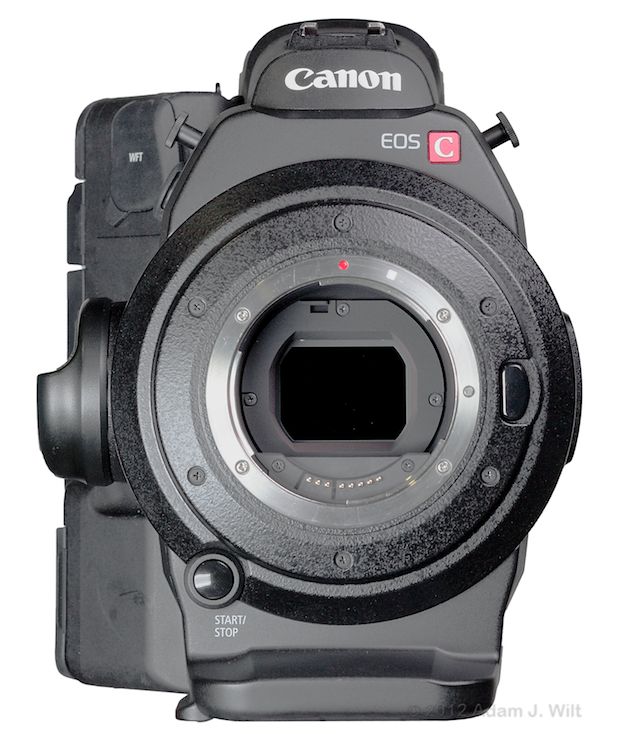
C300 EF business end, powered off with sensor capped.
Thumb rest fitted on the side; START/STOP trigger at the 7:00 position, where (when you’re gripping the camera with your right-hand fingers supporting it and right thumb on the thumb rest) your right index finger can get to it; lens release at the 3:00 position. The sensor… um, where is it? With the power off, it’s not visible.
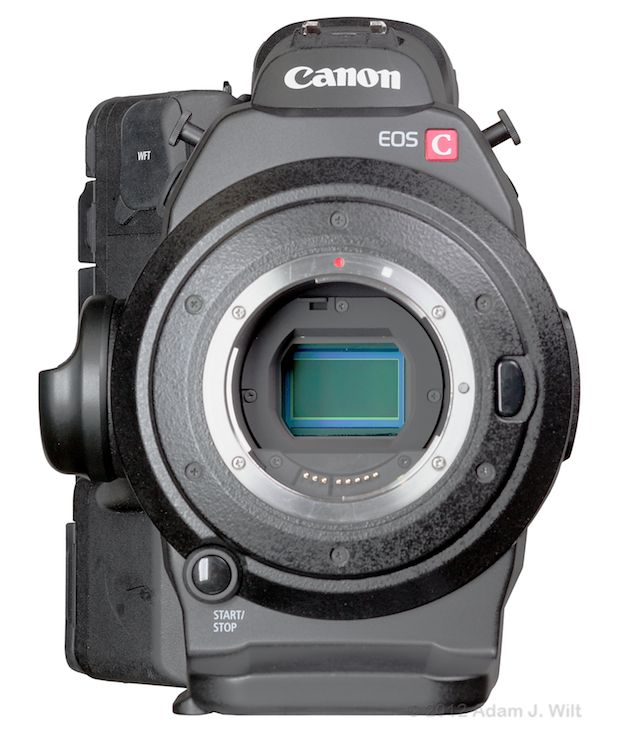
C300 EF business end, powered on to reveal its Super35mm-sized sensor.
It appears that the C300 either has an internal capping shutter, or that it automatically selects the 6-stop ND filter when it’s powered down. Turn it on, and the shutter (or filter) slides out of the way, exposing the sensor to light and to photographic exploration.
The C300 PL looks very much the same, save for the substitution of a rotating breech lock for the PL mount instead of the pushbutton lens release of the EF mount:
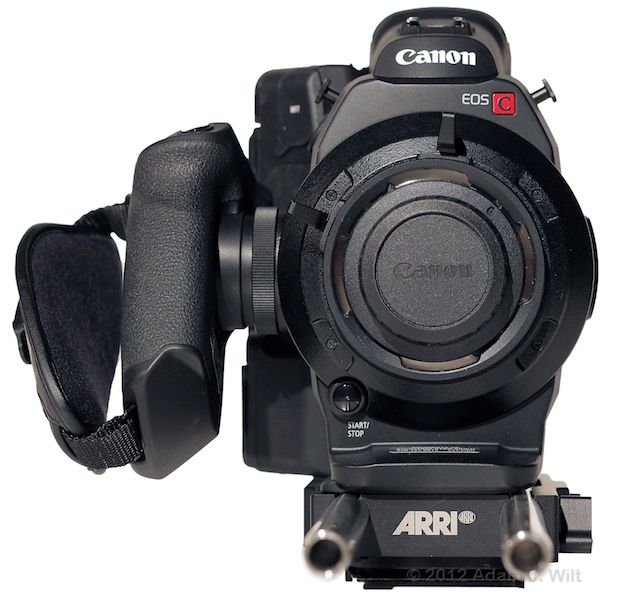
C300 PL with its breech-lock PL mount. (Arri baseplate not included.)
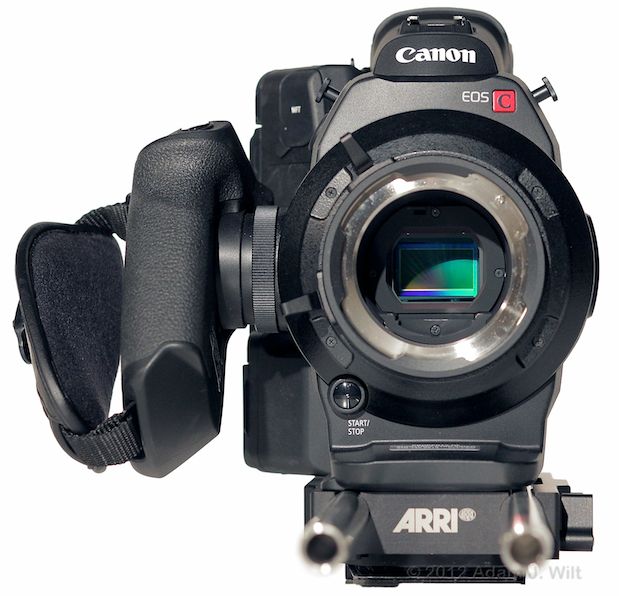
C300 PL with the breech lock opened.
Top Handle and Handgrip
The top handle is a robust metal grip that slides into the camera’s accessory shoe and clamps down firmly with a thumbscrew. It mates solidly with the camera, with no residual wobbles or creaks.
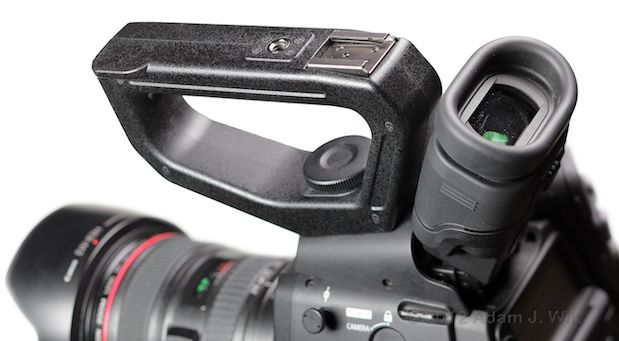
Top handle has two shoes, one 1/4″ socket, and a thumb rest at the front.
There are accessory shoes on the front and the top of the handle, designed for the monitor unit’s feet but also allowing any other accessory fitting a standard shoe. A 1/4″ socket accepts top-mounted fittings like mike mounts and articulating arms.
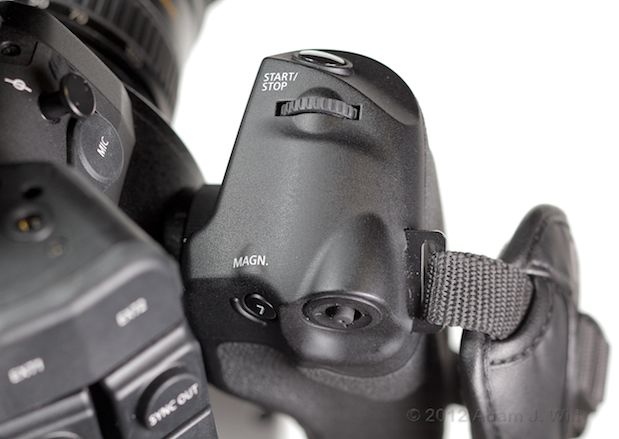
Handgrip with trigger, wheel, four-way stick, and another assignable button.
The handgrip is a nicely contoured handle with a textured, grippy rubber surface. It has a START/STOP trigger in the expected place, a control dial replicating the one on the camera’s left side for iris or ISO control, a four-way joystick like the one on the back panel, and an assignable button that defaults to viewfinder image magnification. The handgrip can be attached at any of 24 different angles; it screws down using a threaded collar around its attachment point.
The grip communicates with the camera using a multi-conductor cable running though its mounting point. We’re starting to see accessories allowing that cable to be extended and the grip relocated: Zacuto has just announced such an accessory, and I’m sure more will follow.
Monitor Unit
The monitor unit combines dual XLR inputs (with phantom power), a 4″ LCD monitor, and the sorts of audio and playback controls that we normally find on the top panels and top handles of other camcorders.
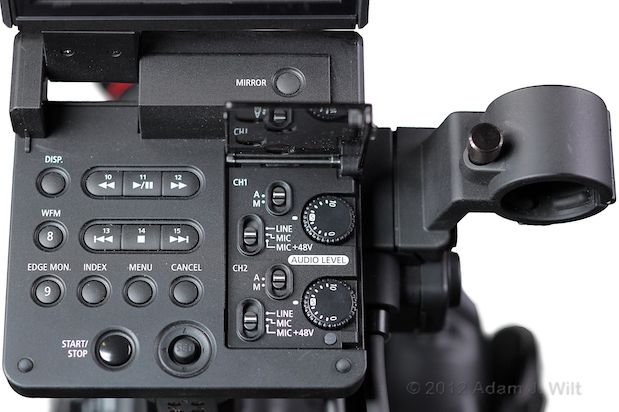
Controls on the monitor unit. Sorry, only 8 assignable buttons up here. Mike mount, dual XLRs on right side.
The monitor unit has mounting feet on its bottom and its aft end, letting it attach to the front or top shoes on the top handle or the top shoe on the camera body itself, without the top handle. The entire monitor unit can spin 270 degrees on its mount; the LCD can then flip either up or down and then spin another 270 degrees, so you can aim the LCD in just about any direction imaginable. There’s a MIRROR button letting you flip the LCD image around as needed for whatever direction you’ve aimed the monitor; since the whole unit is detachable and re-orientable, the LCD can’t automatically flip its image based on its pivot angle.
Transport and display controls do double duty as assignable controls. There’s also yet another START/STOP trigger and another four way joystick, and a full suite of audio input controls beneath a flip-up safety cover.
Dual multipin cables run from the monitor unit to the EXT connectors on the camera body. They use self-locking polarized connectors, not unlike LEMOs, so they’re easy to connect and disconnect by feel. They can’t be plugged in to the wrong ports (one cable end is female and the other is male), and their locking collars ensure they won’t pull out by accident.
Displays
The C300 has a backlit status panel below its EVF, showing white-balance setting, ISO, shutter, aperture, audio levels, and time remaining on the CF cards.
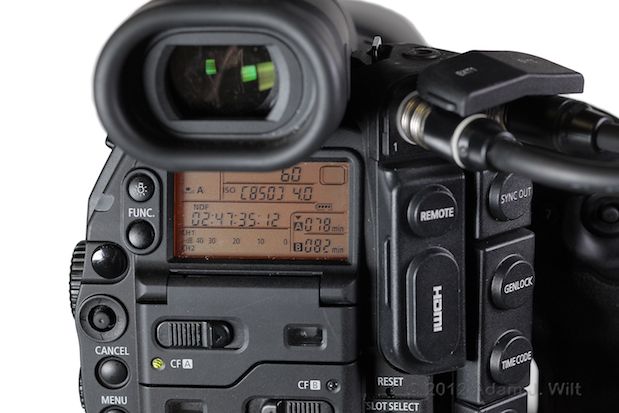
Nicely-backlit status LCD is readable from slightly above…
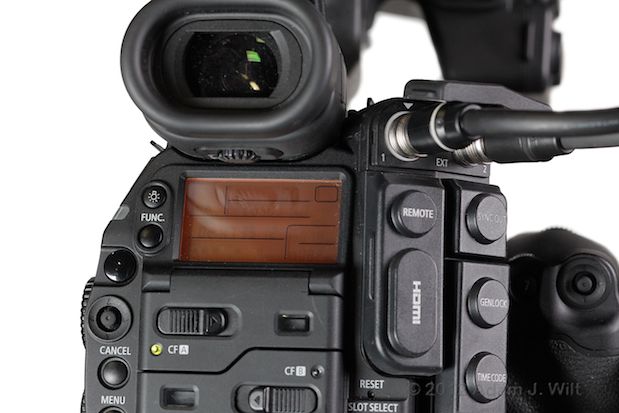
…but it blanks out completely if viewed from below.
Unfortunately this display fades out if viewed from below the level of the panel itself, rendering it less than entirely suitable for jib or crane work where it would otherwise be most useful.
Both the EVF and the 4″ LCD on the monitor unit resolve about 500 TV lines vertically, and 550 TVl/ph horizontally; they’re both decent focusing finders. There are four levels of EVF sharpening (horizontal edge enhancement) to choose from, too, and image-magnification by about 2x to allow for critical focusing. If you find all this newfangled color nonsense to be too distracting, you can set the displays to show images in soothing black and white.
The C300 has a clear and readable status display showing essential information.
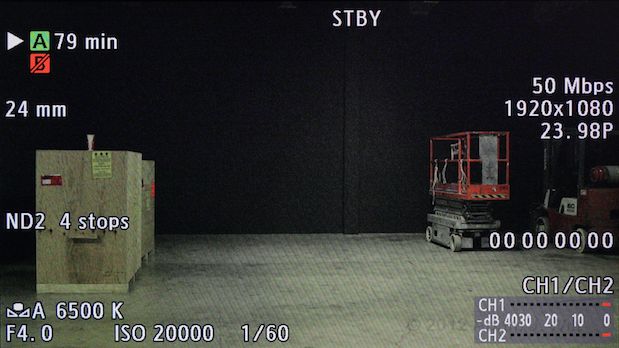
Onscreen display with important camera-status readouts shown (the four sets of zeroes are user bits.)
Beyond the basics, the C300 has more exposure, focusing, and image-control aids than almost any other camera available:
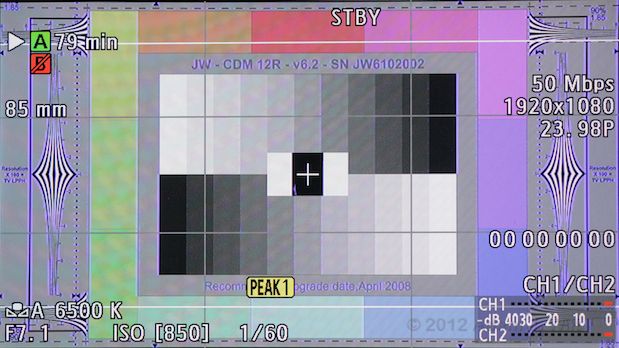
Peaking-in-color; rule-of-thirds, center cross, and 2.35:1 safe area markers.
There are two presettable peaking indicators: you can select the peaking color, the peaking frequency, and the gain.
There are framing markers, rule-of-thirds markers, and a center cross; you can have them displayed in gray or in white.
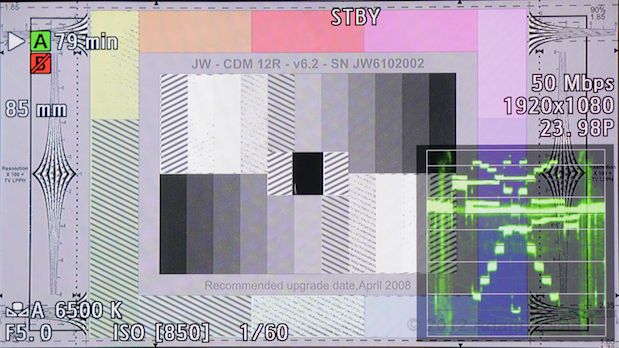
Dual settable zebras help exposure monitoring.
Two zebras are available and both can be shown at the same time.
Both zebras and markers can be sent to the external displays as well as to the EVF and the LCD.
Observe the S-curved highlight response on the WFM. Oh, yeah: there’s a WFM; we’ll look at that more when we discuss “scopes”.
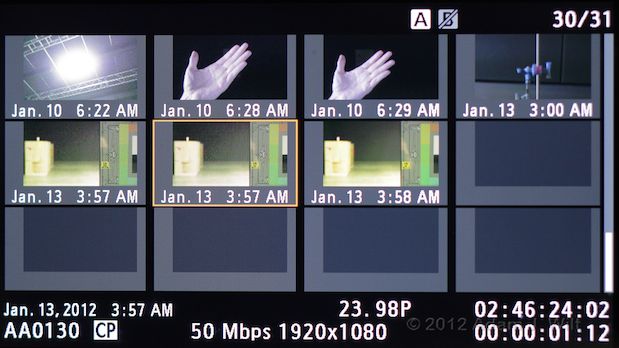
Playback thumbnail mode: note that I had not properly set the camera’s clock!
Switching the camera to “Media” mode displays clip thumbnails. Basic metadata for the currently-selected clip is shown at the bottom of the screen.
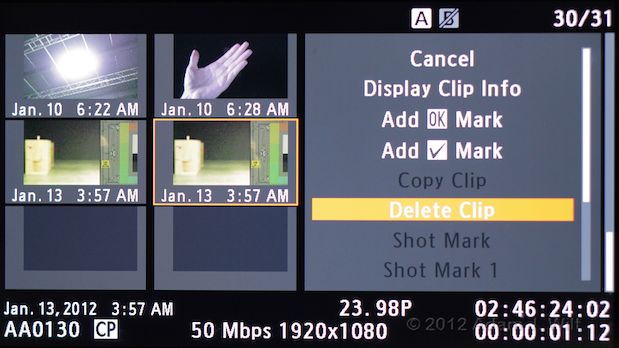
Clip context menu.
Basic clip operations are easily invoked.
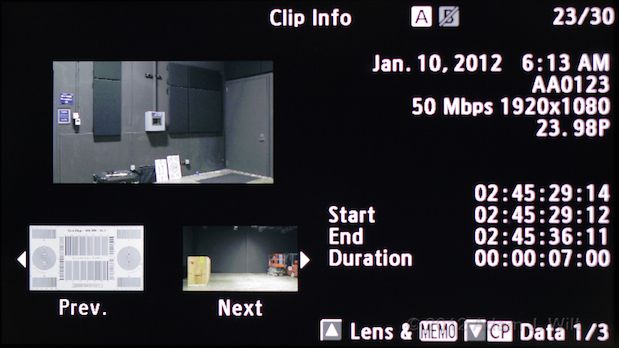
Clip metadata display.
Clip info doesn’t give you a whole lot more data, but you do get a bigger thumbnail. You can change which frame is used for the clip’s thumbnail.
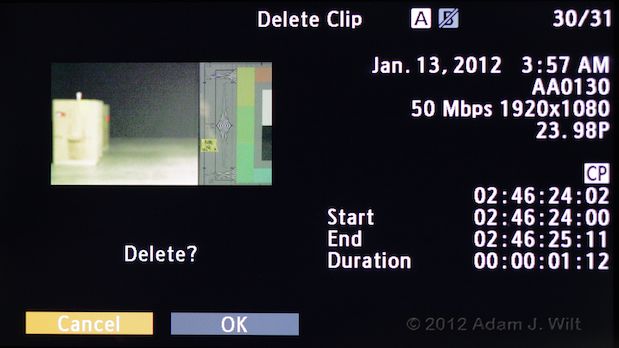
Delete confirmation shows all metadata, so you can be certain it’s the right clip.
If you choose to delete a clip, the confirmation screen includes all the same metadata, so you can sure you’ve got the right clip before you delete it.
You can also page through several sets of Custom Picture data. Because I shot the following screens while the camera was in Media mode, all the entries are blank; had I been in Camera mode as I should have been, you’d see useful info here. Apparently, these screens only show how the camera is currently set up for recording; they don’t tell you how the camera was set when the currently-selected clip was recorded.
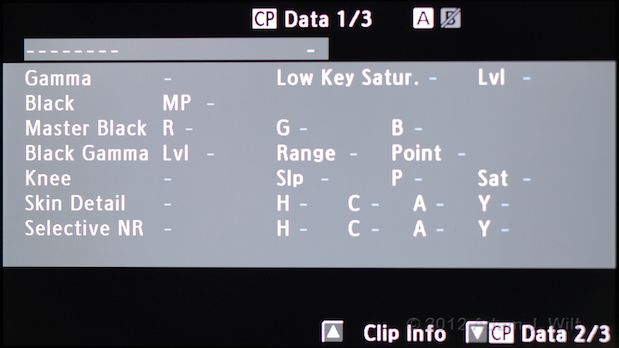
Custom Picture data, screen 1.
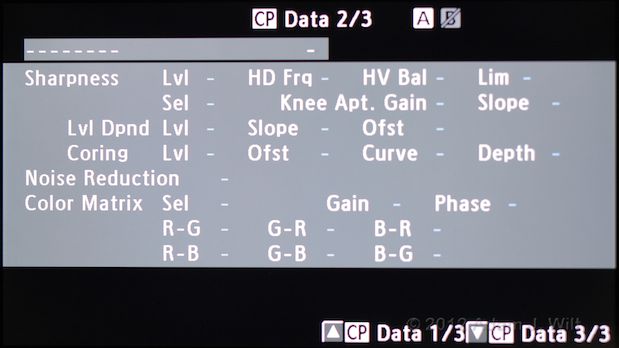
Custom Picture data, screen 2.
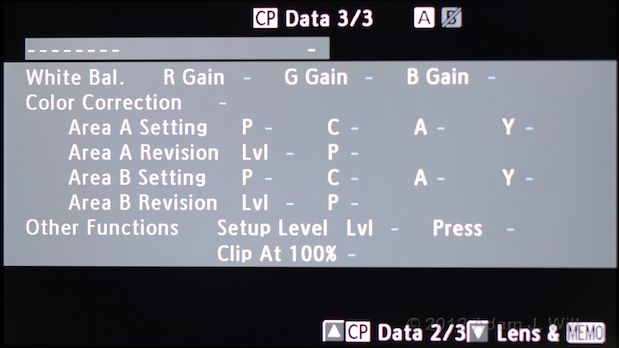
Custom Picture data, screen 3.
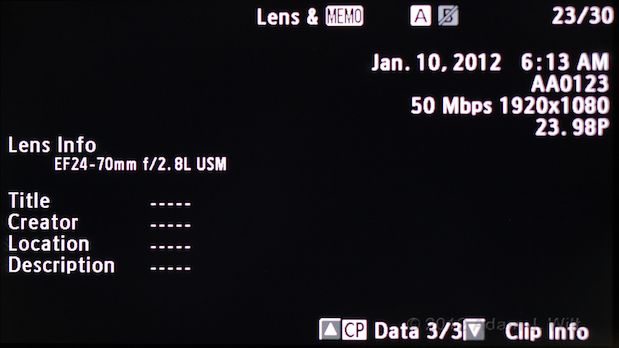
Lens data and text memo screen.
Scopes
Ah, scopes! The C300 has scopes enough to warm the cockles of any video engineer’s heart. Scopes display on the LCD, but not in the EVF. While this leaves the EVF uncluttered for compositional purposes, it requires you to have the monitor unit attached to use scopes. Scopes cannot be superimposed on the external video feeds.
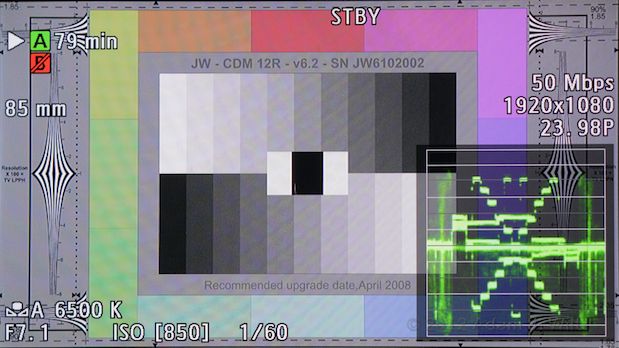
The standard “Line” WFM.
In addition to dual zebras, the C300 offers a finely-detailed waveform monitor. Its default mode is “line”, the conventional line-at-a-time WFM display.
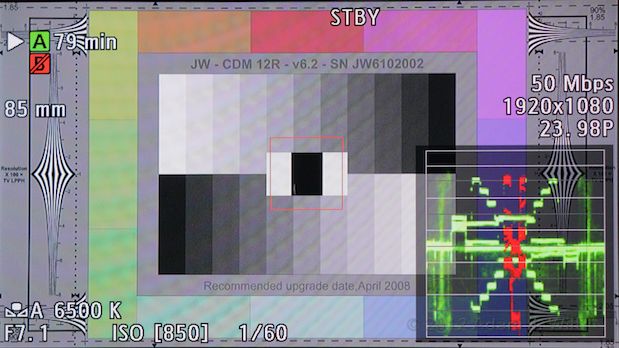
Line + Spot WFM; the red square’s signal is red on the ‘scope.
You can also choose Line + Spot, where a red square appears onscreen. The WFM for the area in the red square appears in red; this “spot meter” helps you discern levels in the center of the picture from all the signal clutter around it.
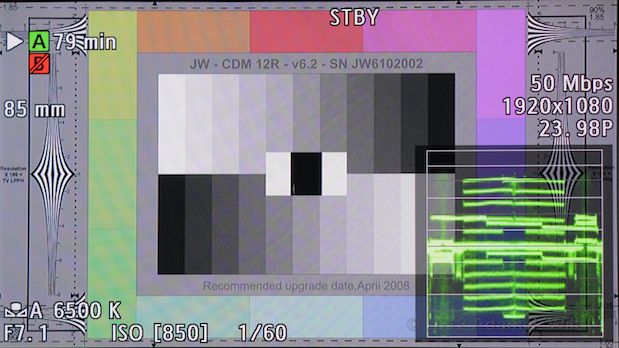
Field WFM: signal shown from top to bottom instead of left to right.
Field mode shows the levels from top to bottom across the ‘scope, instead of left to right. It’s helpful for things like checking vertical lighting balance on a greenscreen.
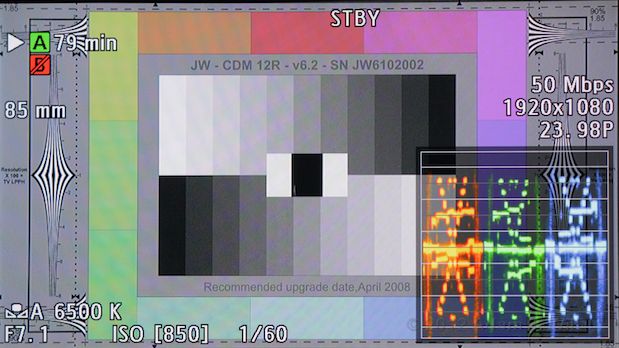
RGB WFM: red, green, and blue channels shown sequentially.
Curious about the response of each color channel? RGB WFM gives you a “parade” display so you can better detect color imbalances, clipping, and offsets.
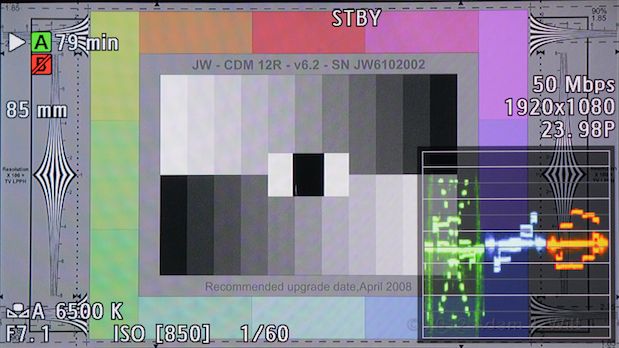
YUV WFM: luma, Cb, and Cr (brightness and color-difference) signals.
The YUV mode lets you see the same data in the Y’CbCr color space: luma, plus two color difference signals.
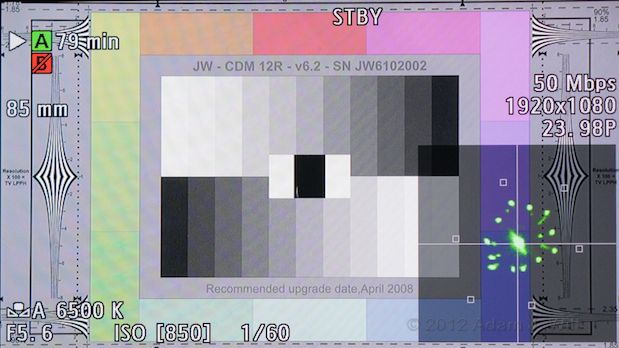
Normal vectorscope.
The vectorscope display has a normal mode, like any other vectorscope…
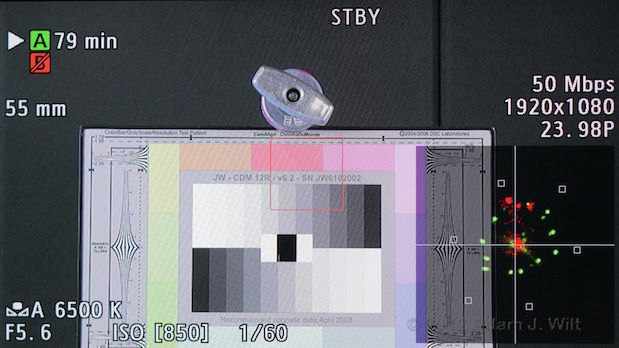
Spot vectorscope, highlighting the signal of the red-boxed image.
…and it also has a “spot meter” mode to highlight the colors in the red-outlined central area of the image.
Edge Monitor
The C300, like Canon’s XF series of camcorders, offers “edge monitors” for focus pulling. Edge monitors are indicators of high-frequency detail in the image; high frequencies relate to sharp edges and are maximized when the image is in focus. The indicators appear as “digital grass”: the sharper the edges in the image (and thus the better focused), the higher the grass grows.
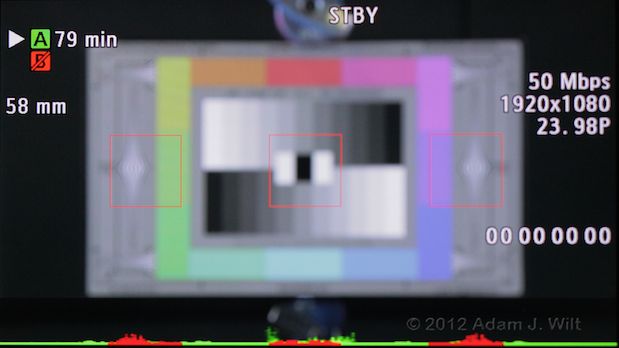
Type 1 Edge Monitor defocused: short digital grass.
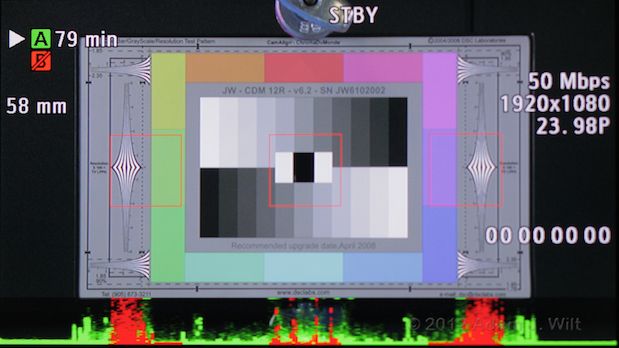
Type 1 Edge Monitor focused: tall grass; red areas emphasized.
Type 1 Edge Monitor is like a line-mode WFM: the grass at any point along the “lawn” reflects the sharpness of the pixels along all the scanlines at the corresponding point of the image. The three highlighted-in-red areas are placed where you’ll often have important focal points.
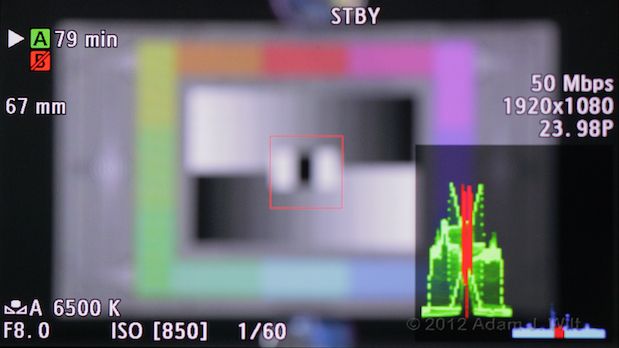
Type 2 Edge Monitor defocused: Line+Spot WFM and digital bluegrass.
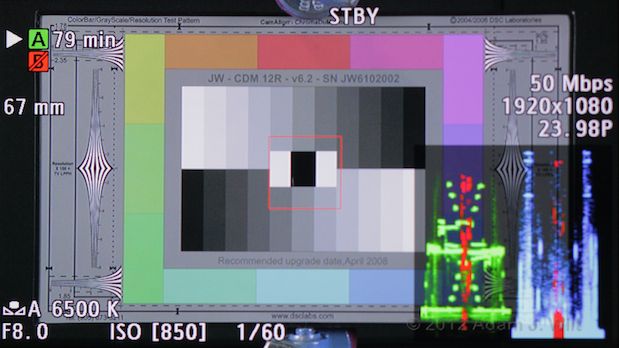
Type 2 Edge Monitor focused: WFM sharper, bluegrass taller.
Type 2 combined a Line + Spot WMF with a Line + Spot “digital bluegrass” display, letting you monitor both exposure and focus on the same scope, albeit with somewhat reduced precision in the grass.
Like the other scopes, edge monitors only appear on the LCD, not in the EVF or on external feeds.
Next: Features and Functions.
Features and Functions
Shutter Speeds and Frame Rates
The camera lives in three different worlds: NTSC, PAL, and 24.00, each defining the fundamental system clock determining the camera’s speeds and capabilities. The first two settings are television-compatible settings with multiple project frame rates available; the last one is strictly for film work, with a true 24.00fps the only frame rate allowed.
In “NTSC”, the camera can shoot 1089/59.94i, 1080/29.97p, and 1080/23.98p, as well as 720/59.94p, 720/29.97p, and 720/23.98p.
In “PAL”, you can select 1080/50i, 1080/25p, 720/50p, and 720/25p.
In 24.00, you can shoot only—and exactly—1080/24p and 720/24p.
Within a given frame rate, you can choose shutter speeds from the “open shutter” rate (e.g., 1/60 for a 59.94i or 59.94p format, or 1/24 for a 24 or 23.98fps clip) all the way to 1/2000 sec, in either 1/3 or 1/4-stop steps. If you prefer to think in film-camera terms, you can select a shutter angle from 360º to 11.25º.
The camera also supports slow shutters (longer than a frame’s duration) down to 1/3 or 1/4 second, depending on the frame rate, and Clear Scan shutters from the reciprocal of the frame rate down to about 1/250 second.
The C300 supports a variety of “stunt modes”:
Interval Recording, for timelapse, lets you record a short burst of 1 to 12 frames (frame-rate dependent) at intervals from 1 second to 10 minutes.
Frame Recording lets you do stop-action work: a single group of 1 to 12 frames is recorded every time you press START/STOP.
Slow & Fast Motion provides overcrank and undercrank, from 1 fps to 25 fps (PAL) or 30 fps (NTSC or 24.00), or to 50 fps (PAL) or 60 fps (NTSC / 24.00).
Pre-Recording continuously captures to a buffer for about 3 seconds before you push the “go” button, so your final clip will include the three seconds before you started recording.
Relay Recording allows recording to roll over from one CF card to the other, so you can keep on shooting even as cards fill up. The C300 lets you change out the inactive card, and even lets you repair the clip database on the inactive card (in cases where power was lost or the card was ejected while writing was in progress) while recording is in progress on the other card—someone at Canon was definitely thinking about the need to keep on working even while once-in-a-lifetime events are transpiring before the lens.
Double Slot Recording records in parallel on both CF cards at the same time: again, a hedge against data-corruption disaster for irreplaceable footage.
Recording
The C300 captures 1080p natively, and also offers 720p recording. Standard-def can be output as a downconverted signal, but the camera doesn’t offer SD recording.
The camera captures video to CF cards using the Canon XF codec, MPEG-2 long-GOP compression with three data rate choices.
The top rate, 50 Mbps, uses constant bit rate (CBR) recording of an 8-bit, 4:2:2 signal; as such, it’s approved for broadcast origination by folks like the BBC. 50 Mbps is the only choice available when the camera is set for the 24.00 system clock.
The middle rate of 35 Mbps captures 8-bit 4:2:0 video using variable bit rate (VBR) compression; it’s roughly comparable to Sony’s XDCAM EX HQ.
Both 50 Mbps and 35 Mbps are full-raster recordings: 1920×1080 and 1280×720.
The low rate is 25 Mbps, CBR, 8-bit 4:2:0, not unlike HDV. Like HDV, it uses a 1440×1080 raster. 720p is not available in 25 Mbps recording.
Outputs
All three video outputs (HDMI, SDI, and SYNC OUT) are active at the same time. Including the camera’s own EVF and LCD, this means that you can have five separate live displays without having to loop through any of ’em!
Somewhat unusually, the C300 doesn’t offer native frame rate output, or PsF (progressive segmented field). Instead, it always runs at the highest vertical rate supported by a standard: 1080/60i and 720/60p in 24.00 mode, 1080/59.94i, 720/59.94p, 480/59.94i (and 480/59.94p on HDMI only) for NTSC, and 1080/50i, 720/50p, 576/50i (and 576/50p on HDMI only) for PAL.
This simplified, configuration-free rate selection works with a wide range of monitors, but it does mean that those using external recorders need to make sure that their choice of recorder properly interprets the pulldown flags in the C300’s video data. A studio client told me that the C300 and the Sound Devices PIX recorders had some pulldown miscommunications as of early 2012; it should all be fixed by now, but it’s always worth checking these sorts of things out before a gig.
The camera outputs 8-bit video, even on SDI. A lot of folks frown on a $16,000 camera that doesn’t spit out 10-bit data, but the proof is in the pictures: it’s not how many bits you have, it’s how you use ’em.
Audio Recording
The C300 captures two channels of linear PCM digital audio at 48 kHz / 16 bits per channel. Audio input is via two line/mike switchable XLR inputs with phantom power on the monitor unit; when the monitor unit isn’t attached, there’s an unbalanced stereo miniplug on the camera body itself. The camera doesn’t have any built-in microphones.
Timecode and Genlock
Timecode is embedded in the SDI stream, and is also available on the timecode port. If you’d prefer the camera to listen to timecode instead of supply it, the timecode port can be switched to be an input instead.
The camera accepts both SD (blackburst) and HD (tri-level) sync on its genlock input, and H timing is tweakable through the menus. Despite its cine-camera leanings, the C300 is quite happy to play with others in a traditional video multi-camera setup.
Image Tweaks and Rendering
The camera offers ten different Custom Picture slots, collections of picture-rendering settings. They’re all adjustable and can be tranferred to and from SD cards to move ’em between cameras—or just to back ’em up for safekeeping.
Within a Custom Picture setting, you have the following controls:
Gamma: four normal gammas, two cine gammas, Canon Log, and EOS standard.
Black: both a Master Pedestal setting, and RGB Master Black controls to adjust color in the shadows.
Black Gamma tweaks the shadow brightness; you can adjust the midpoint, the range, and the degree of adjustment.
Low Key Saturation lets you adjust the strength of colors in shadow areas.
Knee: controls knee on/off, knee point (level at which the knee starts working), slope, and highlight color saturation.
Sharpness adjusts edge enhancement level and gain separately; frequency; coring (to suppress sharpness-induced noise; this control has four adjustment parameters of its own); H/V detail balance; a limit to the level of detail enhancement; a “select” control to adjust the amount of sharpening for high- vs. low-frequency details; and separate “knee aperture” and “level depend” control sets allowing fine adjustment of detail in the highlights and in the shadows respectively. I think this is the most comprehensive set of sharpness controls I’ve ever seen.
Noise Reduction does what it says, at the price of slightly softening the image. It has 12 steps of control as well as an “off” switch.
Skin Detail softens skintones (an anti-sharpness control!). It’s settable for brightness, hue, saturation, effect level, and range of colors affected.
Selective NR works just like Skin Detail, but applies noise reduction based on a selected color.
Color Matrix has a default matrix for each gamma setting, plus gain and phase controls and a full six-vector adjustment matrix.
White Balance lets you tweak R, G, and B gains.
Color Correction gives you two sets of colors you can modify. Like Skin Detail and Selective NR, you pick a color; then you can adjust the phase and the level of the selected color while leaving the rest of the image alone.
Setup Level adjusts the basic black point that “Black” and “Master Black” work with (I’m assuming it’s a “DC Offset” or “Lift” control from the documentation; I didn’t play with it) and has options to compress the tonal scale to ensure that levels never exceed 100%, for broadcast compliance.
Clip at 100% hard-clips any levels that go above 100%, for broadcast compliance (it doesn’t decrease the signal range by 9% to keep things in bounds like “setup level” does; it simply hard-clips anything too bright).
All these adjustments offer a wide range of control; they aren’t timid tweaks. You can drastically alter the appearance of the image using them.
Not all tweaks are available in all gammas. Knees, for example, don’t affect the cine gammas, EOS Standard gamma, or Canon Log.
If you want more detail on how these controls work, the C300 manual (PDF available here) has better-than-normal textual descriptions and actual tonal scale plots showing what the adjustments do.
For a visual sampler, I fixed the ISO, shutter speed, and aperture, and rolled through the different gamma settings, shooting these images off the camera’s LCD:
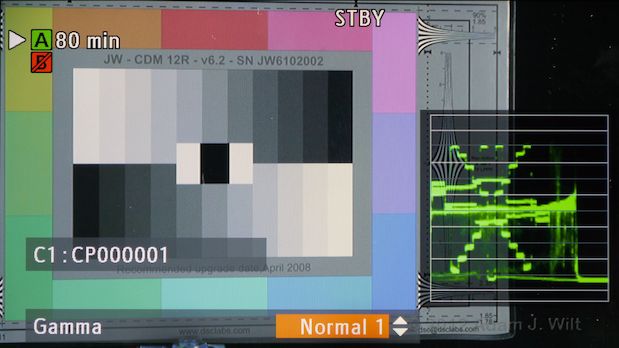
Normal 1 Gamma.
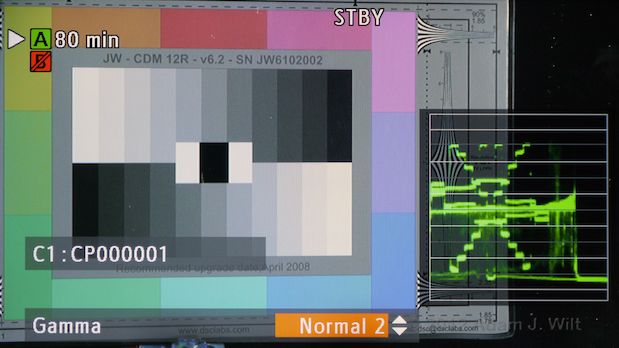
Normal 2 Gamma.
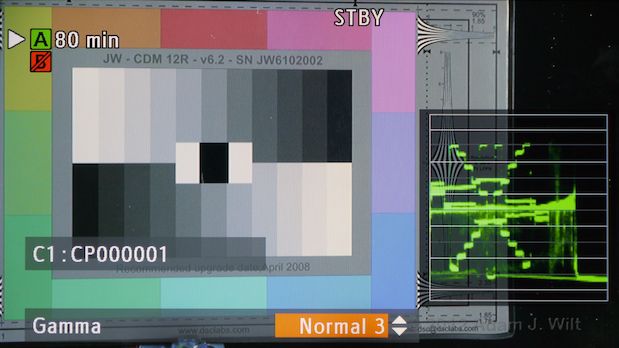
Normal 3 Gamma.
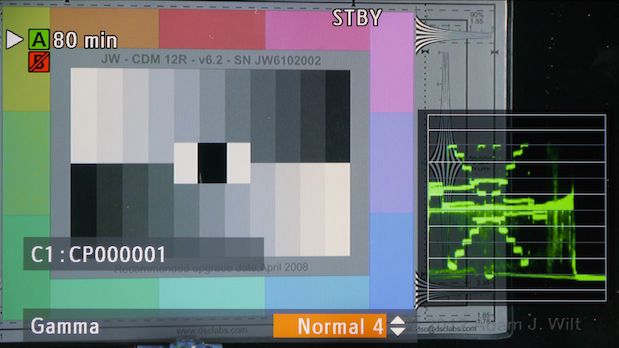
Normal 4 Gamma.
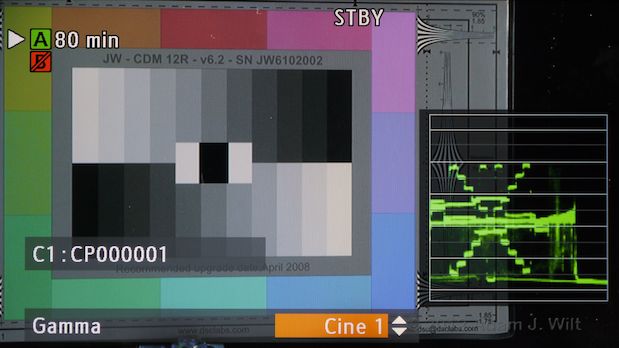
Cine 1 Gamma.
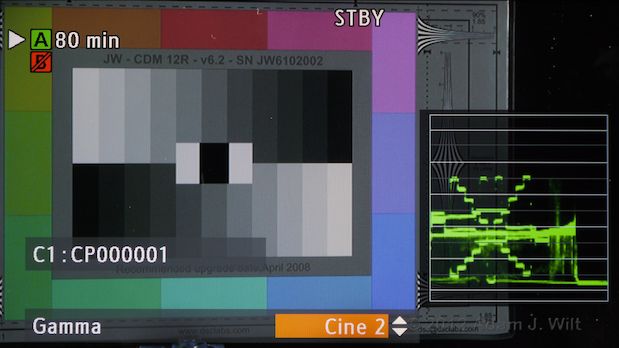
Cine 2 Gamma.
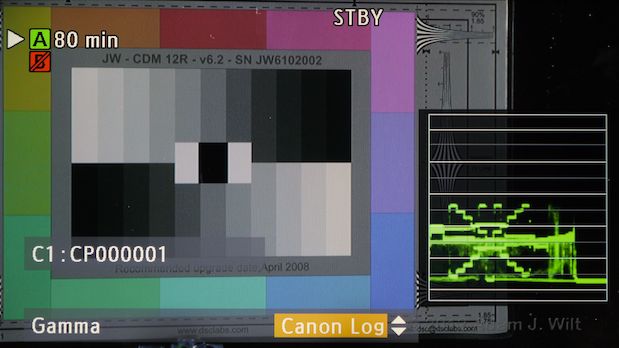
Canon Log Gamma.
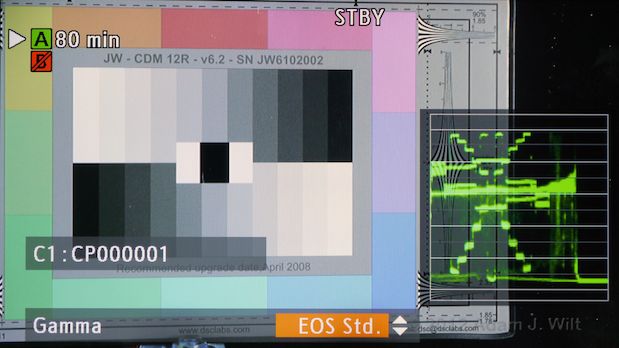
EOS Standard Gamma.
Peripheral Illumination Correction
The EF-mount C300 offers an unusual tweak: the ability to recognize certain Canon lenses and correct for illumination falloff towards the corners of the image. For example, I stuck the 24-105mm f/4 on the camera, and aimed it at a white wall:
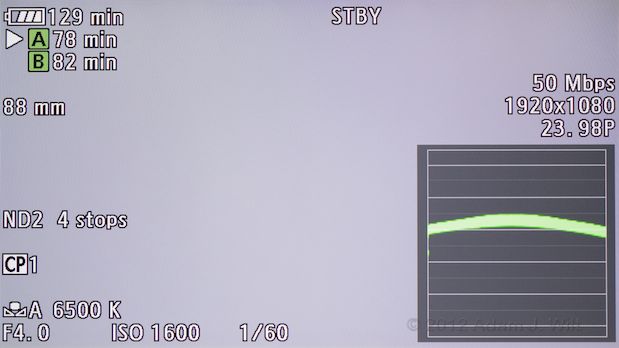
The 24-105mm isn’t noted for the evenness of its illumination.
The lens provides a sort of involuntary vignetting at no extra cost: nice perhaps if you’re looking for it, less nice if you’re trying for an evenly-exposed environment like a greenscreen.
The C300 will correct this in-camera, by tweaking levels across the image to compensate for the light loss.
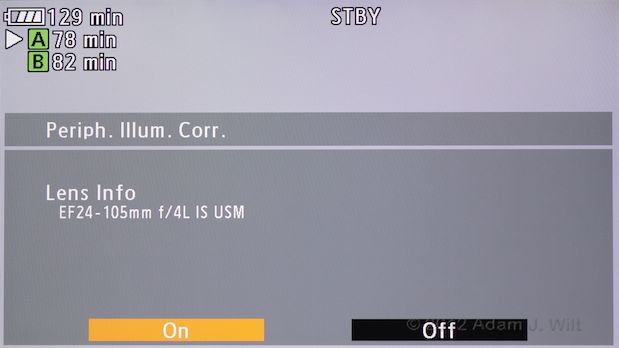
The C300 offers Peripheral Illumination Correction for many Canon lenses.
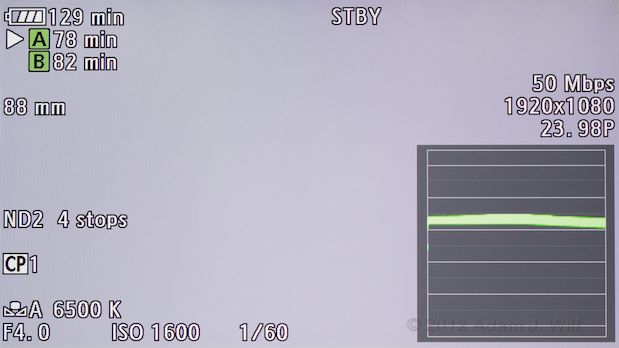
Peripheral Illumination Correction engaged.
Control Customization
You can make the camera work the way you want it to in several ways: you can reverse the direction of the SELECT, control, and grip control dials; you can set the control dials to adjust aperture (except on the PL version), ISO/gain, or disable ’em entirely (aperture and ISO are still adjustable using the FUNC. button); set shutter speed to use 1/3-stop or 1/4-stop increments; set aperture in 1/2-stop, 1/3-stop, or “fine” increments (which seems to run about 6 or 7 clicks per stop; it’s variable); adjust either ISO (320 to 20,000) or gain (-3dB to 30dB) and do it in either full-stop or fractional values (0.5dB for gain or 1/3-stop for ISO).
The camera body, monitor unit, and handgrip have fifteen assignable buttons, all told. Additionally there are four different START/STOP buttons, three four-way joysticks, and two control dials.
Most important settings are available immediately (like ISO/gain or iris on the control wheels) or with a click or two of the FUNC. button for direct setting; you can also get to anything you want through the menus.
Menus
I could talk about the menus at some length, but I’ll simply point you to Canon’s online C300 Menu Simulator and let you see ’em for yourself.
Next: Performance.
Performance
The C300 famously uses a “quad HD” sensor which it reads out as 2×2 photosite arrays instead of using a more conventional deBayering algorithm. Canon’s Larry Thorpe gave a quick overview of this processing at NAB, and there’s a full white paper (PDF) on the Canon site, so I won’t rehash the theoretical foundations here; instead I’ll just talk about what I see.
Image Resolution and Sensor Artifacts
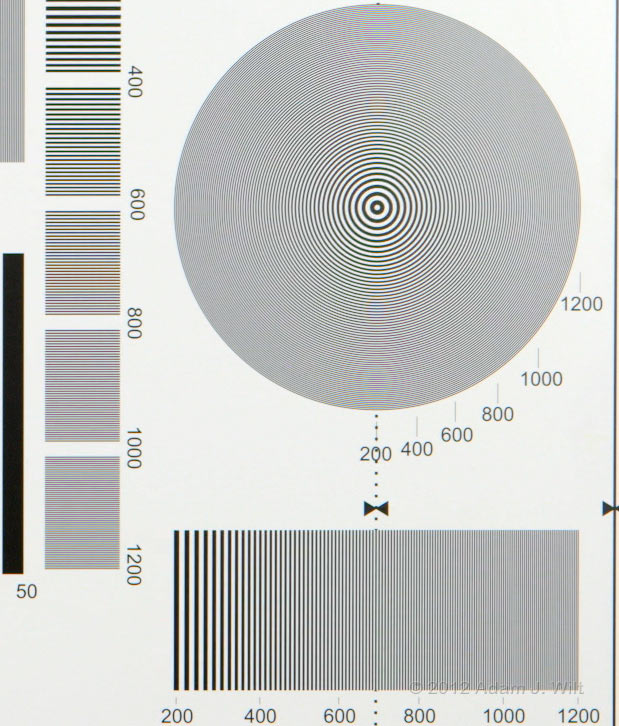
C300 on the DSC Labs MBSW chart, 1:1 extract from a 1080p frame.
The C300 is clearly (pun intended) a very sharp camera. It sees crisp detail well out past the Nyquist limit of 1080 TVl/ph; indeed, the MBSW chart is insufficient to characterize the camera’s response. I do see a bit of chroma aliasing on fine horizontal details, too. Hmmm.
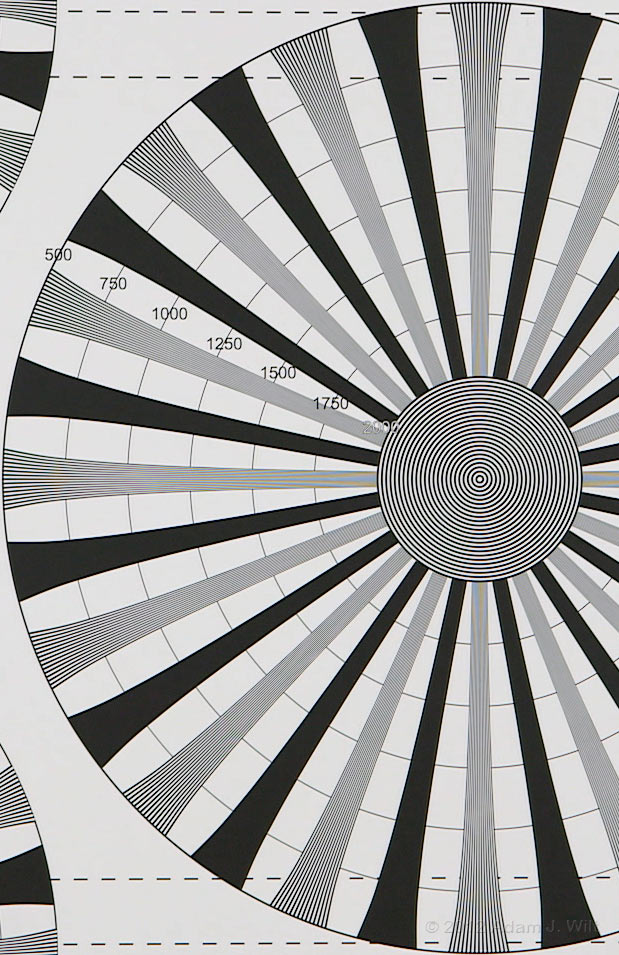
C300 on the DSC Labs RB-SRW chart, 1:1 extract from a 1080p frame.
Using the RB-SRW chart (the famous “4K cine chart” from DSC Labs) we can see what happens with scene detail out to 2000 TVl/ph, and several things become clearer:
– In the H and V directions, there’s clearly a “foldover” in resolution at the 1080-line point, with muted but visible aliasing well beyond that.
– Diagonally, what you see depends on the direction: the 45-degree trumpet in the upper part of the image is very clean and unaliased, while the orthogonal diagonal in the lower part of the image shows zippery artifacts all the way to 2000 TVl/ph.
When you consider that the “dual green readout” used by the C300 consists of one green array diagonally displaced compared to the other, and you think about how the 2×2 photosite groups are thus arranged, you might expect that in one diagonal direction you’re more likely to see aliasing than in the other… and indeed that’s what we see.
– Both H and V show some fine but enthusiastic chroma aliasing—nowhere near as coarse or as vigorous as on certain DSLRs pressed into video production, certainly, but somewhat reminiscent thereof.
In real-world photography the luma aliasing is rarely noticeable enough to call attention to itself. The chroma aliasing is a bit more prevalent, though it’s still rare that it causes a visible problem. 5D Mk II shooters will know the sorts of image details that can trigger the problem, but can rest assured that it’s much harder to give the C300 chromatic conniptions than a 5D Mk II shooting the same scene.
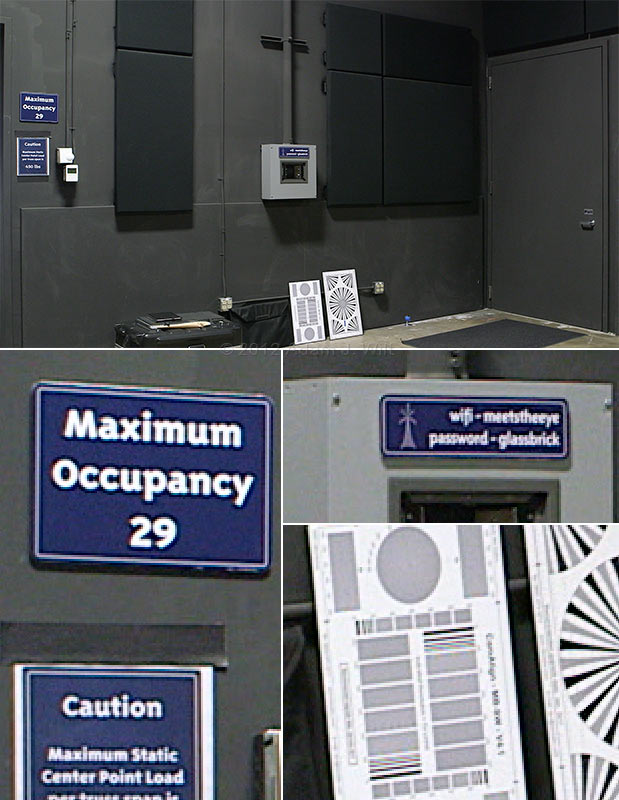
A C300 frame and 200% detail blowups (“nearest neighbor” sampling).
Since artifact visibility is both scene-dependent and observer-dependent, I can’t tell you whether it’s at a level you would find objectionable. I’ve spoken with a number of C300 shooters: some don’t notice any artifacts at all, while others complain about the chroma moir©—though none have gone so far as to say it makes the camera unusable.
Any single-sensor camera using a color filter array is going to face a tradeoff between sharpness and moir©. At Cine Gear Expo, Canon’s Larry Thorpe told me that camera was intentionally tuned more for perceived sharpness than for alias suppression, and Canon clearly succeeded: practically speaking, the C300 is one crisp-looking camera, with only minor visual artifacts as a result.
When I ran this review past Mr. Thorpe for fact-checking, he asked me to expand on his Cine Gear comment:
“[A] different approach to the ever-present compromise between Luma sharpness and associated aliasing … was taken in the C300. The summation of two separate green video components that are spatially offset horizontally and vertically with respect to each other virtually eliminates aliasing components in the final green video. This, in turn, allowed the optical low pass filter to be broadened so that a higher green MTF (H and V) is achieved. Green constitutes more than 70% of Luma, hence the Luma MTF is increased. This strategy does elevate the vulnerability to red and blue video aliasing if scenes are encountered that contain very high frequency R/B information. Overall, however, on the majority of real world imagery, there is a net gain in Luma image sharpness and absence of perceived aliasing.”
Again, I refer you to Mr. Thorpe’s NAB overview and the full white paper (PDF) for the gritty details… and to the pictures and clips that I and others have posted to see for yourself what the practical results are.
Rolling shutter is minimal. I measured it at about 1/60 second, comparable to most other LSS cine cameras in its class.
Sensitivity
The camera’s native (0dB gain) sensitivity is ISO 640, but its nominal operating point is ISO 850, a gain of 2.5dB. That setting optimizes highlight headroom, as shown in Figure 3 of this PDF.
You can select any gain from -6dB to 30dB, corresponding to ISO ratings of 320 to 20,000. As you boost sensitivity, noise increases, but it’s a very fine-grained, isomorphic disturbance; it looks more like film grain than traditional video noise. Just as importantly, there’s no resolution loss at high gains: there doesn’t appear to be any pixel-summing or pixel-averaging used to keep noise under control, so the image stays just as crisp as it does at lower settings.
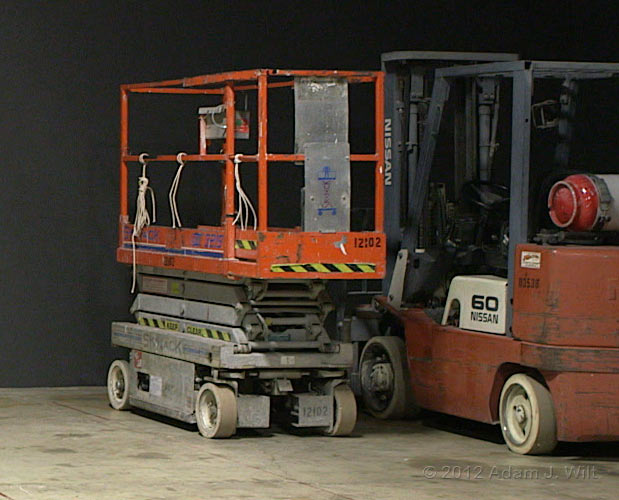
C300 at ISO 850. 1:1 extract from a 1080p frame.
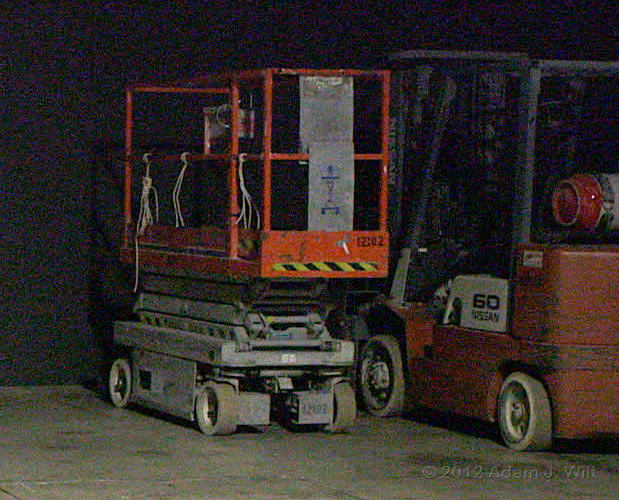
C300 at ISO 20,000. 1:1 extract from a 1080p frame. Different (less) lighting, too.
If you Google “C300 low light demo” you’ll see plenty of examples of how the camera performs at higher gains. Depending on your tolerance for “grain”, you may decide not to shoot higher than ISO 3200, or you might feel fine at ISO 20,000. The C300 gives you that freedom to decide.
Dynamic Range and Tonal Scale
Canon specifies a 12-stop dynamic range for the C300 in Canon Log gamma. I found that, given the comprehensive black gamma and knee controls the camera provides, plus a little bit of post-processing, that I could get see just as many stops in the other gammas as well. The camera does an excellent job of capturing all the light the sensor is capable of discerning, and cramming it into the tonal scale somewhere!
Here are some samples straight out of the camera and into FCP X; I’ve used the contrasty EOS Standard gamma as well as the flatter Canon Log gamma. Once again I’ve used a DSC Labs Xyla-21 chart, borrowed from Art Adams, as new LSS cameras are pushing past the limits of what I can confidently measure with a 13.3-stop Stouffer test wedge. In each case I picked a frame where the second patch just hits clipping, as compared to the already-clipped first patch; I then count one-stop steps starting on patch #3.

C300 Xyla image: ISO 850, EOS gamma, unprocessed.

C300 Xyla image: ISO 850, Canon Log gamma, unprocessed.

C300 Xyla image: ISO 20,000, Canon Log gamma, unprocessed.
I then used FCP X’s “color board” to pull up the gamma control on the clips, making the shadows contrastier and more visible:

C300 Xyla image: ISO 850, EOS gamma, shadows lifted in post.

C300 Xyla image: ISO 850, Canon Log gamma, shadows lifted in post.

C300 Xyla image: ISO 20,000, Canon Log gamma, shadows lifted in post.
End result? The Canon provides an honest 12+ stops of dynamic range, even in EOS Standard gamma, and even at high gains. Depending on your gamma and other settings, the last stop or two might be “gravy stops”, but even so, the C300 is so darned clean that at ISO 850 you can get 5.3 stops of headroom above neutral gray (by Canon’s reckoning) and still find no objectionable (or even noticeable) noise in the 6.7 stops of “footroom” below neutral gray.
Tonal scale handling differs between the gammas, with some interesting tradeoffs. The four “normal” gammas are the most Rec.709-like, and they offer full control of knee parameters. Using the knee saturation control you can somewhat reduce the hue shifts that often occur on traditional knees as individual color channels clip, with bright skies drifting towards cyan and skintones veering towards yellow; and you can pull in the full highlight headroom the sensor can deliver.
The two cine gammas provide a more S-curved highlight response, but they don’t offer much control over that curve.
Canon Log is the least tweakable of the gamma curves; it’s designed to evenly capture the tonal scale in as gradable a manner as possible. The camera includes a built-in viewing LUT so that you can see a bright and contrasty image in the finder while still capturing a darker, flatter, more gradable image. Many people wind up shooting Canon Log without the LUT, simply using it as a WYSIWYG gamma curve and opening the iris a bit to bring the midtones backup; the images still look Just Fine.
EOS Standard is very snappy, with strong S-curving of both highlights and shadows; it emulates the punchy, bright response curve of EOS DSLRs.
All the gammas are more subject to highlight hue shifts than, say, the cine gammas on a Sony PMW-series camera or the NEX-FS700, but in practice these aren’t objectionable on most real-world images. Interestingly, I found the contrasty EOS Standard gamma gave me the most natural-looking highlights with a smooth desaturation and rolloff into clipping; your aesthetic mileage may vary, of course.
Over the years, Canon has refined its color science to optimize the reproduction of skin tones, and this color science has carried into the C300 (as Art Adams discovered and Larry Thorpe confirmed in a conversation at Cine Gear Expo). Colors overall tend to default to a vivid and Kodachrome-y look as opposed to a more neutral palette, but they always look pretty and skintones always look great.
Recording
I stuffed two Sandisk Extreme CF cards into the C300 and shot 50 Mbps 4:2:2 to them. I suffered no glitches or faults of any sort, so I can’t vouch for the in-camera clip repair capabilities.
The clips are stored as MXF files, and with the installation of Canon’s XF utility for FCP on OS X 10.6, I was easily able to Log & Transfer them into FCP 7, either natively or transcoded to ProRes. Using the Canon XF Plugin for Final Cut Pro X 2.1 on OS X 10.7 (it’s not available for 10.6, alas) I also brought clips into FCP X with no problems.
Quality is rather good: pixel-peeping at 300%, I can see very faint traces of mosquito noise and other compression artifacts, but it’s much less “busy” than XDCAM EX HQ. I’ve seen greenscreen footage comped from the C300’s internal recording (XXIT) on the big screen and it looked perfectly clean. The 50 Mbps flavor of the Canon XF codec is approved for origination by the notoriously picky BBC; I would argue that this is further confirmation that the codec isn’t utter crap (grin).
Yeah, sure, 10 bits would be better. So would 4:4:4 color, and full uncompressed recording. I’d like a unicorn, too, while you’re at it… all on a CF card of course.
Bottom line: Canon pix Just Look Good, and the 50 Mbit XF recording is a very nice balance between image quality and operational convenience.
Power
The stock BP-955 battery is said to be good for about two hours of typical 50 Mbps recording, with the monitor unit attached. That seems to be about right based on the short time I had with the camera. With a high-capacity BP-975 battery, that time stretches out to almost three hours, though you’ll have to remove the battery door to accommodate the bigger block.
Various third-party vendors make adapters for other battery systems.
There’s also a DC IN port for wall power, and the camera comes with an AC adapter to feed it.
Optics
The C300 is supplied lensless, but accepts any EF and EF-S mount lens. Full electronic iris control is provided, and IS lenses provide the same image stabilization they do on still cameras. Autofocus is not provided. Peripheral Illumination Correction is available for “approximately 96 EF and EF-S lenses”.
If you have a stable of Nikon F-mount glass, there’s a nice Novoflex adapter that includes aperture control for G-series lenses. Other vendors have F-to-EF adapters as well.
The C300 PL accepts any PL-mount lens. There’s no electrical interface to PL glass: no Cooke /i or Zeiss LDS metadata is conveyed from lens to camera, and there’s no iris display on the status panel or in the viewfinder.
Next: Handling and Operation; Resources; Conclusion.
Handling and Operation
In my first encounter with the C300 I found it to be perhaps the most usable handheld LSS camera in terms of weight, balance and layout. My more recent testing deepened this conviction; I was happy running ‘n’ gunning with the C300 and a reasonably lightweight lens, and didn’t feel a pressing need for a shoulder rig.
I spent a fair amount of time with either the 16-35mm f/2.8L or the 24-105mm f/4L glass on the camera, with the top handle and side grip but without the monitor unit. The weight and balance of the rig was just on the right side of that fine line between nicely massive and stable, and getting too heavy (or too front-heavy) to be comfortable. I collected half an hour of handheld clips that are as stable as I’ve ever shot with a purely-handheld (not body-braced or shoulder-mounted) camcorder, and I didn’t feel like I’d been thrashed after running around with the rig for a couple of hours at a time.

C300 EF with 16-35mm f/2.8, easily handholdable.

C300 with 24-105mm f/4, internally stabilized. Also easily handholdable.
(I got the 24-105mm with my 5D Mk II, and I was underimpressed with it on that camera. The lens shows a considerable amount of distortion on a full-frame sensor. I’m happy to report that it works very nicely indeed on the C300, where the smaller APS-C-sized sensor doesn’t reveal nearly the same amount of distortion.)
I tried lighter lenses, like the Canon 90mm TS-E tilt/shift lens and the Sigma 50mm f1.4, and the camera was just fine with them, too.
When I slapped heavier glass on the camera, like the 24-70mm f/2.8L or the 70-200mm f/2.8L, the package tipped over my personal line into the getting-too-heavy-for-handheld category. Short shots were OK, but lengthy handholding was stressful. The C300 PL with a RED 17-50mm was also a bit on the bulky side for my tastes.

C300 PL with RED 17-50mm T2.9. This is a bit more than I want to support unaided for a long time.
By the same token, adding the monitor unit to the camera, either with or without the top handle, made the camera just a little bit heavier and little bit more awkward, and I wasn’t comfortable with it.
Once I stuck the whole thing on a tripod, I didn’t care about the weight and balance, and I happily piled on bigger lenses and the monitor unit.
The handgrip is very well designed both as a supporting mechanism and as a control surface. It provides excellent control of the camera’s orientation while being as comfortable as any grip I’ve used, and the buttons, dial, and joystick are well placed for easy operation.
I wasn’t as fond of operating the camera with the minimalist thumb rest in place of the grip, but it was still quite usable, and the gripless camera is considerably narrower (and thus easier to pack) than the camera with the grip.
The monitor unit’s LCD is positionable to either side and makes a great focus-confirmation (or focus-finding) monitor for a 1st AC, as well as a quick ‘n’ dirty engineering monitor with its cornucopia of scopes. When shooting as a one-man-band, the LCD can be aimed back so that ‘scopes and digital grass can be watched with one’s left eye while one’s right eye is at the EVF.
Unfortunately all the scopes and the “digital grass” edge monitor are limited to the LCD; pop the monitor unit off for better weight and balance, and you lose those aids, too (not to mention the loss of the XLR inputs). I felt the lack a few times, and would have been happier had the camera let me display scopes and grass in the EVF as well. By the same token, I can enable markers and zebras on the video outputs, but not scopes, grass, or peaking, which seems like an odd and arbitrary limitation. Granted, if I’m on a big enough production that there’s a DIT back in “video village”, he probably has his own scopes available; even so, it’d be handy if I could feed the camera’s scopes to external displays, just for flexibility.
Despite the unusual layout of the camera, I soon found its buttons and controls to be easily accessible (that is, once I got used to pushing the FUNC. button for direct setting of shutter, iris, white balance, and ISO; I spent my first day fumbling futilely for three non-existent toggle switches on the side of the camera and a shutter-speed button on the front!). My only operational problem was that I often hit the rear-mounted START/STOP button while reaching blindly for the FUNC. button, so I have a fair number of what-do-you-mean-the-camera-is-recording? clips interspersed through my footage.

The rear-mounted trigger (shiny black button) is easily hit when reaching for FUNC.
This problem would probably go away with more operator training (ahem), but if Canon updated the firmware with an option to disable that recording trigger (after all, there’s another on the front, one on the handgrip, and one on the monitor unit as well), I wouldn’t mind in the slightest.
Resources
The Cinema EOS product pages (USA site linked; other countries have similar pages) offer downloads of software (including clip-viewing utilities and plugins for various NLEs) and documentation including the operations manual.
Canon Cinema EOS is the starting point for learning about the services and support Canon offers for the C300, as well as being a repository for demo films, behind-the-scenes docs (all very fulsome in their praise of the C300 of course, but there’s useful info in them anyway), and similar eye-candy presentations. Check out the “Heritage” tab, which shows you Canon cameras from 1933 to the present day.
Canon’s Digital Learning Center provides a wealth of material, from white papers to the C300 menu simulator, from case studies to third-party articles and video clips. The DLC is for all of Canon’s pro products, not just the C300, but between the site’s structure and the search function, it’s easy to find anything of interest. Highly recommended.
Canon Professional Services is a support organization set up for still photographers using Canon gear, but CPS is actively working towards supporting Cinema EOS users as well (despite which they still don’t have the C300 in their list of eligible cameras!). CPS has three levels of membership, and offers (depending on level) a support hotline, expedited repair services, loaner gear during repairs, and loaner gear for evaluation purposes.
Conclusions
The C300 isn’t the cheapest LSS camcorder, nor does it have the highest bit depth, nor is it the highest in resolution. What it does have is that elusive Zen quality of “It Just Works”.
It’s as comfortable a handheld LSS camera as I’ve used; it makes very good-looking images with few single-chip artifacts; its codec captures broadcast-ready 4:2:2 imagery on inexpensive and readily-available CF cards, and those images are immediately usable in editing without transcoding, rescaling, or deBayering; it’s workable right out of the box by one-man-bands as well as by two-person crews with an operator at the EVF and a 1st AC at the LCD.
It’s available with a Canon EF mount for use with any EF or EF-S lens, or you can get it with a PL mount for dedicated cine glass (locally, one rental house has about four EF C300s for every PL version; so many folks already have Canon lenses that the EF version is overwhelmingly popular).
Yes, it’s only 8 bits, even on its live video outputs. But those 8 bits are very well deployed; if you set up the C300 to give you the look you want in-camera (and the C300’s comprehensive and powerful Custom Picture settings make this possible), it’s hard to argue that 8-bit-ness is a showstopper. The camera’s images look smooth and organic, even on the big screen at Paramount’s theater on their lot in L.A., as seen from the very front row (yes, I’m one of those people).
I know, it’s only 1080p, despite using a 4K-capable sensor. That limits the amount of pushing in, stabilizing, and deskewing one can do in post, and it means that you’re not 4K future-proof (horrors!). This may be true, but darned few films are being posted and distributed at higher than 2K resolution today, and the C300’s 1080p images take up comparatively minimal space, require no rescaling for broadcast, work in any HD-capable post pipeline, and display on any HD display. In my area (San Francisco / San Jose), the cameras I see working all the time are 1080-line cameras like the C300, various Sonys and Panasonics, and the Alexa recording 1080p ProRes internally. 4K-capable REDs, and Alexas capturing 2880-pixel-wide ARRIRAW externally, are certainly available, but the added complication of dealing with higher-than-HD resolution and raw files makes them special-purpose shooters rather than day-to-day breadwinners.
$16,000 seems like a lot of money these days for an 8-bit 1080p LSS camcorder; it’s the same cost as a Scarlet or a PMW-F3, and rather a bit more than the FS100, FS700, or AF100. But that $16,000 is buying you a camera that Just Works: it doesn’t need a lot of accessories to make it usable; its images are crisp, clean, and very appealing; its files are broadcaster-friendly and flow smoothly into post. In short, it’s a tool that helps you make pretty pictures quickly and easily, in standalone or multi-camera settings, with lots of light or hardly any at all. Get in, get the shot, get out, make your day, make your client happy. Isn’t that what it’s all about?
Pros
- Super35mm sensor with very low noise and 12+ stops of latitude.
- Interchangeable lenses, either EF or PL mount.
- Usable ISOs from 320 to 20,000.
- Three ND filters built in.
- Variable frame rates, slow shutters, Clear Scan, timelapse, and single-frame recording.
- Best handheld ergonomics to date in a LSS cine camera.
- Canon colorimetry and tonal scale rendering.
- Very crisp, perceptually sharp images with minimal artifacts.
- Frame rates from time lapse to 30fps (1080p) or 60fps (720p).
- All three video outputs available simultaneously.
- Excellent scopes and focusing aids.
- Broadcaster-approved 50 Mbps 4:2:2 recording on dual CF cards.
- Flexible and configurable control system with multiple customizable controls.
- NTSC, PAL, and true 24.00fps system clocks.
- Very tweakable Custom Picture settings.
- Comprehensive remote control when WiFi transmitter is attached.
- Full genlock and timecode I/O: the C300 plays well with others.
- HDMI, SDI, and SYNC OUT video feeds all available simultaneously.
Cons
- Some chroma aliasing, mostly on fine horizontal lines.
- Scopes and focusing aids only visible on monitor unit’s LCD.
- Monitor unit increases awkwardness for handheld work.
- Camera get too heavy for handheld work with larger lenses.
- It’s awfully easy to hit START/STOP while reaching for the FUNC. button.
- LCD status panel is unreadable from low angles.
Cautions
- 8-bit video recording and live outputs: no 10-bit capability, so camera is probably better used for WYSIWYG shooting more than for shoot-it-flat-grade-it-later styles of working.
- Non-interchangeable lens mount: EF or PL. Make up your mind before you buy or rent!
- If you plan to record externally, check with your recorder vendor to verify that the recorder reads the C300’s pulldown flags and that it can properly remove pulldown from the C300’s output.
- Balanced audio input requires the use of the monitor unit.
See Also:
C300 Quick Look (with lots of pictures)
Larry Thorpe’s presentation on C300 image processing
Disclosure: Canon delivered a well-used demo C300 EF to me; I returned it the next week via FedEx at my own expense ($168.42).
Jeff Regan of Shooting Star Video brought over a C300 PL for a quick look.
I supplied my own CF cards and Canon lenses, which I already had for use on my Canon 5D Mk II, the camera that shot most of the pix in the article. All my Canon kit was purchased new, used, or refurbished on the open market, with no special deals beyond what Adorama, Amazon, B&H, Craigslist, or Keeble & Shuchat were offering to anyone else.
No material connection exists between me and Canon, Shooting Star Video, or any of the vendors mentioned in the article. No one has offered any payments, freebies, or other blandishments in return for a mention or a favorable review.
(I provide a link for Keeble & Shuchat because they’re my local bricks ‘n’ mortar dealer, and they let me come in and play with stuff before I buy it. If we don’t support our local dealers, they’ll go away, and that would be a Bad Thing. My only material connection to ’em is that I’m a happy customer and I’d hate to see ’em go away.)

Filmtools
Filmmakers go-to destination for pre-production, production & post production equipment!
Shop Now