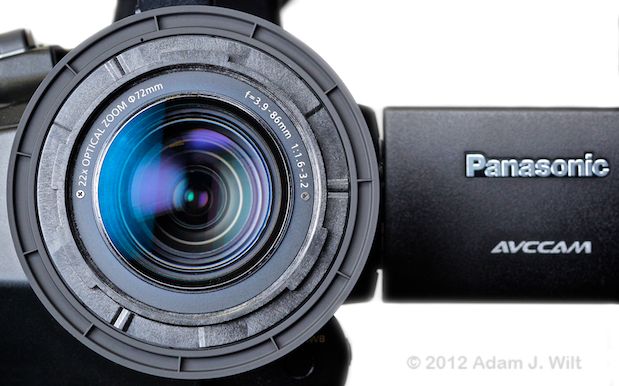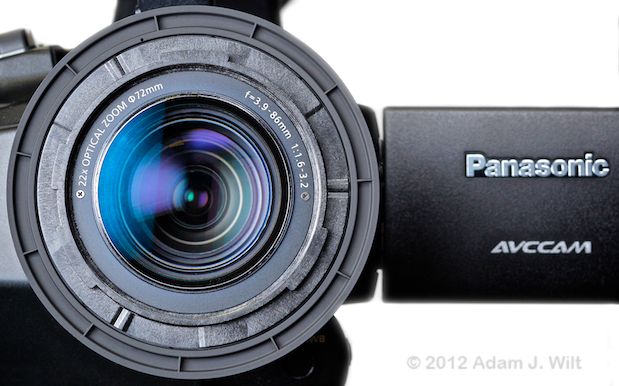
While all the attention is focused on large-single-sensor cine-style camcorders, Panasonic has come out with a line of high-quality 1/3″ 3-MOS handhelds that leave little to be desired. The HPX250 is a handheld version of the shoulder-mount HPX370, while the AC160 and its simplified sibling, the AC130, bring the same fundamentals to the AVCCAM (AVCHD) world. [Updates 2012.01.30: SDI out is 10-bit only on 250, not 160; 2012.02.24: typo page 2, should be “or any of the other misfortunes possible with location audio.”]{C}
Introduction
At NAB 2011, Panasonic showed a trio of 1/3″ 3-chip camcorders, the US$5995 AG-HPX250, the $4795 AG-AC160, and the $3895 AG-AC130. The cameras share a common chassis, the same lens, identical 1920×1080 sensors, but they vary in capability and recording format.
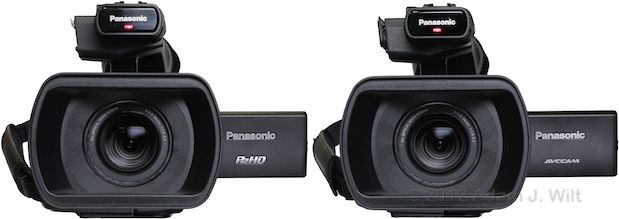
AG-HPX250 and AG-AC160.
The HPX250 records AVC-Intra, DVCPRO HD, DVCPRO50, DVCPRO25, and DV on P2 cards, along with four channels of uncompressed audio. It is 50Hz/60Hz switchable, has HD-SDI, and can overcrank and undercrank for slo-mo and sped-up shots. In essence, it's the shoulder-mount HPX370 repackaged as a handheld.
The AC160 records AVCHD on SDHC cards, along with SD DV25. Like the 250, it has “worldcam” switchability, uncompressed audio, and variable frame rates.
Both cameras shoot 1920×1080 natively, and they can record 720p, 480i, and 576i as well.
The AC130 is a budget version of the 160, giving up 50Hz/60Hz switchability, variable frame rates, SDI, and LPCM uncompressed audio, but costing $900 less than its full-featured sibling.
Despite their commonalities, the 250 and the 160/130 were developed by different groups at Panasonic. While their underpinnings are the same, details of their feature sets, their menu designs, and their video processing are different.
The HPX250 builds on a strong legacy of professional DV, DVCPRO, and P2 cameras dating all the way back to the DVX100, and its menus and operating philosophy will be instantly familiar to anyone versed in the operations of those cameras. The AC160's and 130's internal workings come from the AVCCAM group, and incorporate newfangled ideas like DSLR-style presettable color temperatures and automated face detection.
The 250 uses a 20-bit DSP engine to process its images, as used on the HPX370. The 160 and 130 use a different, 18-bit DSP, with correspondingly different results—subtle rather than blatant, but present nonetheless.
Panasonic sent me both an HPX250 and an AC160 so I could compare and contrast them. I expected to receive a pair of capable camcorders, and in this I was not disappointed: they both make excellent images. What I wasn't expecting was that these hefty handfuls—they're 17″ long and weigh about six pounds—would be the most operator-friendly handheld camcorders I've used.
Design and Handling
These cameras are “handycams” of conventional design, if of Brobdingnagian scale. The lens and body form a cylindrical continuum, surmounted with a carrying handle, stereo mikes, and a flip-up EVF. The left side sports a flip-out LCD and most operating controls, while the right bulges out with a handgrip amidships and an oddly (but cleverly) offset battery compartment astern. The camcorders sit upon admirably large and flat bases, equipped with both 1/4″ and 3/8″ tripod sockets, allowing firm and stable attachment to any tripod or mount available.
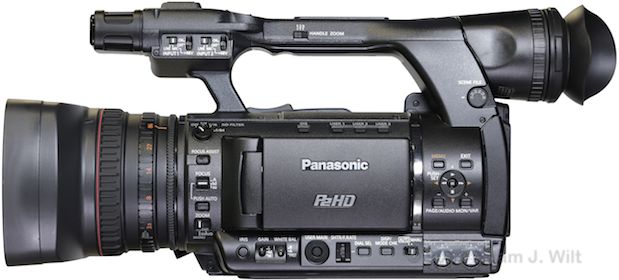
AG-HPX250 left side view.
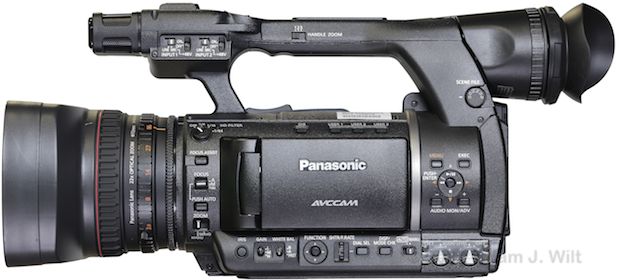
AG-AC160 left side view.
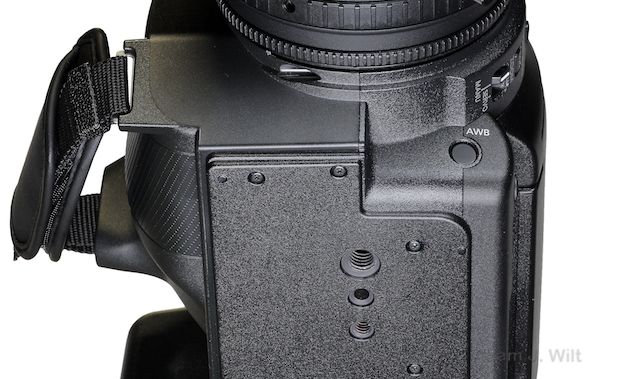
The 160's flat base and dual tripod sockets. The 250 has the same arrangement.
Lens
The 22x lens runs from 3.9-86mm, equivalent to a 28-616mm lens on a 35mm still camera. It sits behind a bayonet-mount hard lens shade, and accepts 72mm filters—the same size filter threads used on the original DVX100, 'way back in 2004.

The 160 with lens hood removed: matte outer ring is focus, shiny middle ring is the bayonet mount. Data plate proudly pronounces that the 22x zoom is an optical 22x. Inside all that is the lens proper with its 72mm filter threads.
A free-spinning servo focus ring with deep fins and a rubbery surface surrounds the front of the lens. It has low friction, no stiction to speak of, and is easily found and operated with a fingertip. It has a video-style short throw of perhaps 120 degrees, and it's not velocity-sensitive: if you keep it from spinning past its limits (as some hard-stopped follow-focus units allow), it's quite repeatable.
There is an MF ASSIST mode available that lets the camera fine-focus once you release control; in this mode the sensitivity of the focus ring is doubled, requiring only half the travel for the same amount of focusing. Also, like other Panasonics, the focus ring is enabled during autofocus, so even if you're letting the camera drive, you can still override the camera to move focus from one point to another.
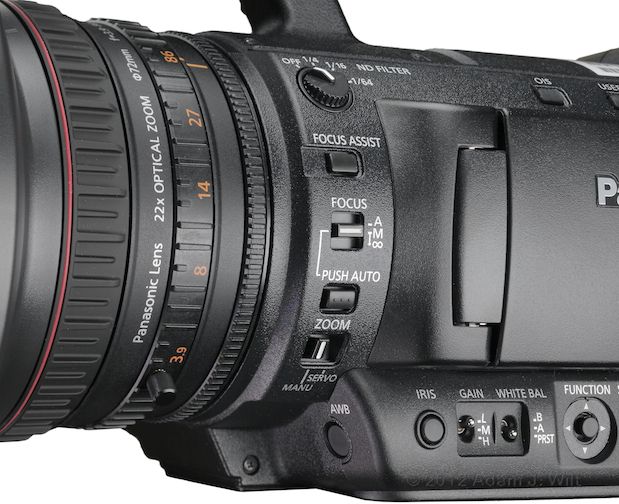
Lens rings and front controls on the AC160.
A smooth, mechanically-coupled zoom ring follows; it needs only a 90-degree throw to travel the range from full wide to full telephoto. It has a small, screw-in nubbin to act as a zoom lever / position indicator, which can be removed if unwanted. The zoom's feel is slightly heavier than the focus ring's, but it's still light and easily adjusted without perturbing the camera's position.
The aft end of the lens assembly consists of a narrow, smooth, free-spinning iris ring, which sets aperture in 1/6-stop increments in manual-iris mode, and controls exposure offset in auto-iris mode. It, too, has a very light touch; I initially felt it might be too easy to turn and thus subject to inadvertent actuation, but in practice its size, narrowness, position, and smooth damping worked extremely well to make it movable when necessary and out of the way otherwise.
The lens block itself appears to extend at least as far behind the iris ring as ahead of it (according to the image here), which helps explain the prodigious length of these cameras: over 17″ from lens shade to eyecup.
Camera Section
Left side: behind the lens and before the LCD, five controls run down the side of the camera.
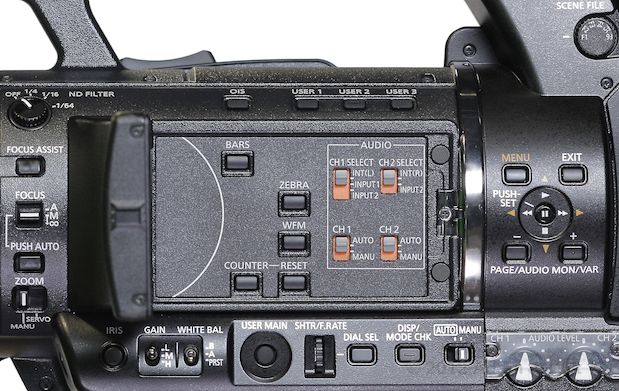
HPX250 left-side controls, LCD open.
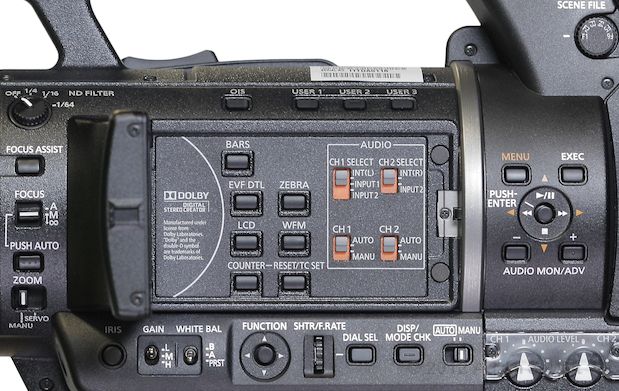
AC160 left-side controls, LCD open.
At the top is a four-position rotary ND selector with a raised index line or pointer, providing 0, 2, 4, and 6 stops of attenuation. This simple control is by far the best ND selector I've ever used: you can instantly tell by touch what filter is selected, and it's easy to use without confusion or befuddlement.
With the usual rotary selector on broadcast cams, there's no physical index mark, and choosing a filter (with your eye to the finder) is usually a case of spinning the knob arbitrarily until, by chance, the right filter is selected. With up/down pushbuttons, there's no tactile indication of what filter is currently selected. With slide switches, as on the Sony EX1 or EX3, there's plenty of tactile feedback, but moving the stiff switch from one position to the next is fraught: more often than not, you'll wobble the camera from the force required, and there's a fair chance you'll overshoot the middle filter position when you're aiming for it.
This Panasonic selector avoids all those pitfalls, and is a delight to use—all the more important since filter-twidding is a frequent task: the lens must be kept at f/4 or wider for optimum sharpness, due to the unavoidable physics of small sensors with high resolutions.
Below the ND selector is a FOCUS ASSIST button. On the 160, this activates a focus-in-red “digital peaking” signal; on the 250 it magnifies the center of the image (but, alas, only when not recording).
In the middle, a three-position FOCUS switch has auto and manual settings, plus a momentary-action infinity focus setting. Below that is the momentary-action PUSH AUTO button.
At the bottom of the stack, a slide switch engages and disengages the zoom motor.
Above the LCD there's an OIS (Optical Image Stabilization) pushbutton, and three programmable user pushbuttons.
Hidden behind the LCD are buttons for colorbars, zebra setting, and LCD WFM/vectorscope overlays, and counter select/reset buttons. The 160 has two buttons the 250 lacks: EVF DTL, to add a fixed “peaking” or edge-enhancement signal to the LCD and EVF; and an LCD button to toggle LCD backlighting or flip the image in the LCD, depending on menu settings.
(Some of these functions can also be assigned to user buttons, so that they can be activated with the LCD folded against the body. Oddly, neither ZEBRA nor BARS can be so assigned.
The 250 has its EVF DTL-equivalent settings in its menus; the 250 allows 15 different levels of peaking as well as high or low peaking frequency settings. The 250 also allows LCD backlighting adjustment in its menus, but lacks the image-flipping settings.)
There are four slide switches for audio setup, allowing either of the two main channels to use auto or manual leveling, and to select between the internal mikes and the two XLR inputs (both channels can also share XLR input 2, so you can feed a single mike to both a high-gain and a low-gain channel). The AVCCAM 160 records two-channel audio while the P2-based 250 records four, with channels 3 and 4 falling back to whichever two inputs (of the two built-in mikes and the two XLRs) are not selected with these switches.
A row of controls below the LCD handle most of the operational setup functions. At the front, a pushbutton toggles between auto and manual iris modes. Two three-position toggles select between low/medium/high gains (all user-selectable as to gain level) and preset/A/B white balances. There's also a pushbutton on the front of the camera for white balance: in preset, it selects between 3200K and 5600K (and on the 160, a VARIABLE value, which you can set to any color temperature from 2400K to 9900K). In A or B modes, it's pushed to set the white balance, or pushed and held in for black balance. When white balance is set, the cameras briefly show the selected or measured value in the center of EVF and LCD displays.
On the 250, the next control is USER MAIN, a user-assignable pushbutton, set by default to Y GET (a spot-meter reading of the center of the screen). On the 160, this position is occupied by a four-way FUNCTION joystick with a variety of purposes; by default it's used to select and position an area of the screen for autofocus and auto-iris operation (upon which I will expatiate later).
Next is a SHUTTER / FRAME RATE / SYNCHRO SCAN selector dial, and a DIAL SEL button to enable the control and select which function it operates. You select a parameter with DIAL SEL, adjust it with up and down spins of the dial, and push the dial in to keep the setting.
One of the DIAL SEL settings is “dial lock”, which prevents inadvertent adjustments: handy perhaps, but the dial, if left alone for ten seconds, goes into lock mode automatically. I often found myself choosing a shutter speed, frame rate, or synchro scan speed, stepping back for a moment to observe its effect on a monitor, then trying to readjust it, only to have the danged camera ignore my input because I'd waited too long. I wound up cursing the timeout on that control; the DIAL SEL button already has “lock” as one of its options, so <rant>if I want the freakin' dial locked, I can jolly well do it myself—there's no need for the camera to get all clever on me, and save me from myself when I don't want to be saved!</rant>
Bringing up the rear of this row are the DISPLAY / MODE CHECK button, used to toggle onscreen displays and to check various parameters, and an AUTO /MANUAL slide switch that, in AUTO mode, puts selected controls into full-auto mode. It's not an all-or-nothing thing; you can choose which operating parameters—gain, iris, focus, white balance—the AUTO setting controls; furthermore you can limit auto gain to 6, 12, or 18dB of gain boost.
The aft end of the left side has a six-position scene file dial in the handle riser. The center of the panel has the four-way control/menu joystick first seen, lo these many years ago, on the DVX100: it's used to navigate, select, and adjust menu items, and to control clip playback, although the control settings differ between the 160 and the 250 (on the 160, pushing the stick up plays a clip, and pushing it in pauses playback, while on the 250 an upward push toggles between play and pause). It's not that one way is better than the other, it's just that, if you have both cameras in your arsenal, you'll have to mentally shift gears moving between 'em.
Additional buttons open/close the menus, execute functions, adjust monitor audio levels or page through thumbnails, and (on the 250) control variable-speed playback.
Top handle: a pod at the front of the handle contains stereo mikes, a tally lamp, and an ambient-light sensor used for white balancing in ATW (Auto-Tracking White) operation. An accessory shoe sits on top; the left side has line/mike/+48v switches for the dual XLRs on the right side.
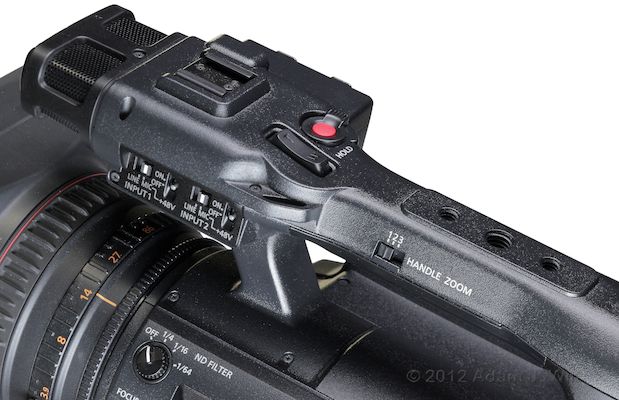
The 160's top handle. The 250's is identical except for the shininess of the paint.
There's a start/stop trigger button with a rotary HOLD switch surrounding it. A single-speed zoom rocker sits beside it; a three-position switch selects one of three speeds for the rocker (it can be set to low/off/high, so that the center position serves as a lockout).
The top of the handle has three tapped accessory sockets: two 1/4″ and one 3/8″. All are deep and robust and should accommodate almost any reasonable load.
A flip-up EVF sits at the rear of the handle. Its design is largely unchanged from that of previous Panasonic handhelds; it's hinged at the top edge, so that applying any pressure to it, as when bracing the camera against your eye, tends to pivot it downwards. This is handy in keeping the eyepiece firmly locked down in the horizontal position, but more than a little disconcerting if you're trying to use it in any elevated position (I should really characterize if as a flip-down EVF, since that what it wants to do).
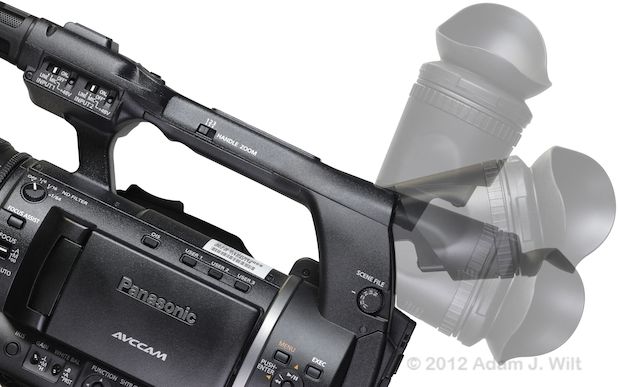
These cameras share a flip-up EVF hinged at the top.
Right side: A centrally-located and comfortably-formed handgrip sits at the center of mass of the camera. It's smooth on the 250, while it has a textured patch on the 160; I found little difference in comfort or security between them, but I tested these cameras in wintertime. I suspect that in warm weather, the texture of the 160's grip will offer better purchase for sweaty hands.
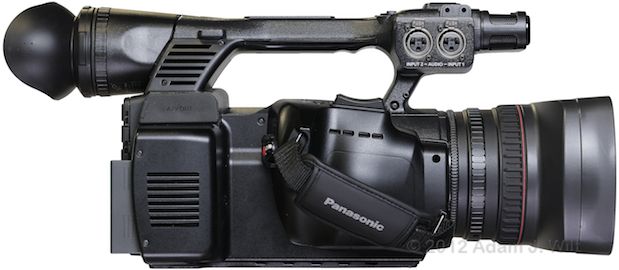
HPX250 right side view; XLR covers removed. RCA outputs above battery well.
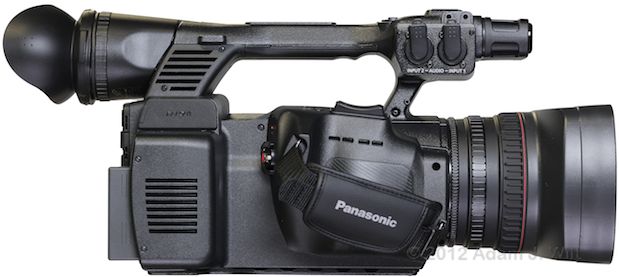
AC160 right side view; XLR covers in place. RCA outputs above battery well.
A variable-speed zoom rocker sits above the handgrip, along with a REC CHECK pushbutton to review the last recording. A start/stop trigger with an on/off/mode switch around it sits on the back, with mode-indicating LEDs above it.
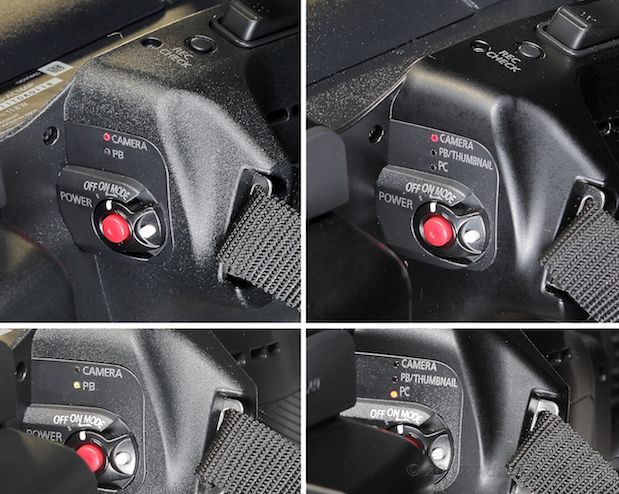
AC160 (left) in camera and playback modes; HPX250 (right) in camera and PC (USB transfer) modes.
At the back, there's a fat battery compartment. Above it, a rubber flap covers three RCA jacks, for composite video and stereo audio outputs.
Back: card slots and I/O connectors fill the back of the camera. A flip-open door on the left side covers two SDHD/SDXC slots on the 160, and two P2 slots on the 250 (as well as an SD card slot, for saving camera setups). Beneath the slots, a pushbutton is dedicated to slot selection on the 160, and is user-assignable (with SLOT SEL as the default) on the 250.
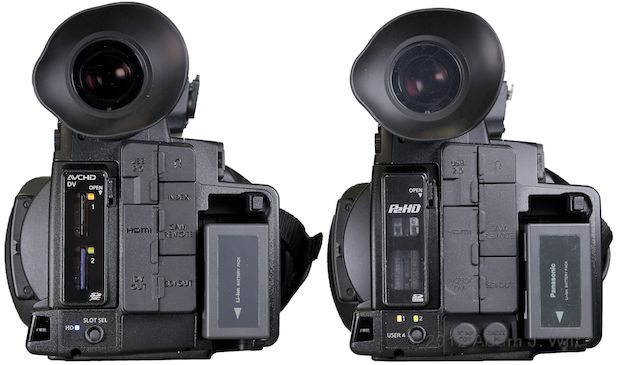
AC160 and HPX250, rubber caps in place.
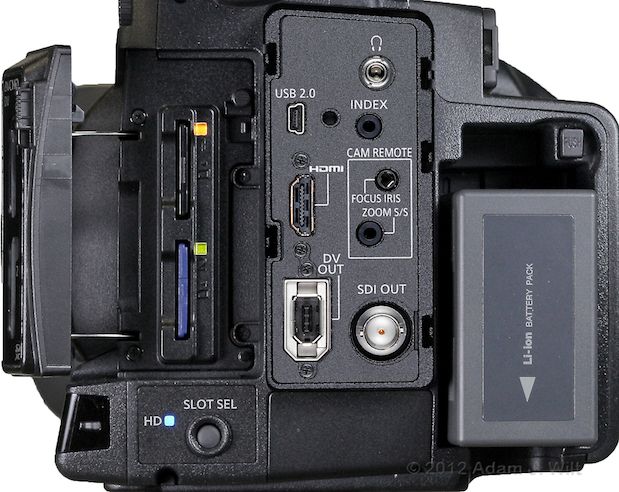
AC160's card slots and I/O ports.
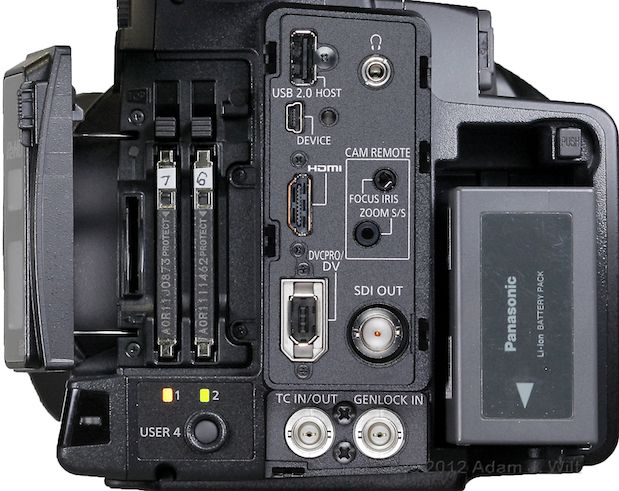
HPX250's card slots and I/O ports.
Both cameras offer USB 2.0 (device-mode) jacks, a full-size HDMI output, a six-pin 1394 port accepting locking connectors, an SDI output, a 3.5mm headphone jack, and Panasonic's serial-control zoom / start / stop and focus / iris jacks. These jacks accept remotes from the likes of Varizoom and Bebob, giving fine-grained, repeatable control over lens parameters: with the Bebob Foxi, you can pull focus and iris like a pro.
The 250 adds a host-mode USB 2.0 port, letting the camera back up its P2 cards to USB hard drives without the need for a separate computer. It also has BNCs for genlock in and timecode in or out; the 250 plays well in multicam setups, and may be an interesting option for stereo 3D mirror rigs as a result.
Displays and Operation
The cameras are equipped with both a flip-out LCD and an EVF. The 3.5″ LCD resolves roughly 500 lines vertically and 350 horizontally; the EVF shows about 500×400. These are decent numbers for SD, but a bit lacking for critical focusing in HD; fortunately both cameras offer focusing aids to assist the solo operator.
The LCD spins around a full 180 degrees to face forward, or 90 degrees in the other direction to face down. When aimed forwards, both the 160 and 250 let you choose between a “mirror” image (flipped left-to-right) as is common on camcorders, or a normal, unflipped image. The LCD is quite usable both indoors and outdoors, though in full sunlight it struggles a bit (it's no worse than the LCDs on other camcorders in this respect).
The EVF, while it has tolerable detail and resides in a formidable housing with a massive eyepiece, lacks sufficient magnification—a long-standing issue with Panasonic EVFs. Instead of an eye-filling picture, the EVF provides the experience of a film seen from the back row of a narrow multiplex theater. While such a presentation keeps the individual pixels of the EVF from being obvious, and lets the eye encompass the entire picture without a lot of looking around, it also leads to unnecessary straining to see fine detail. Watching the diminutive image for focus (even at the 500×400 line resolution of the EVF) is fatiguing after a few minutes; I found myself depending more on the flip-out LCD, even with its slightly coarser image, because I could get “closer” to its picture.
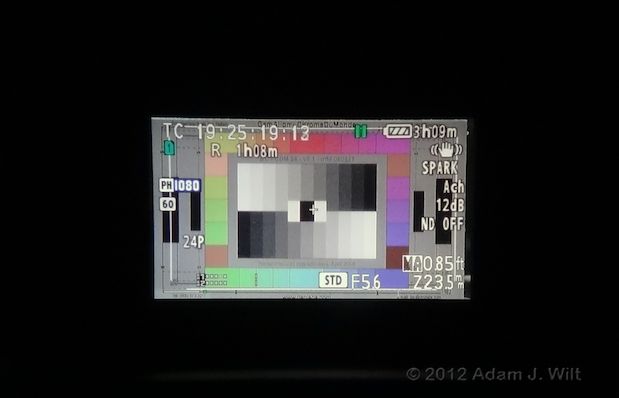
View through the AC160's EVF. The HPX250's image is the same size.
I'm harping on this because Panasonic got so much else right with these cameras' ergonomics that miserly EVF magnification stands out by comparison. It's not as if Panasonic lacks the ability to fill the eye with an EVF's display: the DMC-GH2 still camera's EVF (one of the best EVFs available in any still or video camera) displays an image just over 60% larger than the 160's or the 250's, striking (in my opinion) an excellent balance between having an image big enough to focus with, and one small enough to monitor for composition and content in a single glance.
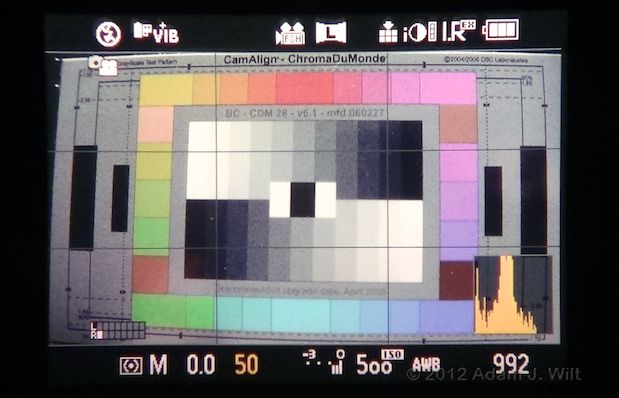
View through a Panasonic DMC-GH2's EVF, shot with the same camera at the same zoom setting.
Enough whining: what about the content of the displays? Panasonic has done its usual, thorough job of supplying a wealth of useful info, though the two cameras offer different takes on the organization and layout of these data.
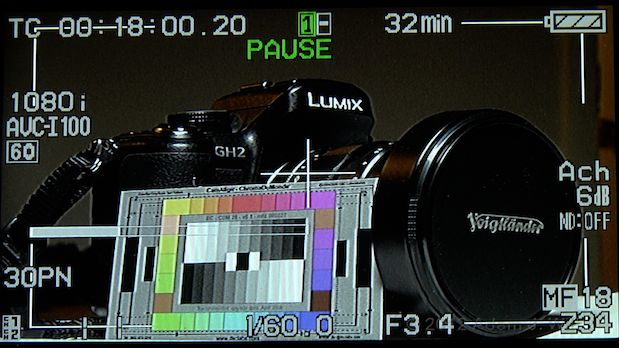
HPX250 LCD: Synchro scan on, lens data as numbers from 00-99.
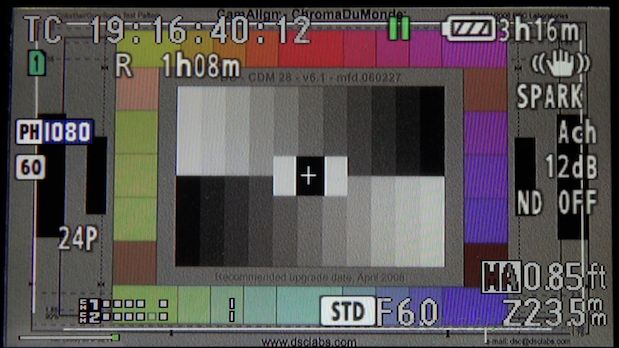
AC160 LCD: No shutter set, so no shutter displayed; lens data as mm and feet. “Spark” is the current scene file's name.
Both cameras offer timecode (or counter value, or user bits) in the upper left; battery status in the upper right; card status and time remaining at the top of the screen; recording format and frame rate on the left; white balance, gain, and ND on the right; audio metering, shutter speed, aperture, zoom, and focus across the bottom. (Shutter speed is only shown when it's set to something other than the default; this is unfortunate, as you're left guessing as to what the default actually is in various modes. It's 1/60 in 60i, for example—the shutter is open for the duration of the field—but it's 1/48 in 24p, a duration of half the frame time.)
The 250 has the same clear, plain display typography found in other DVX/HVX/HPX cameras all the way back to the DVX100. The 160 has a more graphically evolved data overlay, with higher-resolution fonts and more color.
Both cameras' EVFs and LCDs show 100% of the image, by the way.
Focusing Aids
The 250 offers three focusing aids: variable-level EVF peaking, Panasonic's focus bar, and image magnification.
Peaking accentuates high frequencies in the image, like a vigorous sharpening control. The sharpening affects both the LCD and the EVF. There are 15 different strength levels for peaking on the 250, as well as two frequency settings: high or low. With these controls you can set up peaking for just about any situation; unfortunately the controls are buried in the DISPLAY SETUP menu instead of being directly accessible via knobs or buttons.
The focus bar indicates sharpness of focus, growing to the right as focus improves (it measures the amount of high-frequency spatial detail in the image, which increases as focus improves). The focus bar spans half the width of the screen and has enough resolution to be a sensitive indicator. In practice, you get the focus reasonably close, then watch the growth of the focus bar for its halting (when focus is dead-on) or reversing (when you've gone past). It's actually quite useful for fine-tuning focus, more so that it might appear.
Pressing FOCUS ASSIST magnifies or expands the center of the image 3x in the EVF and LCD for critical focusing. It is not available when recording, so it's useless for tracking focus during a shot— peaking and the focus bar wind up being more useful as a result. Still, it's useful for setting marks, and the focus bar remains visible in expanded mode for precise tweaking.
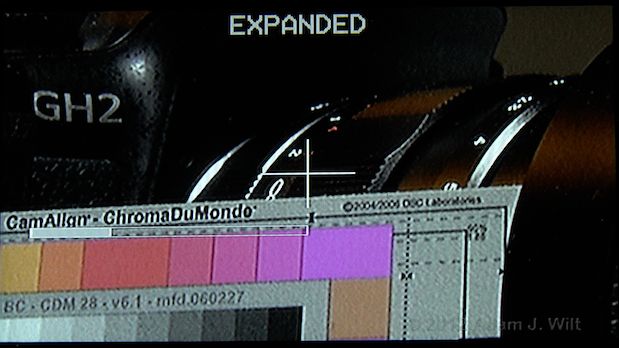
FOCUS ASSIST on the 250: 3x magnification and focus bar.
The 160 also has three focusing aids: EVF DTL, focus-in-red, and a focus bar.
EVF DTL on the 160 is a single-level, on/off peaking, familiar to Panasonic camcorder uses since the days of the DVX100A.
Focus-in-red, activated by the FOCUS ASSIST button, is an additional level of peaking in which sharp details are rendered in red (and only in red, sorry; if you're red/green colorblind, or your subject happens to be red, focus-in-red won't be especially helpful. Choice of focus color would be a welcome improvement). Cleverly, the entire border of the screen turns red, so there's no doubt as to whether you've got it turned on or off.
Focus-in-red is applied “downstream” of EVF DTL, amplifying its effect, so with the combination of EVF DTL and focus-in-red you essentially has three levels of viewfinder sharpening in addition to “none”. I found the combo, though coarser than the 250's fifteen-level peaking control, to be much more usable, as all four variations are quickly selectable using two dedicated buttons with no menu-diving required.
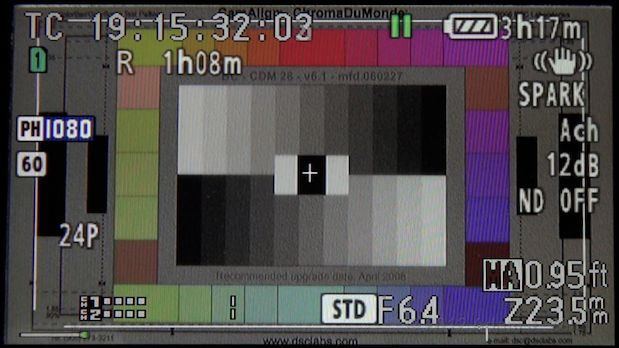
The 160's display without EVF DTL.
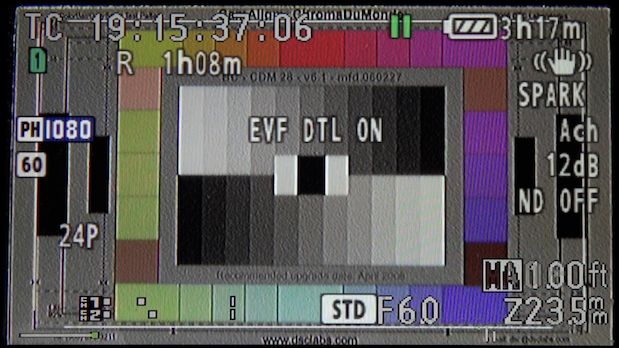
EVF DTL has just been switched on, so a status message appears briefly midscreen.
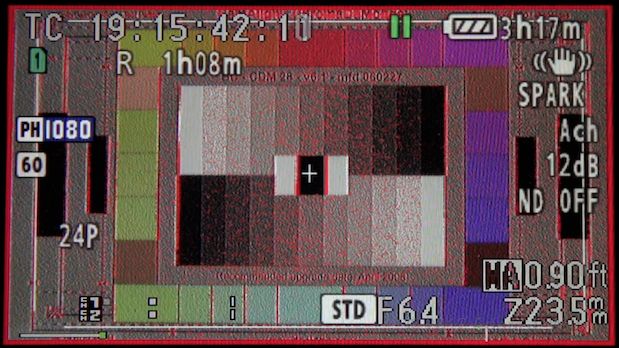
The 160's FOCUS ASSIST engaged atop EVF DTL. It's even detecting the texture in this tiny DSC Labs CDM chart.
The 160 also has a focus bar, which is both more and less helpful than the one on the 250. The 160's bar is a skinny little thing in the lower left corner, growing to perhaps a third the length of the focus bar on the 250, so it's both harder to monitor and less sensitive than the 250's. On the flip side, it pushes a square green “peak level indicator” ahead of it, clearly marking the maximum-focus point just as peak-hold indicators on audio meters mark the most recent loud sound—and it's out of the way, so it's less of a compositional distraction.
Exposure Aids
Both cameras have two zebra settings, each one adjustable from 50% to 105% in 5% increments, but they're used differently on each camera.
The 250 uses the two zebras in concert. You can set it up to show one zebra pattern between the two levels and the other above them (the lower pattern slants from upper left to lower right while the other slants in the opposite direction); to show only a single zebra pattern above a given level, or to show a zebra pattern only between the two levels.
The 160 cycles between zebra off, zebra 1, and zebra 2, with the active zebra pattern appearing on brightnesses within about 5% of the zebra's level setting. The current level selection is displayed for about two seconds, then the indication disappears; I usually wind up setting both zebras to the same value on Panasonics that behave this way, so I won't get confused as to which zebra I currently have selected.
Both cameras also offer a “spot meter” option, Y GET, which reports the brightness level of a box in the center of the screen as a numerical percentage.
The cameras also let you superimpose a waveform monitor or a vectorscope image on the LCD (but not in the EVF; I found it useful to leave the WFM displayed on the opened LCD while watching the picture in the EVF at the same time). The 250 displays monochrome, semitransparent 'scopes on the right side of the LCD, while the 160 uses opaque 'scopes with a brown graticule. The 160's WFM fills the center of the screen, while the vectorscope sits on the right like its counterpart on the 250.
The 250's 'scopes are a bit harder to read, but they block less of the picture; the 160's 'scopes are clearer, but obscure important info. These cameras display momentary status messages in the center of the screen: zebra selection, shutter dial selection, shutter dial mode, and the like. On the 250, you can change shutter speed or zebras with a 'scope displayed, and the status messages appear in front of the 'scope image. On the 160, all such messages appear behind the 'scopes—their second half obscured by the vectorscope, and the entire message hidden behind the WFM.
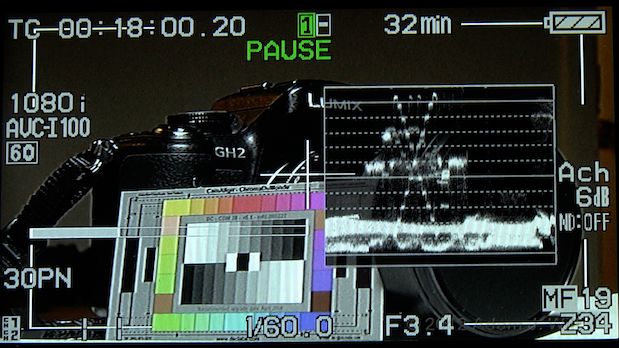
HPX250's WFM. 'Scopes on the 250 don't block status messages.
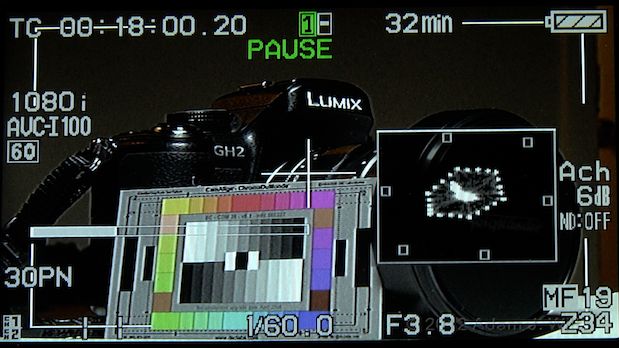
HPX250's vectorscope display.
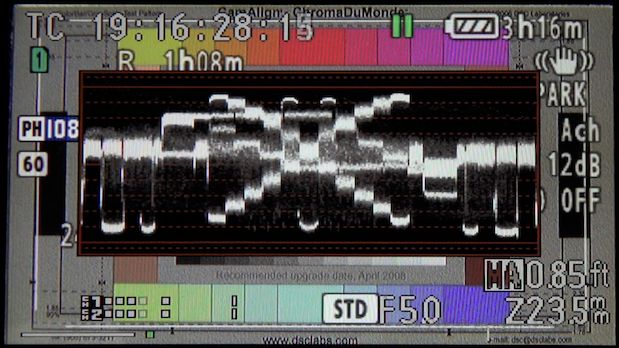
AC160 WFM. Note how it's layered atop all other display elements.
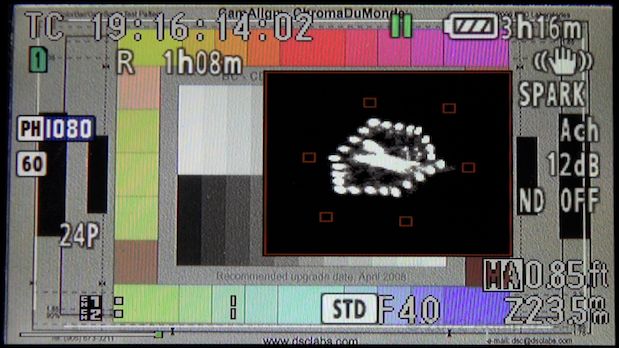
AC160 vectorscope display.
It's frustrating, especially while trying to set synchro-scan speeds to avoid flicker: flicker is most easily seen on the WFM, yet with the WFM displayed, you can't see what mode you've set for the shutter dial (and you have to select a mode, because—remember?—the dial auto-locks after ten seconds and has to be re-enabled). As a result, doing anything involving 'scopes on the 160 that also means changing a setting with a status message requires a frantic scramble to toggle the 'scope off, change a setting, and toggle the 'scope on again… and again and again and again, until you're done. If you're torn between these two cameras and you use the 'scopes a lot, this factor alone may push you towards the 250.
The 160 has one more trick up its sleeve, something the 250 lacks: a still-camera-style bar-graph exposure meter, called “iris meter”. It's lurking at the right side of the bottom of the screen: a small vertical bar indicating what the camera thinks is “proper” exposure, with shorter bars appearing to the left as the image is underexposed, and to the right as it's overexposed. Each short bar indicates a sixth of a stop, with an intervening space appearing for each stop over or under.
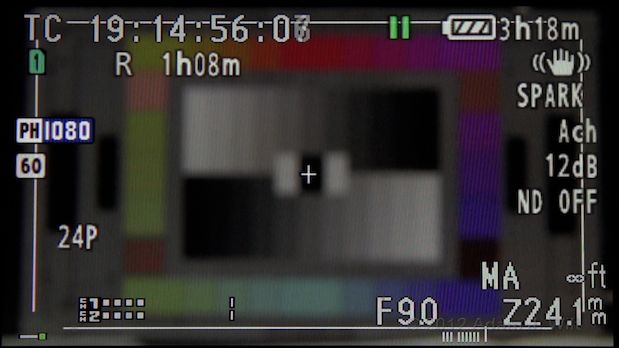
Iris meter at bottom right, just outside safe-action area. Here it indicates 1.5 stops underexposure.
In auto-iris AE adjustment mode, where turning the iris varies the level the camera considers to be proper, a small green tick mark drifts away from the “normal” bar to indicate the override.
Iris meter doesn't replace zebras or 'scopes, but it's a very handy reminder when you don't have those other aids displayed, and it's always unobtrusively there.
Audio Monitoring
The cameras both offer bar-graph audio meters in the lower left quadrant of the display. Tick marks show the -12dB level on the 160, and both the -20dB and -12dB levels on the 250, but you're left guessing where the 0dBfs level is until you hit it—a long-standing annoyance with Panasonic's metering.
The 250 offers an additional, pop-up meter spanning the lower third of the display. This meter shows decibel levels by number, just like a real level meter (grin), so it's immediately obvious what your headroom is and how close you are to exceeding it.
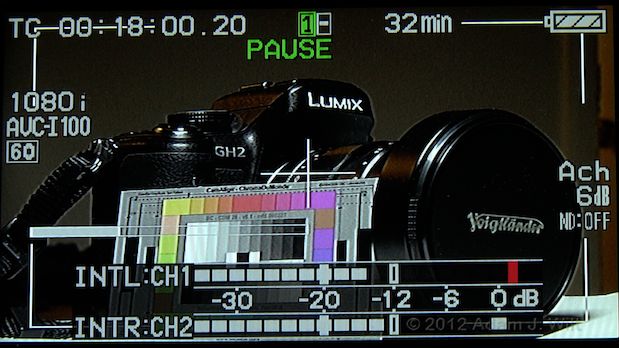
HPX250's enhanced audio level meters, just after hitting clipping on Ch. 1, and getting darned close on Ch. 2.
(Perhaps I protest too much: both cameras appear to have excellent peak-end limiters. I pegged the meters on several occasions, but the resulting tracks play back cleanly and pleasantly, with no audible evidence of abuse. Hitting the ceiling occasionally with these cameras isn't the disaster it can be on lesser devices.)
The cameras have very nice headphone outputs, too, with plenty of volume and low noise. With Sony MDR-7506 cans plugged in, I happily monitored audio with the 'phones level at about the 2/3 point.
Compositional Aids
The cameras default to showing a center marker and a 90% safe action area, as I show in my screenshots. Both can be turned off, and the safety marker can also be set for 4×3, 14:9, 1.85:1, 2:1, 2.35:1, or 2.39:1 in HD recording. In SD, the choices are 90%, or 4×3 (when shooting widescreen, of course).
The 250 also allows 13:9 and 14:9 SD widescreen markers, while the 160 adds a nine-line grid overlay in HD.
A single press of the DISP / MODE CHK button removes most of the data display from the picture, leaving only the timecode readout, the run/pause indication, and the safety zone.
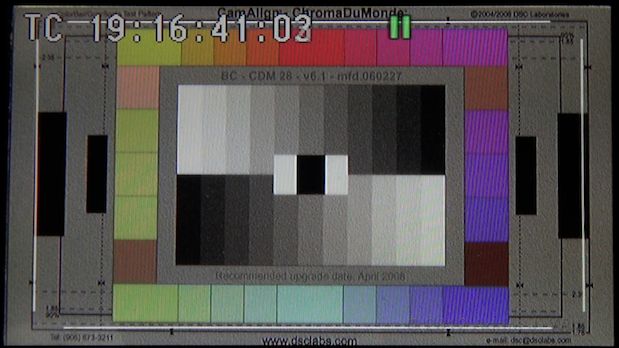
The 160's display, decluttered.
Lens Data
The cameras show iris setting with a resolution of 1/6 stop. They also let you display zoom and focus settings as arbitrary scales from 00 to 99, or as mm and feet (focal length and focal distance respectively), or as mm and meters, thus satisfying the metric and the imperial crowds as well as the old-school 00-99 folks. Panasonic warns that distance readouts are “not entirely accurate”; I didn't tape 'em out, but my review cameras seemed to be very close, judging by eye.
Other Stuff
The 250 shows a four-segment battery-level indicator, but no battery-life estimate. The 160 has the same four-segment display, but it reports estimated battery life in hours and minutes remaining (probably because the 160's conversation with its battery is more modern; the 250 and 160/130 use incompatible battery types. Indeed, I was able to power the 250 with the AC supply and adapter plate from my venerable DVX100, which predated the modern trend towards “talkative” battery connections).
The 250's menus will be instantly familiar to anyone using a DVX, HVX, or HPX-series Panasonic: columns of white text, green highlights for the current selection, and pop-up lists of settable parameters. For the most part, you can twiddle with the 250's menus while seeing the effect of the settings on the underlying picture, a helpful feature when shooting in the field without a separate monitor.
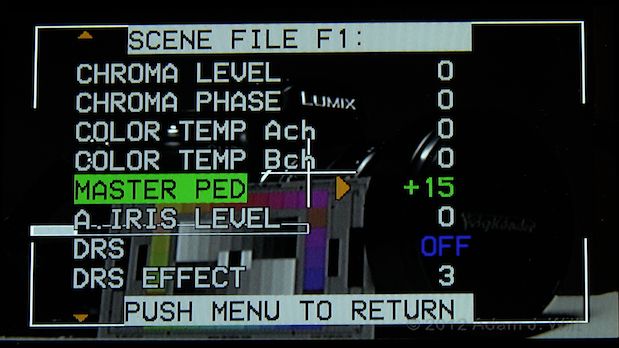
Scene file menu on the HPX250. DRS “OFF” is blue because DRS isn't available in this mode.
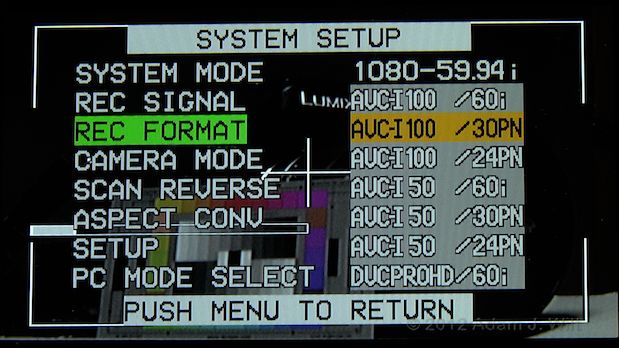
Choosing a record format in the 250's System Setup menu.
The 160's menus feature large, pretty boxes with gradient backgrounds, which unfortunately obscure the underlying image, so that seeing the effect of a menu setting requires a separate monitor, or repeated menu exit and re-entry. This odd design choice makes sense when you consider that these same menus are used on other AVCCAM camcorders, including touchscreen cams like the AG-HMC40, where the large boxes serve as touch targets. While the 160 lacks the corresponding touchscreen, the common menu design and layout across AVCCAM models makes it a lot easier to switch between 'em and find what you're looking for.
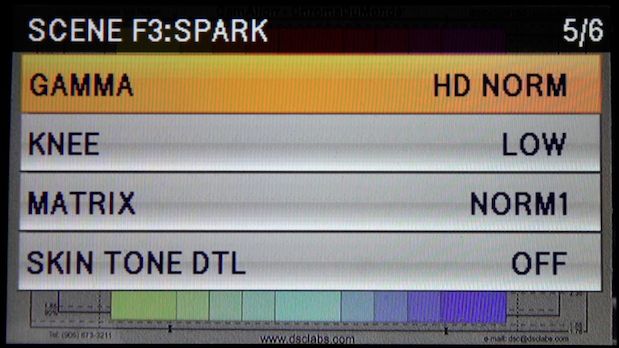
Scene File menu (page 5 of 6) on the AC160.
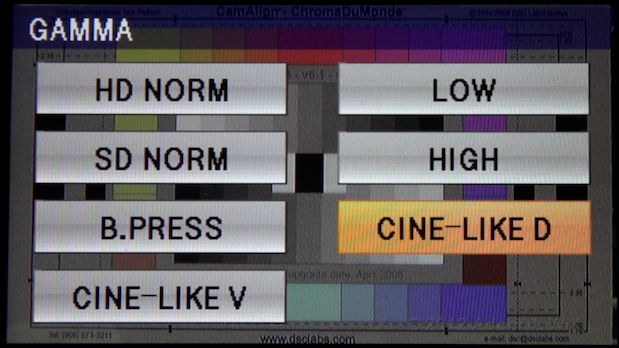
Selecting gamma in the AC160's Scene File menu.
It's interesting to note what happens when you hit the record button while a menu is displayed. The 250 drops the menu and goes right into record mode; it assumes that you hit record for a reason, and hastens to comply. The 160 ignores the button; it waits for you to purposefully exit the menu before it will allow anything as rash as recording! Neither philosophy of operation is necessarily better than the other, and each will have its adherents.
Recording
The HPX250 records AVC-Intra 100, AVC-Intra 50, DVCPRO, DVCPRO50, and DVCPRO HD on P2 cards. The AC160 writes AVCCAM (Panasonic's moniker for AVCHD) and DV to SDHC cards.
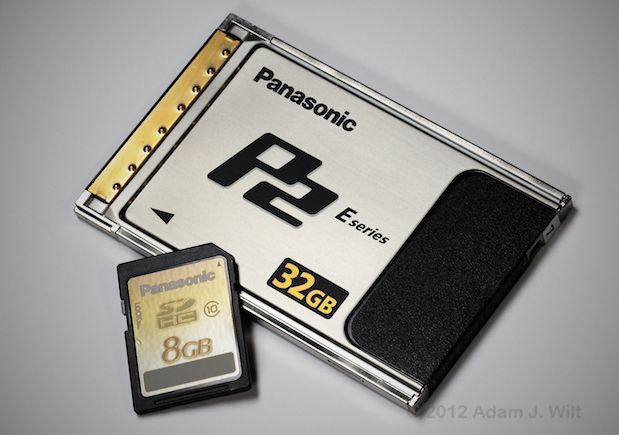
P2 cards, or SDHC cards? Pick your medium, pick your camcorder… or vice-versa.
A Panasonic 16 GB, Class 10, 25 MB/sec SDHC card costs $55 at B&H, while a Panasonic 16 GB, E-Series, 1.2Gbit/sec P2 card costs $400. However, AVC-Intra 100 takes roughly five times the space of best-quality AVCCAM, so you really need the $630 64 GB P2 card instead. On a dollar-per-minute basis, it's more than ten times the cost to shoot AVC-Intra as to shoot AVCCAM… right?
Wrong: this frequently-made cost comparison is only valid if you don't reuse your media. In my own operations I treat solid-state media as a capital cost, similar to a camera purchase, not as an operational cost like a tape cassette. When I buy a solid-state camera I also budget for media, typically a card for each slot, with perhaps a spare as well. Once purchased, the cards typically last as long as the cameras do, and cards can migrate from one camera to another as they go obsolete less quickly than cameras do. (News shooters and other intensive users may have a different calculus; they may wear out cards faster than cameras through heavy daily use, but even so, cards aren't consumed the same way tape is.)
Nitpick: Panasonic says the 64 GB card will hold 64 minutes of 100 Mbps AVC-Intra 100, while it only takes a 12 GB SDHC card to hold 65 minutes of 21 Mbps PH-mode AVCCAM footage, not a 16 GB card. However, Panasonic doesn't make 12 GB SDHC cards, and their 8 GB card costs the same as the 16 GB card at the time I'm writing this, so I'm using 16 GB cards as baselines for comparison.I'm using B&H's January 2012 prices as my reference simply because B&H carry both products and they have an easily-searchable website. This is not a sly attempt to promote B&H; I'm not getting any kickbacks for doing so, and my only material connection to 'em is as a satisfied customer.
Let's leave aside the somewhat-spurious cost issues and discuss the differences in the codecs and their image qualities.
The HXP250's highest-quality recording is AVC-Intra 100: a 100 Mbps, 10-bit, 4:2:2, full-raster intraframe codec using MPEG-4 AVC compression. It is arguably the cleanest, most artifact-free, least lossy in-camera recording available, short of HDCAM-SR and the higher-bitrate DNxHD and ProRes422 variants. Certainly in the handheld-camcorder market, there's nothing better. If you pixel-peep AVC-Intra 100 pictures, you will occasionally see mild compression artifacts, like minor mosquito noise around sharp edges in a busy scene; but in general AVC-Intra 100 is a robust acquisition format suitable for aggressive color grading, greenscreen, VFX, point-based motion tracking, and all manner of heavy manipulations. In addition, it's fully accepted as an origination codec by most major broadcasters / program distributors.
The 250 also captures in lesser formats: AVC-Intra 50 for DVCPRO HD quality at half the data rate; DVCPRO HD for FireWire transfer and backwards compatibility; DVCPRO25 and DVCPRO50 for SD workflows.
The AC160 captures in AVCHD: a long-GOP MPEG-4 AVC codec with 8 bits, 4:2:0 color sampling, and varying data rates and sampling rasters; the highest quality averages 21 Mbps (24 Mbps max) at 1920×1080 (1280×720 for 720p), with lesser quality modes at average bit rates of 17, 13, 8, and 6 Mbps (the latter recording a 1440×1080 raster). The 160 also records SD using the DV codec at 25 Mbps.
<rant>
It appears to be a requirement of the AVCHD consortium that each mode be given an arbitrary two-letter code; Panasonic uses PH, PM, HA, HG, and HE, while Sony calls their variants FX, FH, PS, HQ, and LP. It's impossible to puzzle these out by any sort of rational process; you must keep the manual handy, learn the codes by rote memorization… or simply remember that on a Panasonic, the good one is PH, and ignore all the rest!
</rant>
The high-quality mode (PH, remember?) is considerably better-looking than HDV, and almost on a par with XDCAM EX HQ. As a long-GOP codec, it's stressed not only by the complexity of a single frame, but by the differences between succeeding frames. On static shots, even the low-quality modes look quite good, but they rapidly fall to pieces once complex motion appears in a scene. The PH mode holds up very well under most conditions, though difficult images like dense foliage blowing in the wind can lead to some loss of fine detail and subtle gradations, and may cause some blocking to appear.
In general, images from the AC160 in PH mode look very good in normal playback, with compression artifacts only noticeable in complex scenes during freeze-frames or slo-mo. Even then, while pixel-peepers may see things to whinge about (typically a grainy noise-like degradation during fast motion, or subtle posterization and blocking in gentle gradients), most viewers won't notice any impairments. I would happily use the AC160's compressed images in applications that don't require extreme grading, high-end compositing, or point-based motion tracking. For those more demanding applications, of course, AVCHD—even at 21 Mbps—shows its limits. Yes, it can still be used, but expect to spend more time in post cleaning up or working around the limits of 8-bit, 4:2:0 images with heavy compression.
For what it's worth, many high-end distributors specify that the bulk of footage in submitted programs be captured at a minimum of 50 Mbps for long-GOP codecs, or 100 Mbps for intraframe codecs. The HPX250 can meet this requirement; the AC160 cannot, not without an external recorder (there are often other requirements, too, like a minimum sensor size of 1/2″ or 2/3″, but that's a topic for another time). Fortunately, both cameras offer a 4:2:2 signal on their HD-SDI ports (10-bit on the HPX250), so capturing high-quality material externally is easy.
Both cameras offer all the bells and whistles you'd expect from a dual-slot solid-state camera: pre-record, to capture material starting a few seconds before the record button is pressed; interval (time lapse) recording; variable frame rate recording; and relay recording to bounce between cards as they fill up, up to a total time of 12 hours (hot-swapping cards on the HPX250 as needed, or using two 64 GB cards on the AC160 and not physically swapping them out while recording; AVCCAM cameras don't support hot-swapping the way P2 cameras do).
The 250 also allow loop recording (once a card fills up, recording will loop around and record over the oldest material, continuing until manually stopped); one-shot (single frame) recording; and one-clip recording (multiple clips can be recorded in a single file, instead of each clip being its own file).
The 160 provides a simultaneous recording mode, letting you record to two cards in parallel—you can hand one card to the producer for review, while you keep the other one for post, or as a safety copy (producers have been known to lose, damage, or accidentally reformat cards; shocking, I know, but true).
The 160 limits interval recording to AVCHD mode only; you can't use it in DV modes (this is oddly backwards: DV is an intraframe codec, so it's naturally capable of recording individual frames, while AVCHD is long-GOP, requiring 12 or 15 frames to be captured before the entire Group Of Pictures is compressed and recorded as a single unit). When you shoot an interval clip that isn't a multiple of the GOP length, the camera will finish off the clip by repeating the final frame as needed to fill out the GOP; for example, if you grab eleven single frames in 1080p30, the final frame will be repeated four more times to give the codec fifteen frames to compress. The “extra” repeated frames can of course be trimmed off in post; it's just something to be aware of.
Both cameras include menu options to “repair” or “restore” clips damaged by power failures while recording or other such operational glitches. Having only ever had one such failure, three years ago on a single clip on an HVX200, I haven't had the need to put these functions to the test—and it didn't occur to me to eject a card or yank out the battery while recording, just for the pleasure of exploring clip restoring.
Next: Performance; In Use; Conclusions.
Performance
Optics
The lens is a capable performer with very few compromises.
It goes wide enough (28mm equivalent) that I never felt the need for a wide-angle adaptor; I was able to capture views of automobile drivers, from seatback to steering wheel, with the camera handheld in the passenger's seat. With a 22x zoom ratio, it has plenty of telephoto reach, too.
You'll see mild barrel (fisheye) distortion fully wide, changing to mild mustache distortion (barrel in center, pincushion at outer edges) from 10% to 35% of the zoom range, diminishing to essentially rectilinear at 65% onwards. In no case is the distortion troublesome; in normal shooting it's not even detectable unless you're focusing on architecture.
The maximum aperture ramps considerably, from f1.6 fully wide to f3.2 at 85% of the zoom range, roughly halfway between 27mm and 86mm—after which it seems to open up a bit, perhaps 1/4-1/3 stop. At that same point, evenness of illumination starts to fall off: from entirely flat at the wider end, to a gradual and even falloff of perhaps 1/2 a stop at the edges. It's not visible unless you're looking for it on a WFM. And of course, these are full-wide-open artifacts; if you're shooting at f4 to start with, neither ramping nor vignetting will be observable at all.
There's only a tiny touch of green/magenta chromatic aberration at full wide angle, and only if you're actively looking for it. These cameras use built-in chromatic aberration correction, and it works extremely well.
The lens is a varifocal, not a parfocal or “true” zoom; a servo system maintains focus while zooming. Switch off the zoom motor and snap-zoom quickly—half a second from end to end, or faster—and the focus will blur for a few frames before recovering, but normal-speed zooming is fine, with no focus drift or blurring observable.
Power zoom speeds range from about 3.5 seconds to 30 seconds. Given the extreme zoom range, that means that even the 30-second speed has a fairly hard bump starting and stopping; easing into a dead-slow zoom creep isn't something to count on. Having said that, I found the zoom rocker to be surprisingly controllable in real-world run'n'gun shooting, with eases in and out of normal zooms being both smooth and readily repeatable.
These cameras give you multiple choices for focusing:
• Full manual: you're in control. If you need cine-style repeatability from the servo-driven mechanism, you can use a mechanical follow-focus with hard stops, or the Bebob Foxi focus/iris remote control.
• Full auto: The camera drives focus, but you can always override it with the focus ring, alive and enabled at all times.
• Manual, with momentary auto: a short press of the PUSH AUTO button hands focus control to the camera, for as long (and only for as long) as you hold the button down.
• MF ASSIST: MF assist mode, settable in the menus, fine-tunes manual focus by using autofocus momentarily once you stop turning the focus ring to refine your setting. Once focused to the camera's satisfaction, MF ASSIST shuts off, leaving the focus fixed until you once again turn the ring. MF ASSIST only searches within a narrow range of positions, so it won't diverge suddenly from your desired focus zone; by the same token its fine-tuning requires you to get focus reasonably close in the first place.
I found MF ASSIST to be a mixed bag. Most of the time it works very well, but sometimes it may disagree with you on where focus should be set. At one point I was trying to focus on a particular detail of the body of another camera, but there was a shinier, more contrasty highlight on the camera's lens—I focused carefully on the camera body, then MF ASSIST just as carefully pulled focus back an inch or two to the shiny highlight, every time I tried the shot.
It's the same risk you run with full-time autofocus: are you and the AF system of the same opinion? If you find that you and your camera always agree, then MF ASSIST will be a valuable part of your arsenal; if you and your camera frequently “think different”, then full manual with the occasional tap on PUSH AUTO will likely suit you better.
Autofocus works well overall, though like all autofocus systems it's subject to “hunting” back and forth around a desired focus point. That hunting doesn't visibly affect the focal point, which remains crisp and clear. Instead, out-of-focus element in the scene can “breathe”, pulsating in their out-of-focusness at about a 1 Hz rate. It's not typically noticeable unless such elements are bright and contrasty, and again, it's an artifact of autofocus hunting common across many cameras.
The optical stabilization is on a par with that of other fixed-lens Panasonics: functional and helpful, if perhaps not quite as steadying as the similar stabilization in Sony and Canon handhelds.
Overall, I found this lens to be much less limiting than most built-in zooms: it goes wide enough, stays rectilinear enough, and maintains an evenness of illumination, such that I never felt that I needed to avoid any part of the zoom range, nor did I ever wish I had supplementary lenses.
Resolution and Detail
The cameras use three 1/3″ MOS sensors with 1920×1080 active photosites. They resolve 1000+ TVl/ph, and have balanced H and V resolutions. These are no-nonsense, no-excuses, full-resolution HD camcorders.
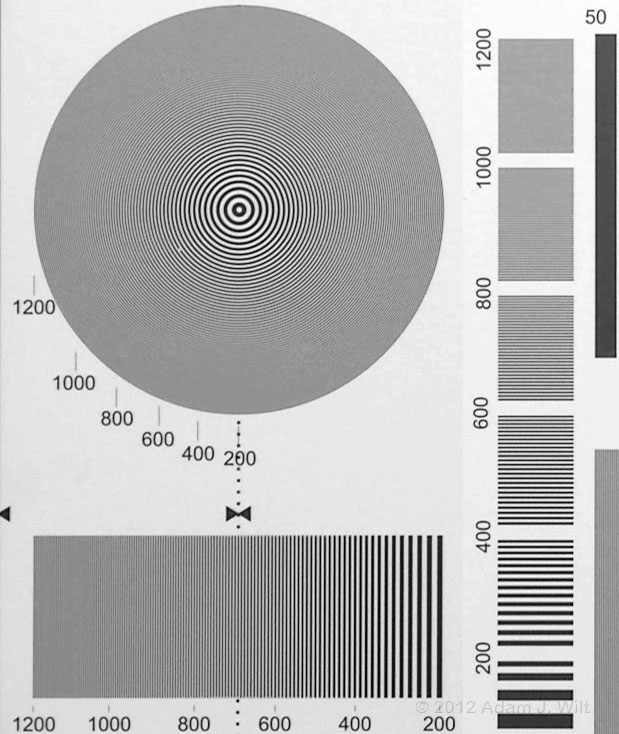
Pixel-for-pixel sample from the HPX250, AVC-Intra 100. (Left half of chart used, as right half was slightly out of focus!)
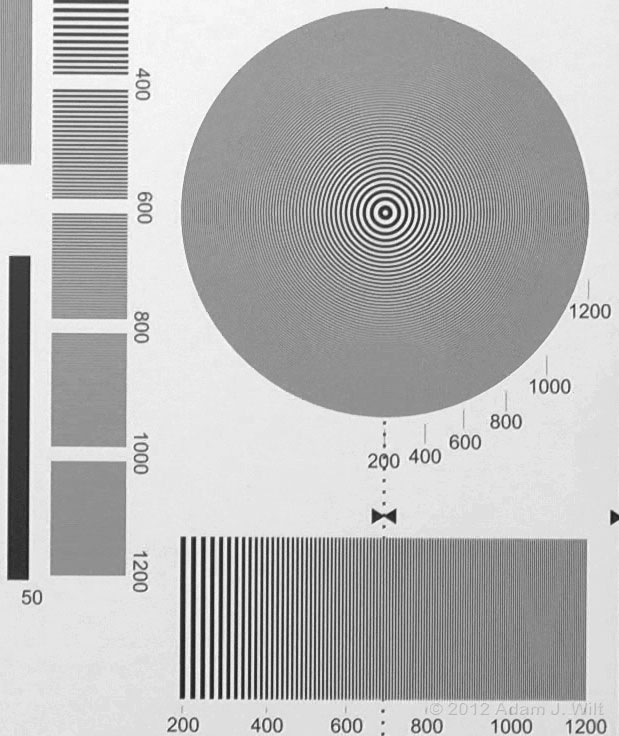
Pixel-for-pixel resolution sample, AC160, PH1080/24p recording.
Charts from the two cameras look slightly different: I had the 250 level with the chart, but the 160 was slightly tilted, which may be a factor in the differing appearance of the high-frequency gratings. They also appear to differ in their sharpening processes; both cameras were at default detail settings when I shot the charts.
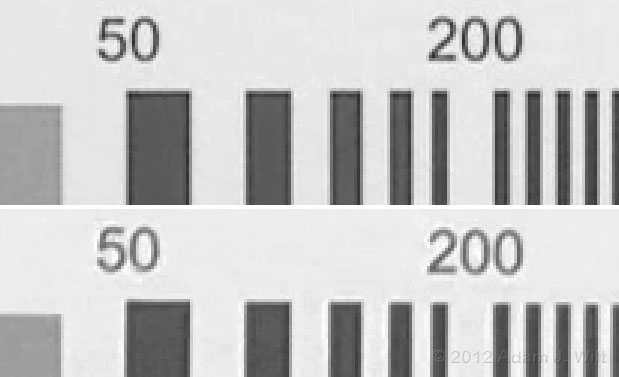
Differing detail: 250 above, 160 below. The 250's enhancement seems to prefer darker edging than the 160 does, yet the 160 seems to be more “enhanced” overall. These 3x-magnified excerpts are taken from the same still frames as the 1:1 chart extracts above.
On the 160, detail at -7 appears to be fully off while detail +7 is rather edgy. Detail -7 on the 250 seemed generally comparable to detail 0 on the 160; I was never able to fully remove detail from the 250. Yet the detail rendering is rather different between the two cameras; the 160 appears to sharpen mid-to-high frequencies a bit more aggressively than the 250 does for any given setting.
Practically speaking, this winds up being one of those number-of-angels-dancing-on-the-head-of-a-pin distinctions. With the cameras at comparable detail-level settings, I wasn't able to discern any any obvious difference in detail rendering between the two cameras when shooting real-world scenes.
In any event, I frequently found myself stopping playback of real-world 160 footage and marveling at the sharpness, resolution, and naturalness of the rendering; there wasn't a trace of the jaggedness, “screen-door” rendering, moir©, aliasing, or other artifacts of lesser 1/3″ camcorders. As far as spatial rendering is concerned, I'd happily intercut footage from either of these cameras with clips from full-HD 1/2″ and 2/3″ camcorders; it's that crisp, clear, and clean.
Across the different recording formats available, test charts from these cameras look pretty much like the test charts from the AG-HPX370, with the main differences being a more rectilinear rendering (the 22x lens on these camcorders showed less distortion than the 17x on the 370) and less green/magenta aliasing on the downsampled SD pix, which I attribute to less chromatic aberration from the 22x lens (Panasonic's C.A.C. only corrects aberrations horizontally, leaving any vertical chromatic aberration free to make mischief with test-chart downsampling).
One aspect of shooting HD with 1/3″ sensors is that, for optimal results, you need to keep the iris at or wider than f/4, maybe f/4.8. At smaller apertures, diffraction sets in and robs you of resolution, softening the image (see the pix in the 370 review for graphic examples). The four-position ND switch on these cameras makes it easy to ensure a wide aperture in almost any situation, though a bright day on snow or in the desert might require adding more ND filters in front of the lens.
However, Panasonic has not seen fit to provide a menu setting limiting how small an aperture auto-iris can set, so you'll want to be actively monitoring the iris setting to ensure sharp imaging even when the camera is calling the shots. Many Sonys, by comparison, offer a minimum-auto-iris setting, and they'll use gain and/or shutter speed to compensate as needed when the light gets too bright—or they'll let the image get overexposed. It's just something to be aware of if you value your fine detail.
Sensitivity and Noise
The 250, like the 370 before it, touts “P.A.P. (Progressive Advanced Processing), a 3D adaptive processing technology.” The camera offers two modes: P.A.P. 1 with full, temporally-recursive noise reduction; and P.A.P. 2, which uses less (if any) interframe data.
P.A.P. 1 offers a stop more sensitivity in progressive shooting than would otherwise be available, but at the expense of some motion trailing in shadow areas, occasionally visible in low-key scenes. It's similar in appearance to the “lagging shadows” sometimes visible with noise reduction in some LCD monitors or DVD players.
I was able to see the lagging shadows in a few very dark shots using P.A.P 1, though normally it wasn't an issue. Shooting P.A.P 2, I never saw the problem, nor did the 160 ever show it (not surprising, as the 160 does not use P.A.P.).
I rate the 250 (in P.A.P 2) and the 160 at ISO 400. With P.A.P 1, the 250 jumps to ISO 800. That's in progressive modes; shooting interlace, the 250 seemed to be 1/3 stop (P.A.P 1) or 2/3 stop (P.A.P. 2) more sensitive, while the 160's sensitivity didn't change at all. Normally, you'd expect interlace to have twice the sensitivity of progressive (usually, two scanlines are read out in parallel in interlaced, and combined; this is done to reduce interfield twitter, and has the side effect of doubling sensitivity). The sensitivity changes on the 250 imply that P.A.P. is definitely boosting progressive ISOs, but the lack of change on the 160 is puzzling. Perhaps the 160 is always scanning in progressive, and interlacing later on in its processing chain? In any event, it's clear evidence that the 160 and 250 take different approaches to image processing.
Both cameras offer gain settings from 0dB to 18dB in 3dB steps, settable on the three-position gain switch, as well as 24dB and 30dB “super gains” available on a user-assignable pushbutton. Image noise is just barely visible at 0dB; getting a perfectly clean 1920×1080 image out of 1/3″ chips is still beyond the bounds of practicality—but these Panasonics are as clean as any other 1/3″ camera I've seen with comparable resolution. As gain is boosted, noise increases too (see the HPX370's gain-boost pix), but it maintains an isomorphic, film-grain-like appearance at all times. I avoided gain on older Panasonics because I found their noise unappealing, yet with the 160 I often found myself shooting at +6dB or +12dB and being perfectly happy with the way the images looked.
CMOS Artifacts
The sensors use rolling shutter readouts, and I measured frame-readout time as about 1/60 sec from top to bottom in both cameras, comparable to the HPX370 or the Sony PMW-EX1. Yes, there's jellocam: worse than on a RED or an Alexa (cameras costing much more, of course), but better than on the HPX300, Canon DSLRs, GoPros, and freakin' iPhones—often way better. Some degree of jellocam is the price we currently pay for high-resolution, low-noise sensors in such small sizes.
On the flip side, the 3-MOS sensors don't show any of the vertical smear on bright highlights that CCD sensors suffer from.
Tonal Scale, Gammas, and Knees
These cameras offer the same gamma presets as other Panasonics, with several “standard” gammas and two “cine” gammas with lower midtones.
• HD Norm, the default gamma for HD shooting.
• Low, a similar gamma with slightly darker midtones.
• SD Norm, the default for standard-def, carried over from the original DVX100.
• High, curve with slightly brighter midtones than HD Norm.
• B. Press, like Low but with shadows crushed a bit more.
• Cine-Like D, a flatter, darker curve optimized for dynamic range.
• Cine-Like V, like D, but with somewhat snappier midtones and more of an S-curve in the shadows and highlights.
All the gammas have knees, and as on the 370, the 250 and 160 knees have an S-curve-like compression profile with a less pronounced inflection point than traditional knees have. The result is a smoother transition from the normal part of the tonal scale into the compressed highlights, as well as a softer highlight clip.
It's not a log, cinegamma, or hypergamma curve, but it's not as harsh as the typical video knee is; it's more of a compromise setting between the two. It's a bit more clippy that Sony's cinegamma and hypergamma curves, but it retains chroma saturation well up into the highlights, which many folks find to be a desirable tradeoff. As on the 370, this S-curved knee reduces the abrupt hue shifts in the affected highlights, and overexposed skintones are equally smoothly handled in all gamma curves.
In auto mode, the camera sets the knee point; you can also select Low, Mid, or High knees, which kick in at 80%, 90%, and 100% respectively (except in the 160's cine-like gammas, which do not offer manual knee control).
While the ultimate clipping point seemed fairly consistent across the gammas, the cine-like gammas appeared to hold usable detail in the highlights about half a stop longer than the normal gammas. Additionally, the 250's option of a Low manual knee in cine-like gammas let me capture another half stop of highlight detail on my Stouffer density-wedge test target.
Yes, that's a bit hand-wavy. Unfortunately, I had uneven illumination when shooting the Stouffer wedge, which I didn't discover until after I had returned the cameras to Panasonic, so I can't quote hard numbers for latitude, highlight headroom, and the like. I was able to eke out ten stops from the 370; the 250 has the same sensors and processing as the 370, so we can infer that the 250 most likely has the same latitude. The 160 looked very comparable in my side-by-side tests, though its lack of a manual knee in cine gammas (possibly due to that camera's 18-bit processing, compared to 20-bit for the 250) may cost it half a stop overall—still very respectable for a 1/3″ camcorder.
If you need more latitude still, both cameras offer three levels of Dynamic Range Stretch. Like the Shadows & Highlights adjustments in Photoshop or Aperture, DRS uses local contrast adjustment to bring up shadows and hold down highlights. Overdone, DRS can show diffuse dark halos around bright objects and light halos around dark ones; it's a powerful tool but one requiring discretion in its application (Panasonic warns that unless you have a scene with strong contrast and deep blacks, DRS may introduce noise into unnecessarily-lifted shadows).
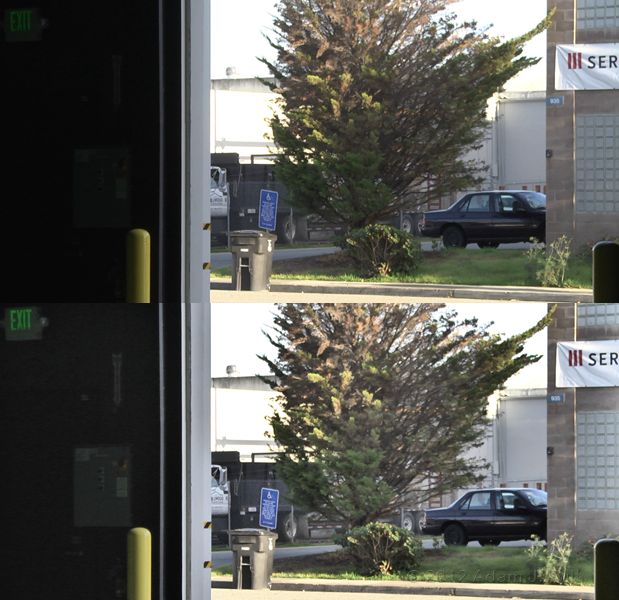
DRS off (top), DRS on at level 3 (bottom).
DRS is unavailable in 1080p modes on the 250, though it's there on the 160.
Color Reproduction
Panasonic's famous four color matrices are present on both cameras:
• Norm 1, the default color matrix.
• Norm 2, a slightly more saturated look.
• Fluo, which boosts reds for shooting under fluorescent lights.
• Cine-like, stronger saturation, suitable for the darker images of cine-like gammas.
Not to beat a dead horse, but again I refer you to the HPX370 review for visual comparisons.
Additionally you have control over global saturation, phase, color temperature (warmer or cooler, with separate tweaks for white balance A and white balance B), and pedestal.
Panasonics tend towards neutral, natural, pleasing colors overall, and these cameras follow in that tradition. When I play back clips I've shot with these cameras, the playback has the same colors I saw in the scene. Really, is there any higher praise for a camera's color rendering?
If there's anything to complain about with Panasonic colorimetry, it's that overexposed highlights hold a bit too much saturation for my tastes—though the soft knee of this generation of cameras makes the effect less troublesome than on older Panasonics (and bear in mind that I'm a fan of Sony's cinegammas, which aggressively roll off saturation in highlights, so you may well find my kvetching to be overwrought).
Audio
The 250 captures four channels of 48 kHz, 16-bit, uncompressed audio, two from the built-in mikes, and two from the XLRs. The two inputs you select with the on-camera controls go to channels 1 and 2; the remaining two go to channels 3 and 4 using AGC. It's a handy thing to have when you're using the XLRs; the built-in mikes provide “scratch tracks” on 3 and 4, and provide handy backups in case your offboard mike batteries die, or your wireless mikes take an RF hit or a cellphone squitter, or a cable comes unplugged, or any of the other misfortunes possible with location audio.
The 160 captures two channels as Dolby digital compressed or as LPCM uncompressed, both with 48 kHz sampling and 16 bits of depth.
I recorded long stretches of dialog and rang cowbells in a quiet room while recording both kinds of audio on the 160. Listening to playback with Sony MDR-F1 'phones, I'm hard-pressed to hear the difference between 'em. It may be the case that the PCM tracks are a bit more “spacious” and “open”, or it may be the case that I'm hearing what I expect to hear because I know which tracks are which. In any event, the difference (if any) is small, and I wouldn't hesitate to use the Dolby Digital tracks in real-world productions if I had no other choice.
The built-in mikes do a good job, with relatively little handling noise coming through except in quiet passages. Power zooms at top speed were faintly audible, while slower zooms weren't noticeable unless I listened for them.
Panasonic's audio quality has been a strong point since the days of the DVX100. Tracks are clean and quiet, and the camera's peak-end limiters are very good, compressing overly-loud transients without obvious distortion. I'd have no qualms about recording production audio on either of these cameras.
Monitoring, Playback, and Offloading
Both cameras offer HDMI, HD-SDI, and composite video outputs. The HDMI and SDI outputs can be set for HD or for downconverted SD playback, with the SD output letterboxed, center-cut, or anamorphically squeezed.
Both cameras share the peculiarity that enabling SDI prevents the EVF from being used when the LCD is open. With SDI on, you can only use the EVF with the LCD closed, even if you've set the EVF to be always on.
The two cameras allow live output and playback on their 1394 (FireWire) ports when a DV format is selected (standard-def on both cameras, and DVCPRO HD on the 250 only). AVC-Intra and AVCHD are not supported on 1394.
Both cameras offer thumbnail displays of images with detailed metadata screens and various manipulation options. Normal and high-speed playback are possible, as is single-frame advancing (and reversing on the 250; due to the long-GOP nature of AVCHD, the 160 can only go backwards in half-second increments).
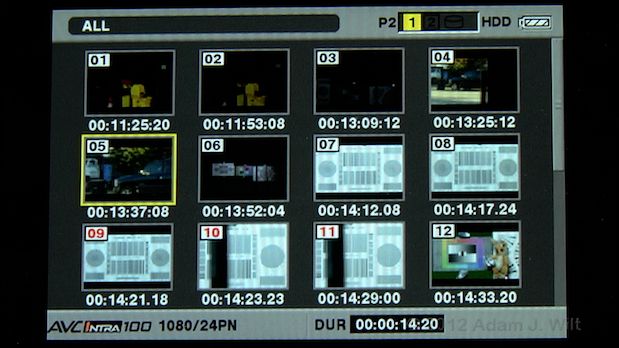
Clip thumbnails on the HPX250.
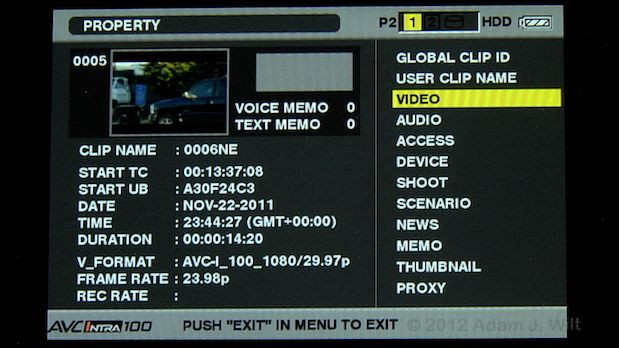
Clip properties as shown on the HPX250.
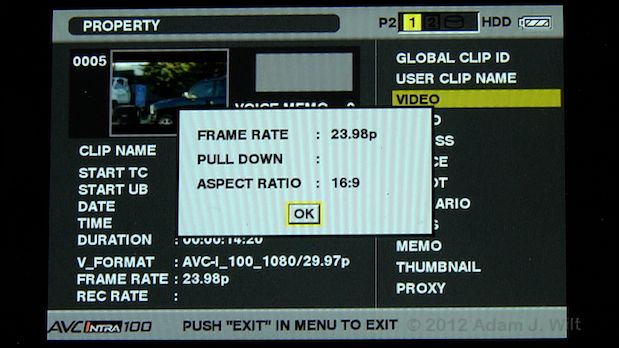
Each item in the right-hand column has its own metadata popup.
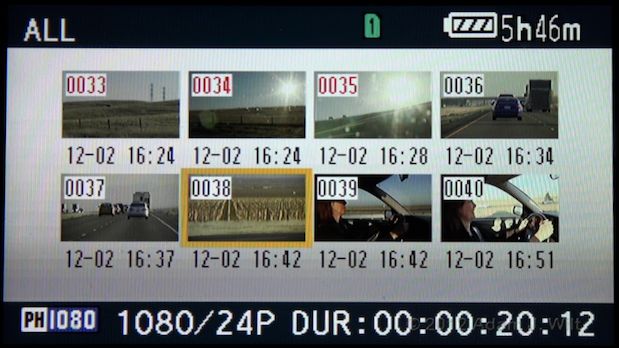
Clip thumbnails as shown on the 160.
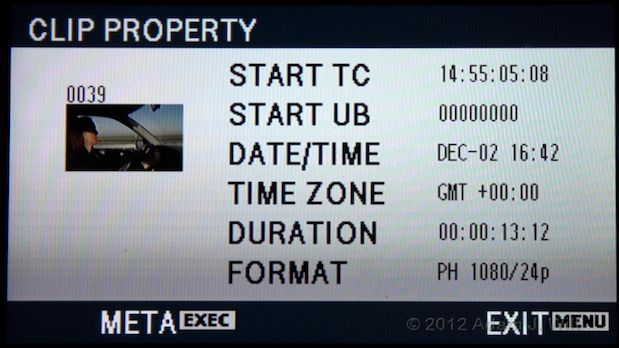
Clip properties for an AC160 clip.
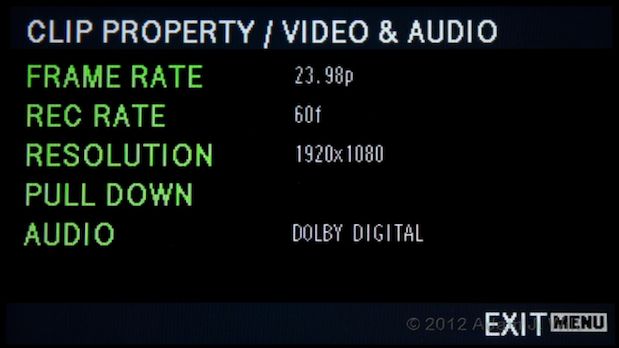
One of several pages of metadata for an AC160 clip.
Connecting the cameras as USB devices lets their cards mount on the computer as standard storage devices, so you can copy their files off or ingest their clips in your favorite NLE. The 160 switches to “PC mode” as soon as it's connected to a computer, whereas the 250 waits until you manually switch into PC mode (and it has a separate LED for that state on its handgrip, as we saw above).
In my tests, both Final Cut Pro 7 and Adobe Premiere Pro CS5.5 saw the clips from either camera and imported them with ease.
The 250 also has a USB host port, letting you connect a USB drive or Panasonic's P2 STORE unit directly to the camera and offload P2 cards to individual partitions on the storage device, with no computer needed.
The 160's SDHC cards can be slotted into any Mac or PC SDHC card reader and downloaded directly. The 250's P2 cards require a P2 card reader or a PCCard (PCMCIA) slot; if the latter, you'll need Panasonic's P2 card device driver for Mac or Windows, freely downloadable from Panasonic's support site.
Other Features
Variable Frame Rates – Both cameras offer VFR recording. The 250 offers 17 steps of VFR from 1-30 fps in 1080p, and 25 steps from 1-60 fps in 720p. The 160 provides 22 steps from 2-60 fps in 1080p—it's the first affordable camera I'm aware of offering full-res 1080p 60 fps slo-mo—but doesn't allow VFR in 720p. Available frame rates are typically 2 to 6 fps apart: 1,2,4,6,9…,48,54,60 fps on the 250, and 2,6,9,12,…,48,54,60 fps on the 160.
In 50Hz mode, the maximum frame rate is 50 fps instead 60 fps (on the 250, 1080p's max rate drops from 30 to 25 fps).
Scene Files – these cameras put their imaging tweaks, including frame rates, gammas, pedestal, color controls, detail, and the like, in Scene Files. Six scene files are selectable using a rotary dial, making it easy to define several presets and switch between 'em at a moment's notice. Scene files can be saved to SD cards, too, for backup and for transfer between cameras.
Digital Zoom – the cameras offer 2x, 5x, and 10x digital zoom, assignable to a user button. They look as good as any digital zoom does.
Flash Band Compensation – The 250 (but not the 160) is able to detect a flash going off in the picture, and stitch together the parts of the two flashed frames (or fields) into a coherent whole, compensating for the half-on/half-off split frames caused by rolling shutter capture. I discuss FBC in detail in that danged 370 review.
Area Tracking – The 160 steals a play from the still-camera playbook, letting you position a target area onscreen and monitor the contents thereof, using it for focus (either autofocus, or just setting the active area for the focus bar readout), auto-iris, Y GET (spot meter reading), focus and iris together, or focus and Y GET together. It's just like moving the focus/metering point in the viewfinder of a DSLR. You use the FUNCTION joystick below the LCD to position the target, and click the joystick in to set it. It's very useful when your subject is framed off-center, and the programmability of the control—it can drive focus and/or iris directly, or just display focus and exposure data for you to track manually—gives it great versatility.
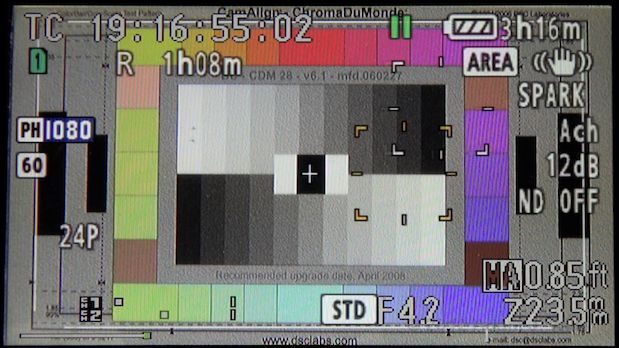
AREA mode on the 160. The yellow target is the currently-measured area, while the white target to its upper right is the shows the currently-selected area. Pressing the joystick in will start measuring the selected area.
Face Detect – The 160 pushes the envelope even farther with automatic face tracking. If the camera detects a face, it'll set exposure and focus on that face, and follow the face around the frame.
It works quite well as long as you understand its limitations. Contrasty faces are easily seen, but those with less-defined details, like that of a white-haired old lady with silver-rimmed glasses, need to fill more of the screen before the camera will detect them. As long as the camera sees a face, it holds focus and exposure consistently, but if that face turns away, or gets too small, or gets too close to the edge of the picture, the camera falls back on its normal focus/exposure modes, and you may see the exposure pump up or down as a result.
Detail Settings – both cameras give you control over the detail level, a separate vertical detail level, and “skin detail” to remove added sharpening on skin tones.
Genlock and Sync – The 250 offers full genlock and timecode sync capabilities, making it a natural for frame-locked multicam shoots. The 160 lets you jam-sync timecode, but it doesn't offer genlock synchronization.
Power and Charging – Both cameras run for well over three hours on their stock batteries, and both come supplied with AC adapters.
Battery chargers for the AC160 and the HPX250.
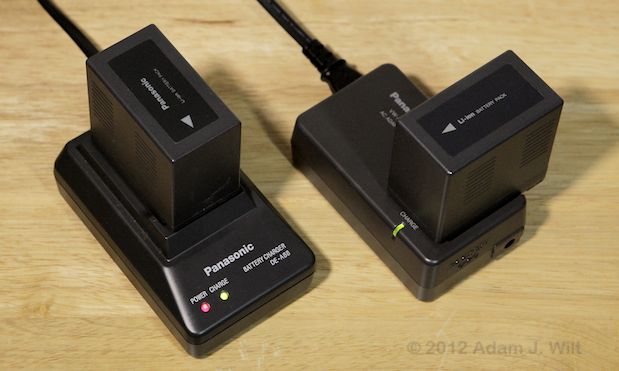
HPX250 battery and charger, left; AC160 battery and charger, right.
The AC160 uses a stylish charger that doubles as an AC adapter, using a battery eliminator that plugs into the camera where the battery normally resides.
The HPX250 uses the same style of charger that other DVX/HVX/HPX cameras do, but unusually for this camera family, it doesn't serve as the AC adapter. The 250 ships with a separate adapter, one that also uses a battery eliminator—but with a cable that's not quite long enough to let the adapter brick rest on the floor when the camera is five feet up on a tripod!
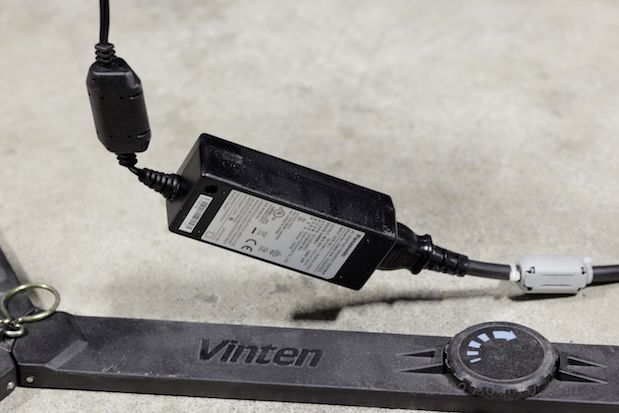
The HPX250's AC supply, left hanging by its too-short cord.
It's a silly mistake; you'd think that an AC supply's battery eliminator cable would be designed specifically for tripod-mounted usage, but it looks like nobody actually tested such a setup before committing to a production run.
Having a separate charger and AC adapter does mean that you can charge the 250's battery while simultaneously running the camera on wall power.
What about the AC130?
The AC130 is a “de-featured” version of the AC160, lacking the following:
• 50Hz/60Hz switchability: you can get a 60Hz model or a 50Hz model, but you can't switch standards on the 130 as you can on the 160.
• Linear PCM audio: the 130 only records Dolby digital compressed audio.
• VFR: the 130 doesn't offer variable frame rate recording.
• SDI: the 130 doesn't have an SDI terminal, only composite and HDMI.
On the flip side, it's $900 less expensive, or about 20% cheaper. If you don't need “worldcam” flexibility, SDI, LPCM, or VFR, why pay for them? Alternatively, the 130 makes a great “B camera” for a 160, with the same basic performance, same media, and same interface.
In Use
I admit to a certain jaded resignation when Panasonic sent me these cameras: I expected them to perform well technically, but I'm not a fan of the “handycam” design for big cameras. Once cameras get past a certain size, weight, and side-heaviness, they cease to be comfortably handholdable, and the whole raison d'être for the form factor disappears. For me, that size, weight, and imbalance limit is typified by Panasonic's original DVX100.
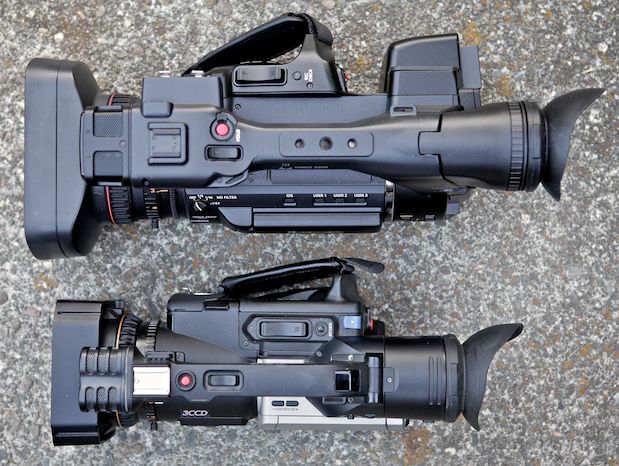
A DVX100 alongside an HPX250.
While riding in a car with the AC160, I photographed other cars at full telephoto (a good test of the optical image stabilization), the driver of the car I was riding in (a great test of wide-angle capability) and all manner of roadside scenes. The camera was indeed big and bulky; aiming it towards the driver meant that it spanned half the passenger's seat.
Yet I found it unusually well-balanced despite its bulk: that laterally-offset battery compartment moves the center of gravity closer to the handgrip, so there's less off-center weight rolling the camera off to the left. Longitudinally the camera is perfectly balanced, and the handgrip's contours afford a stable and reasonably comfortable grip.
As we drove through sun and shadow, exposure changed dramatically. The four-position rotary ND switch made it trivially easy to select exactly the right ND filter to keep the iris in its sweet spot, with no false moves, fumbling, or mistakes—something no other camera has ever allowed me to do. I started to regard this camera with more respect.
I used the camera in a run'n'gun style, handholding for long periods. Run'n'gun is a demanding test of a camera's operation, as you have to react to changing situations in real time, without rehearsal and without the luxury of poking around in the manual. I fully expected to be annoyed with the AC160 after five minutes or so, with its considerable weight fatiguing my wrist and its various buttons and dials frustrating rather than facilitating the smooth execution of my shots.
It didn't work out that way. The weight, while noticeable, was well-enough balanced that it didn't become an issue. Much of the fatigue I feel in long handheld operations is due not so much to the weight itself, but to its (often poor) distribution. With the camera's center of gravity so close to my wrist, thanks to the offset battery well and the curvature of the handgrip, there wasn't a lot of torque required to hold the camera straight and level. The resulting reduction in tension was dramatic; I didn't need to use the “death grip” I usually employ with large handhelds.
And the controls? When flying small aircraft, the ideal condition is one in which the controls are said to be “well harmonized”: it takes the same amount of perceived effort to deflect the plane in pitch, roll, or yaw. When driving a car, you similarly want all the control forces to be Just So: pedal pressures should be light enough that you're not tired from mashing down the accelerator, yet heavy enough that you're not straining to keep your foot from mashing it down too far; the steering should be effortless and responsive, but not so sensitive that the car skitters across the road at the merest touch of the wheel.
The AC160 is like that: every important control requires just the right amount of force. The lens rings are light enough that they're easily and smoothly moved without disturbing the aim of the camera, yet they're stiff enough that they aren't inadvertently moved should your fingers brush them lightly (and they're all readily distinguishable by feel, too). Important buttons are easily findable by touch, and firm enough that you won't trigger them by accident, yet you can activate them with a gentle pressure.
I've already praised the four-way ND selector; let me praise it again for the sureness of its feel, the ease of its operation, and the security of its click-stops.
Panasonic has finally fine-tuned their four-way joysticks so that they offer precisely the right resistance in each dimension: I was able to make up/down/left/right selections without false moves and without accidental center-pushes, and at the same time I made center-pushes without inadvertent up/down/left/right moves.
The zoom rocker had just the right resistance, range of travel, and repeatability that the zoom lens did precisely what I expected it to do.
Little things, all of them, and yet they add up to a Big Thing: not once in my shooting did I fumble for a control, push the wrong button, bump the wrong lens ring, or grumble at something for preventing me from doing exactly what I wanted to, when I wanted to do it (aside from that danged self-locking shutter dial, that is).
Part of it is the harmonization of the controls, part of it is the stress reduction of holding a well-balanced camera, and part of it is the versatility and capability of the camera itself: its wide and entirely usable zoom range, good low-light capability, helpful OIS, and informative viewfinder displays. I spent less time fighting with the camera to work around weaknesses and balky controls, and more time just shooting. Any time a camera stays out of your way and lets you focus on image-making, that's a Good Thing. That these cameras record such technically excellent images only makes them more attractive.
Yes, I would have liked an EVF with higher magnification, and I had to play hide-and-seek with DIAL SEL status messages hidden by the WFM. These cameras aren't perfect, but they're the most user-friendly handycams I've seen so far.
Conclusion
The HPX250, AC160, and AC130 are 1/3″ 3-chip handhelds that deliver excellent, no-excuses image quality, combined with surprising usability and operator friendliness.
All these cameras combine true 1920×1080 sensors with a very good 22x zoom, providing crisp and clean pictures over a range of focal lengths from a satisfyingly wide angle through an ample telephoto. Aside from a two-stop light loss at the telephoto end, the lens does nothing to discourage you from exploiting its full range: sharpness, distortion, color fringing, and evenness of illumination are well-controlled throughout. Audio quality is also very good, with clean recordings and excellent peak limiters.
The 250 captures clips in 10-bit, 4:2:2 AVC-Intra, or the entire range of SD and HD DVCPRO formats. It records on P2 cards, known for ruggedness and reliability.
The 130 and 160 capture 8-bit, 4:2:0 AVCHD (and standard-def DV) to SDHC cards instead (for those worried about SDHC reliability, these cameras let you record to both cards at once).
The 250 and 160 offer “worldcam” flexibility and variable frame rates. The 160 is notable for providing VFR in 1080p all the way out to 60fps.
If you don't need worldcam flexibility, LPCM audio, or VFR, the 130 gives you the same image quality, lens, and operational controls as the 160 does, for $900 less.
There's rolling-shutter “jellocam”, and you have to avoid apertures smaller than f/4 for best sharpness, but the former is the current tradeoff for affordable, low-power, full-res MOS sensors, while the latter is an unavoidable consequence of shooting full HD with 1/3″ chips. From an image quality standpoint, these cameras are at the top of the 1/3″ class.
Yes, they're big; yes, they're bulky. Yet they're surprisingly comfortable to handhold and to operate, thanks to a balanced layout and operator-friendly controls.
These cameras combine excellent image quality, versatility, and superb usability. They should be on the short list for anyone looking for affordable handheld camcorders.
Pros
• True 1920×1080 sensors; crisp and clean HD images.
• Excellent 22x zoom with a wide-enough wide angle.
• 1080i, 1080p, 720p, and standard-def recording.
• AVC-Intra recording (250 only).
• Variable frame rates (160, 250) including 1080p60 (160 only).
• Worldcam 50Hz/60Hz switchability (160, 250).
• Panasonic's natural colors and soft knee.
• Good sensitivity; film-grain-like noise at high ISOs.
• Nicely balanced; easier to handhold than they should be for their size.
• Well-harmonized control layout, textures, and forces.
• Best ND selector control ever.
• 1/4″ and 3/8″ tripod and accessory sockets.
• Good selection of viewfinder readouts and data displays.
• Focus bar; EVF peaking (250); EVF DTL plus focus-in-red (130, 160).
• Area Tracking and Face Detect (130, 160).
• Full 10-bit output on SDI (250).
• Six-pin 1394 / FireWire port for DV-format connections.
• Full genlock and timecode sync (250).
Cons
• Small EVF image.
• Status messages hidden behind WFM / Vectorscope (130, 160).
• Focus Assist magnification not available while recording (250).
• Shutter dial self-locks after 10 seconds.
• EVF tends to flip closed if any pressure is put on it.
• EVF Peaking controls buried in menus (250).
• Battery eliminator cable too short (250).
Cautions
• MOS sensors with 1/60 sec rolling shutter.
• 160: VFR only in 1080p, not 720p.
• Image tweaks are more limited than on higher-end cameras.
• Although they handle well, these are still big, bulky handheld cameras.
• For best sharpness, iris needs to be kept at f/4 or wider.
• No SDI, only HDMI (130).
• No genlock (130, 160).
• Free-spinning servo focus and iris rings require third-party remote control for consistent, repeatable control.
More Info
Panasonic Global's HPX250 info.
Panasonic USA's HPX250 page.
PDFs of the HPX250 manuals (European version).
An AG-HPX250 FAQ by Panasonic Japan.
Video: Panasonic's Steve Cooperman discusses the HPX-250.
Panasonic Global's AC130 / AC160 info.
Panasonic USA's AC160 page, with PDFs of the operating manuals.
Panasonic USA's AC130, with PDFs of the operating manuals.
Interesting commentary, including a tip on using PUSH AUTO while in autofocus for faster focusing, which I didn't try because I had sent the cameras back before I read it!
P2 utility software downloads.
AVCCAM utility software downloads.
The Bebob Foxi is an affordable, repeatable cine-style follow-focus and iris control for all Panasonics with a focus/iris port. Bebob also makes the Zoe zoom controller.
Varizoom makes video-style remote focus/iris/zoom controllers for Panasonics.
Disclosure: Panasonic sent me an HPX250 and an AC160 for review, and I returned them to Panasonic at my own expense.A tip of the hat to Jeff Regan at Shooting Star Video for the loan of two P2 cards, without which I wouldn't have been able to record anything from the 250.
I purchased SHDC cards for the 160 with my own funds; they're being repurposed in other cameras.
No material connection exists between me and Panasonic, Bebob, Varizoom, Shooting Star Video, or B&H Photo. No one has offered any payments, freebies, or other blandishments in return for a mention or a favorable review.
Panasonic reviewed an early draft of this article for technical accuracy. Any remaining errors are mine alone.

Filmtools
Filmmakers go-to destination for pre-production, production & post production equipment!
Shop Now