Adobe is making a big play for Final Cut Pro users with their CS6 release of Premiere Pro. It’s vastly improved over the Premiere Pro of old and is a lot like Final Cut Pro. There’s even a keyboard shortcut layout for Final Cut Pro users. But it is a totally different application than our old Final Cut friend and some things you’re used to in Final Cut Pro either aren’t there or just work differently. Figure out the differences and work with the changes as Premiere Pro CS6 is a great application … and as we all know Final Cut Pro 7 isn’t going to get any better.
option + up and down arrow doesn’t move clips up or down a layer in the timeline
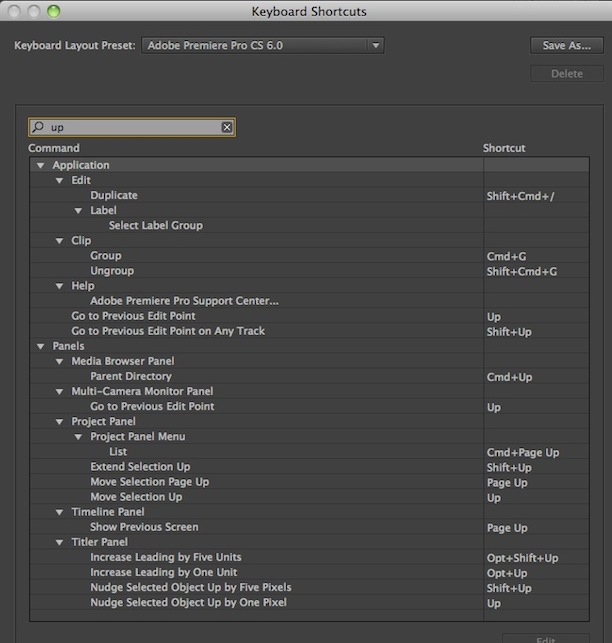
Final Cut Pro editors love the keyboard quickie of option up and down arrow. Select items in the timeline and hitting those key combos will move items up or down a track at a time provided there aren’t other clips in the way. This doesn’t happen in Premiere Pro CS6. I wish it did as it’s a very nice shortcut that is fast and keeps things in perfect sync as there is no mouse involved.

In the above keyboard shortcuts I searched for UP and you can see what the UP key is set up to do by default
If there’s another way to achieve this via the keyboard then please let me know.
Crop is a filter
Final Cut Pro editors are used to having edge cropping built right into the Motion tab as a part of the inherent attributes of every clip. This isn’t the case in Premiere Pro CS6. Crop is a filter that has to be applied from the Effects tab. Unfortunately there is no feather option on the crop and using the Edge Feather effect doesn’t feather the crop, only the original edge. Of course you could Dynamic Link over to After Effects and do all the cropping and feathering you can imagine I suppose. Other things like Distort and Drop Shadow are available in PPro as effects as well.
Under the Effect Controls of a clip there is no Crop
But search the Effects and Crop is a GPU accelerated effect
Adjusting the mixer doesn’t change the clip level at the playhead
It’s a very important audio mixing distinction to note that Premiere Pro CS6 uses track based mixing via the Audio Mixer. When you move one of the Audio Mixer sliders the rubber banding for the clip at the playhead does not change. The level for the entire track changes.
Track Volume rubber bands are turned on for the voice over track and music track in the above image (you can change the track names). Clip Volume is turned on for the other audio track.
To adjust the audio on a per-clip level you have to use the rubber banding on the actual clips in the timeline. Whether this is better or not than the way Final Cut Pro 7 does it is open for debate but that’s track based mixing vs. clip based mixing.
Effects and filters can’t be applied via the menus
In Final Cut Pro effects (filter, transitions, favorites, generators) got their own tab for drag and drop application but they also could be applied via a menu item. Premiere Pro CS6 doesn’t have such a menu item so you have to use the Effects tab. Effects can be applied via a drag and drop to clips in the timeline or drag it to the Effect Controls tab. Double clicking an effect will also apply it to selected clips in the timeline.
Having effects always available via a menu as we do in FCP7 is a nice alternative to dragging them out of a tab.
The Effects tab with GPU accelerated effects highlighted.
There’s no automatic search in the media reconnection dialog box
If you’ve got media offline in Premiere Pro CS6 and you’re going through the reconnection dance (yes, unfortunately the reconnection dance can be a part of PPro as well) you’ll probably miss the Locate and Search buttons from the Final Cut Pro Reconnect window. They at least made it easier to dance the reconnection dance. Premiere Pro doesn’t have a version of that.
FCP wasn’t very good at media management but at least it could search for offline media itself in the Reconnect Files dialog box.
You’re really on your own when searching out offline media in PPro. It does show the name of the file it’s looking for. Hopefully media management is on the top of the PPro engineering list.
What does the absence of an automated search during the reconnection dance mean? You gotta manually search it out so good luck with those crazy file-based camera names. All the more reason to keep media organized and online.
Next Page: 6 through 10 including multiclips and paste attributes
You can’t save custom timeline layouts
Final Cut Pro had the option to save a custom timeline layout after you had painstakingly taken time to adjust track sizes to your liking. These were saved in the user’s Library folder / Preferences / Final Cut Pro User Data / Track Layouts. While you can adjust track sizes at will (as long as the tracks are twirled down and open) PPro doesn’t have an option to save the different timeline versions you might create.
Saving minutely adjusted timeline track layouts in FCP is a very nice thing.
Multiclips don’t exist
Premiere Pro CS6 has rather strong multicam editing capabilities. You can switch as many cameras as you can have video tracks and there’s a dedicated Multi-Camera Monitor for live camera cutting but it doesn’t have a multiclip equivalent. This means you can’t take a stack of multiple camera angles and “group” them into something that behaves as a single clip. A multicam timeline kinda behaves like a single clip as you can edit that into the timeline but I can’t find any keyboard shortcuts to quickly “step through” a multicam clip. This means you can’t quickly move through multicam angles via a single keystroke in the timeline which is very important with music videos or concerts where you might have tons of camera angles. That’s a bummer too as I use multiclips/group clips all the time and Premiere Pro CS6 seems like it’s very close to having just that.
Above you can see a Multicam sequence that has been cut into the timeline. It looks like an FCP multiclip clip and you can change the angles in the timeline but I can’t find a keyboard shortcut to step through them. To me that’s what makes a multiclip/group clip/multicam clip really, really useful.
Paste Attributes isn’t selective
If you look under the Premiere Pro CS6 Edit menu you’ll see a Paste Attributes option. But if you use it there won’t be a pop-up that asks exactly what you want to paste. You’re pasting pretty much all the assets on a clip including things like Motion, Opacity and Filters.
Paste Attributes is available but it pastes everything.
The opposite of that is the Remove Attributes command that FCP has that PPro does not. But what Premiere does have is the Remove Effects option, located under the Clip menu (or right+click on a timeline clip). This does give the option to selectively remove certain video and audio attributes.
Remove Effects does allow for more selective removing of things than Paste Attributes does.
You really miss all of Final Cut Pro 7’s Paste and Remove Attributes options when they are gone. coughfcpxcough
I can’t find a keyboard way to nudge a clip’s position
In Final Cut Pro if you were working on a clip’s position in the Canvas then option+ arrow keys would nudge the clips a pixel at a time. I don’t see any wy to do this for a clip (or title, graphic, whatever) in the Premiere Pro Program monitor.
While you can’t seem to nudge a clip in the Program via keystrokes (please correct me on this if I’m wrong) you can always use the yellow “scrubber” numbers in the Motion parameters on a clip to move the position a pixel at a time.
You can’t have different output frame rates and resolutions than what your sequence is set to … kinda, kinda not
This is a bit of a confusing one. In Final Cut Pro the options for viewing your cut on an external monitor via 3rd party hardware could be a confusing setup. But the nice thing about it was once you understood how it worked it worked very well, especially for things like viewing different formats than the edit timeline. Part of this is dependent on the video hardware drivers and part of it is the software application.
FCP gave you a lot of options for viewing and converting video out of a supported 3rd party video card.
PPro CS6 works differently with its new Mercury Transmit option for 3rd party video cards. It works very well for playback and output of your editing frame rate as I’ve been using it successfully with Blackmagic hardware. It’s MUCH improved over Pro 5.5. The issue seems to be sending out different frame rates. Part of this might be attributed to the hardware maker and how they have chosen to support Premiere Pro. Read the links below for more detail on this issue.
This forum thread at Adobe.com is discussing the issue in detail and this blog post on Little Frog in High Def digs into it as well. It would appear that this is something the hardware manufacturers will have to address in their Mercury Transmit support.
These are some of the things that I’ve found myself looking for in Premiere Pro CS6. While this sound like a negative article I don’t mean it that way at all as I really love PPro CS6 and it’s definitely going to be my Final Cut Pro 7 replacement. Hopefully this article will save a few editors some time when moving from FCP7 to PPro 6. More than that though I hope the PPro engineers might give this a read and add (or improve upon) some of these features. Many of them are very handy and it doesn’t matter where they originate from as they’d be great in any NLE.


