![]()
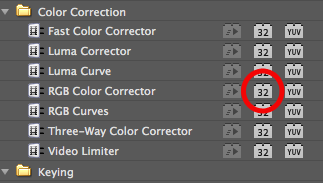
Recently, I’ve been getting a lot of questions about the new icons in the Premiere Pro Effects panel, in particular, the “32-Bit” icon seen at left.
People have asked how these effects relate to the 64-bit Mercury Engine, if they are limited in some way? The answer is no – these icons mean that these effects use 32-bit floating point color, the gold standard of color processing.
Trying to understand video color precision is, well, a confusing task. There are so many different terms floated around – 8-bit and 10-bit color are used to describe cameras, while software talks about 8 bits per channel, 16 bits per channel, and 32-bits per channel “floating point” color. What does it all mean? And, for the colorist, how does Premiere Pro handle color? If these are burning questions in your mind, then read on.
When your camera processes the light coming in the lens into data, it has to assign a number to each of the colors being recorded. Each pixel gets its own set of numbers. Typically a low number means very little of that color – a pixel with an RGB value of 0,0,0 would be completely black.
If 0,0,0 represents black, then what represents white? Well, that depends on what we call the bit depth. The higher the bit depth, the bigger each number can get.
Let’s look at one color – blue. In an 8-bit world, blue is represented by a number than can be between 0 and 255. If I had a knob to adjust the value of blue, it would look like this: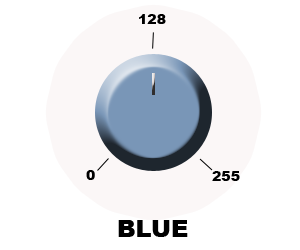
Pretend that this knob makes a “click” every time you raise or lower the value, and there are 256 distinct “clicks” on the knob. This means that there are 256 “steps” between the brightest, most saturated blue, and no blue at all. A “middle-of-the-road” value of blue would be around 128 on this scale. Adjustments have to be made in whole “clicks” – there is no value of “127.5” in 8-bit color precision.
Now, let’s look at 10-bit blue. A knob to adjust blue on a 10-bit device might look like this:
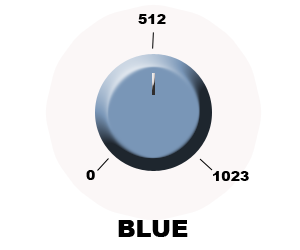
Wow! The knob now goes to 1023! This doesn’t mean that 10-bit blue is more saturated; it means that there are more steps to get to the maximum saturated shade of blue. A 10-bit value of 1023 is potentially the same color as the 8 bit value of 255. If you look at the two knobs in the pictures, you’ll see that the middle points of the knob are 128 and 512, and these values also represent the same color. There are just a LOT more subtle shades of blue selectable on the 10-bit knob. Again, there are no intermediate steps; no decimal values. There are 1024 distinct “clicks” on the knob.
Just for giggles, here’s what a blue control knob would look like for a 12-bit device:
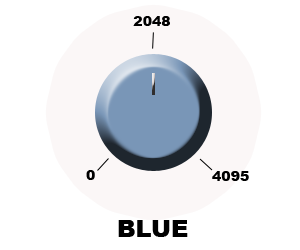
Starting to see the pattern? The higher the color bit depth, the higher the color precision. A higher color bit depth means more variety, more choices on how much color can be used for each pixel.
Each pixel has more than just one color – each pixel usually has 3 numbers assigned to it – either RGB or something called YUV, which I’m not going to explain here. Each of these values are all the same bit depth – If a camera is an 8-bit recording format, each value for each pixel is an 8-bit number.
Now, 8-bit, 10-bit, and 12-bit color are the industry standards for recording color in a device. The vast majority of cameras use 8-bits for color. If your camera doesn’t mention the color bit depth, it’s using 8-bits per channel. Higher-end cameras use 10-bit, and they make a big deal about using “10-bit precision” in their literature. Only a select few cameras use 12-bits, like the digital cinema camera, the RED ONE.
Software like After Effects and Premiere Pro processes color images using color precision of 8-bits, 16-bits, and a special color bit depth called 32-bit floating point. You’ve probably seen these color modes in After Effects, and you’ve seen the new “32” icons on some of the effects in Premiere Pro CS5.
8-bit processing actually works the same as 8-bit on the camera – each color for each pixel is stored as a value of 0-255. When adjustments to colors are made, they move up one whole number. So, for example, if I had a blue value of 128, and wanted to make a small adjustment, I could change the value to 127 or 129.
To enable more steps, there’s 16-bit color. 16-bit color is used by After Effects and Photoshop, but isn’t in Premiere Pro CS5. This works the same way, except each channel has 32,768 steps to choose from. Any time you drop an 8-bit source into a project using 16-bit color, the 8-bit values are remapped to their relative positions in the new color space. Zero stays zero, and 255 becomes 32768. The midpoint value of 128 in my last example would be mapped to 16384. That’s a whole lot more steps to work with – I can make much more subtle adjustments to the amount of blue in the image. 16-bit color also requires whole “clicks” – You still can’t use a decimal value, like 16384.5 to define a color value.
Both 8-bit and 16-bit color still suffer from the limits when you hit the top end or bottom end of the range. If I start to play with values, I can brighten and darken color values that push pixels to the maximum values. If colors are pushed too far, the values can run into a “wall”. Bright areas in 8-bit precision can turn into a big undefined blob. In 16-bit, there’s more latitude in the middle, but the extra precision doesn’t help if the values go over the top or the bottom end of the scale.
Here’s an example image where a brighten filter has been applied in an 8 or 16-bit image, and a darken filter has been applied to the actor’s head:
If you look at the darkened area on the upper right part of the head, it’s just a big bright blob. All the detail is gone from the bright parts of the image, because all the values were maxed out, and the darken filter is just reducing these values to uniform shades of gray. The brighten filter brought all the pixels up to 255,255,255,(8-bit) or 32768,32768,32768 (16-bit) and the darken filter is reducing all 3 values by the same amount.
32-bit color gets around this by mapping the colors differently, leaving some room for over-bright and under-dark values. Instead of mapping 0 to 0 and 255 to some HUGE number, zero is actually mapped to the midpoint of the range. Zero is moved to the middle of the dial, and there are many steps in either direction above and below the old, mapped, “maximum” values.
Here’s the same image as shown above, but the processing was done in a 32-bit sequence:
As you can see, the Darken filter is bringing back the detail, where the head and the light meet, because 32-bit floating point color can store the differences in the pixels, even when the values are pushed above 100% white.
When you see a 32-bit value mapped into a number, it’s expressed with a decimal. The standard range of colors are mapped to a value of 0.0000 and 1.0000, so 0 in 8-bit mode is 0.0000 in 32-bit, and 255 in 8-bit is mapped to 1.00000. The middle of the regular range is 0.5000. Thanks to the decimal place, there are still many thousands of steps to make adjustments, but now, there’s also the potential to go “out of range” and create values that aren’t visible.
Using the same knob graphic, as above, you’d have to think of 32-bit floating point as a smooth-turning knob, with an LED readout above it, like this: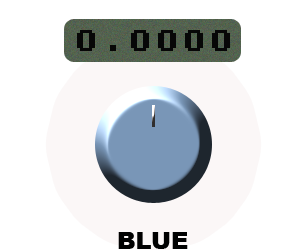
With 32-bit float color, you have a near-infinite amount of values, and you can store over-bright and under-dark values as you manipulate and play with color values.
(BTW – the reason it’s called “floating point” is because the position of the decimal can change as needed. The maximum number is not 9.9999. It’s 99999. The decimal values get lost at the higher ends of the scales, but the ends of the scales are almost never used.)
Chris Meyer has a great tutorial that describes 32-bit float color here: http://www.lynda.com/home/Player.aspx?lpk4=30903
Okay, now how does this relate to Premiere Pro? Some of Premiere Pro’s effects are full 32-bit floating point effects and have the ability to work in this high color precision. There’s a little secret to making this happen, however. Since 32-bit float color is more memory intensive, you need to turn on a small check box in the Sequence settings:
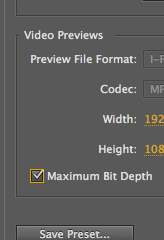
This “Maximum Bit Depth” check box enables your timeline sequence to work in 32-bit floating point color if those effects are used on the timeline. Keep in mind that this does increase the RAM used by Premiere Pro, so it’s recommended for higher-end systems.
If you have existing sequences, right-click on the sequence in the bin, and choose Sequence Settings to change this value. You can change it any time.
Most file formats are 8-bit formats – rendering back to a DV file, or a QuickTime file means that the color precision needs to be crunched back to 8-bit. If a file format does support a higher color precision (DPX and AVC-Intra P2 are 2 formats that support 10-bit precision) then there will be a “Maximum Bit Depth” selection in the Export Settings dialog box as well. Here’s an example of the Max Bit Depth check box for AVC-Intra output: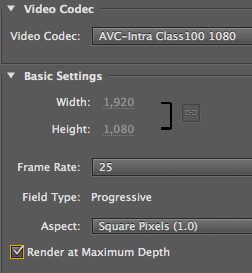
Some formats, like DPX, have built-in presets for output that include this extra color precision:
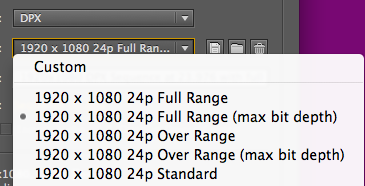
Steve Hoeg, one of the Premiere Pro engineers, provided some examples of how Premiere Pro will handle color precision in different scenarios:
1. A DV file with a blur and a color corrector exported to DV without the max bit depth flag. We will import the 8-bit DV file, apply the blur to get an 8-bit frame, apply the color corrector to the 8-bit frame to get another 8-bit frame, then write DV at 8-bit.
2. A DV file with a blur and a color corrector exported to DV with the max bit depth flag. We will import the 8-bit DV file, apply the blur to get an 32-bit frame, apply the color corrector to the 32-bit frame to get another 32-bit frame, then write DV at 8-bit. The color corrector working on the 32-bit blurred frame will be higher quality then the previous example.
3. A DV file with a blur and a color corrector exported to DPX with the max bit depth flag. We will import the 8-bit DV file, apply the blur to get an 32-bit frame, apply the color corrector to the 32-bit frame to get another 32-bit frame, then write DPX at 10-bit. This will be still higher quality because the final output format supports greater precision.
4. A DPX file with a blur and a color corrector exported to DPX without the max bit depth flag. We will clamp 10-bit DPX file to 8-bits, apply the blur to get an 8-bit frame, apply the color corrector to the 8-bit frame to get another 8-bit frame, then write 10-bit DPX from 8-bit data.
5. A DPX file with a blur and a color corrector exported to DPX with the max bit depth flag. We will import the 10-bit DPX file, apply the blur to get an 32-bit frame, apply the color corrector to the 32-bit frame to get another 32-bit frame, then write DPX at 10-bit. This will retain full precision through the whole pipeline.
6. A title with a gradient and a blur on a 8-bit monitor. This will display in 8-bit, may show banding.
7. A title with a gradient and a blur on a 10-bit monitor (with hardware acceleration enabled.) This will render the blur in 32-bit, then display at 10-bit. The gradient should be smooth.
There are other examples, which I hope to highlight in my next blog entry.

Filmtools
Filmmakers go-to destination for pre-production, production & post production equipment!
Shop Now