
Chromatic Aberration is the culprit behind colored fringing – often cyan or red, and vertical in direction – appearing on high-contrast edges. Technically, it results from the failure of a lens to converge all colors from the same source at the same destination point. It is most likely to occur with lower-quality lenses and shorter focal lengths.
As I tend to use higher quality lenses and longer focal lengths, I bravely assumed I could pretty much ignore it. Until it slapped me in the face. Here's how to identify it, and correct it in Adobe Photoshop.
{C}
Identifying Fringe Elements
The image at the top left of this page exhibits chromatic aberration: Look for the cyan fringe where the dark vertical rock edge meets the sky. (Note that it is nowhere near as apparent where a lighter section of the rock meets the sky; high contrast is one of the conditions that make chromatic aberration apparent.) This is different than edge artifacts you might have seen due to over-compressing, over-sharpening, or over-color-enhancing an image, each of which is shown below:


The above edge artifacts are caused by over-compressing an image (left), over-sharpening it (center), or applying certain extreme color correction settings such as maxing out the Vibrance (right).
Fixing It in the Adobe Camera Raw Dialog
I am moving toward performing as many as my image corrections and enhancements as practical inside the Camera Raw dialog: Changes performed here are nondestructive, and carried alongside the original image rather than appearing just in a specific edit of the image.

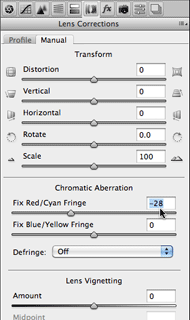
 It so happens that Adobe Camera Raw has a section for curing lens issues such as chromatic aberration and vignetting. (By the way, you can also add vignetting here for creative effect.) Zoom in to at least 100% and carefully adjust the slider corresponding to the color fringe you see until to disappears, but not so far that a fringe of a complementary color – such as red is to cyan – starts to appear. Note that if you rotated your camera 90 degrees to take a portrait rather than landscape oriented shot, the fringing will appear along horizontal rather than vertical lines.
Fixing It in the Lens Correction Filter
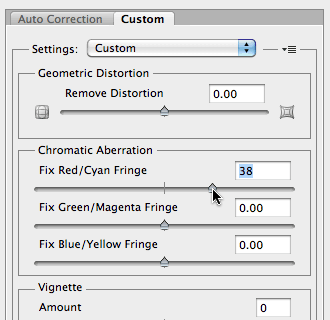
If you prefer to work on your images after the Camera Raw dialog has processed them (or didn't shoot in Raw in the first place), you get another crack at fixing chromatic aberration in Photoshop's Filter > Lens Correction effect. Note that even though Photoshop uses an image's metadata to identify the camera, lens, and focal length used, I have found I cannot rely on its automatic settings; in this photo's case, it removed only about two-thirds of the fringe present in the worst areas of the image (and again, the amount of fringing can vary depending on the image content).
 Instead, disable Auto Correction, click on the Custom tab, zoom in to 100 or 200%, and tweak the appropriate slider to taste. Two things to note: One, you get one more color fringe combination option in the current version of the Photoshop Lens Correction filter than you do in the current version of the Adobe Camera Raw dialog, although Camera Raw offers an additional Defringe option – more on that below. Two, the parameter values inside Lens Correction and Camera Raw do not line up: My particular fix required a certain negative value in Camera Raw, and a larger positive value in Lens Correction.
(Creative note: Unlike chromatic aberration where the Photoshop Lens Correction effect has more options, the Vignette controls are more powerful in the current version of Adobe Camera Raw: In addition to the Lens Correction section of the Raw dialog, also look under Post Crop Vignetting in the FX section.)
Purple Haze
A different kettle of fish is a purple fringe you might see in some images, especially around specular highlights. There are several potential causes of this, including issues with particularly small sensors (which rely more on microlenses to amplify the light hitting each photosite). The chromatic aberration advice given above won't fix this purple fringe. If you manage to catch it in the field, try underexposing the image or changing your camera angle slightly to reduce the strength of blown-out specular highlights, as this is the biggest problem area. This is also a case where you might want to try Adobe Camera Raw's Defringe set to Highlight Edges, as it focuses on specular highlights.
All's Well
I cannot emphasize enough how the amount of chromatic aberration you notice will change from photo to photo depending on the contrast present in it, the length of lens you use, and how sensitive you are to its potential existence. The image I used above was shot with a Canon 5D mkII and its bundled 24-105mm lens shortened all the way up to 24mm (with a Hoya HMC Super UV[0] clear filter on the end); the amount of fringing was reduced just by shooting the same scene at 28mm, and often unnoticeable in other images from the same excursion (in the Bisti Wilderness area in New Mexico) that were otherwise shot with a length of 24mm.
Just for eye candy, below is the final version of that image, as well as a few other selects from the hike:


Our photographs and artwork, as well as content contained in our books, videos, blogs, and articles for other sites are all copyright Crish Design, except where otherwise attributed.

Filmtools
Filmmakers go-to destination for pre-production, production & post production equipment!
Shop Now


