![]()
OK, so you CAN teach an old dog new tricks!
While the previous installments of Avid Hidden Gems have all been from memory – basically just some cool power user tips – today, I actually dove into the manual itself to:
1) find things that are completely new to me
2) rediscover things that I’d forgotten
3) remind myself about things that I use all the time, but others might not have discovered.
GEM #1
Here’s a new feature that sneaked in when I wasn’t looking. (Please don’t write to me to gloat that this has been in since version 1 and I just never noticed it.)
There is a new Setting for Mouse. If you open your Settings tab in the Project window and scroll down – or hit the M key to jump to the M settings – you’ll see the Mouse setting, which is a User setting (as opposed to a Site or Project setting.)
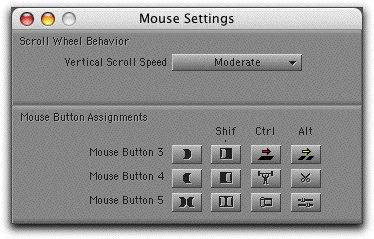 Double clicking the setting will call up the image in the screen shot (minus all of the icons that I’ve mapped here). You can then do Command-3 (on a Mac) or Control-3 (on a PC) to call up the Command Palette. From there you can drag and drop icons that you’d like to map to the various keys on a mouse or trackball. As you can see, you can map up to twelve commands if you use the modifier keys.
I have a Mac Mighty Mouse connected to this system and the functionality worked as advertised on two of the three extra buttons. On a Mighty Mouse, the top scroll button is button 3, the left side button is button 4 and I would think that the right side button was number 5, but it’s not. I also tried various “chordings” (clicking multiple buttons at the same time) to no avail. Button 5 always executed the same command as Button 4, for some reason. The manual warns that you can’t map anything to the standard left and right (1 and 2) buttons on a mouse and that some functions or modifier key function combinations may already be mapped to those keys. So it may take some digging into your OS or your mouse software/settings to get this working.
I also attached my Kensington “Expert Mouse” trackball to the system, and couldn’t get ANY of the functionality of the Mouse setting to work with it. I even tried going into the System Settings and turning off all of the normal Kensington defaults for the buttons, and could never get it to work with the Mouse settings, so your mileage may vary depending on your pointing device.
GEM #2
The other part of the Mouse setting is the ability to change the scroll speed on the mouse when commanding various Avid items, like the timeline or scrolling through bins. Basically, you can use the scroller on the mouse to navigate anywhere you have scroll bars. In the timeline, it’s particularly handy, particularly if the height of your timeline can’t really handle the number of tracks in the sequence. You can use the scroller to go up and down in the tracks and also forward and backward in the timeline.
GEM #3
This didn’t work for me, but maybe it’ll work for you: if you hold down control on a Mac (Windows on a PC) and use the scroll wheel when in the Effects Mode, you can supposedly move sliders up and down by single digit increments. With my Mighty Mouse, this would only scroll up and down the list of effects. I thought the problem might be the Zoom settings in Universal Access on my Mac, but that didn’t help. Could be a bug in my version of the software or a conflict with one of my other user settings.
GEM #4
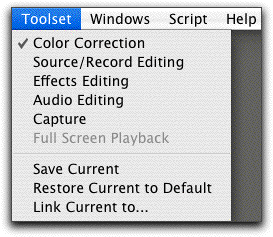 It’s easy for the more veteran Avid editors to forget about the benefits of Toolsets. To switch between standard editing and effects or color correction or audio work, you can go in to individual modes for those things, but if you use Toolsets, they’re essentially like Workspaces. You can customize the layout of the tools and windows and instantly jump back and forth between them. This is especially handy coming in and out of color correction, since that tends to screw up the placement of your windows.
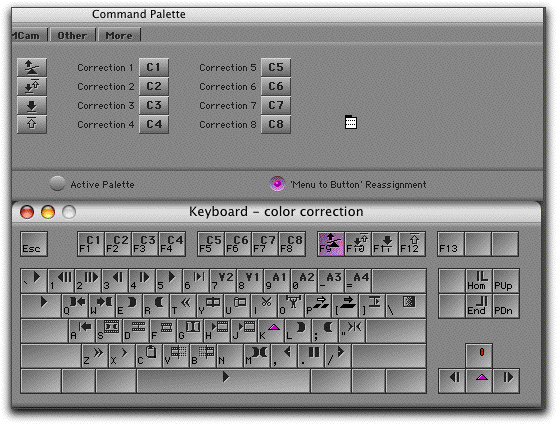 One way to get yourself into the habit of using Toolsets is to map them to the keyboard. You can do this by opening your Keyboard setting and the Command Palette (cmd-3 on a Mac or control-3 on PC) and using the Menu to Button reassignment button at the bottom of the Command Palette. Click on the keyboard key where you want the Toolset to be assigned, then click on Toolset and drag to the Toolset you want in the menu.
You can also have other settings automatically be linked to specific Toolsets, so if you have a specific keyboard setting for doing color correction, you can link it to the color correction toolset so that each time you choose the color correction toolset, the keyboard commands change too. You can do this with any settings, like Bin Views or timeline settings, for example. To link a setting to a Toolset, just select the Toolset and choose “Link Current To” in the Toolset menu. This calls up a dialog box where you can Link Named settings to the specific Toolset. Just type in the name of your keyboard setting (or other setting) and they’ll be linked.
If you aren’t crazy about having to memorize dozens of different keyboard settings, think of this: Keep all of your keyboard settings basically identical except for the function keys, then have a different keyboard setting for each task (like audio, effects, color correction, trimming) and the only thing that changes are the function keys.
GEM #5
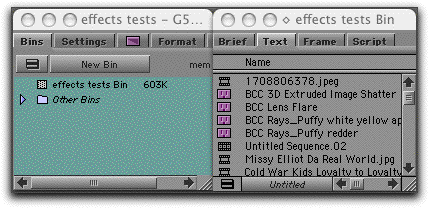 Change the background color of your Project Window. Bins and the Project Window look very similar, especially when you have a ton of bins open and it’s late in the day. Closing a bin by accident is not usually a big deal, but it’s a pain when you accidentally close your Project Window. To prevent this, I changed the color of my Project window. This is a user setting, so you don’t have to re-do it on every project.
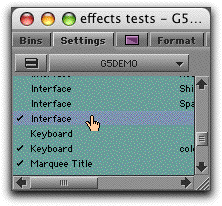 All you have to do is go to the Settings list and double click the Interface setting that has the checkmark next to it. The checkmark indicates that this is an Active setting – in other words, the one that is applied now.
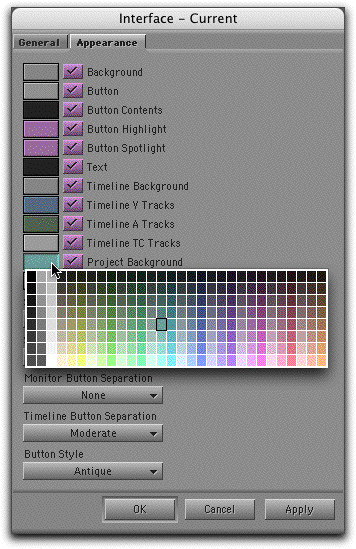 Then in the Appearance Tab of the resulting Interface setting window click on the little color chip next to the Project Background selection. I’m not one of those guys that likes a million colors on his monitor, so I chose a fairly subdued pastel that would be easy to read from, but would also make the Project Window stand out easily in a pile of Bin windows.
GEM #6
Similar to the tip above, you can change the background color of bins (which I can’t seem to do on my version of software or with my user settings right now at least), but you can also do something else that is cool, which is change the Font type and size in the bins. This helps in two ways: it can make a certain bin stand out among other bins – for example, your SEQUENCE bin can have big, bold letters – and it helps your eyes if the font is just too darn small.
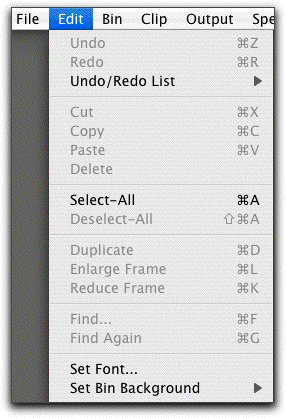 To change the color of the background of a bin or the font, you select your bin and choose the Edit Menu from the menu bar. At the bottom are the two choices for Set Font and Set Bin Background.
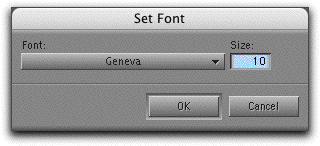
Hope you got something out of at least one of these tips. Stay tuned for more. Make sure to subscribe to the RSS feed so you don’t miss out on other Avid tips in the future.

Filmtools
Filmmakers go-to destination for pre-production, production & post production equipment!
Shop Now


