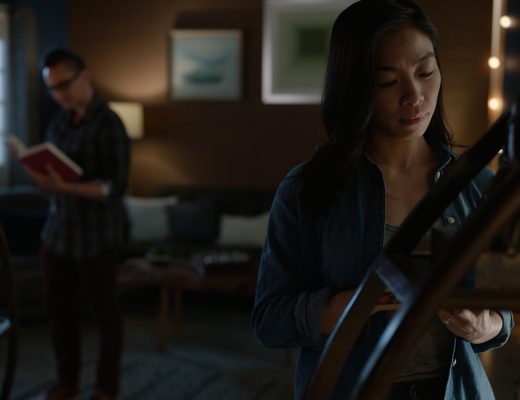
This kind of spot is a natural for film–but we shot it on HD. And unless you’re looking very, very closely, you’ll never be able to tell.
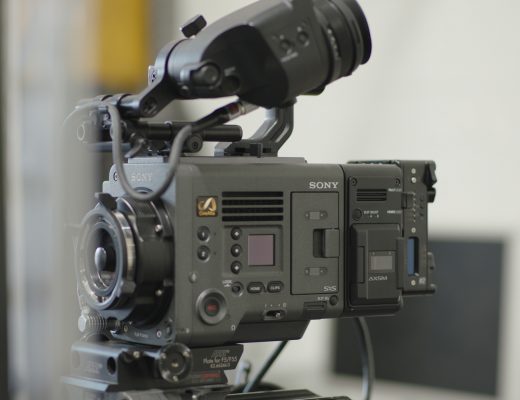
“Bright, cheery, pretty”–that was my mandate. This political spot for California’s No on Prop 8 campaign required a warm, familiar and cozy feeling, and originally we pitched the agency on the idea of shooting this spot on the RED camera. That didn’t fly, unfortunately, so we fell back on our old trusty standby: the Sony F900R camera with a Pro35 adapter and Zeiss UltraPrimes. (I originally ordered Zeiss SuperSpeeds from our rental house, Chater Camera, but they gave us a free upgrade because they like both us and the cause.)
As we were going to shoot out windows on either side of the set we keyed with two Kino Flo Flathead 80’s (eight tube flourescent fixtures) bulbed for daylight. We also spent some time lighting the background to create the feeling of a sunlit day interior. Backgrounds always take the longest to light, because they take up the most physical space, but you have to light them because you always need a background to shoot against. Compared to backgrounds, lighting people is easy!
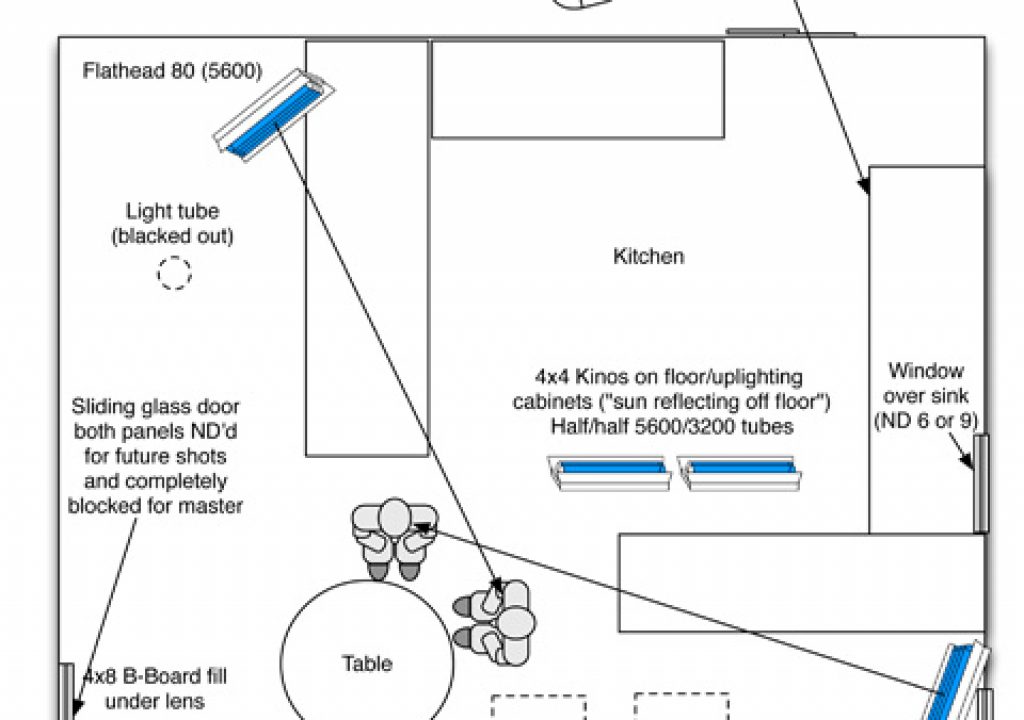
Click through to the next page to see my initial lighting diagram…
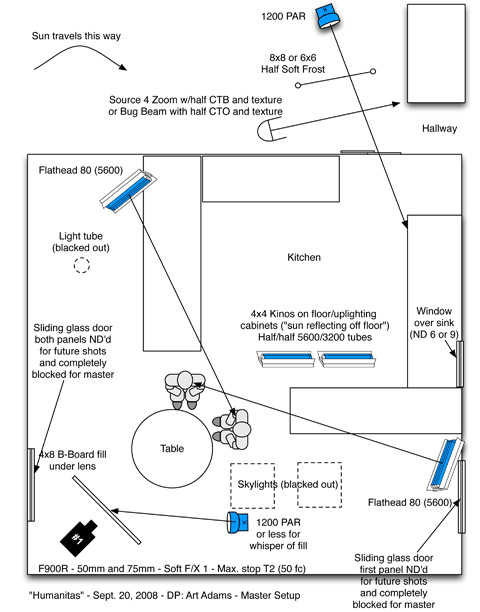
This was the biggest setup, and it took about two hours to rig with the small crew that we had. I made a few adjustments to this diagram on the day of the shoot:
The 4×8 bead board fill under the lens became a 4’x4 tube Kino Flo next to the lens. When I drew this out in a Starbucks shortly after the location scout I think I was a bit over-caffeinated, which caused me to overestimate the size of the corner the camera was to be crammed into. The intention of the 4’x8′ fill was to create the feeling of sunlight bouncing off the floor or a wall, but it turned out to be too big and not quite right for this setup.
The 4’x4 KinoFlo was placed immediately to the right of the lens, extending horizontally from the matte box off to camera right. By putting the Kino Flo at lens height I minimized the vertical shadow of the light: as the 4’x4 Kino Flo is 4′ wide and 1′ tall, the short axis (the 1′ tall part) will cast a sharper shadow than the wide axis.
If I’d put the Kino Flo vertically next to the lens I’d have eliminated the chin shadow but created a horizontal nose shadow. I hate horizontal nose shadows, so I used the Kino Flo horizontally so it wrapped around the nose shadow and eliminated the chin shadow by putting the light immediately next to the lens. If I’d raised the light above the lens I’d have created a slight downward chin shadow, and if I’d lowered it I’d have eliminated the chin shadow but created some upward shadows cast by hands onto clothes. Upward shadows, if soft, can feel like ambient light reflected off a floor or a table, but in this case I didn’t feel it was appropriate. I wanted a very smooth look, and the bigger the fill light is and the closer it is to the lens axis the smoother the shot will feel.
I only used one bulb on the fill Kino Flo but we did use Lee 250 diffusion to create a bigger source. One bulb is too sharp in the short axis (the bulb is only 1-2″ thick, which casts a sharp shadow) and diffusion on the lamp doors spread it out to a full 4’x1′ source. Normally I like to use thicker diffusion, like Lee 216, but a flourescent bulb is pretty soft in the first place and 250 usually works just fine.
The Kino Flos on the kitchen floor were bulbed with two 5600k bulbs and two 3200k bulbs each, which is the same as putting half CTO on full daylight bulbs but without the light loss. I wanted to create the feel of warm sunlight bouncing off the floor.
I used Half Soft Frost from the hallway to light the kitchen cabinets because I like the quality of that diffusion. It resembles thick shower curtain and has a kind of soft glow about it.
We used a Source 4 with a zoom lens in the hallway to create a sunlight effect on the door in the background. I love Source 4 zooms because, when you put a pattern in them and throw them out of focus, the pattern develops red and blue fringing around the edges. It feels like a mistake, but a good mistake: the sunlight feels like it’s bouncing off something shiny in the living room or coming through imperfect window glass. I’m constantly looking for ways to light things without giving away the fact that I’m using a light, and the occasional optical mistake helps sell that illusion.
The opening shot has a little move to it, but instead of doing that on the dolly we used a 3′ slider. The dolly is a great camera platform if you have to move fast (and most of us do!) and by using it as a support for the slider we were able to quickly place the camera and add a little motion without laying down track or dance floor.
I ended up using much less ND than I expected, but more about that on the next page…
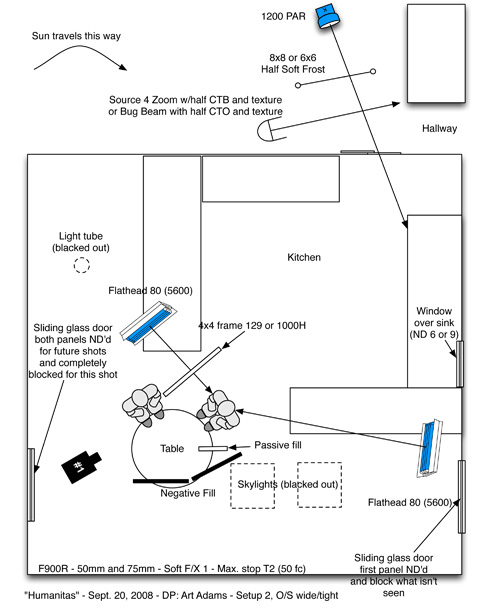
At this point we started seeing out windows, but when we put any ND at all on them it looked like night outside. In the end I put a 4’x4′ floppy flag out the small window across from the camera to cut some of the ambient light that was hitting the surface outside the window. The sliding glass door was never ND’d as we changed our shot and never saw it.
The frame of 129 or 1000H became a frame of Lee 216. Lee 129 is extremely thick diffusion and I love it because you don’t get any hint of a specular source through it. 1000H tracing paper has the same quality, although it’s a little warmer and much more fragile. Both of those diffusions turned out to be too thick, so I fell back to Lee 216 because I got a bit more light transmission through it and it was dense enough to create the nice smooth source I wanted out of the eight-bulb Flathead 80. (The Flathead 80 has a separate ballast, making it lighter and easier to hang, whereas the Image 80 has a built-in ballast on the light itself. I specified Flathead 80’s for this job because I thought we might have to lay them on the kitchen counter and I wanted to use the lightest unit possible.)
The Flathead 80’s have gone from being 3/4 rear key lights to a soft frontal key and a soft scratch. I did use the negative fill, because the wall on that side was painted a warm color and I wanted the fill to be neutral, but the passive fill (a bounce card) was tossed in favor of the same horizontal Kino Flo fill light I’d used for the wide shot. (Passive fill is a surface that catches the light in the scene and bounces it back; active fill is either a light or a bounce surface with a light aimed at it.)
You’ll notice that the Kino Flos on the floor of the kitchen are gone. As lights disappear from the shot they are pulled out to facilitate wrap and prevent overtime.
Our final setup is on the next page…
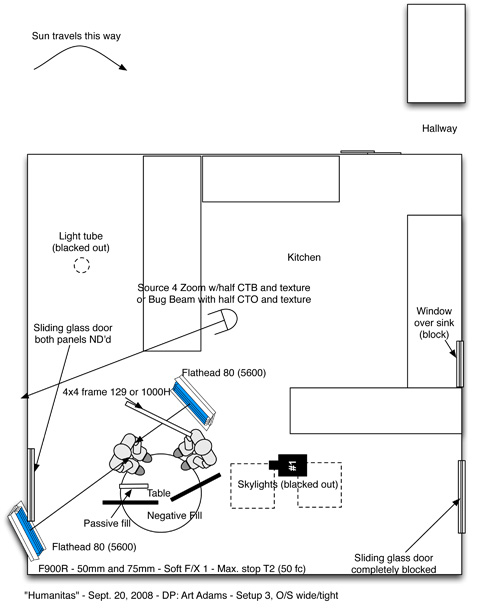
At this point a lot of the lights from the wide shot are gone. The Flathead 80’s have changed roles again: the key from the last shot is now the scratch light, and the scratch light from the last shot is now the key. We shifted the table a bit to get a better shot out the window. In a situation like this I blocked out any light source that isn’t in the shot so that it didn’t mess with the cosmetic qualities of the lights I am using. That’s why the skylights and the light tube are blocked out: top light from a high angle is not what’s needed to make these women look pretty.
The ND we used on the sliding glass door turned out to be too much (it was N6 or N9) so I had the grip crew build two 8×8 frames: one with a double net on it and one with a single net on it. We placed them both outside the window, separated by about two feet to prevent moire, and shot through them to the back yard. We used a hose to wet down a fence in the background to darken it a bit.
Once again, the passive fill in this drawing ended up being an active fill from the 4’x1′ Kino Flo with one bulb turned on placed immediately next to the camera. For this angle the unit was to the left of lens, whereas on the other shots it was on the right.
I used a Schneider Soft F/X 1 filter to smooth out some of the high frequency detail in the shot (wrinkles). I left it the same in both the wide and tight shots because the focal lengths didn’t change significantly: we used the 50mm UltraPrime for the wide shot and then shot closeups with the 50mm and 85mm on both sides.
That was it. We shot it all at a T2 and it turned out looking very soft and smooth.

Filmtools
Filmmakers go-to destination for pre-production, production & post production equipment!
Shop Now