The largest issue in post production is maintaining the highest quality for compositing, graphics, effects and delivery; whether that content is used in broadcast, theatrical or direct to DVD release.
Camera native codecs are amazing for their ability to capture light at the highest quality, yet this “native” camera data was never meant to work directly within the editing process, only within the manufacturers proprietary camera hardware.
This intermediate codec, called ProRes, was designed specifically to maintain full colorspace and 10bit workflow throughout the post process allowing Final Cut Pro to finally take its place as a truly professional editing platform.
Topics
- What is ProRes
- Properties
- ProRes Data Rate and Compression Ratio
- ProRes Standard vs. HQ
- Scalar Playback and Performance Enhancement
- 8bit vs. 10bit
- Compressed vs. Uncompressed workflows
- Advantages with HDV content
- Hardware support for ProRes
- Acknowledgements
- Tech Notes
Recently, when asked to take a hard look at Apple’s ProRes codec, I hesitated. I was a big fan of working with Panasonic’s DVCProHD in Final Cut Pro, converting virtually every tape format that came to me into this camera codec.
I understand the issues of working with a camera’s native 8bit codecs, where manufacturers custom design the best conversion possible in hardware, allowing 8bits of gray per channel to use every one of the 256 levels of gray possible. While useful for the immediacy, outside of customized solutions the results can often be very different when used for editing. Whenever motion graphics or compositing is needed, these 8 bit camera native codecs do not maintain non-camera materials or composites at optimum quality.
It was the release of AJA’s IoHD that prompted me to follow up on what the ProRes codec is, how it works and what the advantages are to my workflow. I found that while DVCProHD and Long GOP Mpeg files can offer exceptional quality for acquisition, their use in post could be a detriment to achieving high quality work.
What is ProRes?
ProRes was designed to be the highest quality intermediate codec to keep the postproduction workflow data at 10bit quality, yet at a low enough bandwidth to be usable for the majority of FCP users. ProRes is currently available only on Apple OSX platform and requires components from the FCS2 suite to be installed on your computer, either from FCP or the Qmaster rendering engine.
The process of using intermediate codecs in postproduction is not uncommon. In fact, they have been used some form or another since the start of non-linear editing. The advent of IEEE 1394 “Firewire” specification allowed us to see and natively edit the information as the camera recorded it. The use of the DV codec is synonymous with the burgeoning growth of video as an artistic medium, just as P2 and HDV guided FCP users into HDTV. However, with many complaining about the quality of their imagery or the need for constant rendering in the HDV codec, widely used in Prosumer and Consumer HD camcorders, something was needed.
ProRes solves many of the issues that haunt these formats, albeit at a cost of an Intel Mac and somewhat greater needs for attached storage because of ProRes’s lower compression level and the resulting larger file sizes.
ProRes Properties
Apple’s ProRes codec is a 10bit, full raster (i.e.: full frame geometry) discrete cosine transform (DCT) based compression algorithm that allows for frame geometries covering all of the standard HD and SD formats, assorted smaller geometries for proxy-based editing and playback in Final Cut Server. In addition the DCI (Digital Cinema Initiative) specific outputs for digital cinema delivery at 2048 x 1080 and standard 2K digital intermediate frame geometries of 2048 x 1566 and 2048 x 1152 are also supported.
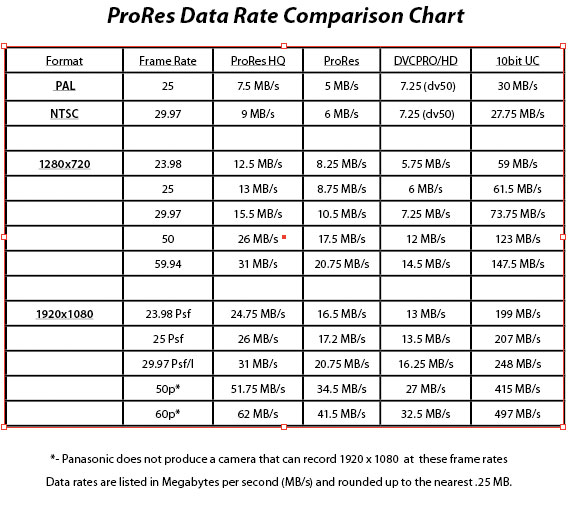
ProRes currently comes in 2 levels of compression. Originally called HQ (high quality) and SQ (standard quality) in Apple’s documentation, the 220Mbits version is now called HQ, and the lower bandwidth 145Mbits version is just now referred to as ProRes.
For comparison on what this means, Sony’s HDCam camera format is approximately 136Mbits, while Panasonic’s DVCPROHD is listed as 100Mbits. Even delivery formats like Panasonic’s D5 mastering format is only slightly less compressed than ProResHQ at 250Mbits for 1080 23.98sF, while HDCam SR’s mastering format is usually recorded in 4:4:4: Dual Link mode at 440Mbit (880Mbits is now available).
ProRes is considered a variable bit rate codec, where the amount of compression varies based on frame rate, interframe differences and motion interpolation. Much like h.264, it operates as a DCT scalar codec, with the ability for full frame playback previews from ½ or ¼ size frame data, lowering the data throughput while maintaining high image quality. This functionality allows the user advantages in playback of additional tracks of video, higher quality previews and increased RT functionality. However Apple errantly allows for ProRes to support native compressed aspect ratios found in DVCProHD and HDV when converting in software. While this sounds like a great idea, it causes severe issues when applications outside of the FCS Studio package are part of the ProRes workflow.
Data Rate / Compression Ratio
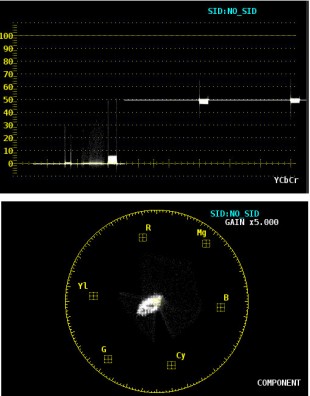
Waveform and Vectorscope images indicating the difference between the original uncompressed 10bit image and the first generation conversion to DVCPROHD.
As previously stated, the specifications for compression are for 220Mbps for the HQ version and 145Mbps on the standard version. The data rates for Standard Definition geometries are 63Mbps and 42Mbps respectively, allowing ProRes to be more efficient in SD workflows than any other 10bit codec.
The “Bit Rate” refers to average amount of data that is transferred or processed per second. ProRes, being a variable bit rate (VBR) codec, allows the more complex parts of the video to be encoded at a higher bit depth for more detail, while the less complex areas are encoded at a lower bit depth, thereby allowing for overall smaller file sizes. ProRes is approximately a 5.5:1 compression ratio at its maximum and slightly more than 3:1 at its minimum compression level for SD content.
This means that despite the quality there is still a fair amount of compression being done on each file. I initially loved DVCProHD, but quickly found that if any color correction or motion graphics were to be part of the edit process, material processed with DVCProHD would fail my quality standards. Because of this, many facilities have endured postproduction using compressed formats despite the pantheon of postproduction issues compression brought.
Standard vs. HQ versions
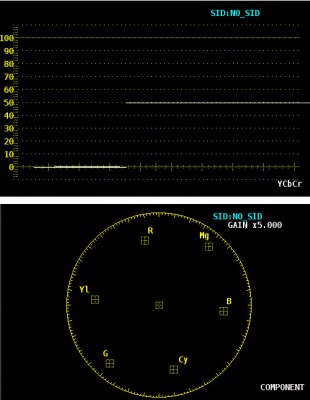
Waveform and Vectorscope images indicating the difference between the same original uncompressed 10bit image and the first generation conversion to ProResHQ.
In trying to discern the differences between the Standard and HQ versions of ProRes on live capture, I was hard-pressed to see any differences between the 2 compression levels on live content except under very close inspection. While I could see differences on my Leader 5800 WFM monitor, it was only when viewing was set to a 5X magnification. Seeing the differences in compression with the naked eye was difficult despite the fact that I was viewing the images split-screen on a Cine-tal reference monitor.
The only intermediate format that has ever maintained true mastering quality for me has been 10bit uncompressed. I could reprocess, capture and convert imagery endlessly when working with uncompressed originals. I was able to handle the files over and over again without fear of loosing data. With ProResHQ I found nearly that same quality at about 1/5th the file size and throughput needed for a standard uncompressed 10bit HD workflow.
While re-compressing the video in software (or with content captured in the standard version) the image started to degrade after about 10 round trips through the decompression / recompression cycle. In the hardware solutions (the IoHD and Kona 3) I found something very different. I could not see any noticeable differences between the 1st generation ProResHQ file and the 50th version after being run thru AJA’s hardware. While that is more generations of capture and playback that one file should EVER need, I was stunned that even in the process of capture the files held up better than I ever imagined, certainly as well as staying uncompressed could give, not to mention considerably less storage is required for the ProRes compressed files.
While comparing the software-converted files I noticed a couple of interesting issues. My testing found that when the camera native codecs (DVCPROHD, HDV or SxS) were converted to ProRes in software they universally ran better when using the Standard version of ProRes rather than choosing the HQ version. This was most noticeable on HDV and DVCProHD originals that seem to consistently stutter or choke when playing back software-converted HQ content from compressed camera originals. The best explanation I have is ProRes HQ wants to fill in 10bits of information from the 8bit native compressed files. Due to the massive amount of processing needed to handle this conversion, it overwhelmed most systems on playback, whereas the standard version of ProRes is not trying to over-sample the 8bit data but rather it allows that data to move freely within the larger 10bit color space, easing the load on the CPU when processing the video for output.
One thing to note, the worst software conversion was using Final Cut Pro’s (v6.0x) Media Manager to handle the process. Not once did MM ever do the conversion in a manner I deemed correct. The most glaring example of this error was when P2 or native HDV files were converted inside Media Manager, they would retain the “native” aspect ratio of the original content even after conversion to ProRes. This caused applications like Apple’s Shake and Adobe’s After Effects to have playback errors in the software-converted versions due to the “incorrect” aspect ratio of the conversion, despite the fact the files play fine within the Final Cut Studio apps.
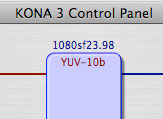
The Kona 3 Control Panel indicating that Final Cut Pro is
receiving sending less that 100% of the full frame
The best conversions were done in Compressor (#1 overall) or making the conversions one at a time in the QuickTime player. Both of these methods produced working ProRes files from the camera’s native codec in the correct aspect ratio every time.
Scalar Playback and Performance Enhancement
Since ProRes has the ability to scale during playback, I wanted to share some insights on how this works and what pitfalls can arise when it happens. Apple allows ProRes scaling capabilities for one reason; it allows the user realtime playback of more layers of video, filters and effects. FCP sees that it needs additional CPU functionality so it dynamically asks for a scaled version of your original video allowing the processor to use its cycles for processing the filters and effects, rather than decompress the larger (and better quality) video file. Think of it as Dynamic Offline.
That presents a real issue for fans of the RT extreme engine, since FCP is not using all of the data available. Without rendering the sequence, the user is actually sacrificing the quality for playback, not as much an issue for monitoring as it is for those who use the RT engine to bypass the rendering process for output. Within the Kona Control panel whenever the frame buffer indicator changes to red, it is showing that Final Cut Pro is delivering less than a full raster size frame for output to your IoHD or Kona card.
8bit vs. 10bit in Post


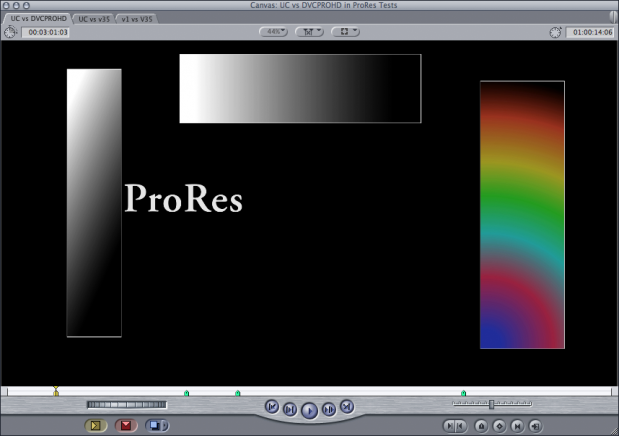
More levels of gray give the gradient on the right a smoother look.
We mention “Bit Depth” here as it refers to the potential accuracy of color reproduction. The number of levels of gray that can be faithfully reproduced determines what we call the default “Bit” or Color depth. 8bit color depth is by far the most common in use today, with cable and satellite transmissions as well as all Mpeg encodings, as are all in-camera videotape formats. However, when not handled correctly, the 256 levels of gray can create problems often appearing as banding or artifacts during playback.
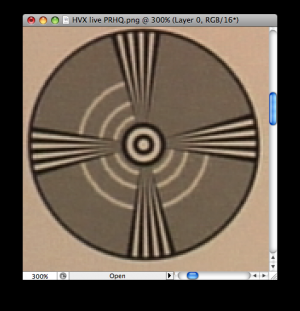
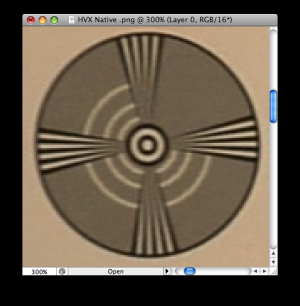
ProRes captured version on the left shows greater detail and sharpness over the same image captured as DVCProHD.
Working within a 10bit space offers users wider latitude when doing effects, color correction or image processing due to the much larger 1024 levels of gray per channel. Having more information allows the image processing to use as much of the available color space as needed when applying color correction, converting or especially when compressing the image back down to 8bits for delivery.
Compressed Vs. Uncompressed Workflows
One of the biggest issues in most post facilities is maintaining quality all the way through to delivery whether the content is used over the air or not. The camera native codecs are truly amazing for their ability to capture light as RGB data in a quality form. However, that “native” data was only meant to work within the manufacturers proprietary hardware and custom designed software in specific cameras. That we can edit these files at all is truly amazing. Prior to the firewire revolution the number of people that ever saw a camera’s native compression schema were very, very few.
While an uncompressed workflow’s higher quality and ease-of-use often win the debate for many users, the hardware requirements for a multi-user uncompressed HD environment are financially or technologically prohibitive to the majority of users. Knowledge of fibre connectivity, switching, compression packets, drive throughput, sustained data rates and image compression is now a necessity. Few if any, understand the requirements for sustained storage capable of delivering in excess of 200 MB per-second, per user, to allow them to work efficiently and effectively in uncompressed HD. With that in mind it is easy to see the need for a viable, cost effective solution for working in 10bit HD from Apple is long overdue.
I had resigned myself to using only uncompressed workflows for all HD mastering and relying on DVCProHD as my “offline” format. With the advent of a truly professional intermediate codec like ProRes, in association with tools such as AJA’s IoHD, I have given up my reliance on uncompressed workflows and have begun utilizing only ProRes workflows. It is my belief that ProRes is one of the last pieces of the puzzle allowing Apple to take its place at the head of the line in current and future NLE production tools.
Advantages with HDV Content
While the HDV format offers Final Cut Pro users cost effective ways to enter the HD editing, the low cost of these tools belay the plethora of issues involved with natively editing HDV content on a Mac. Whether users capture HDV direct into ProRes or work with software converted files, ProRes allows welcome relief from the Long-GOP mpeg editing issue, offering HDV users full I-frame editing, RT extreme acceleration, true 10bit capabilities and a reprieve from the endless rendering needed for playback while still allowing users the use of tools they are accustomed to working with. A HDV to ProRes workflow offers users of these low cost cameras to edit projects with the ease and convenience that they shot them.
Hardware Support for ProRes
While a number of companies claim they have hardware support for capture into the ProRes codec, AJA has exclusivity with the IoHD, designed in cooperation with Apple, just as the original Io product line was, and no other manufacturer can produce ProRes-specific hardware based capture acceleration because of the cooperation that Apple and AJA have together with this product line.
Manufacturers other than AJA claiming ProRes hardware support are only handling that compression via the host computer’s CPU, robbing precious processing cycles to encode in this mathematically intensive task. While the IoHD can handle its HD captures on virtually any MacBook Pro or MacPro running on an Intel processor.
Apple ProRes vs. Camera Native Compression
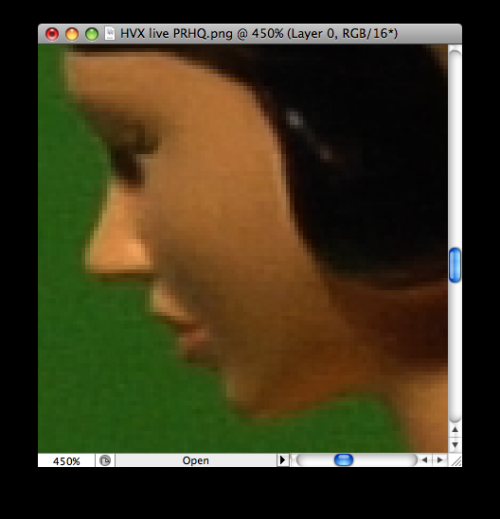
Note that the DVCPROHD version on the left has slightly more banding in the cheek areathan the ProRes version on the right
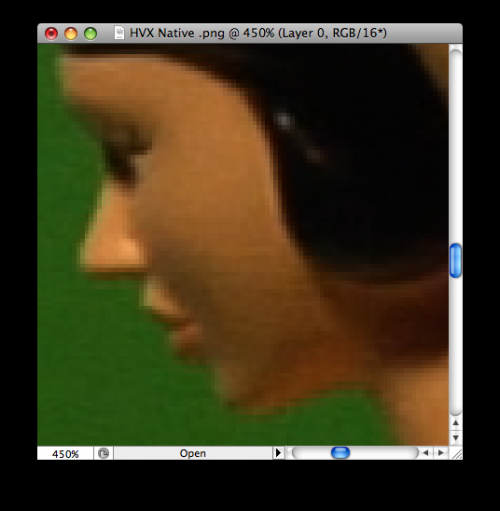
Note that these images are magnified to allow for visual comparison
Conclusion
Apple’s ProRes codec finally allows Final Cut Pro to be the useful and viable alternative to what was a painfully laborious process of editing uncompressed HD on a Mac. Whether your content is captured live from camera, mastered from existing tape or converted in software from any of the existing media formats, ProRes is something you should seriously look at. This is especially true for anyone looking to create and maintain the highest quality imagery throughout the production process. ProRes was not intended to replace the camera native codecs we use daily but to extend the post process into the future. With ProRes’s relatively low bandwidth requirements for playback, modest needs for file storage and extensive capabilities within the RT Extreme architecture for both quality, performance and incredibly high quality playback. Apple has finally shown the postproduction world there is more within Pro Apps than just hype. Final Cut Pro Users will understand that uncompressed HD quality has arrived in a compressed space with the release of ProRes and that leaves the once vaunted DVCProHD workflow for Final Cut Pro floundering in an 8bit quandary of banded skies and broken graphic dreams.
Tech Notes
The original files for this test were assembled from camera original materials in an Adobe After Effects project and delivered as video, additional text and gradients elements within the AE project were all processed for testing as 10bit uncompressed 4:2:2 1920 x 1080 23.98 Psf output via an AJA Kona 3 card (driver v5.2). This master uncompressed 10bit 4:2:2 YUV file was first laid off to HDCamSR tape, then the output was captured via a single link HDSDI to an AJA IoHD and Kona Desktop setups for testing.
IoHD setup: 15in. MacBook Pro 2.66, 4 gigs RAM, OSX 10.5.4, QT 7.5 FCP v6.0.4 All laptop content was captured direct to a Sonnet F2 eSata drive via a Sonnet ¾ express card.
Kona 3 Desktop setup: Quadcore Intel Mac with 16 gigs of RAM, OSX 10.5.4, QT 7.5 FCP v6.0.4, all desktop content was captured to and played back from a Dulce DQ Pro array via the supplied SAS connection.
The camera comparison was captured with the laptop IoHD configuration, simultaneously recording to P2 and via baseband component out using a Panasonic HVX 200 and simultaneously recording to SxS cards and baseband via the HDSDI out of the Sony EX1 Live capture was done direct into both the 720 and 1080 formats, due to the nature of the recording characteristics of both cameras the duplicate frame extraction for the live files were done in post to achieve to progressive frames from the interlaced output.
All Trademarks, service mark and registered copyrights included or mentioned in this article are used regard and within the rights of the individually registered owners. Use here does not constitute an endorsement for products or services.
Special Thanks
To Leader Instruments and Tektronix USA for the waveform and vector scopes, AJA Video Systems and Fletcher Camera Chicago for hardware and technical support, Sonnet Technologies and Dulce Systems for storage, and most of all to John Ladle at HDSales for keeping my nose to the grindstone.

Filmtools
Filmmakers go-to destination for pre-production, production & post production equipment!
Shop Now