The RED camera and its proprietary .R3D, file-based workflow has been a subject of much discussion, speculation and frustration for many in the post-production industry since it began shipping. It has also made a lot of shooters and camera owners into post-production people since they are choosing to do (or attempt to do) a lot of the complex post-production themselves. There has been much discussion on reduser.net from day one on how best to edit RED camera material. Early on RED had an exclusive deal with Apple and that made Final Cut Pro a choice for most. FCP’s QuickTime based architecture makes it a natural choice since RED supplies (for free) a QuickTime component for download from their website.
This codec will give any Intel Macintosh the ability to playback the QuickTime reference files (or “proxies” as they have come to be called) that the RED camera generates during a shoot. These files live in a folder with the raw .R3D file and as long as they are kept together on a hard drive the RED codec will allow most any QuickTime aware application to work with the clips. While very convenient, the ability to use the proxy files is very processor intensive. Depending the speed of your hard drives, speed of your computer and any number of other factors (RAM, background processes, alignment of the moon) playback might not be perfect. These proxy files can also be imported directly into Final Cut Pro and edited. A recent update to FCP will also allow the application the ability to import native RED QuickTime files. This is a re-wrap of the .R3D files into self-contained QuickTime files. Both methods (proxies and native RED QuickTimes) are similar in performance. A search of reduser.net will reveal people who have great success with these methods and others who have great frustration. While the process does work it is, IMHO , less than ideal for anything other than the simplest single-layer edit. One reason I say this is that RED’s own white paper on the subject states “Because native RED media is extremely processor-intensive to work with, you’ll want to use Unlimited RT while you work. Otherwise, you may need to do a lot of rendering.” Whenever I see instructions to edit a Final Cut Pro timeline in Unlimited RT I start looking at options of how I can transcode the footage to a more use-able format. While this does make realtime full frames-per-second playback (somewhat) possible it becomes a bottleneck in a smooth edit process when you begin to do things like adding transitions and effects, make multigroup clips for a music video or multicam shoot, add motion and/or speed effects or anything you do in the normal course of an edit. It becomes time to render pretty much everything. Rendering each and every dissolve and playing back as less that the full frame rate is not an efficient way to edit.
That leaves the question of: Into what format do you convert your RED footage in order to offline edit?
This whole discussion will beg the question of why do you need to offline in today’s world of file-based, low bandwidth / high quality HD codecs? Truth is you really don’t need a traditional offline to online workflow with much of the technology that is available today. It’s often more a matter of retraining your thought process to working with graphics, audio lay-back, fine tuning and things like that for an online today more than it is recapturing media at a high resolution. Or it may mean passing off the edit to an online editor more fluent in final graphics and broadcast specs than a creative editor is. But with RED and the processor intensive nature of the RED proxies and RED QuickTimes an offline to online workflow is a great option. Even if you are doing it all yourself you can still “offline” in ProRes and “online” with native RED QuickTimes which can be sent to Color. The RED Final Cut Studio whitepaper (here’s a pdf link ) outlines this process. It is an extra step but it does work relatively well (at least it did on the two jobs that I have tried it on).
My choice for offline editing in Final Cut Pro is to convert all of the raw footage to Apple’s compressed but high quality codec ProRes 422. There are choices for ProRes in both standard definition and high definition as well as regular quality and HQ (high quality). I usually offline RED projects at 1920×1080 ProRes with the occasional conversion to a standard definition ProRes file depending on where the editing will take place and on what type of system. Older G5 Macs will work very well with SD ProRes files. Since this is offline editing there is no need to use the higher bandwidth ProRes HQ since the visual quality is pretty much indistinguishable. What if you don’t plan to online your RED project? Then a conversion to ProRes HQ would be in order but doesn’t it seem to defeat a large part of the purpose of shooting a “camera raw” format like RED when you don’t conform an edit back to the original raw .R3D files and all of the advantages the format offers? Would you transfer a film with only a one light and never properly re-transfer selects? There are so many options for RED available today so the question is: why would you not? That’s a discussion for another time.
Using Apple Compressor
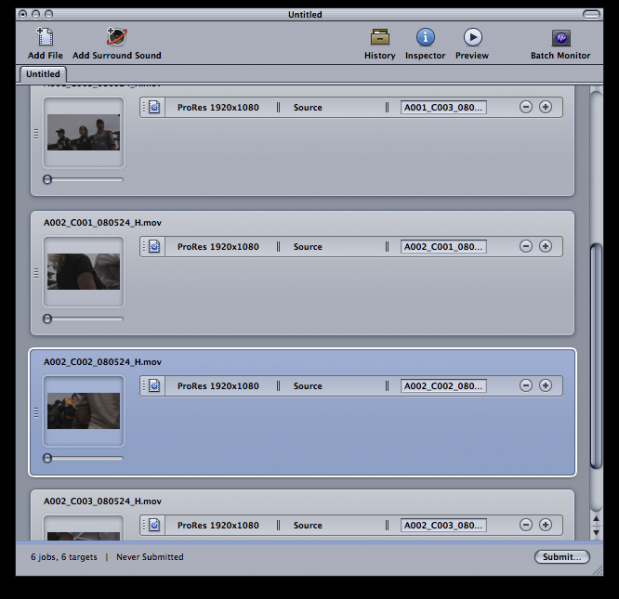
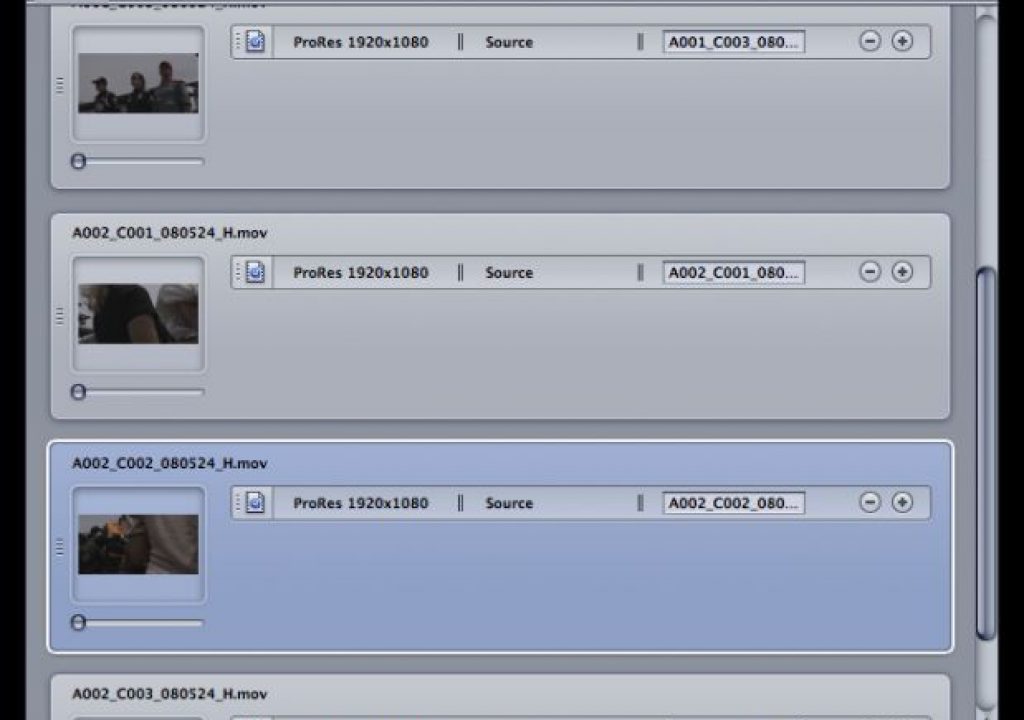
A conversion of the raw RED footage to ProRes files for the edit can happen in one of three ways. A tried and true method that has worked since day one is using Apple Compressor and running the RED camera created proxy files through a batch conversion to create self-contained ProRes QuickTimes. As mentioned above the RED camera creates the proxy files when shooting (or they can be regenerated in RED’s REDAlert software) and these proxies can be placed into a Compressor batch and be trans-coded into a new self-contained QuickTime.
 Since the RED camera places each shot into its own folder and then those folders are usually placed into another folder per download of CF card, getting the proxies to Compressor can be a time consuming process if you attempt to drag them in one at a time. That’s where a search on your media drive for a specific string can come in handy. Since the QuickTime proxies always have an identifying suffix you can just search for that specific suffix and then drag the search results into Compressor. The proxies are created in 4 sizes, _P for the smallest size, _M for medium, _H for high and _F for full size. Depending on your shooting resolution you could use the _M, _H or _F files for processing since Compressor will scale the footage to your desired resolution. But be aware that the _F is a big file when shooting 4K. To make selection of these files easy I use the Find function of my favorite Finder replacement tool Pathfinder . Pathfinder allows you to designate a single directory for very detailed and very powerful search strings. Search for “_H” and all the _H size proxies from a shoot show up in Pathfinder’s search results. Drag the results to Compressor and then choose your setting:
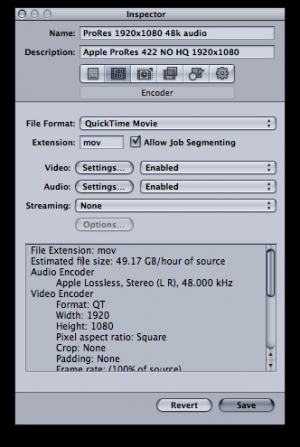
I use a ProRes 422 1920×1080 setting but once in Compressor the files can be trans-coded to a variety of resolutions and formats. If you are working on a less powerful computer then you could even create standard definition DV rez files for easy playback. Once Compressor has batch processed the files you are ready to edit.
RED’s own REDrushes.
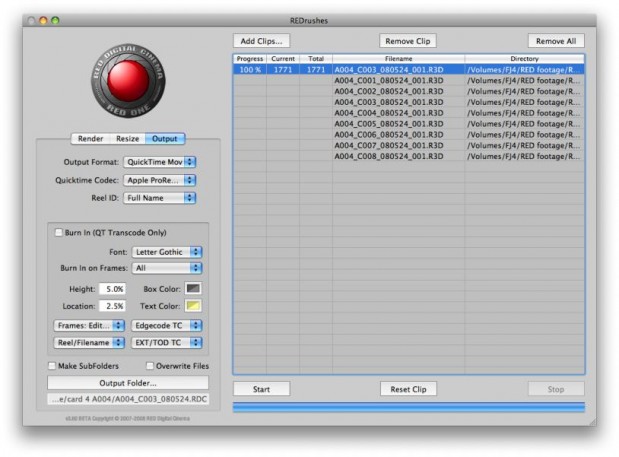
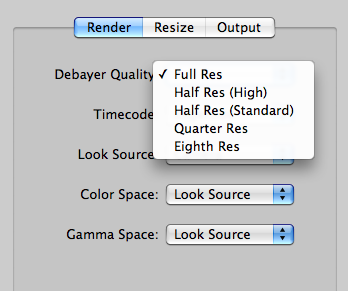
A second method involves the RED application REDrushes. REDrushes is installed when you install the REDAlert program for grading and working with single shots. REDrushes uses a RED utility that is installed with REDAlert to batch render new QuickTimes from the original .R3D files. REDrushes is very nice in that it allows direct encoding from the raw .R3D files and as well as a lot of control over the import parameters. The Render tab allows different debayer quality in the trans-coding (beware that a full debayer takes a lot longer that quarter), the output format and codec, the ability to apply a look file and (very important) which of RED’s two different timecode tracks to use:
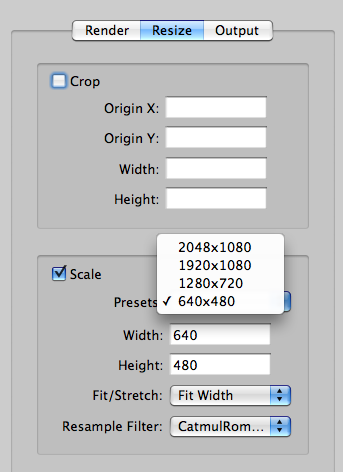
You can also custom crop the footage and scale it to 1080 HD and downward in the Resize tab:
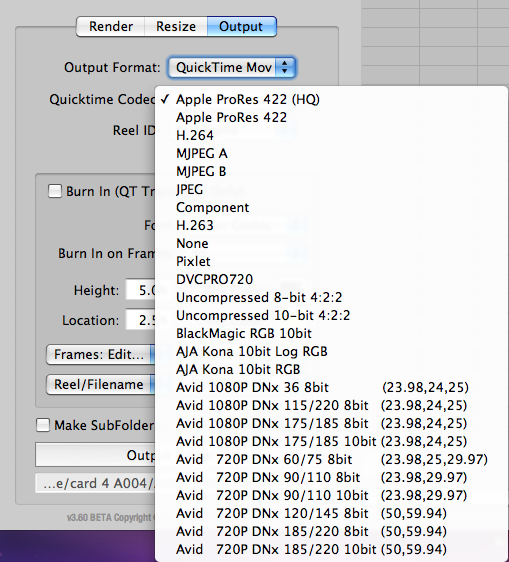
The Output tab provides output formats (QuickTime, DPX or TIFF sequences), output codecs, the ability to add Burn-In timecode and the output path where the new files are saved:
It’s also multicore aware so it will use your 8-core Mac Pro’s processors to their fullest extent. Once you have your settings and have added your files to process via the Add Clips… button it’s a press of the start button and away it goes. The control that REDrushes provides is one of the best options presented here and would be the best solution except for one big annoyance, it seems to crash a lot. I’ve used different versions on two different machines and have had mixed results lately with REDRushes stability. Maybe I am holding my head wrong. An informal discussion on reduser.net reveals mixed results with REDrushes. Comments like “My experience – only crashes when/if close to running out of HD space” and “I get best results on an 8-core system by doing 4 clips at once and setting the cores per clip at 2 and then walking away. Or if I’m going to continue working on the machine, do 3 clips at once and leave the # of cores at auto” helps hint at how to keep REDrushes running smoothly. Of course only doing 4 clips at once totally defeats the purpose of batch rendering as you can’t place a whole shoot into the application and allow it to render overnight. I hope that RED continues to improve the stability of REDRushes as it is a RED editor’s best friend … when it’s behaving.
The Final Cut Pro Log and Transfer tool
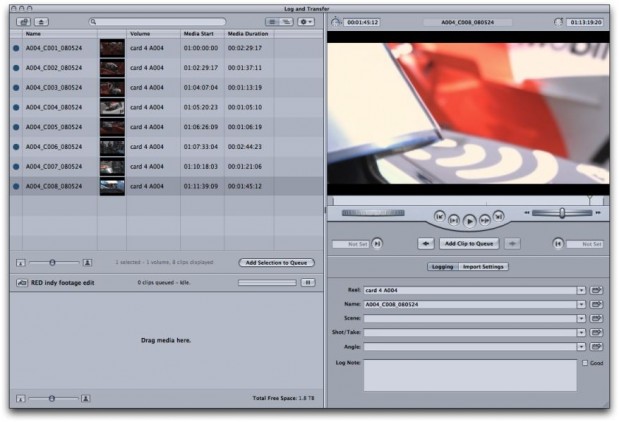
The third method of trans-coding RED files to ProRes is right from within Final Cut Pro using FCP’s own Log and Transfer tool. This process will be familiar to anyone who has loaded P2 media into FCP as the process is nearly the same. Near the end of 2008 RED provided new support for the editing of “native REDCODE media (R3D’s) wrapped in QuickTime.” This new functionality involved importing the media through the Log and Transfer tool. But these QuickTime wrapped R3Ds are still very processor intensive to work with and don’t much of any real performance advantage over editing the proxy files. The Log and Transfer tool also offers the option to encode to ProRes and it makes importing very easy though the clips do take some time to process. Upon opening the Log and Transfer tool you should first check your preferences:
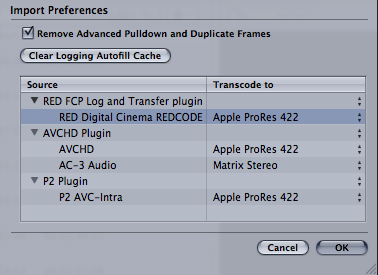
Set the import to ProRes (or ProRes HQ if you desire) and then load the media by navigating to your R3Ds via the Add Folder button in the upper left corner. Once FCP has scanned the media the shots will load into the L&T window. This tool provides a lot of options for individual clips as you can scan and shuttle each clip, mark IN and OUT points if you only want to take in specific parts of a clip as well as log and make comments. When you are ready to process you can drag individual clips into the Queue (it says “Drag media here” so it’s a bit idiot proof) or select the Add Selection to Que to add all the clips or clips from a multiple selection. FCP will now begin the process of trans-coding the R3Ds to new, self-contained ProRes clips. It’s important to remember that new media is created in the Capture Scratch folder that you have designated and FCP will place the new clips into your currently selected Logging Bin. One other item to note is that at this writing FCP will only bring the clips in at 2K (2040×1024) resolution. There are no options to trans-code to 1920×1080 (or any other reduced size) or keep the 4K clips at 4K. A 2K ProRes file actually plays back pretty well but files that size might just be a bit overkill for offline editing depending on your system.
One other thing that the L&T tool does offer is the ability to apply a custom look designed in REDAlert to the files upon import or use one of the default custom looks provided:
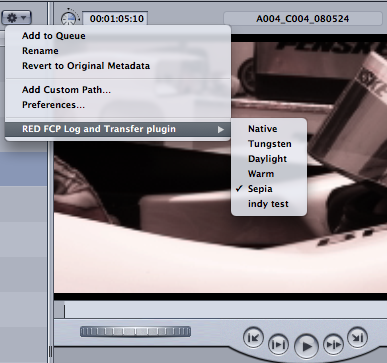
You can save your own custom presets in REDAlert via the File > Save Preset setting and they will show up in the RED FCP Log and Transfer plugin menu above. Choose that new look from within the L&T preferences and this look will be applied to all the clips you are importing. Be aware that there are some limitations on these “look” files created in REDAlert. They were outlined by Adam Wilt in his PVC article RED+FCP: Native REDcode Importing.
Encode times
By far the biggest downside to trans-coding to ProRes is the time that it takes the machine to process and churn out new files. As a quick test I took the same 1 minute 13 second .R3D file and timed the different encodes (on a 8-core 3 ghz Mac Pro, 3 ghz RAM, fiber channel RAID). Here are the results:
Final Cut Pro Log and Transfer tool: ProRes HQ – 6:13, QuickTime native – 10 seconds – This isn’t surprising since a “native” clip is only getting re-wrapped in a QuickTime wrapper and copied to your Capture Scratch folder but you still have most of the processor intensive playback issues that you have with proxies.
Redrushes: Quarter resolution debayer quality to 1920×1080 ProRes HQ – 1:33, Quarter resolution debayer quality to 640×480 ProRes HQ – 1:03, Quarter resolution debayer quality to 640×480 H.264 – 1:04, Full resolution debayer quality 1920×1080 ProRes HQ – 7:56, Full resolution debayer quality 640×480 ProRes HQ 7:40.
Compressor: ProRes HQ full 2K resolution – 8:34, 1920×1080 – 13:38
It’s easy to see that a ProRes encode takes a lot of time when compared to using the proxy files or making RED QuickTime native files. This is where leaving a batch encode running overnight is a great solution. Compressor would seem to still be the best option since it is reliable and can down-res the files from 2K and 4K to a more manageable size. If FCP’s Log and Transfer tool could down-res then it would be a great option too. To me, the absolute best option would be a stable REDrushes. Its control and ease of use trumps both Compressor and FCP’s Log and Transfer tool. A dedicated Macintosh that has had its operating system slimmed down to only the barest essentials might make for a more stable REDrushes and make a great encoding station. If you are a hardcore RED camera post-production house/user then that might be the best investment of all.
But wait … there is a 4th way. All of the above methods stay directly in the RED/Apple universe. If you want to venture outside of that universe you could use a 3rd party application like Clipfinder. The RED user community has built a number of great applications and utilities and Clipfinder is just one example. It’s a free application (donation accepted) that is very similar to REDrushes in functionality. And it’s speedy. It created ProRes files from the same test clip used above in 1:22 at 1920×1080 doing a quarter resolution debayer and a lightning fast 32 seconds for a 640×480 quarter resolution transcode. The more options the better.
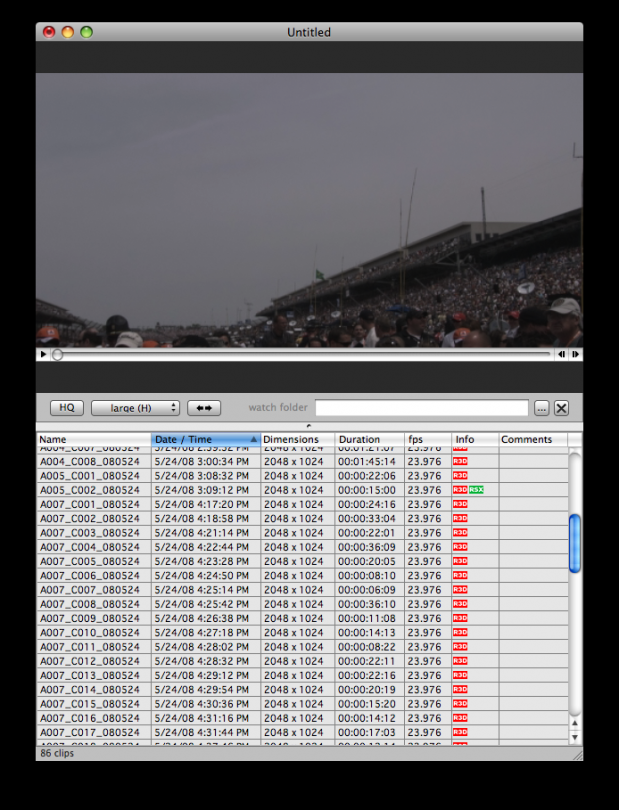
You can load whole directories and see valuable info like the duration and resolution of a shot and the presence of a .RSX look file. It also provides all of the rendering options that REDrushes provides in its own interface with the ability see cropping options and save presets:
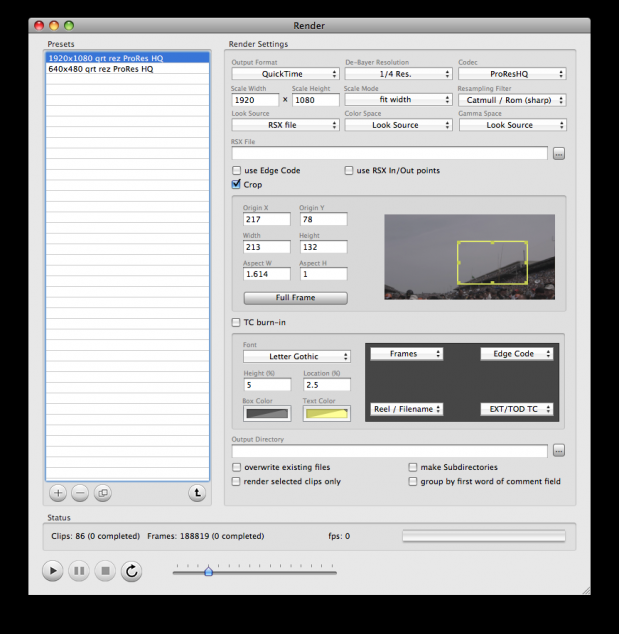
There’s even a “watch folder” option that will scan a folder and render any newly added clips. There are even more options detailed in the extensive help files on the Clipfinder website. It uses the same underlying technology that REDrushes uses to render its clips so my question is how stable of an application is Clipfinder? Is it more stable than REDrushes? I put on a batch of an entire RED music video shoot (102 .R3D files) and asked Clipfinder to render 640×480 H.264 BITCs for the client to preview and log the footage. When I got in the next morning I had a folder full of 102 640×480 H.264 BITC QuickTime files:
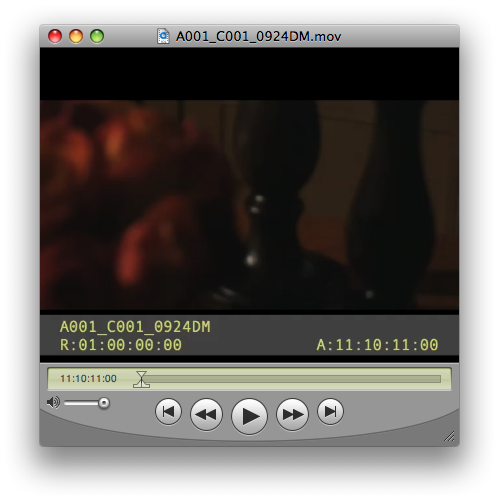
So far I like Clipfinder very much!

Filmtools
Filmmakers go-to destination for pre-production, production & post production equipment!
Shop Now