Although I am primarily an After Effects artist, I also spend some time in Final Cut Pro and Motion. Quite often, I want to translate a favorite technique from one into the others. Unfortunately, this is usually accompanied by a spirited session of find-the-filter as the same visual effect may have different names – even between Apple’s own applications!
Changing Black & White
When I want to change a color image to grayscale, the fastest way to get an acceptable image* is to apply an effect which changes the darkest values to black, the lightest values to white, and maps grayscale values in between. In After Effects, this effect is called Tint (in the Color Correction category) – you can pick what colors to map the darkest and lightest values to, but the defaults of black and white work fine.
Final Cut Pro also has an effect called Tint (in its Image Control – not Color Correction – category), and at its default settings it provides the same results as AE’s Tint. Oddly enough, FCP’s Tint only has one color swatch, which yields the results whether it is set to black or white, but as mentioned the default works fine for the task at hand.


To quickly convert a color image (top left) to grayscale (top right), we use Tint in either After Effects (above left) or Final Cut Pro (above right).
 In Motion, the corresponding filter is called Colorize (seen at left), in its Color Correction category. (The Motion filter called “Tint” adjusts the midtone color, not the black and white colors – more on that later.) For better or worse, Motion’s Colorize defaults to warmer variations of black and white; I have to save a Favorite with pure black and pure white to use it as a simple grayscale effect.
 By the way, both Motion and Final Cut Pro have a filter called Gradient Colorize. Although it defaults to a black and white ramp – which would make you think it would yield the same results as AE/FCP’s Tint or Motion’s Colorize – the default results (seen at left) are much starker than either Tint or Colorize.
Changing Middle Gray
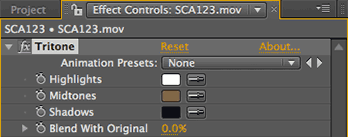
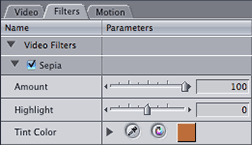
If I want to keep the black and white points in a clip the same, and change the middle luminance value to a color of my choosing (think sepia effect), the fastest effect to reach for in After Effects is Color Correction > Tritone. In Final Cut Pro, this effect is actually called Sepia (in its Image Control category); in both cases, they default to a sepia-ish tone, but you can set this middle color to taste.


AE’s Tritone (above left) yields similar results as FCP’s Sepia (above right).
 Motion too has a filter called Sepia (seen at left). But unlike Final Cut Pro, it is in the Color Correction (not Image Control) category, and you can’t change its middle color. If you want to do that, you need to apply Motion’s Tint filter (which is different than either AE’s or FCP’s “Tint” effect).
The reason I’ve been sorting through this madness is that we’ve just finished an article on creating grayscale images for Artbeats.com; it should appear in their Written Tutorials section roughly the first week in April. (*And no, the answer isn’t always just reducing the saturation.) The lack of consistency between Apple’s own two programs is particularly maddening: The parameters for “Tint” appear deceptively similar between Motion and FCP, but they work differently; “Sepia” is also different between the two programs (for those keeping score, Tint in Motion is like Sepia in FCP).
Excuse me while I run screaming into the night…
The content contained in our books, videos, blogs, and articles for other sites are all copyright Crish Design, except where otherwise attributed.

Filmtools
Filmmakers go-to destination for pre-production, production & post production equipment!
Shop Now


