
What follows in this article is not a debate of Avid vs. Final Cut Pro or a conversion document that says you should move from Final Cut Pro to Avid Media Composer, but rather a step-by-step guide for anyone new to Avid (or curious about the software in general) to launch the software and perform a few basic functions. It will be geared more toward the FCP editor, but a lot of the basic functionality is the same in many non-linear editors. I won’t compare and contrast various Avid and FCP features as that’s not the focus of the article though I will point out the Avid equivalent of a number of FCP tools. And if you’ve never edited with a NLE application before then consider this primer a way to get your feet wet in Avid Media Composer 3.5.
The trial version of Avid Media Composer is free with “full functionality for 14 days following installation” and includes electronic documentation so a lot can be learned about the software if you have the time to spare. I think the most important thing for a Final Cut Pro editor trying out Media Composer for the first time is to throw away any preconceptions that you may have heard or read about how Media Composer differs from FCP and realize that as a tool it is really … no better or no worse. They are different applications that do some very basic things in very different ways. With that in mind I hope this tour through some of those very basic functions will be a good introduction to Avid Media Composer.
No Dongle = Yes to Trial Version
With the release of Avid Media Composer 3.5 Avid began a path to eliminate copy protection via the hardware dongle that has been a piece of Avid culture for years. While much maligned over the life of the product the dongle still has its fans. But one thing that the elimination of the dongle has done is allow Avid, for the first time, to offer a demo version of Media Composer Software. You can now download a fully functioning 14 day trial version. The debate is open as to the 14 day length of the trial but it’s apparently due to licensing of certain codecs or software used within MC Soft that sets the limit to 14 days.
Of course the first step is to download and install the software. 3.5 is available for both Macs and PCs (this article focuses on Macs with Macintosh key commands) though it is only Intel compatible so older G5 and G4 PowerPC users need not apply. It won’t let you install it at all … I know as I tried. You have to fill out a form and Avid will email you a download link so be sure and check your spam folder if you don’t see the return email.
Lay of the Land
First launch Media Composer with from the icon in the dock or double click the icon in the Applications folders. Once launched you be greeted with the Select Project window:
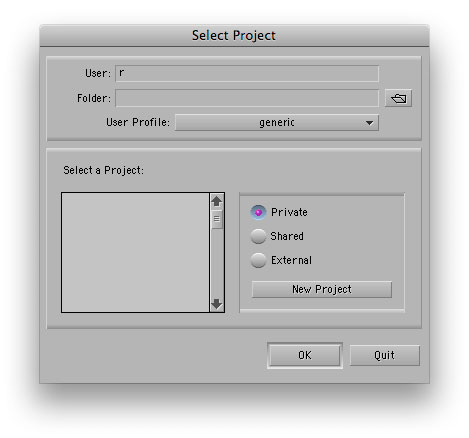
A blank Select Project window that shows upon launch
Unlike Final Cut Pro or Adobe Premiere you can only have one Avid project open at a time, though you can open bins and edit sequences from other projects into your currently open project via the File > Open Bin menu command. The Select Project window allows the editor to choose two main things: the project and the User Profile. Avid collects all the user settings into a single folder (HD > Users > Shared > AvidMediaComposer > Avid Users) that is movable from machine to machine. These user settings include things like custom keyboard layouts, saved Bin View columns, timeline customizations and saved export presets among other things. FCP has many of these same customizations but they are individually saved in different folders. The Select a Project pane is where you choose a project. If you are starting a new project then the Select Project window is also where you create a new project. Clicking the New Projet button you will select the name and format of the edit. This setup could somewhat be compared to the Sequence Presets in FCP.
If this is your first time in MC Soft click the pop-up menu next to User Profile and choose Create User Profile. Give your profile a name as you have to have a User Profile in order to launch a new project. You now have to create that project. Click the New Project button, give it a name and choose the type of project:
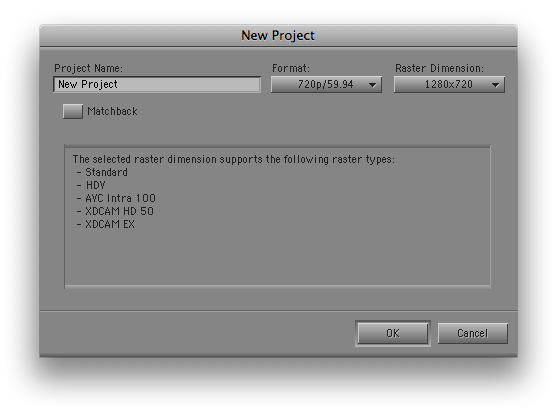
The New Project setup box
You have the option of all standard resolutions and frame rates. You also have to choose the Raster Dimension. Since MC natively supports formats like DVCPRO HD, XDCAM and HDV they support the odd raster size that some of the formats use like 1440×1080 for HD instead of the standard 1920×1080. Native support means less rendering and less processing power required for playback.
For the purposes of this article I’m going to use 720 59.94 as my format of choice so this is the format I will choose under the New Project setting. Upon creation of the project you will be greeted with a blank Composer window (think FCP’s Viewer and Canvas in one window), an empty Timeline window, a single empty bin and the Project window. The Project window is where all of your bins reside and they can be seen in the Bins tab:
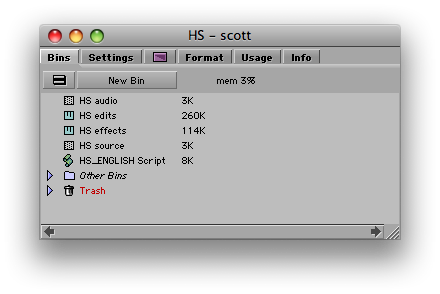
A newly created Avid project
There are other tabs across the top so feel free to click through and take a look at the tabs. They are for information like the project format, Usage that keeps a running tab of how long the project has been in use, Info for hardware and memory allocations, and a purple icon that is the effects tab. The effects tab houses all the different effects and transitions. They are broken down by class on the left with the different effects within a class on the right. Of special note is the Settings tab. Settings is Avid’s preferences menu. In fact if you access the Avid Media Composer > Preferences menu it takes you to the settings tab. There are way too many settings here to go over in this article but let’s look at a couple of them specifically.
With the Settings tab select in the Project window scroll down to the Media Creation setting and double click it. This setting is where you tell Avid how you want it to handle media creation from things like importing and digitizing to title creation and rendering:
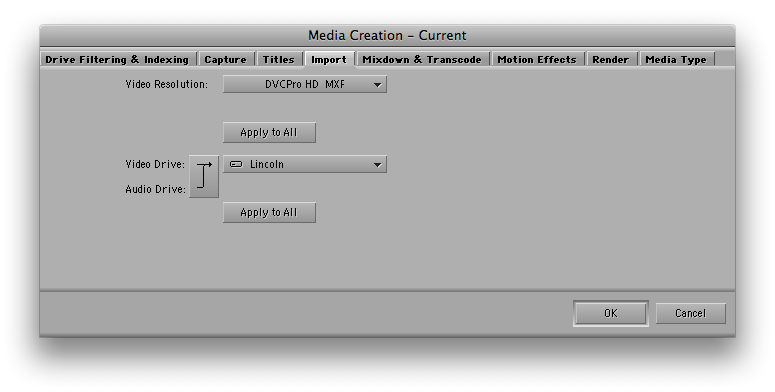
Media Creation preference
It’s similar to setting the Capture Scratch folder in FCP though you are setting more than just where media will reside. The easiest way to set your Media Creation settings is to select a tab like Import and choose both your desired video resolution and your Video Drive. You may see options for different resolutions like DNxHD where you will have the option of setting different bit rates like DNxHD 145 under Video Resolution. Next choose your designated fast media drive as your Video Drive. If you only have one fast RAID then select that drive and choose Apply to All as this will select that media drive for all media created such as renders, imports, motion effects etc. You can also choose to send audio and video to separate drive by clicking the arrow if so desired. Once you’ve set Media Creation choose OK to save those settings.
The second setting to check is Keyboard. Double click Keyboard and a default Avid keyboard layout will appear:
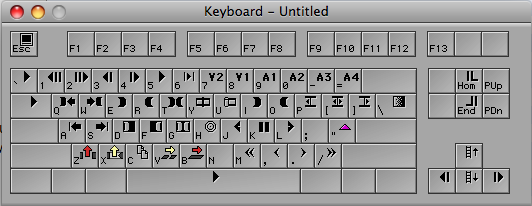
A default Avid keyboard layout
It’s important for an editor coming from FCP to understand this layout and how Avid thinks about its keyboard. Unlike FCP, the Avid keyboard doesn’t try to make it easy to remember keys like S for Slip or D for Distort but rather it places the keys in a more frequently used type of positioning (read the Keyboard Manifesto for more about this topic). If you hover your pointer over the keys a pop-up will appear to show what each key does. When you hit the SHIFT key you will see the keyboard change to show what keys are mapped to a shift+keystroke. There’s not many shift keys by default so they are waiting to be mapped. Also, all of the F-keys are blank so they are an open pallette to mapping your most frequently used commands like Match Frame, Add Edit, and Segment Mode (more on that later) to name a few.
Next choose Tools > Command Palette (or command+3). This is a list of all the button commands in Avid:

The Command Palette lists all Avid button in one palette
Tabs across the Command Palette represent all the various categories for different Avid commands. You can use this palette to map keys to the keyboard. With ‘Button to Button’ Reassignment selected you can click and drag a command from the Command Palette to the keyboard (shift + drag to change the shift keys). Active Palette makes the Command Palette live and you can click the button to perform the various command. It’s highly recommended that new users leave the Active Palette open to help learn the various Avid commands and symbols. Finally ‘Menu to Button’ Reassignment lets you click any button on the keyboard and then assign that button to a menu command. Learn your keyboard well and you can work much faster.
Other settings worth noting are Bin which allows you to set (among other things) Auto-Save intervals. Capture, Deck Configuration and Deck Preferences for many settings relating to tape based capture. And Interface for customizing the appearance of the application.
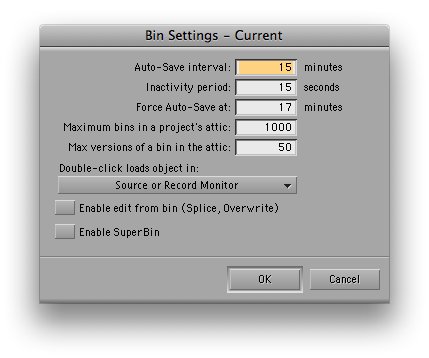
Avid Bin settings prefrence
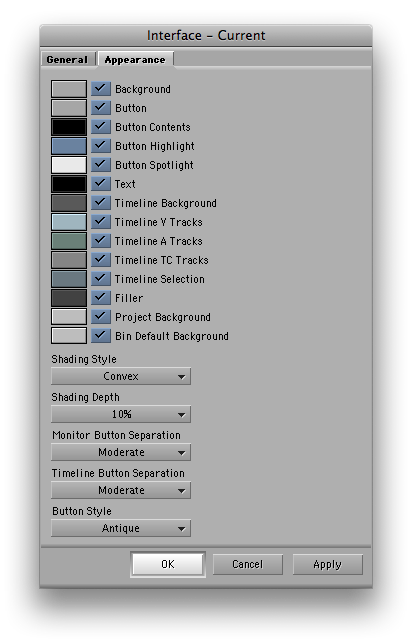
Avid Interface preference for changing colors, shapes and other aspects of the interface
Next, getting media in to Media Composer and making an edit
Next, let’s get some media into Avid. With the release of Avid Media Composer 3.5 a feature has been added called Avid Media Access (or AMA) that makes getting P2-based and XDCAM media into the application a snap. Since Avid’s media format is MXF and both P2 and XDCAM media are MXF getting this media into Avid is a snap. The hope is that in the future Avid will expand the AMA architecture for including many other media formats. The key when shooting P2 and XDCAM is to leave the file structure intact when backing up your P2 or solid state cards as Avid will access this natively. It can also access media directly of the cards.
Getting that media into Avid is easy. Access File > Link to AMA Volume…
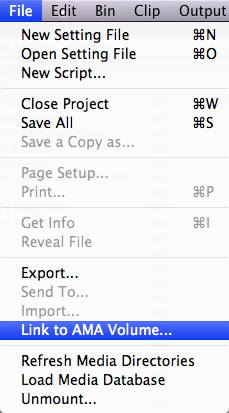
Then navigate to your P2 or XDCAM media and it will immediately create a new bin with that footage in your project. In this project I had a single P2 card from a shoot and I backed up both the CONTENTS folder and LASTCLIP.TXT file into a folder called test footage. I select the test footage folder and AMA created a new bin called test footage and brought that media into the bin with all metadata intact. You know a clip is an Avid Media Access clip as it is highlighted in yellow in the bin. All other media would just sit on the normal bin background color:
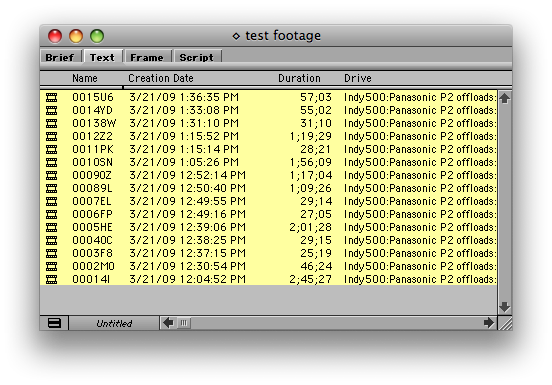
AMA linked media in an Avid bin
You can also bring media into Avid via a firewire connected deck, File > Import, or drag and drop from the Finder. When drag and dropping Avid will create new media in a specific Avid Media File folder on your designated media drive. This is another big difference from Final Cut Pro in that Avid will convert media to its own MXF format and store it in its own folder (that is for all except AMA linked media). One of Avid’s strong points has always been its media management and this is part of the reason why … that and some kind of magic database that seems to work wonders when tracking media over huge jobs. For higher end IO then Avid requires their hardware such as the Avid Mojo DX. Full HD in and out but it is expensive.
Before we make an edit let’s look at an Avid timeline. Choose Clip > New Sequence (or shift+command+N). When you make a new sequence you will be prompted as to where to place the new timeline you are creating:
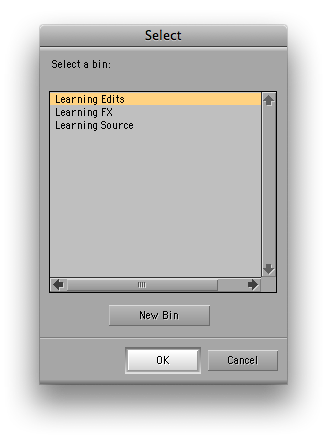
Select a bin to place you new edit sequence in
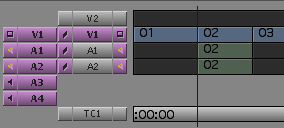
Select your Edits bin that you create in the Project window and you will now see an Untitled Sequence appear in your Edits bin. It’s good housekeeping to immediately rename that sequence into something that makes more sense. You will see a blank timeline with 1 video track and 2 audio tracks. This is the default number of tracks created but this can be changed in the Settings > Timeline preference. Double click a piece of media on the little film frame icon from your bin to open it in the Source monitor. This brings up both sides of the Track Selector Panel in the timeline. The Track Selector Panel (or patch bay) is very similar to that of FCP. In fact, this is where FCP got the design of the FCP patch bay and it was different in early versions of FCP. Source Track selectors are on the left and Record Track buttons on the right:
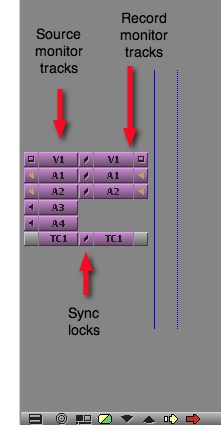
If you have multiple video or audio tracks and you want to change where Source media is patch to you just click + drag in the V1 (for example) track selector on the Source side and an arrow will extend out. Drag that arrow to a new track and it will patch. Before we make any edits, turn on Sync Lock by clicking the little gray box between the two TC1 (timecode) tracks. Sync Locks are turned on when you see the little hash marks between the track selectors. Sync Locks are very helpful when learning the application as it will keep all audio and video in sync by adding filler when needed while performing edits and trims. FCP behaves in a way that it’s almost like always having sync locks turned on. I rarely turn the Avid sync locks off except for when I am doing very specific trims where I want clips to move in a certain way while trimming.
Let’s make our first edit. If it’s not still there, double click a clip from the bin to open it in the Source monitor. Mark and IN and OUT point and then press the Overwrite button ![]() between the monitors or (better still) hit the B key on the default keyboard. You can drag the clip from the Source monitor into the timeline to create and edit but the less drag/dropping you do the faster you can work. The first thing you’ll notice after editing media into the timeline is that you can’t click and select that media that you have just placed into the edit. Clicking on the media tracks or the timecode track of timeline will move the playhead. Clicking and dragging will scrub the timeline. Turn CAPS LOCK on to turn on audio scrubbing. Clicking around in the areas outside of the tracks will produce no noticeable result … at least not yet. This is probably the single biggest sticking point for an FCP editor when you try out Avid. Media Composer doesn’t have the same kind of timeline interactivity that FCP employs. It’s not better or worse, just different. An indepth look at just the Avid and FCP timelines can be found here.
between the monitors or (better still) hit the B key on the default keyboard. You can drag the clip from the Source monitor into the timeline to create and edit but the less drag/dropping you do the faster you can work. The first thing you’ll notice after editing media into the timeline is that you can’t click and select that media that you have just placed into the edit. Clicking on the media tracks or the timecode track of timeline will move the playhead. Clicking and dragging will scrub the timeline. Turn CAPS LOCK on to turn on audio scrubbing. Clicking around in the areas outside of the tracks will produce no noticeable result … at least not yet. This is probably the single biggest sticking point for an FCP editor when you try out Avid. Media Composer doesn’t have the same kind of timeline interactivity that FCP employs. It’s not better or worse, just different. An indepth look at just the Avid and FCP timelines can be found here.
Load another piece of media into the Source monitor to make another edit. Avid and FCP both use the same concept of 3-point editing as the basis for making edits. As long as you have 3 INs and OUTs set you can make an edit. There are exceptions to this rule but that is the basis of the concept. Either set an IN and OUT point in the Source or the Timeline and IN point in the other (the playhead will also act as an IN point if one is not set) and choose to Overwrite, B, or Splice-IN, V.
![]()
The red and yellow arrow icons are used all around the Media Composer application
Splice-In is Avid’s term for an Insert edit by the way so if you Spline In you will move the media after the edit later in the timeline. You now have an actual edit in the timeline. Now perform a second, third and fourth edit and we will use that simple timeline as a base to try Segment mode and trimming. Try and set up a timeline that looks similar to this:
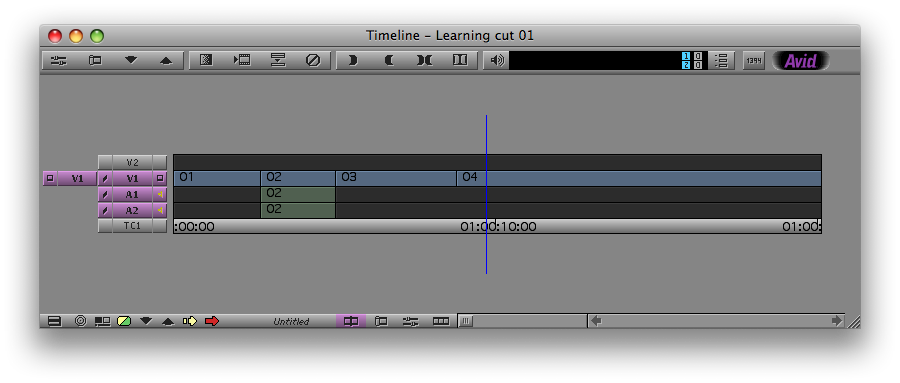
As I mentioned before, Avid’s lack of click and drag timeline interactivity is a big turnoff to many who have only edited with Final Cut Pro or even Adobe Premiere. You shouldn’t think of Avid’s timeline manipulation as being worse, only different. At first it might be very frustrating that you can’t just click and drag clips around an Avid timeline or click and drag to shorten or extend a clip. This can all be done, just in a different way.

To move a clip around the timeline via a drag and drop method you must enter Segment Mode. Segment mode can be entered in several different ways but the active mode is identified by yellow and red segment mode arrows in the bottom left corner of the timeline:

Avid Segment Mode icons in the Timeline window
If you are in a particular mode the cursor arrow will change to the segment mode arrow and that mode will be highlighted. Segment modes are simple and their function is reflected by their color and resemblance to the Overwrite and Splice-In arrows.
The yellow arrow is Extract/Splice-In Segment mode. This mode will allow you to move clips around the timeline and it will shift and shuffle other clips around and NOT leave a gap in the timeline. It’s somewhat comparable to moving a clip in FCP and holding down the OPTION key to swap their position though in Avid you can drop a clip right in the middle of another one. The best way to understand what Extract/Splice-In does is to select a clip in our simple edit and move it. You can enter segment mode by clicking the desired segment mode arrow at the bottom of the timeline or by click and dragging from LEFT TO RIGHT beginning in the area above the timeline and lassoing down into the timeline to encircle an entire clip. You will see an outline as you click and drag to see what you are lassoing. If you don’t circle the whole clip and only an edit you will enter trim mode, more on that later. If you were to have many video layers in an edit and couldn’t get around the clip you wanted this way you can also hold down CONTROL and lasso from LEFT TO RIGHT. When using the lasso method, whatever the LAST segment mode that was chosen is the mode that will be entered. The lasso method can be confusing at first so it’s probably easier to click the segment mode to enter it (or better yet map the segment modes to your keyboard) and then click, or shift+click to select multiple clips, the clip you want to move. Once you grasp the lasso method though it can be a very fast and powerful way to make multiple selections. The red arrow is the Lift/Overwrite Segment mode. In this mode moving a clip will overwrite the media where you place the clip and leave a gap behind. Let’s give them a try.
A good way to understand what the two different segment modes do is to look at what happens when you delete a clip via segment mode. First, click the red Lift/Overwrite arrow, then click a clip in the middle of your timeline and hit the DELETE key. The clip is deleted and a gap is left behind:
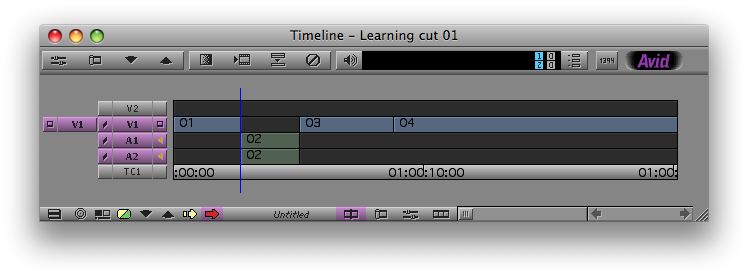
Deleting a clip in Lift/Overwrite Segment Mode leaves a hole
Undo (command+z) that operation, click the yellow Extract/Splice-In arrow and do the same thing. Notice that the clip is deleted and the gap is closed. In my example I deleted the video of clip 02 and all the rest of the media in the timeline moved to fill the hole left behind by the deleting of clip 02:
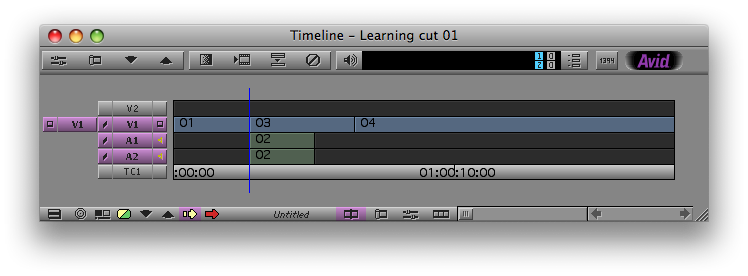
Deleting a clip in Extract/Splice-In Mode closes the hole and shifts the rest of the edit
Undo and let’s try moving a clip with segment mode. First click the yellow Extract/Splice-In arrow and move one of the timeline segments to the right a bit. You will see that this mode has, in my example, moved segment 03 down and split segment 04, moving part of 04 ahead of 03 to fill the gap left behind. No media has been removed from the timeline:
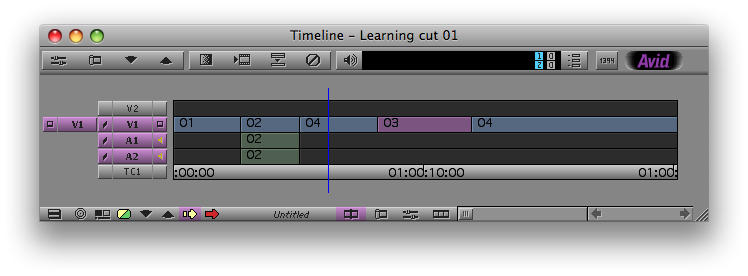
Moving clip 03 in Extract/Splice-In Mode has shifted part of clip 04 earlier into the hole left behind
Now undo (command+z) that operation, click the red Lift/Overwrite arrow and do the same thing. Lift/Overwrite mode does just that, it overwrites the media where the segment is placed and leaves a gap:
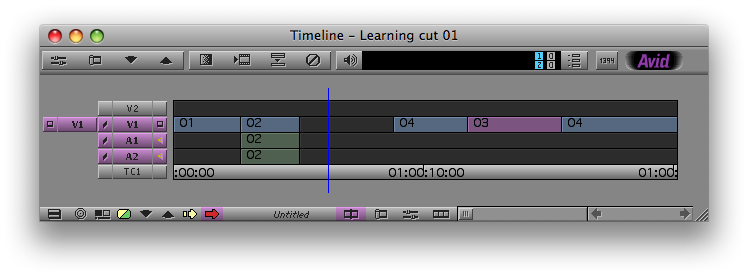
Moving clip 03 in Lift/Overwrite Segment Mode has left the hole behind and overwritten part of clip 04. Notice the shorter segment in the last bit of clip 04
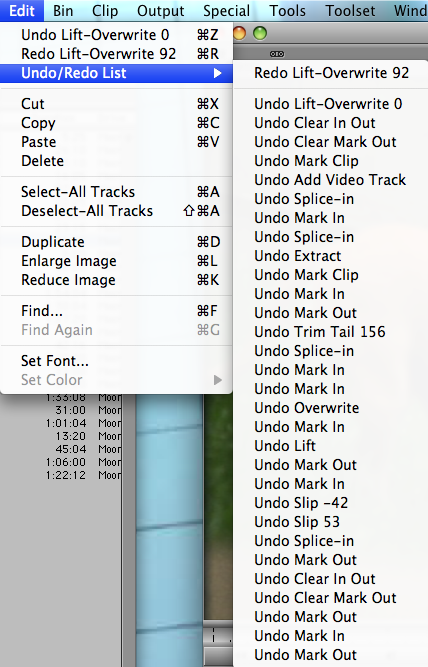
You can now undo the last operation as well. That is the basics of how Segment mode in Avid works. A couple of things to keep in mind when using Segment mode. When dragging a clip you can press Command while dragging to snap the clip to other edits. You can select and move clips on both video and audio tracks at the same time. You can select the black FILLER between, above or below clips and move that as well. You CANNOT select clips that aren’t adjacent (for example clips 01 and 03 in my timeline above) and move them at the same time. Clips must be adjacent … for whatever silly reason. And if you mess something up there’s always the Undo menu to help out. Avid has a very helpful Undo/Redo List (Edit > Undo/Redo List) that is a line by line list of the last actions. It can be a lifesaver when trying to get back to an earlier state:
You may have noticed the Four-Frame Display when dragging a clip in Segment mode:
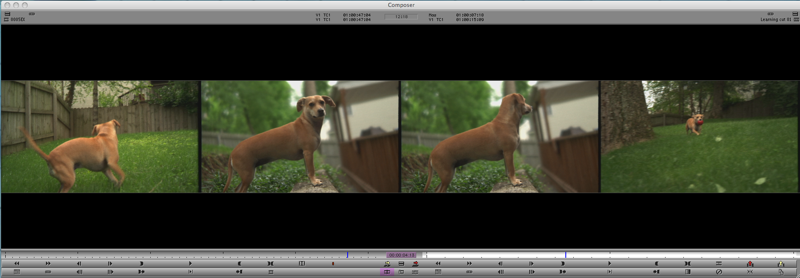
This is a handy way to see what you are doing when moving a clip via Segment mode. The left frame is the last frame of the outgoing clip and the right frame is the first frame of the incoming clips. The middle two frames are the first and last frames of the clip you are moving. When using the Four-Frame Display in Segment Mode the first and fourth frames are the ones that will move since they are the edits being affected.
Next, using one of Avid’s most powerful features: Trim Mode
The next mode, and IMHO the thing that sets Avid Media Composer apart from all other NLEs, that needs exploring is Avid’s Trim mode. Trimming in general is a way to fine tune an edit once you have media in the timeline. In FCP, trimming is accomplished through manipulating edits in the timeline via click and dragging using different tools. FCP has a Trim Edit window but it is clunky, painful and seems to be rarely used. You can think of the Avid Trim mode as an easy and very interactive way to fine tune your edits. It performs via JKL scrubbing, the trim buttons, + and – values on the keypad and click and dragging as well. Trim mode provides realtime feedback in the Source/Record monitors as well as the timeline. No matter which method you are using you will see a little line move with the clips you are trimming instead of the playhead as you make that trim.
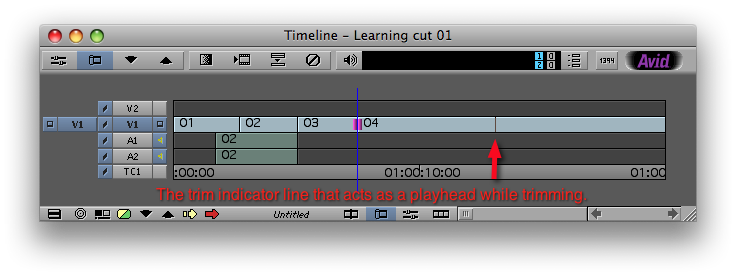
That tiny line is an amazingly interactive way to monitor your trims in realtime
This little line provides very nice visual feedback as you make a trim. I once wrote a detailed comparison of the Avid and FCP trim tools and that can still be found online.
Let’s make a simple type of trim that an editor makes all the time, performing a split edit (or a J cut) where the audio precedes the edit. In our sample timeline I want to take the audio on A1 and A2 roll it backwards. I haven’t placed any audio in the timeline other than clip 02 but if you have audio in all of you clips it will act the same. There’s several ways to enter Trim mode and trim the audio in this scenario:
 The most straight forward way to enter Trim Mode is to hit the Trim Mode button, defaulted on the Avid keyboard to u
 ![]() . There’s also a Trim Mode button at the bottom of the timeline
. There’s also a Trim Mode button at the bottom of the timeline ![]() . To trim a specific edit move the playhead to the edit and press the u key. Once in Trim Mode you will see little pink trim rollers appear on the edit
. To trim a specific edit move the playhead to the edit and press the u key. Once in Trim Mode you will see little pink trim rollers appear on the edit ![]() . If you entered trim mode and saw that the pink rollers have appeared on the V1 track the press the 8 key to turn off V1 or click the V1 selector in the patch bay. Once in Trim Mode you can toggle tracks on and off without ever leaving the mode. This is another feature that makes it very powerful. Once you have your trim set up to adjust the audio and make your split edit your timeline will look something like this:
. If you entered trim mode and saw that the pink rollers have appeared on the V1 track the press the 8 key to turn off V1 or click the V1 selector in the patch bay. Once in Trim Mode you can toggle tracks on and off without ever leaving the mode. This is another feature that makes it very powerful. Once you have your trim set up to adjust the audio and make your split edit your timeline will look something like this:
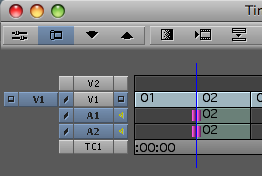
You will also notice that the Composer window has changed a bit. The tic marks in the mini timelines below the Source and Record monitors have disappeared and little purple Trim Counters have appeared below the Source/Record monitors to keep track is how many frames have been trimmed ![]() .
.
You can now create your split edit in a number of different ways. You can move the cursor over the rollers (the arrow will change to a roller icon itself) and click and drag the edit, you can hit + or – a timecode value on the keypad (in this case for a J-cut it could be – 24) or you could use the four default trim buttons on the keyboard: m , (comma) . (period) / ![]() . M and / will move an edit forward or backward 8 frames in a 24 fps project and 10 in a 30 fps project and the , & . keys will move the edit one frame. But by far the most powerful way to trim an edit is using JKL scrubbing. With the edit ready for a trim hit j to trim the edit back. Notice the little trimming line begin to move instead of the playhead as you see the media in the source monitor begin to roll backwards. Even if you are only trimming audio you will see the video move as a reference, another very powerful feature that is lacking in FCP’s trim window. After rolling the trim back for about a second you have made the split edit:
. M and / will move an edit forward or backward 8 frames in a 24 fps project and 10 in a 30 fps project and the , & . keys will move the edit one frame. But by far the most powerful way to trim an edit is using JKL scrubbing. With the edit ready for a trim hit j to trim the edit back. Notice the little trimming line begin to move instead of the playhead as you see the media in the source monitor begin to roll backwards. Even if you are only trimming audio you will see the video move as a reference, another very powerful feature that is lacking in FCP’s trim window. After rolling the trim back for about a second you have made the split edit:
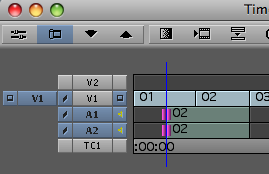
Next, while still in Trim Mode, deselect A1 and A2 and select V1. You’ll see that the rollers have moved to select an edit in V1. Let’s move that selected edit down a few edits later by hitting the s key. The a and s keys ![]() are defaulted to the Go To Previous Edit, Go To Next Edit keys respectively. By using the s key to move the trim down we can jump from edit to edit and not leave Trim Mode:
are defaulted to the Go To Previous Edit, Go To Next Edit keys respectively. By using the s key to move the trim down we can jump from edit to edit and not leave Trim Mode:

In my example I have moved the trim to the edit between 03 and 04. Now just play with your edit using JKL scrubbing. You can scrub the edit back and forth as well as double and triple speed the trim. This type of trimming is what FCP calls Dynamic Trimming (it has a toggle button to turn it on and off in the FCP Trim window). It was added to FCP in an upgrade after the software’s introduction and while it did make the Trim Edit window more Avid-like it still doesn’t work nearly as well. This type of trim is a dual-roller trim in that trimming takes part on both sides of the edit and the overall duration of the timeline isn’t being affected. A dual-roller trim is like using the Roll Tool in FCP. This is where the philosophy of Avid and FCP differ. FCP wants you to select a tool and then use that tool in the timeline, usually with a lot of mouse interaction. Avid wants you to enter a mode and continue to work in the timeline using your normal keyboard playback keys. If you notice Avid Media Composer doesn’t have any kind of tool palette at all like FCP or Adobe Premiere does. Hence the reason it has modes. Apple has always promoted FCP as “mode free editing” and while that may make the app easier to learn initially there is a lot of power in Avid’s modes, Trim Mode especially.
It’s also important to know how to perform a single-roller trim, or what FCP calls a ripple edit which is performed with the Ripple Tool. To perform a single-roller trim make sure you are still in a double-roller trim and click either the A or B side in the Composer, A being what is now Source monitor and B being the Record monitor. This will select a single-roller trim and this can be seen in the timeline as the edit now appears with a single pink roller on the side you selected. In my example I selected the B side, by clicking the Record monitor, so my roller appears on the right:
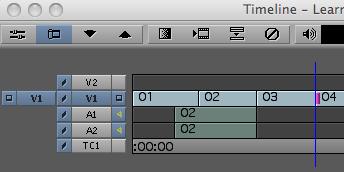
The edit set up for a single roller trim
With this single-roller trim selected use any of the above methods (click and drag, keypad, JKL scrubbing) to perform the trim. A trim to the right (using the L key) will “take up” media in clip 04, making clip 04 shorter and shortening the overall length of the timeline. A trim to the left (using the J key) will “let out” media from clip 04 and make the clip and the timeline longer. By trimming to the left you can let out media from clip 04 until there is no media left in the clip.
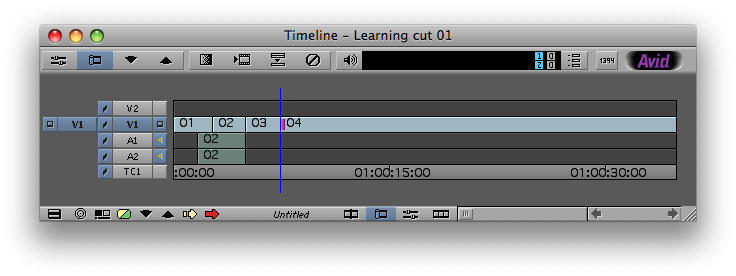
Clip 04 trimmed out to include the entire clip in the edit
Instead of actually clicking in the Composer window to choose the type of trim you can also use the default of the p [ ] keys to select the A, B or both sides to trim ![]() . p will trim the A side, [ both the A and B side (a dual-roller trim) and ] the B side. It’s just another way to work very quickly in the Avid trim mode while keeping your hands firmly planted on the keyboard.
. p will trim the A side, [ both the A and B side (a dual-roller trim) and ] the B side. It’s just another way to work very quickly in the Avid trim mode while keeping your hands firmly planted on the keyboard.
Trimming on the fly is especially important as well. Once in Trim Mode you can press the space bar to preview the edit. At any time during the preview you can hit an IN or OUT key and Avid will readjust the edit to where you hit IN or OUT. It can be a great way to place an edit on a beat of music or just to place an edit by feel as you are watching your program. It’s a way of making an edit trim that is not really possible by clicking and dragging in the timeline.
These few steps are the basics of using the powerful Avid Trim Mode. Please continue to experiment by adding more layers of video, trimming different tracks at the same time and just playing around in general. As I have said IMHO the Avid Trim Mode is one of the most powerful tools of any non-linear editor available on the market. And it’s used for the guts of an edit, assembling your story and fine-tuning that edit in a very fast and efficient way. To go into extreme depth about Avid Trim Mode would require much, much more time and type so look up Trim Mode in the Avid help files to learn even more. But above all just play with it as that’s one of the best ways to learn how it works.
Next, Slipping and Sliding clips with the Trim Mode”
The other place where Trim Mode works its magic is for Slip and Slide operations. FCP utilizes both the Slip and Slide tools for click and drag operations in the FCP timeline or Viewer as well as numeric operations using the keypad. Avid has always had an additional way to slip and slide edits via playback and JKL scrubbing in Trim Mode. This again demonstrates Avid’s ability to edit in a very interactive style as you watch and listen to your media playback as opposed to clicking and dragging in the timeline.
Let’s slip a clip via JKL scrubbing. Slipping changes the IN and OUT points of a clip while leaving the clip in the same place in the edit. First we have to get our segment into Slip mode. This can be accomplished by the lasso method described above when moving into Segment mode but instead of dragging from left to right you click and drag from RIGHT TO LEFT either in the gray space above the timeline or by holding CONTROL + dragging around an entire clip. You can also select a clip with either Segment mode and then push the u key to enter Trim mode. When this happens the clip will appear with two pink trim rollers on the inside of the head and tail of the clip:
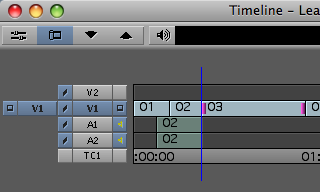
Slipping a clip is identified by trim rollers on the inside edits of a clip
When you have a clip selected for slipping you will see the 4 frame display in the Composer window like in Segment mode. When you have the clip selected for slipping, begin to JKL scrub. You are now slipping the clip. You will see the little interactive playheads in the timeline move as you JKL scrub and the head frame (the second clip in the Four Frame display) will play back in realtime in the Composer window. If you would rather see the tail frame during playback just place the cursor over the tail frame in the Composer (the 3rd frame in the four frame display) and it will playback. You can also use the click and drag method by click on a pink roller and dragging, using + or – values with the keypad and the Trim Left or Right m , . / buttons. Once you are done with your slip hit the escape to exit or press the Trim Mode (u) button on the keyboard to exit.
Trimming on the fly can be used in Slip and Slide trimming as well. Enter slip mode, hit the L key to play the clip and then watch as the clip plays in the four frame display. When you get to the frame you want as your new IN point hit the i or e key to create a new IN point and slip mode will stop on that frame with the new IN point you selected. You can then hit the space bar to review the edit while still in the slip Trim Mode. There are many many different ways to utilize all of these types of trims so it’s best to just read over the help files and experiment.
You can also perform a Slide edit in much the same way. A slide doesn’t change the IN and OUT of a clip but rather where the clip is in the timeline. As you perform a slide edit, you “take up” or “let out” media on surrounding clips. A slide is identified by the pink trim rollers on the outside of the head and tail of a clip. To enter slide mode first put a clip into slip mode and then option + double click on the clip. The rollers will then ajust to the outside of the clip:
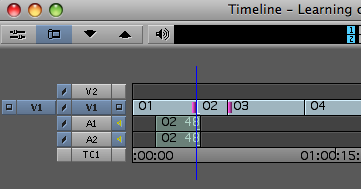
Sliding a clip is identified by trim rollers on the outside edits of a clip
In the above example clip 02 was placed into slide mode and the moved 48 frames later in the edit, hence the white out of sync indicators in the 02 audio below displaying 48. Place a clip in your own edit into slide mode and use any of the methods discussed to slide the clip. When sliding a clip the 1st and 4th frames of the 4 frame display in the Composer window will move as you are altering the IN and OUT points of the tail frame of the outgoing clip and head frame of the incoming clip. Playing the clip and editing on the fly by hitting a new IN point is a particularly powerful method as you can monitor audio and make these trims on the fly.
If you are reviewing edits while in Trim Mode with the space bar (or by clicking the Play Loop button ![]() in the Record monitor while in Trim Mode) and find that you would like more pre-roll before the edit or post-roll after the edit then check you Settings tab > Trim:
in the Record monitor while in Trim Mode) and find that you would like more pre-roll before the edit or post-roll after the edit then check you Settings tab > Trim:
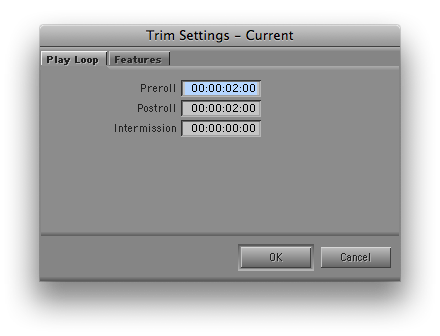
Here you can set that Preroll and Postroll while reviewing trims as well as the Intermission, the pause between as it will play the edit review in a loop.
You can also enter the slip and slide modes by first entering Trim Mode and then shift+clicking right on the inside or outside of the opposite side of the desired clip you have selected to trim. To slip shift+click on the inside of the clip opposite the double-roller and shift+click on the outside of the clip to slide. There are many different ways to achieve most any task in Avid so the more you read the help files and the more you experiment the more you will discover. The entire Trim Mode, be it double or single-rollers trims of a single edit, slipping and sliding of clips, trimming multiple edits and/or clips at the same time, big or small Trim Mode, trimming on the fly, is so full featured that to explore it in detail could be the subject of a whole book. I hope this simple introduction to the basics of the Trim Mode will show an editor new to Avid a good taste of the power than can be unleashed when using Trim Mode.
And remember to always keep an eye on the Trim Counters at the bottom of the Composer window while in Trim Mode. It keeps a running tab on how many frames you have trimmed since entering Trim Mode, be it regular roller-based trims or Slip and Slide trimming:

Both A and B Trim Counters show the same number of frames trimmed in a Slip or Slide or double-roller trim
Lastly, adding effects, keyframing, titling and transitions
Adding an effect in Media Composer is a click and drag proposition. Unlike FCP where all clips could be considered to have basic effects like scaling, cropping and positioning “built in” to the clip and waiting for adjustment in the Motion tab of the Viewer, Avid clips do not so you have to add an effect to a clip to do any kind of changes like scaling, cropping etc. The easiest way to get access to these basic clip adjustments is to add the powerful 3D Warp effect to a clip.
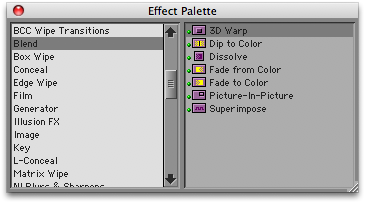
To add the 3D Warp effect (or any other effects for that matter) access the Effect Palette by either the Tools > Effect Palette menu (command + 8) or the Effect Palette tab in the main project window. The categories of effects are listed on the left with the specific effects and their icons listed on the right. For the 3D Warp choose the Blend category > 3D Warp. Click on the 3D Warp icon and drag it onto a clip in the timeline. The effect is now applied. You can see the little icon on the clip in the timeline:
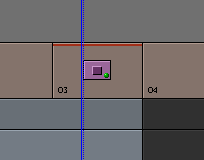
A clip with the 3D Warp effect applied
Now time to adjust parameters. With the playhead parked on the 3D effected clip (be sure the V1 icon is turned on in the timeline patch bay) enter Effect mode by clicking the effect button at the bottom of the timeline ![]() or using the Tools > Effect Editor menu option. With that the Effect Editor will open:
or using the Tools > Effect Editor menu option. With that the Effect Editor will open:
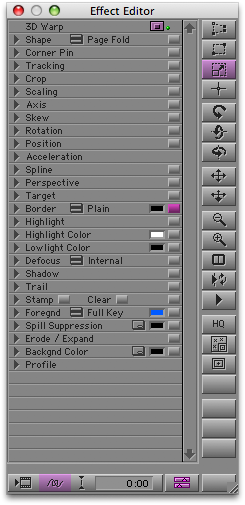
The Avid Effect Editor with the 3D Warp parameters
The Effect Editor is very similar to FCP’s Viewer > Filter tab. It’s the place where all of the parameters for a given effect can be adjusted and keyframed. At first it doesn’t look the same as there is no timeline available for keyframing the effects. In older versions of Avid all keyframing took place by adding keyframes in the mini-timeline below the source monitor. With later versions Avid added the Promote to Advanced Keyframes command which opens a timeline just for keyframing of effect parameters. To access advanced keyframes look in the lower right corner of the effect editor and click the Advanced Keyframe button:
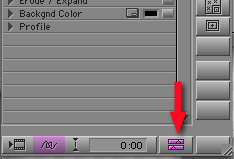
A timeline will open in the right of the effect editor where keyframes can be added for all the different parameters of a given effect on the Keyframe Graphs. This Effect Editor timeline behaves like any other keyframing timeline that you might experience in Adobe After Effects and FCP as well. Pick a parameter like Scaling and twirl down the little disclosure triangle to the left of Scaling to open up the x and y parameter controls. You can then move the playhead within the clip and begin to add keyframes and adjust parameters just like in any keyframe based animation timeline. Move your playhead into your 3D Warp effected clip, either on the Timeline window or the advanced keyframe timeline in the effect editor. You can add a keyframe by clicking the pink keyframe icon ![]() at the bottom of the Effect Editor or hitting the ‘ (apostrophe) key
at the bottom of the Effect Editor or hitting the ‘ (apostrophe) key ![]() on the keyboard. When you click the pink keyframe key at the bottom of the Effect Editor you will get a pop-up asking you exactly where you want to add the keyframe. These different options are pretty self-explanatory and offer nice options when adding keyframes. I like to choose Add to Open Group as that will add keyframes to whatever parameters are twirled open at the time. I can control where to add keyframes by what I have opened. Do this and adjust the scaling parameter, then move forward a bit, add another keyframe and adjust the scaling parameter again. You’ve just made a scaling animation in Effect Editor. Play it back to watch the animation in the Record monitor.
on the keyboard. When you click the pink keyframe key at the bottom of the Effect Editor you will get a pop-up asking you exactly where you want to add the keyframe. These different options are pretty self-explanatory and offer nice options when adding keyframes. I like to choose Add to Open Group as that will add keyframes to whatever parameters are twirled open at the time. I can control where to add keyframes by what I have opened. Do this and adjust the scaling parameter, then move forward a bit, add another keyframe and adjust the scaling parameter again. You’ve just made a scaling animation in Effect Editor. Play it back to watch the animation in the Record monitor.
If you twirl down the little triangle to the right of the parameter sliders you will open the animation curves graph. This is Avid’s version of the familiar animation curves editor and right clicking on a keyframe in the curves editor will give you a pop-up with all the usual keyframe eases and options:
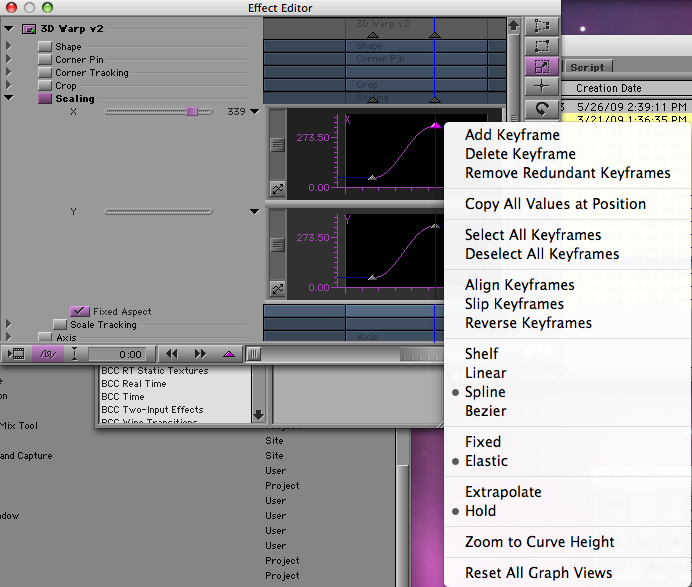
Avid has done a lot of work to make keyframing easier. You can move single keyframes by selecting a keyframe triangle either in the Effect Editor timeline or the mini timeline under the record monitor and holding the option key down while dragging to move a keyframe. You can also move multiple keyframes at once by shift + selecting all the keyframes you want to move and then option + dragging on one to move them all. If you look at the advanced keyframe pop-up menu when you right + click on a keyframe you will also see two options called Fixed and Elastic. One of those options will have a dot next to it to tell which is selected. When set on fixed, the duration of a set animation will not change when you change the overall length of the shot via trimming in the timeline. If set to elastic the keyframes will move either stretching or shortening the duration of the animation in proportion to how you have changed the length of the shot. If you’ve ever copy and pasted and deleted and reapplied keyframes in FCP then this is a welcome addition to keyframing. When working in the advanced keyframes timeline I enjoy really stretching out the Effect Editor (I wish it would get even bigger) so it really feels like any other animation program. Spend some time playing around with at least the 3D Warp effect and the advanced keyframes and the use should feel very natural if you’ve used this type of thing for motion graphics. When finished hit the escape key return to Source/Record editing by hitting the y key on your keyboard or clicking the Source/Record button ![]() at the bottom of the timeline.
at the bottom of the timeline.
It’s also important to know how to apply multiple effects to an Avid clip. If you were to apply another effect, say a Flip, right on to the clip where your 3D Warp was applied then the 3D Warp would disappear. You have to do what Avid calls a “Step In” and apply the effect. To Step In place your playhead on the clip where you applied the 3D Warp effect and click the Step In arrow at the bottom of the timeline:
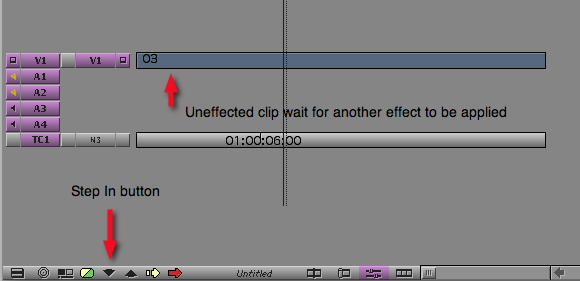
You then get a view of only that single clip in the timeline with no effect applied. Drag another effect from the Effect Palette to apply that effect. You can keep stepping in as many times as you need to apply multiple effects. It’s a clunky way to apply multiple effects but that’s how it is done in Media Composer. While you are stepped in begin to add keyframes and tweak parameters using the Effect Editor like we did above with the 3D Warp tool. Some effects don’t have keyframing options (like the Flip effect) so there will be no parameters to keyframe. If the effect supports Advanced Keyframes click the button to open that timeline. If the Advanced Keyframes button is missing from the lower right corner of the Effect Palette then keyframes can be added in the mini timeline below the Record monitor:

If Advanced Keyframes aren’t available for a particular effect add keyframes in the mini timeline below the Record monitor
Once you have added keyframes to a stepped in effect click the Step Out button ![]() to step back out to the full timeline. You can then open the Effect Editor and see all of the effects you have applied. If you have promoted an effect to advanced keyframes and animated a parameter while stepped in you can then adjust, keyframe and animate all parameters of all effects in the Effect Editor. This is similar to having multiple effects applied to a clip in FCP and opening those effects in the Viewer under the Filters tab:
to step back out to the full timeline. You can then open the Effect Editor and see all of the effects you have applied. If you have promoted an effect to advanced keyframes and animated a parameter while stepped in you can then adjust, keyframe and animate all parameters of all effects in the Effect Editor. This is similar to having multiple effects applied to a clip in FCP and opening those effects in the Viewer under the Filters tab:
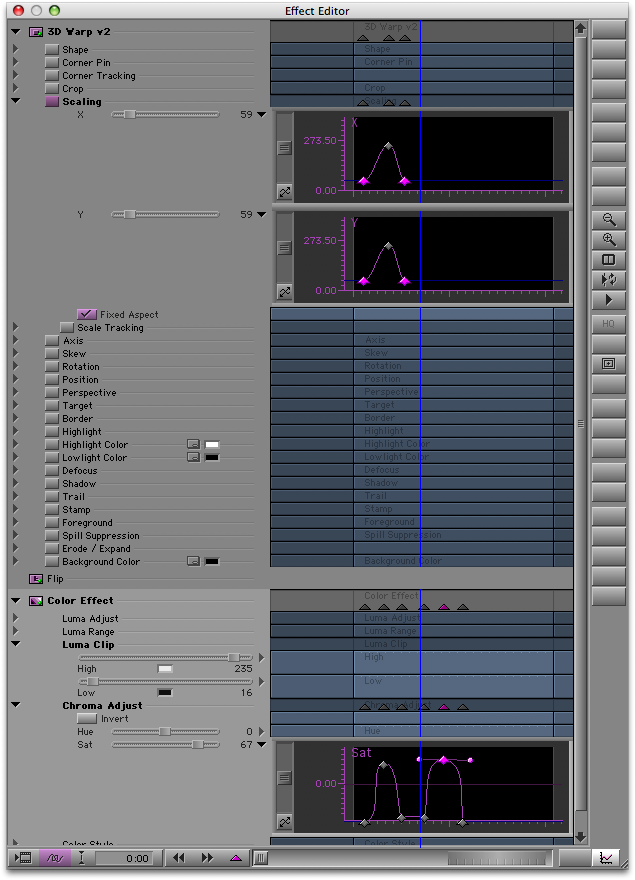
Multiple effects applied to a clip. Notice the Bezier curves applied to the Color Effect
Let’s try just a few other things before we wrap up this installment of The Basics of Avid Media Composer for a Final Cut Pro Editor. Avid has an Add Transition button for adding basic transitions like dissolves and fades to black. Put the playhead near and edit and hit the (backslash) ![]() key. A pop-up pops up for selecting the type of transition, the duration and the alignment. There’s a mini timeline in the popup that shows the transition visually. You can also click and drag both sides of the transition in this mini timeline to adjust it.
key. A pop-up pops up for selecting the type of transition, the duration and the alignment. There’s a mini timeline in the popup that shows the transition visually. You can also click and drag both sides of the transition in this mini timeline to adjust it.
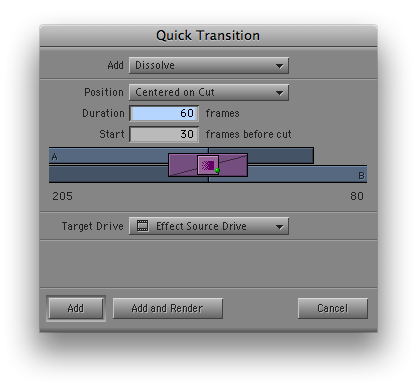
Use the Quick Transition popup to apply dissolves, fades and dips to color
There’s also a number of transitions in the Effect Palette like wipes, peels and pushes to name a few. They can be applied by click + dragging them to the edit between clips in the timeline. Then park the playhead on the edit and enter Effect Mode to adjust.
To create a title in Avid Media Composer choose Clip > New Title. You will get a popup asking if you want to create this title in Marquee or the Title Tool:
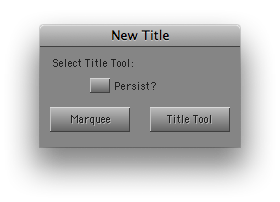
Check Persist if you want to avoid this pop-up. This can be turned on and off in Settings > Marquee Title
For our purposes here choose Title Tool for the simple titler. Marquee is an advanced titling application that is kind of like After Effects for titles. You can do advanced titles and animations with Marquee and could spend many hours learning how to use it well. The simple title tool is very basic but does offer a WYSIWUG design approach with shapes and borders and the ability to do rolls and crawls. The Title Tool will also show you the frame you are parked on in the background to aid in design.
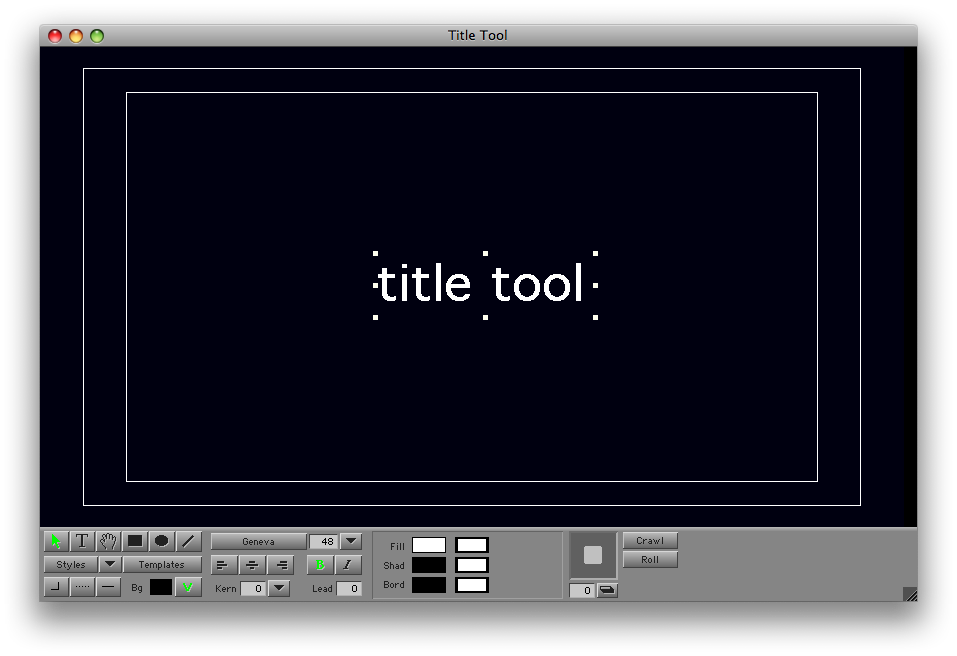
The Avid Title Tool showing a black background
If you’ve made it this far in the article then you must have been using this as a guide as intended to try out Avid Media Composer 3.5. Thanks for taking the time to work through some of the basic features of Avid and through this article. As I stated at the beginning the purpose of this article isn’t to persuade anyone to move from Final Cut Pro to Avid Media Composer or to say that one application is better than the other, though there are features in each app that is better than comparable features of the other. This article was meant to help anyone curious about Media Composer be able to download the free demo and “kick the tires” on some of the basic features that make Avid Avid. If you learn to use Media Composer properly and understand the differences between it and FCP and understand why things are different it can be a great tool to add to your editing tool kit, especially if you are using Avid Media Access supported media like DVCPRO HD and XDCAM. Happy editing on whatever platform you may choose!

Filmtools
Filmmakers go-to destination for pre-production, production & post production equipment!
Shop Now