Here is my review of the new Smart V2M mobile audio interface kit from Saramonic, with 2 included lavalier microphones. The Smart V2M mobile audio interface kit immediately reminds me of RØDE’s SC6-L Mobile Interview Kit, but the Smart V2M continues where the SC6-L stops. Both can connect two lavalier microphones to iOS or iPadOS via Lightning and record either combined (for live or live-to-drive production) or separate tracks (for more control in post). That’s where the RØDE SC6-L stops, since it is only compatible with Lightning for iPad, iPhone and iPod Touch. On the other hand, the Smart V2M can also due the same via USB-A or USB-C, which means that it is equally compatible with Android and conventional computers, as well as iOS and iPadOS. There are other differences which I’ll cover ahead. And how does it sound? Ahead I’ll share some test recordings.
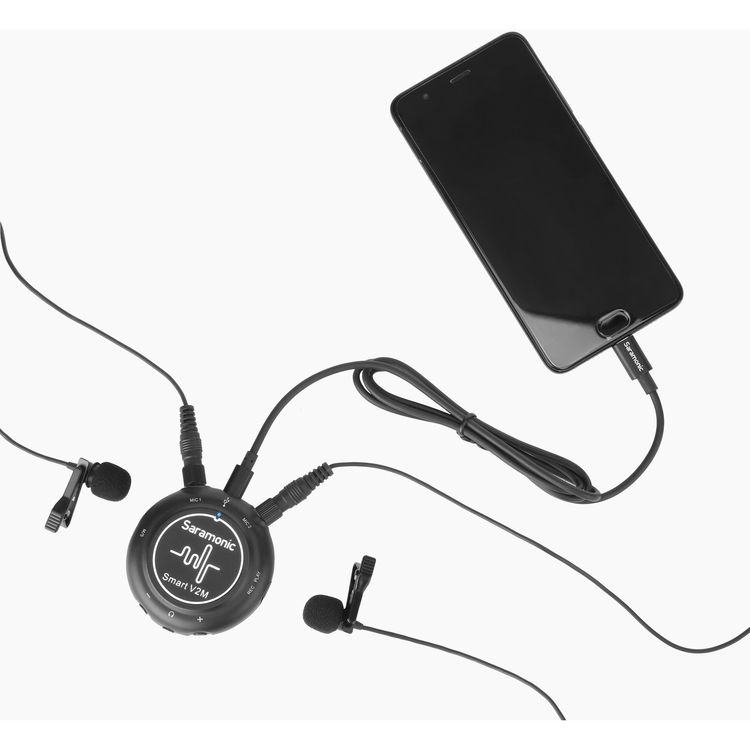
What comes in the box
- 1 x Smart V2M audio interface with preamps and A-to-D converters
- 1 x Lavalier microphone with a 3-meter (9.8-foot) cable and locking, gold-plated connector
- 1 x Lavalier microphone with a 5-meter (16.4-foot) cable and locking, gold-plated connector
- 2 x Alligator-style mic clips
- 2 x Fitted foam windscreens
- 1 x Micro USB to Apple Lightning cable
- 1 x Micro USB to USB-C cable
- 1 x Micro USB to USB-A cable
- 1 x Hook-and-loop cable wraps
- 1 x Storage bag
- 1 x User manual
- 1 x Warranty card
Applications
To connect any combination of two unbalanced TRS microphones, where it always provides low-level bias voltage (“plugin power”) to the microphone and sends the signal(s) to the appropriate smartphone, tablet or even a conventional computer. You have individual gain control of each input, and the choice of recording discreet separate tracks or to combine the two, as explained in the introductory paragraph.
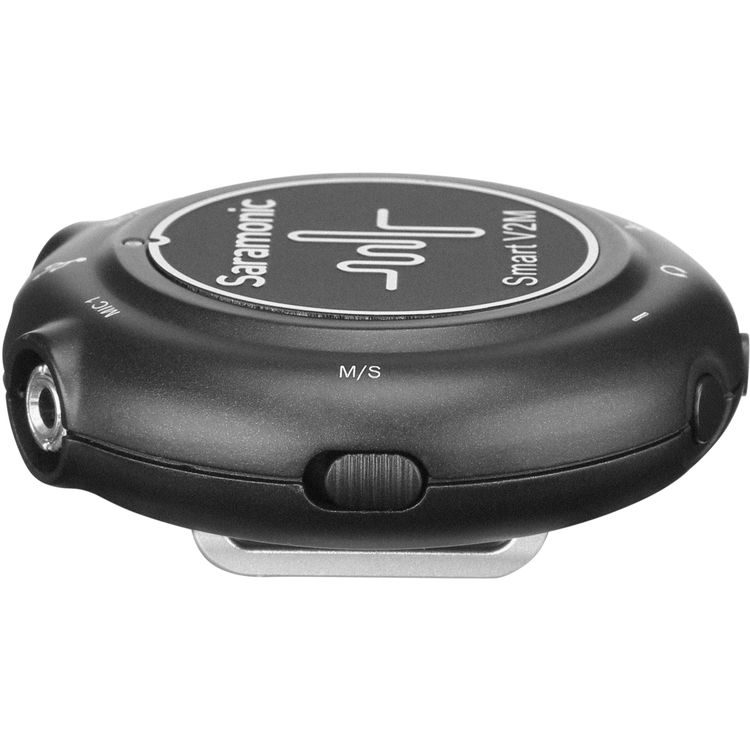
To set record separate tracks, set the switch to S (Stereo). To combine them, set it to M (Mono) as shown above.
Preamps and potentiometers
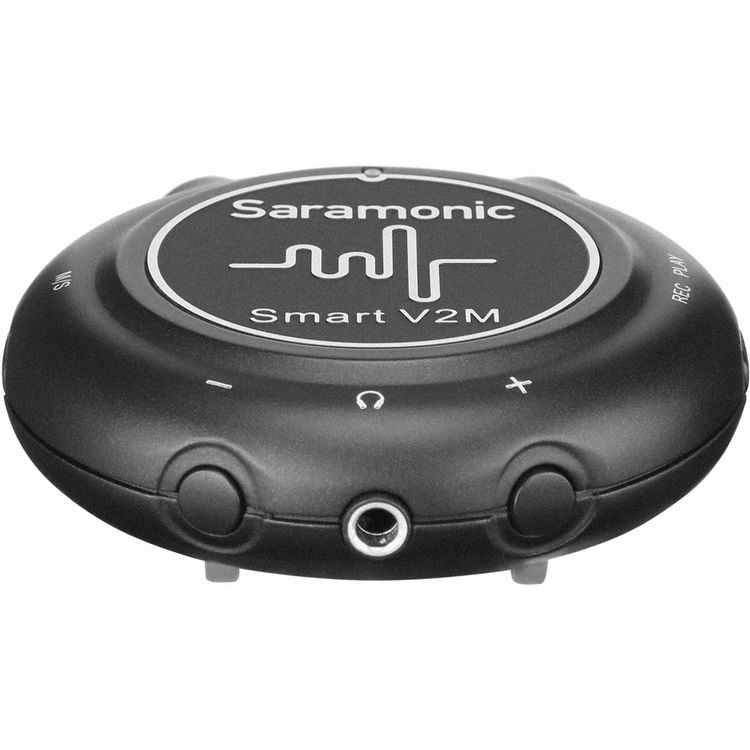
Unlike the larger Saramonic SmartRig+ which I reviewed back in February 2020 (which has physical knobs to control the gain), the Saramonic Smart V2M has them as + (plus) and – (minus) buttons. This allows the Smart V2M to be much more compact and even pocket-sized. I would say that the + (plus) and – (minus) buttons are not as good as the physical knobs, but much better than the RØDE SC6-L (which only allows adjusting the gain via the dedicated app).
As far as the maximum gain, Saramonic specs the Smart V2M as +30 dBu. If you read my review on the Saramonic SmartRig+, you already know that Saramonic tends to underrate its gain ratings. In any case, given that the Smart V2M is targeted only to be used with electret condenser microphones which tend to have a high output level, I found it to have more than enough gain when connecting that type of microphones.
Monitoring: Latency free or playback
Like the SmartRig+ I reviewed in February 2020, the Smart V2M offers either latency-free monitoring when recording/broadcasting live orplayback to hear sounds coming from the connected device. Unlike most other interfaces I have tested, the SmartRig+ and the Smart V2M cannot do both at the same time. You must move the switch between Record and Playback to determine what you hear in the headphones. I heard myself live through the headphones when it was in the REC position and did not hear sound from the device in that position. When I switched to PLAY, I heard sound from the device, but did not hear myself. Of course, there are apps that allow live monitoring, but that always has delay (latency).
As a result, the REC or PLAY situation is fine for self production, but does not allow for latency-free monitoring and also hearing the sound of another remote person during a remote call or when one is a remote panelist.
In addition, using my favorite CB-1 isolating headphones (which are rated at 32 ohms, reviewed here, shown above), the output level in my headphones fortunately was more than acceptable when recording at -12 dB. There is no volume knob on the Smart V2M, so the level to your headphones when monitoring live is fixed. When in the PLAY setting (playing back from the connected device via USB-C), the playback volume level must be adjusted on the connected device.
Setting levels
Unlike the SmartRig+ I reviewed back in February (which has no level indication at all), the Smart V2M does have an LED which change colors to indicate a healthy or oversaturated.
To set the levels with the Smart V2M:
- For microphone input 1, you long-press the – (minus) button until you see the blinking LED. Then you release the long press and begin to short-press either the – (minus) or + (plus) to increase or decrease the level from where it is currently.
- For microphone input 2, you long-press the + (plus) button until you see the blinking LED. Then you release the long press and begin to short-press either the – (minus) or + (plus) to increase or decrease the level from where it is currently.
I used the more precise meter in the Auphonic app to adjust the levels to peak at -12 dB for the raw recordings. However, having the LED level indicated on the Smart VM2 is much better than nothing if you are forced to use a non-professional app that doesn’t give a proper audio meter. That’s why I’m glad Saramonic included it. Later I normalized them to -16 LUFS when exporting each recording from Hindenburg Journalist Pro (covered in many articles).
How the Smart V2M introduces itself to the system
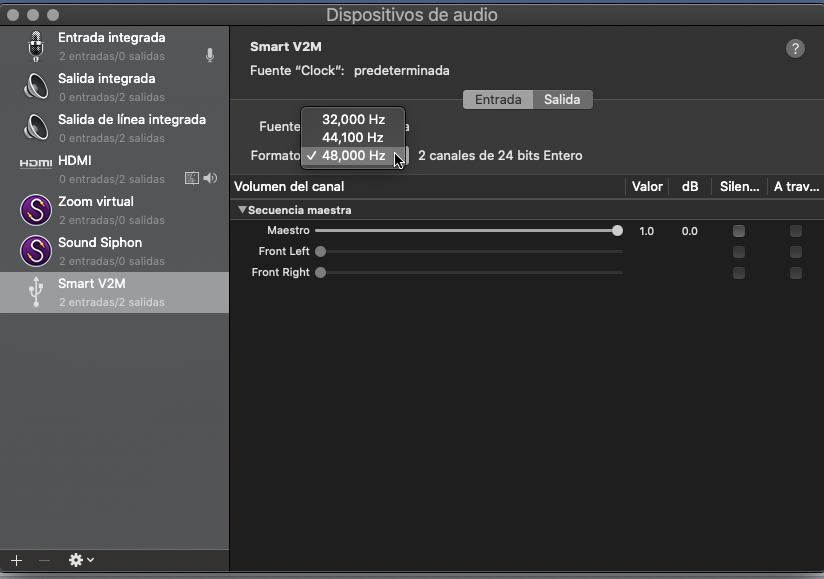
Of course, the Smart V2M supports 48 kHz audio sampling frequency and up to 24-bit. Since it’s a two channel device, the Smart V2M always introduces itself to the system as a “stereo” device, even when set to “Mono”. The only difference when you set it to “Mono” is that either (or both) connected microphones are panned to center. This is ideal for live or live-to-drive. For productions that will be edited, it’s better to keep the two microphones separate (if there are two).
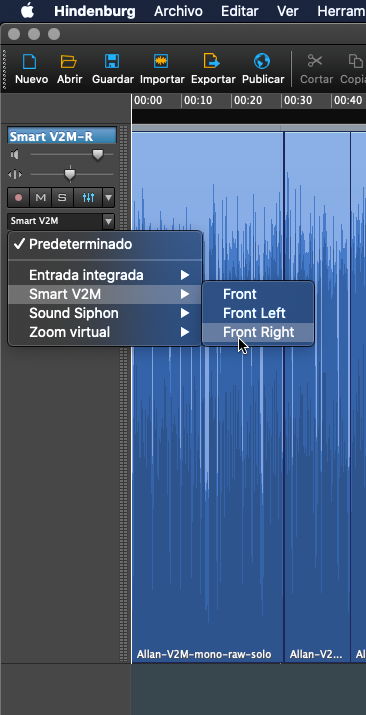
If you connect Smart V2M to a multitrack audio recorder app like Hindenburg Journalist Pro, you can record each microphone source on a separate track directly.
Indoor recordings
The first indoor recording is solo (by myself) to evaluate the quality of the included lavalier microphone, preamp and A-to-D converter in the Smart V2M:
Above, the unadulterated recording of the included lavalier microphone that came with the Smart V2M.
Above, the recording of the included lavalier microphone that came with the Smart V2M after mild noise reduction in Hindenburg Journalist Pro.
The second indoor recording is also solo (by myself) to demonstrate the versatility of the Smart V2M by using it with a head-mounted microphone of another manufacturer (to be reviewed in the near future). As covered in other articles, if everything is equal, a higher signal-to-noise ratio is achieved with a head-mounted microphone than with a chest-mounted microphone.
Above, the recording of the head-mounted microphone connected to the Smart V2M after mild noise reduction in Hindenburg Journalist Pro.
Outdoor recording (interview)
The outdoor recording was done from opposite corners at a noisy outdoor café in Coral Gables/Miami, Florida. There is plenty of background sound. The Smart V2M was set to “Stereo” in order to record dual mono in a fake stereo file in the Auphonic app in my Android phone. Of course, the recording was made at 48 kHz audio sampling rate. Both people had one of the two included lavalier microphones, connected to the Smart V2M.
After the recording, in post-production I did the following:
- Imported raw fake stereo file from the Android phone to macOS using the free HandShaker app.
- Imported file the raw file into an empty track in Hindenburg Journalist Pro.
- Went to the menu Tools>Separate Stereo
- Exported each one separately and followed the procedure covered in my 2017 article My multitrack crossgating audio workflow to eliminate crosstalk via Auphonic.
As in the past, Auphonic did a great job of filtering and crossgating. I really thought this would be a great opportunity to compare Auphonic’s crossgating with Hindenburg Journalist Pro’s Magic Levels, but I quickly observed that the latter is best suited with an environment with much less background noise.
About the included lavalier microphones
I was very impressed with the length of the cables, which are 3 meters (9.8 feet) for mic 1 and 5 meters (16.4 feet) for mic 2. I was also very impressed with the locking connectors and the included windscreens. I was less impressed with the sound quality itself. Of course, I know that no lavalier mic will sound as good as the studio microphones I generally use and test.
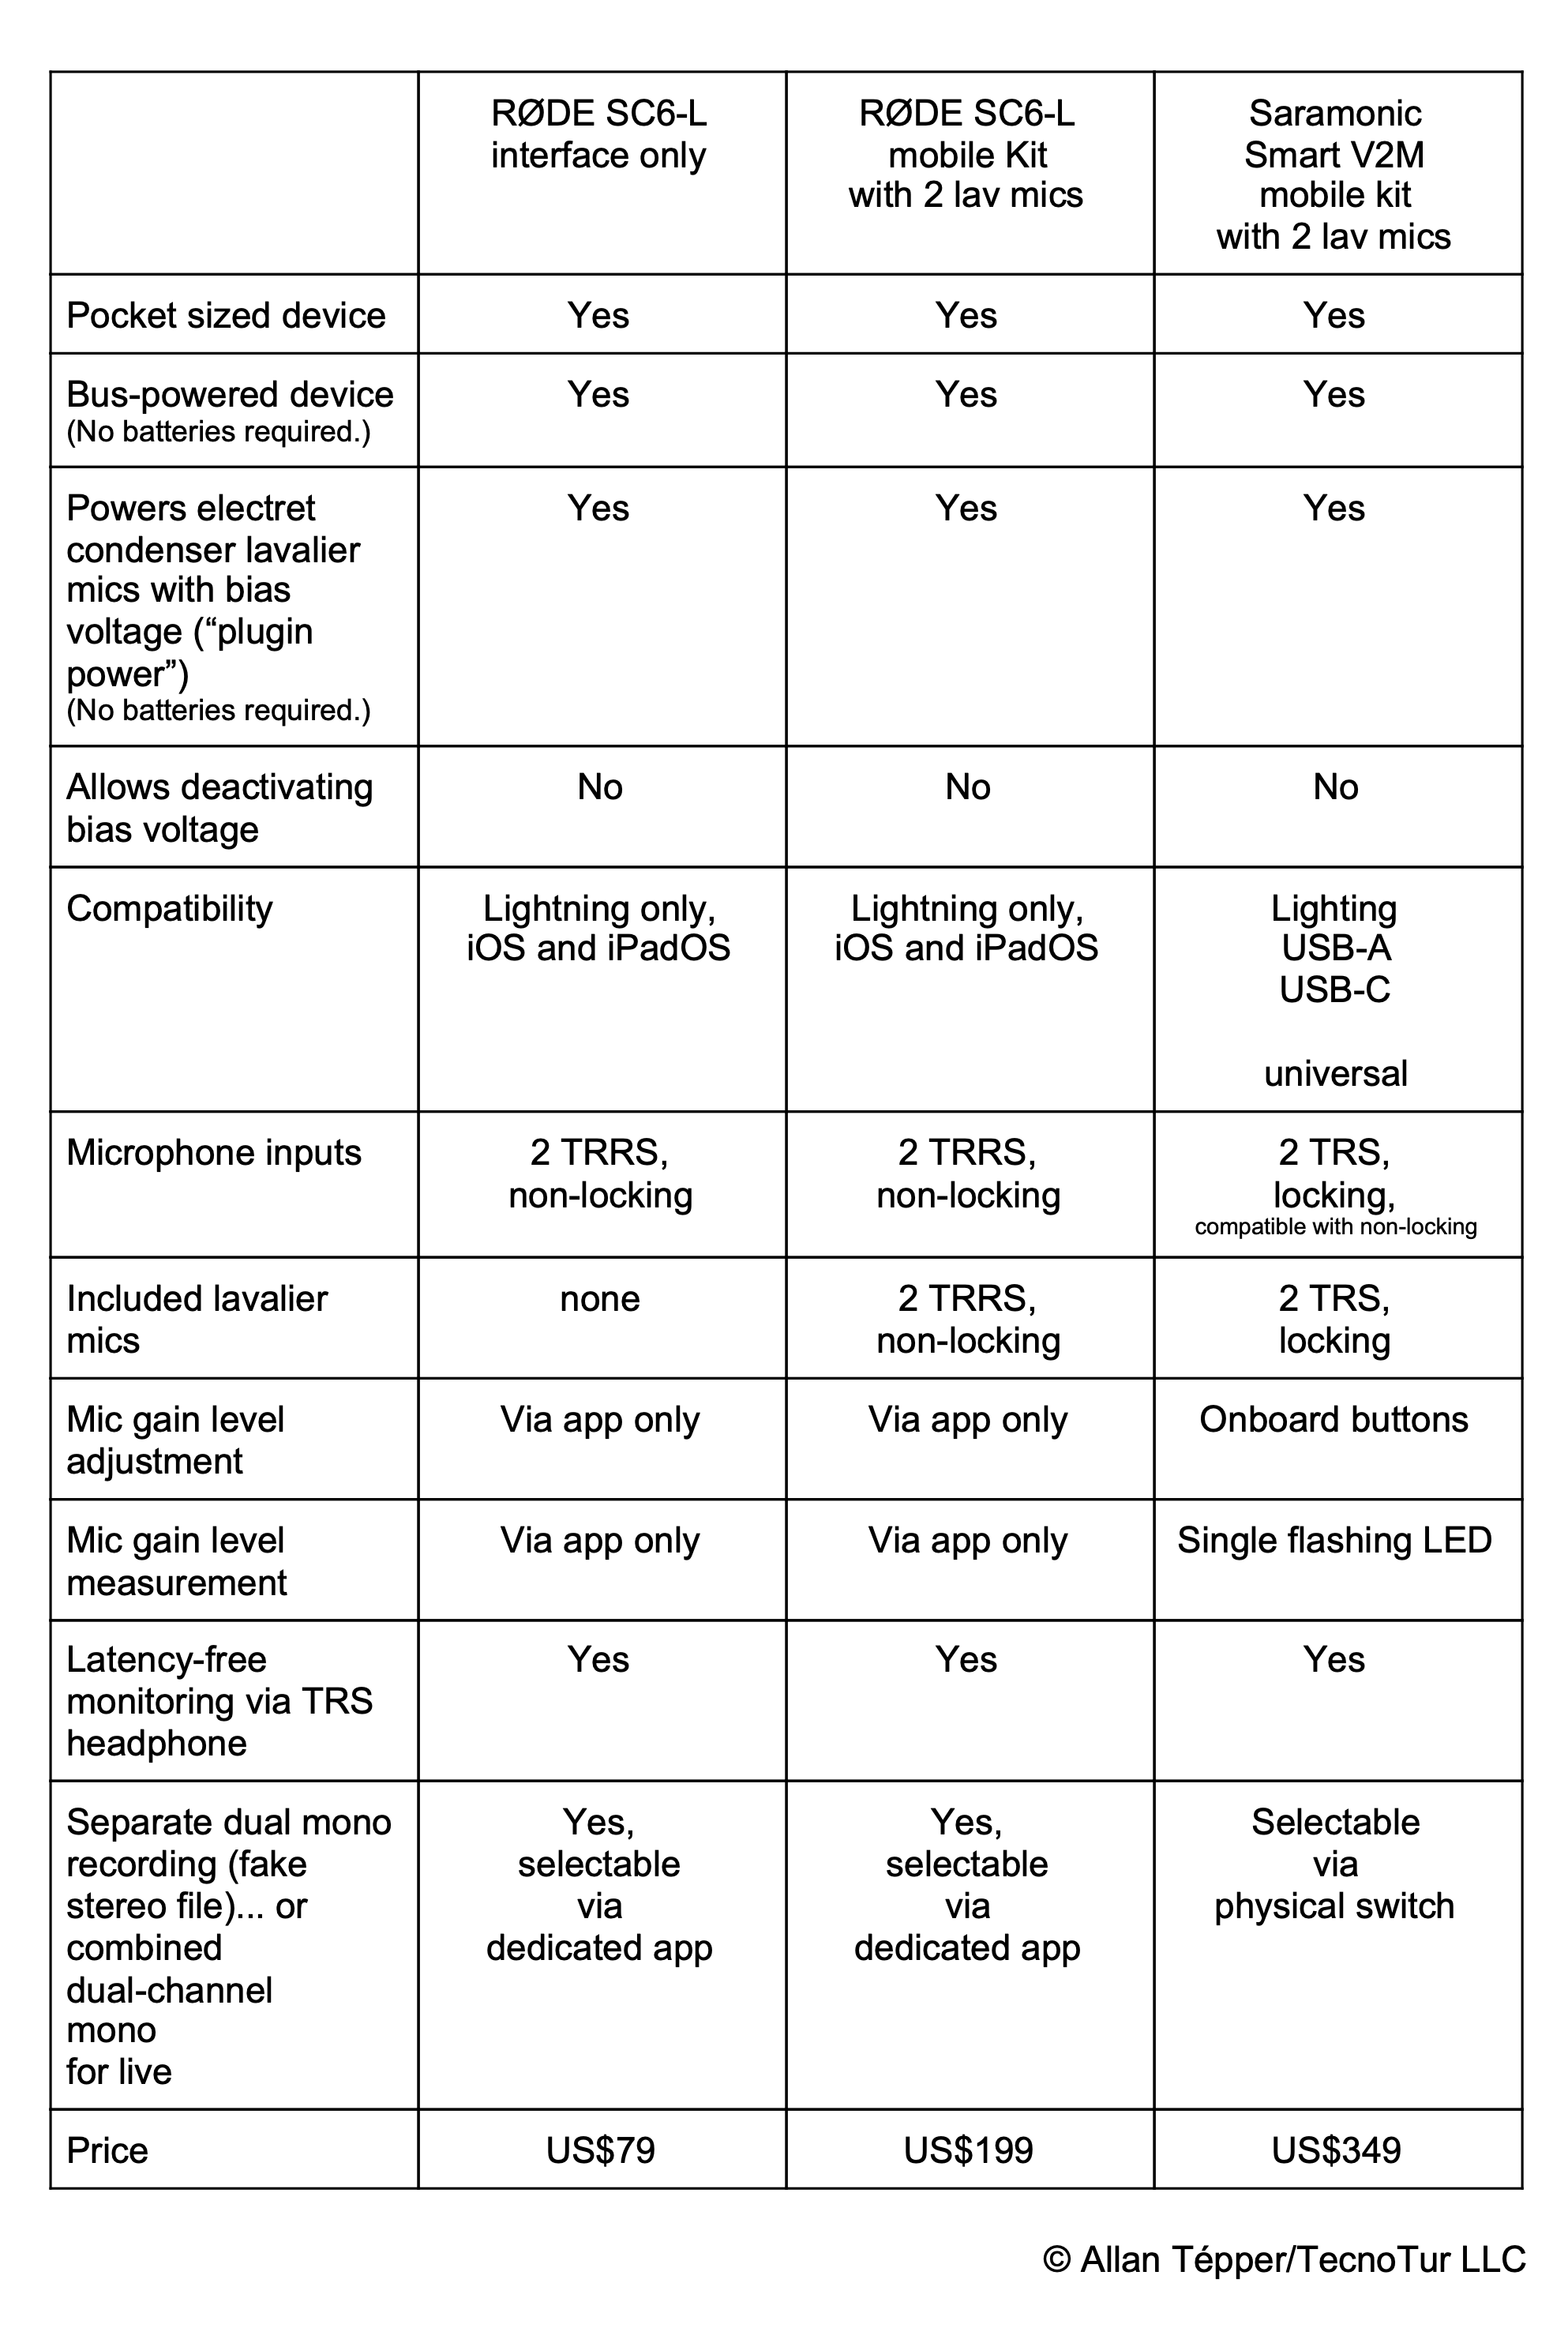
Comparison chart
Ratings
Looks and build quality

Connectivity for multiple platforms and devices

Zero-latency monitoring for local use only

Monitoring for use with a remote guest or when used by a panelist

You would have to do your sound check in the REC mode (while you hear yourself) and then switch to REC to hear the remote guest or host other panelists, thereby not having the full confidence.
Gain for electret condenser mics

Sound quality in its price range

Conclusions
The Smart V2M may be the only pocket-sized interface I know about so far that can truly cover all devices, including Android via USB-C as well as iOS, iPadOS, macOS (via Lighting or USB-C) and Windows (via USB-A or USB-C). Android users who need to connect two separate microphones —or Android users who also want to use it for some other platform sometimes, beyond Android— will be the most attracted to it. I would recommend Saramonic (in addition to the current package deal) offer the Smart V2M interface standalone, without any included microphones, so purchasers can have more freedom to chose the desired unbalanced electret condenser microphones to use, be they lavalier, head-mounted microphones or even handheld ones including shotguns.
(Re-)Subscribe for upcoming articles, reviews, radio shows, books and seminars/webinars
Stand by for upcoming articles, reviews, books and courses. Sign up to my free mailing list by clicking here. If you previously subscribed to my bulletins and no longer receive them, you must re-subscribe due to new compliance to GDPR. Most of my current books are at books.AllanTepper.com, and my personal website is AllanTepper.com. Also visit radio.AllanTepper.com.
Si deseas suscribirte (o volver a suscribirte) a mi lista en castellano, visita aquí. Si prefieres, puedes suscribirte a ambas listas (castellano e inglés).
Suscribe to my BeyondPodcasting show in English or CapicúaFM en castellano.
FTC disclosure
No manufacturer is specifically paying Allan Tépper or TecnoTur LLC to write this article. Some of the other manufacturers listed above have contracted Tépper and/or TecnoTur LLC to carry out consulting and/or translations/localizations/transcreations. Many of the manufacturers listed above have sent Allan Tépper review units, including Saramonic. So far, none of the manufacturers listed above is/are sponsors of the TecnoTur , BeyondPodcasting CapicúaFM or TuSaludSecreta programs, although they are welcome to do so, and some are, may be (or may have been) sponsors of ProVideo Coalition magazine. Some links to third parties listed in this article and/or on this web page may indirectly benefit TecnoTur LLC via affiliate programs. Allan Tépper’s opinions are his own. Allan Tépper is not liable for misuse or misunderstanding of information he shares.
Copyright and use of this article
The articles contained in the TecnoTur channel in ProVideo Coalitionmagazine are copyright Allan Tépper/TecnoTur LLC, except where otherwise attributed. Unauthorized use is prohibited without prior approval, except for short quotes which link back to this page, which are encouraged!

Filmtools
Filmmakers go-to destination for pre-production, production & post production equipment!
Shop Now


