I get a lot of e-mails from people asking me questions about Media Composer. I thought that it would be super helpful, with their permission of course, to post the question and my response, to hopefully help other people out! Here we go!
I’m working as the AE on an independent documentary feature. Most of my work has been in reality TV but I have a few questions regarding mixed frame rate and would love some guidance.
Most of the footage has been shot in 23.98 and they’re planning on finishing in 23.98. However, I’ve received some footage at different frame rates. Even some pretty odd frame rates like 49.97.
In reality TV, we just conform everything outside of Media Composer and then bring it in at the correct frame rate. Would it be best to keep that practice and conform everything to 23.98 outside of Media Composer then link/transcode or is it possible to “Keep source frame rate” when transcoding?
The day I’m most concerned about was shot at 24fps and I’m curious if I kept the source frame rate, what effects it may have on syncing and grouping. Would I need to bring in the audio at 24fps for that day and would it cause issues down the line in the final mix?
I’m currently working in Media Composer 2018.12 but will be using Media Composer 2020 soon.
Sorry for so many questions!
Thanks
AE
Well AE, hopefully my response will help shed some light on what I think your best workflow would be!
Here are my overall thoughts on workflow when it comes to longer format projects. What is important to keep in mind in your workflow is that you can very easily work with mixed frame rates in any Media Composer project. As I always discuss when I teach, there are three main areas where the entire project can fall off the rails.
Project Creation – Create a project with the incorrect frame rate and you’re done. You obviously can’t change that (you can change the raster size, however) after the project is created, so make sure you lock in that 23.98 frame rate.
Transcoding/Consolidating – Make a misstep here, and again, the project will sink. It’s important to transcode (or consolidate) your footage properly and as “flexibly” as possible, so the editorial team has the ability to work with the transcoded media as easily as possible.
Exporting – Assuming you’ve set up your project correctly, and transcoded your footage properly, the exporting part of the workflow is simple, and whatever you’re going to export will have been trickled down to, from the correct workflow up to this point.
The first thing you have to ask yourself before you get rolling is, are they working with Offline media in a rough cut scenario. If so, you’ll be transcoding everything (I’ll assume you’re doing that for argument sake). This means one thing for sure, right out of the gate. Low Resolution. DNxHD 36. Except for one problem. DNxHD 36 technically doesn’t exist anymore. Since Avid switched over to the SUPER annoying “HQX, HQ, SQ and LB” tags, DNxHD 36 is now called “DNxHD LB”. Now, with that said, I’m telling you all this based on the fact that all the footage you’ll be bringing in and transcoding would be 23.98, and I know that it won’t be, as you mentioned in your initial e-mail, so there are some slight modifications we’ll need to make, as we get rolling. Now, once you’ve linked to your media, there’s a few things you’ll have to do before you transcode your media. Let’s talk about that now.
SOURCE SETTINGS

The source settings of each individual clip is based on three factors.
1) The clip you’re linking to was acquired in a RAW format like RED or Blackmagic Design
2) the clip you’re linking and consolidating to has a different acquisition color space then the final color space of your project (normally REC709) OR additional adjustable settings that can be configured, before you transcode – i.e. – RED, ALEXA, etc.
3) The clip you’re going to transcode has a different raster dimension then your project. Meaning that you’re bringing in 2K/4K/Higher media into an HD project. Media that you might want to adjust the framing of, after the fact.
Let’s start with number one and work our way day. RAW footage, inside of Media Composer, depending on the company, will give you access to parameters that were available when the footage was originally recorded. Parameters like ISO, Exposure, Tint, Kelvin. All of which can be adjusted before your footage is transcoded. What’s important to keep in mind about transcoding is that any “Linked Plug-in” parameters (RED RAW, Blackmagic RAW adjustable parameters), will be gone, once you transcode, so make sure you have things set correctly, before you crunch that media.
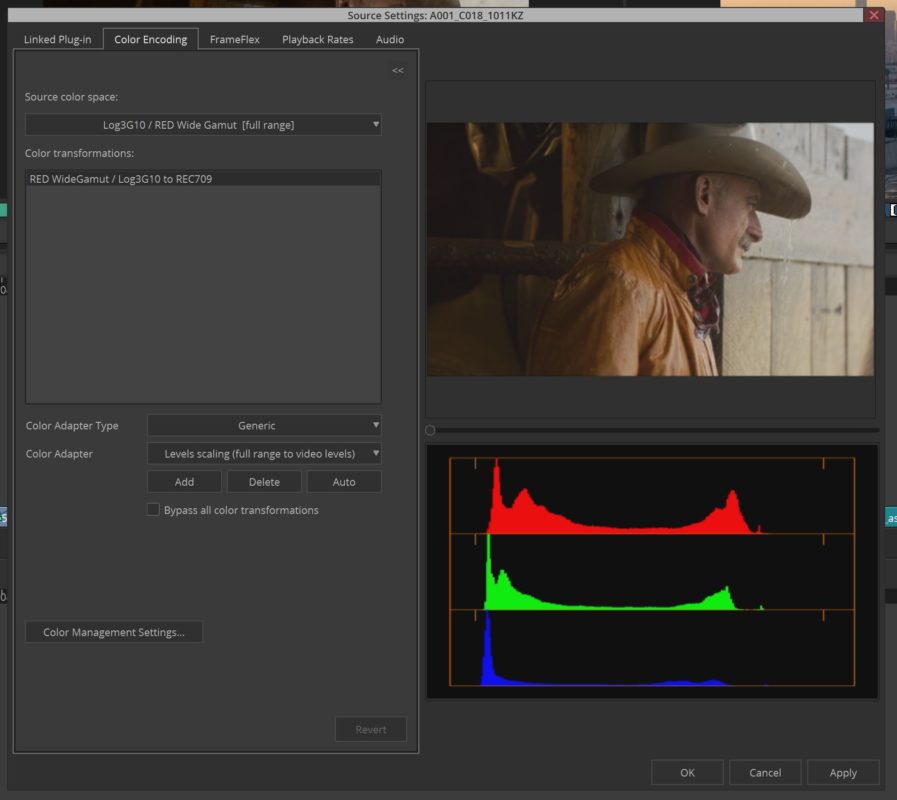
Number two, Color Encoding, basically this means Technical LUT’s. Does your footage require a technical LUT, like LOGC to REC709 (for Alexa footage), or REDWideGammut/LOG3G10 to REC 709 (RED footage), to make the footage look “correct”? This is the window you will add that in.
Last, but certainly not least, we have number 3. FrameFlex. Probably the most confusing, and under explained option in Media Composer. Seems simple in its concept, but unbelievably brutal in its application. This window is designed to bring in larger than HD frame sizes, and more specifically aspect ratios, and correct them before you transcode.
Alright, with all that being said, I want to clarify a few things. For the most part, assuming that things were set up correctly in the field, Media Composer does a pretty good job of setting the Linked Plug-in parameters for you, when it comes to RAW media. It will also add the proper LUT/LUT’s to your footage, based on the metadata included with that media. Media Composer also comes standard with a ton of technical LUT’s you can add to your footage (LOGC to REC709 is a perfect example). If, however, the LUT was provided to you by the on set production team, there’s a simple way to add it to the drop down menu. In the Color Encoding window, simply click on “Color Management Settings”.
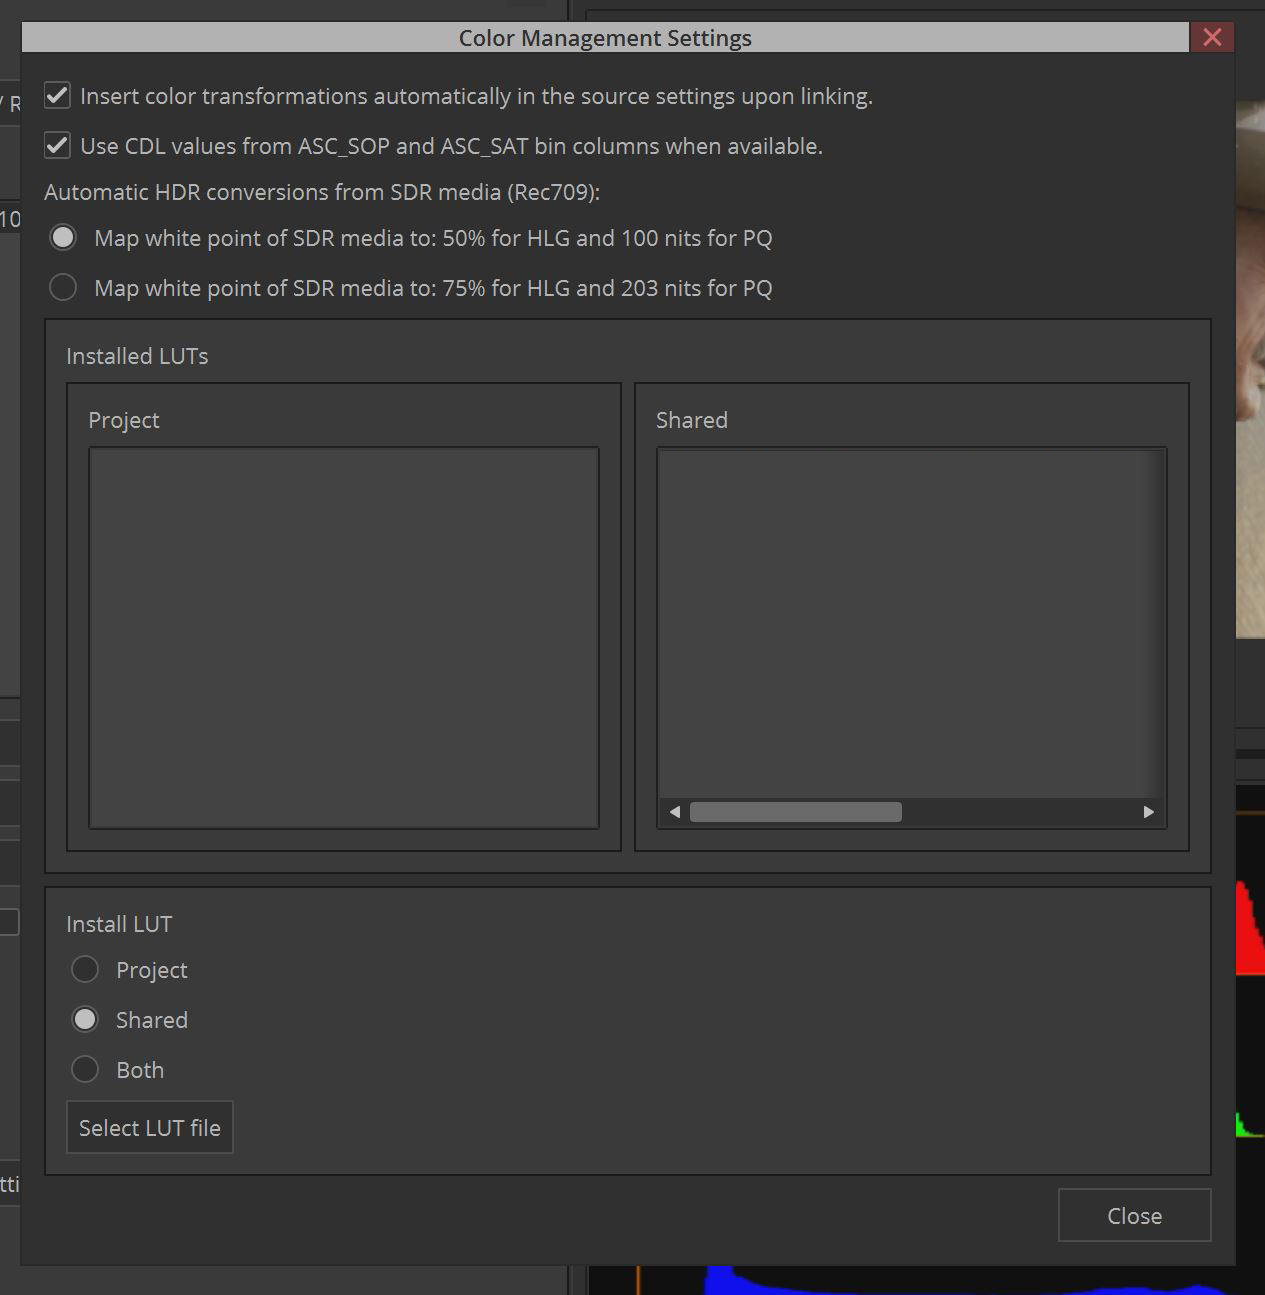
Make sure you select whether you want the LUT available across the entire system (Shared) or just for the project you’re working on (Project). You can now click on “Select LUT File” to choose the LUT file (wherever you have it located) you want to work with.
Media Composer supports the common LUT’s like CUBE, so you should be good to go. Now, you can simply select the LUT from the drop down menu, and click “Add” to add it to the “Color Transformations” window. Keep in mind, you’re not limited to one LUT. You can add however many you want. If you want to use LUT’s in a creative way, you still need to load them through the “Color Management Settings” window, and then add it through the “COLOR LUT” effect in the Effects Palette.
And, before we talk about the transcoding process specifically, it’s important to talk about Frame Flex, and its basic setting, which can be altered at any point, assuming you transcode your footage correctly.
The FrameFlex window might seem a little confusing, but what is important to keep in mind, is that assuming your footage has been interpreted by Media Composer correctly (the top part of the window with Raster Dimension, etc), you really only need to focus on the “FrameFlex” area, and one parameter specifically. Your FrameFlex Frame Aspect Ratio should match the raster dimension of your current project, and not that of the clips you’re bringing in. If you’re working in an HD project, it should be set to 16×9. Instagram – 1:1, Facebook 9×16, etc. If you have this parameter set correctly, you’ll notice the little dashed FrameFlex Window change aspect (assuming the clips aspect is different from your frame’s aspect) to match that of your timeline.
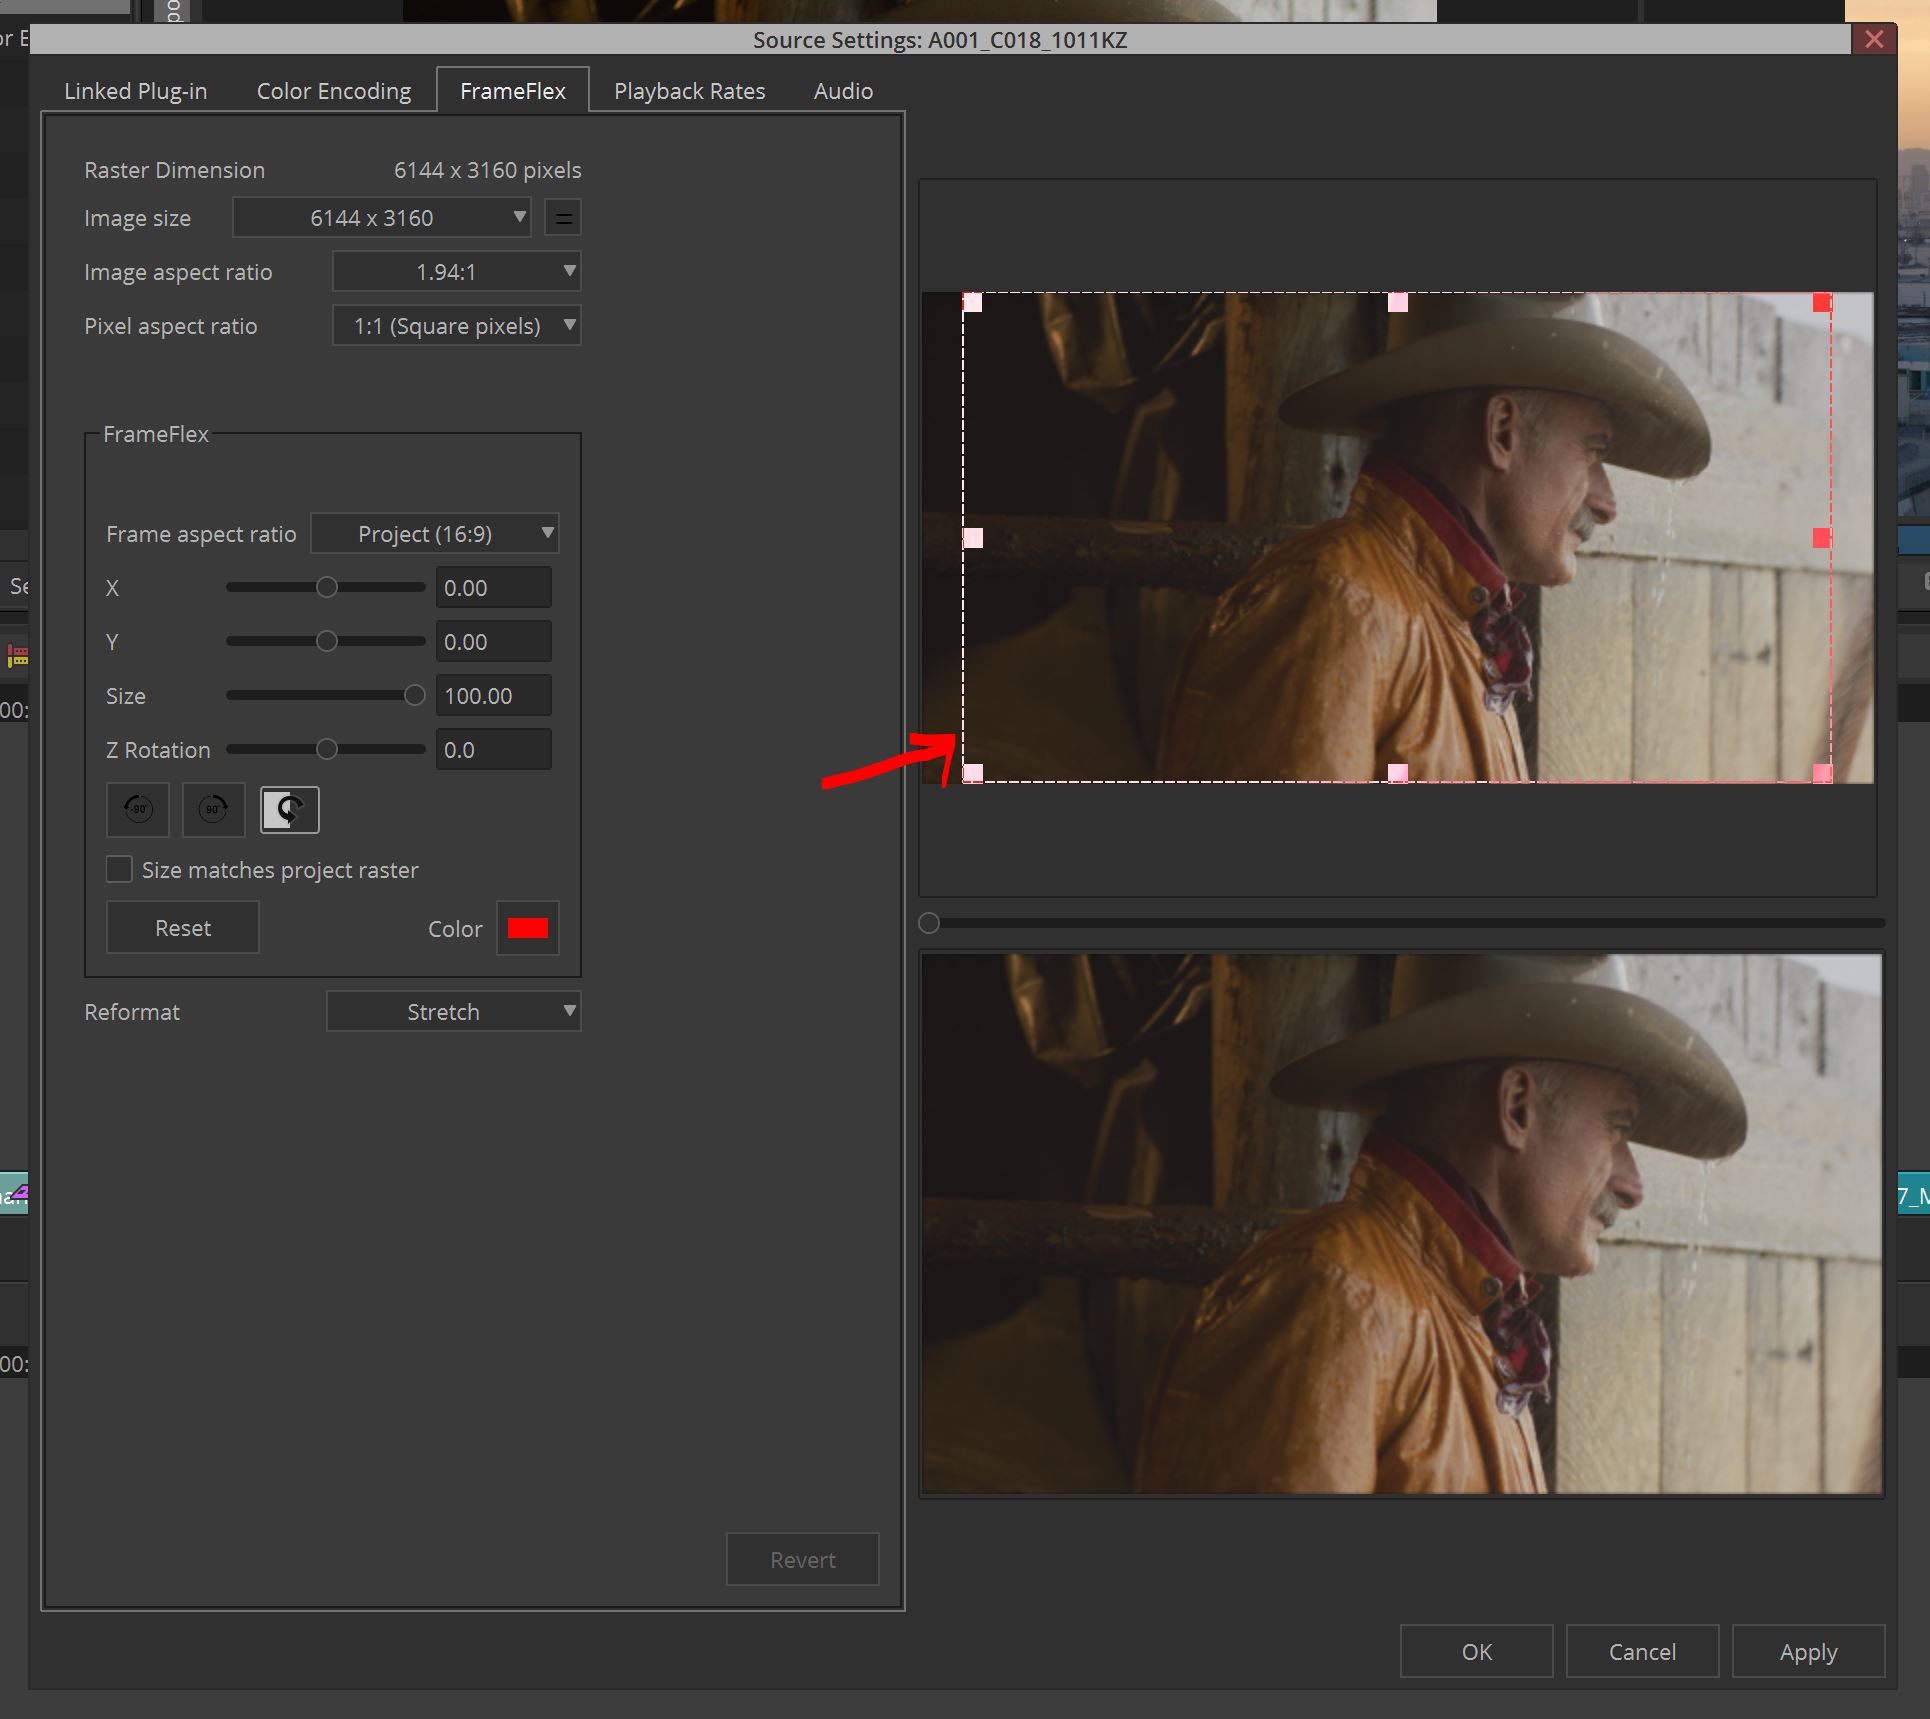
What’s important to keep in mind about this workflow specifically is that it’s non-destructive, meaning that you can move the frame around to reveal parts of the cropped image at any time in the editorial process, which is super helpful!
Alright, let’s talk transcoding now.
Once you’ve set up your Source Setting the way you want, it’s time to get down to Transcoding your footage (we’ll save Consolidating for another time). I’m going to make an assumption at this point. I’m going to assume that that your RAW Settings are set the way you want, and your Color Transformations won’t change, as we’ll be baking those into our clips during Transcode, but leaving our FrameFlex options open, to make adjustments down the editorial waterways.
TRANSCODING
First, select the clip or clips you’d like to Transcode. Then, right click and select “Consolidate/Transcode”. The first two things to set are the fact that you want to Transcode, and the drive you’re going to.
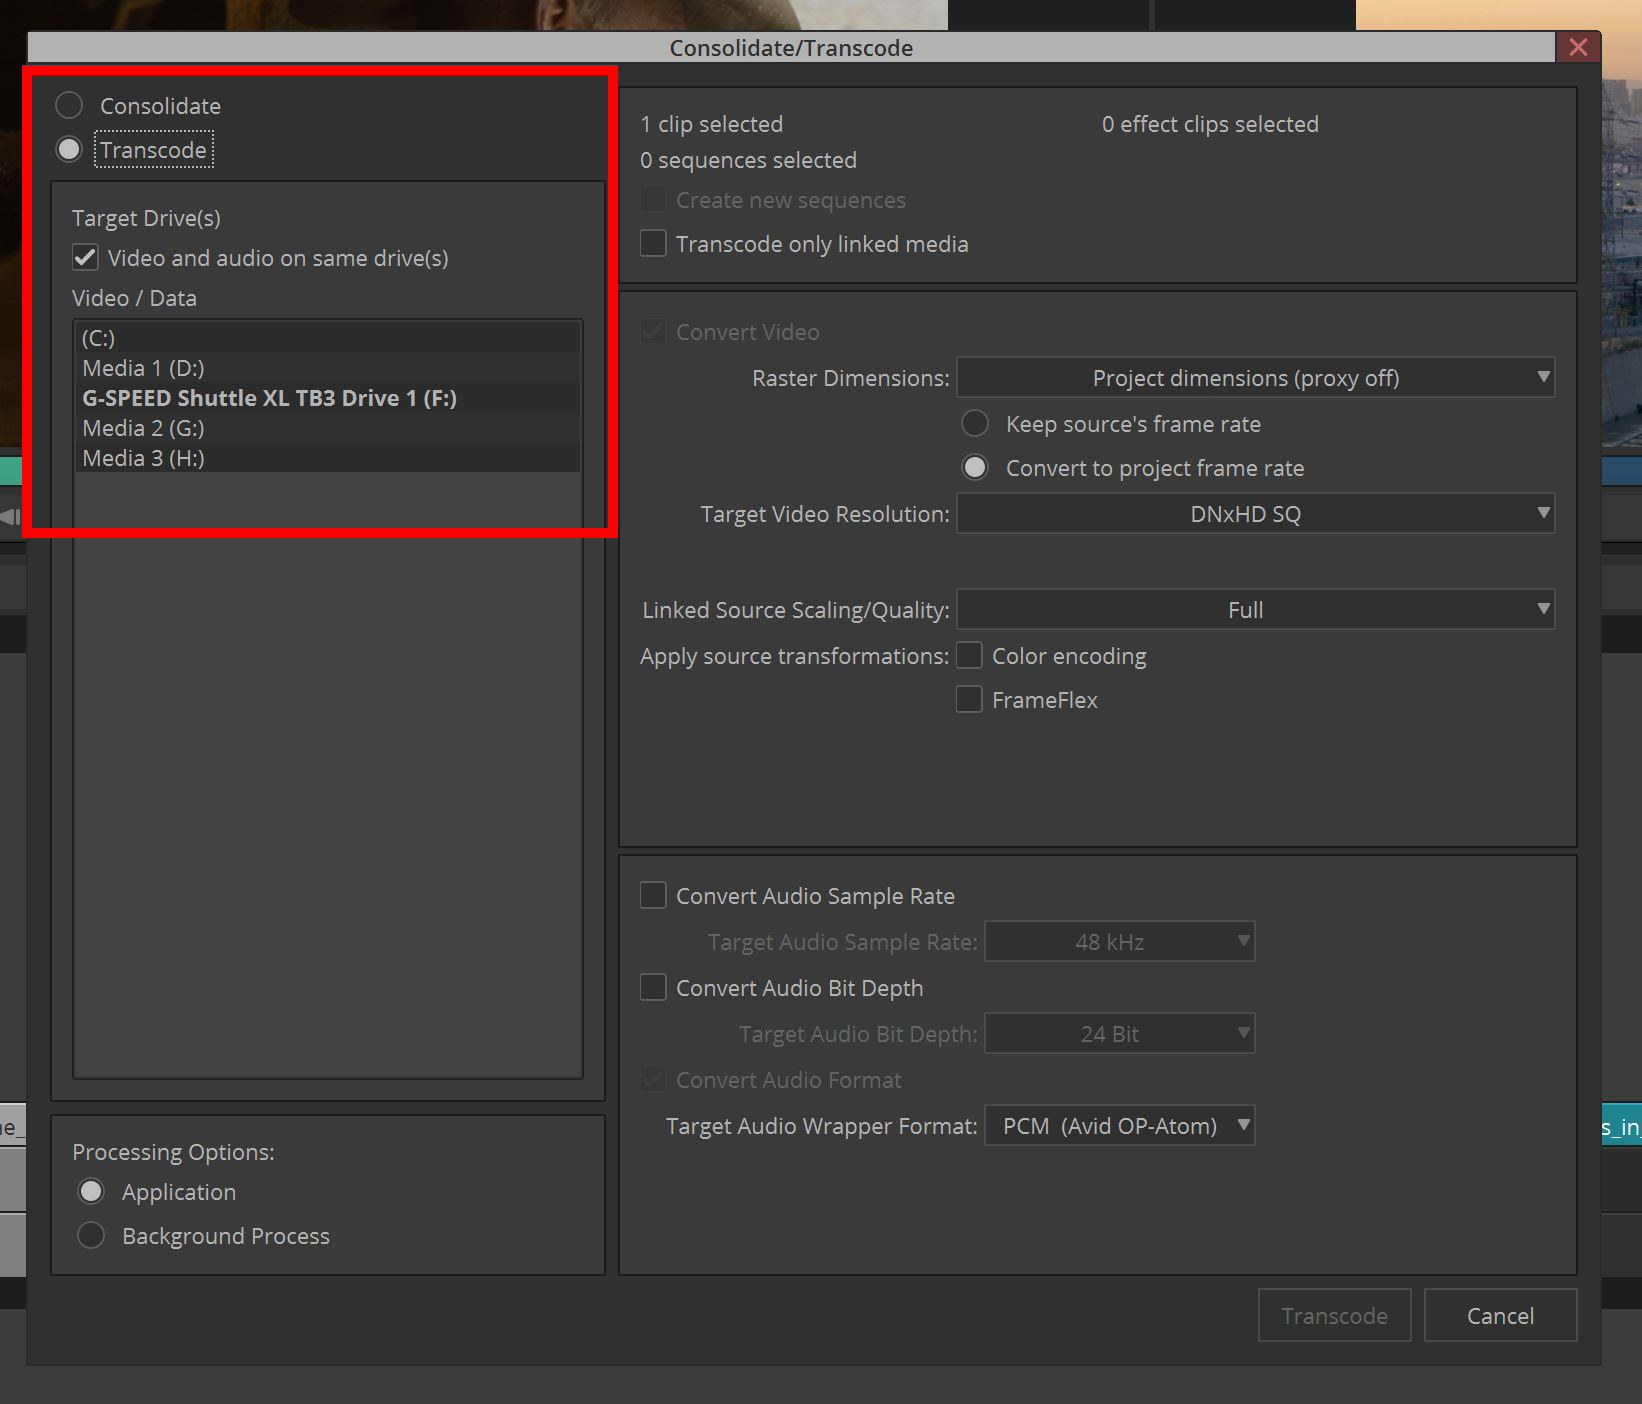
Next, here’s where we’re going to get specific. Most people, at this point, set the Raster Dimensions parameter to be the “Project Dimensions (Proxy Off)”. I don’t do that. I always transcode my larger than HD material at the Source’s Dimensions, and not the Project’s Dimensions. Why? Project’s Dimensions is destructible. Meaning that once you do it, you can’t get that footage back to make easy adjustments to the framing via FrameFlex. Transcoding at the Source’s size will leave it at it’s original dimensions (assuming it’s different from your project), for you/the editor team to have flexibility with down the pipeline. Next, we’ll choose to keep the source’s frame rate. By doing this, it will remove the option to encode at DNxHD, and give us the option to encode at DNxHR, which is Avid’s codec for different-than-HD media. The last three options we’ll set is that we want our footage to be DNxHR LB, which is the equivalent of DNxHD 36, we’ll leave the Linked Source Scaling/Quality at Full. Assuming you’re working with RAW media, this will force it to be encoded at the best quality, and last but not least, we’ll back in Color Transformations, so no one can adjust them after the fact. Your transcoding window will look a little bit like the image below.
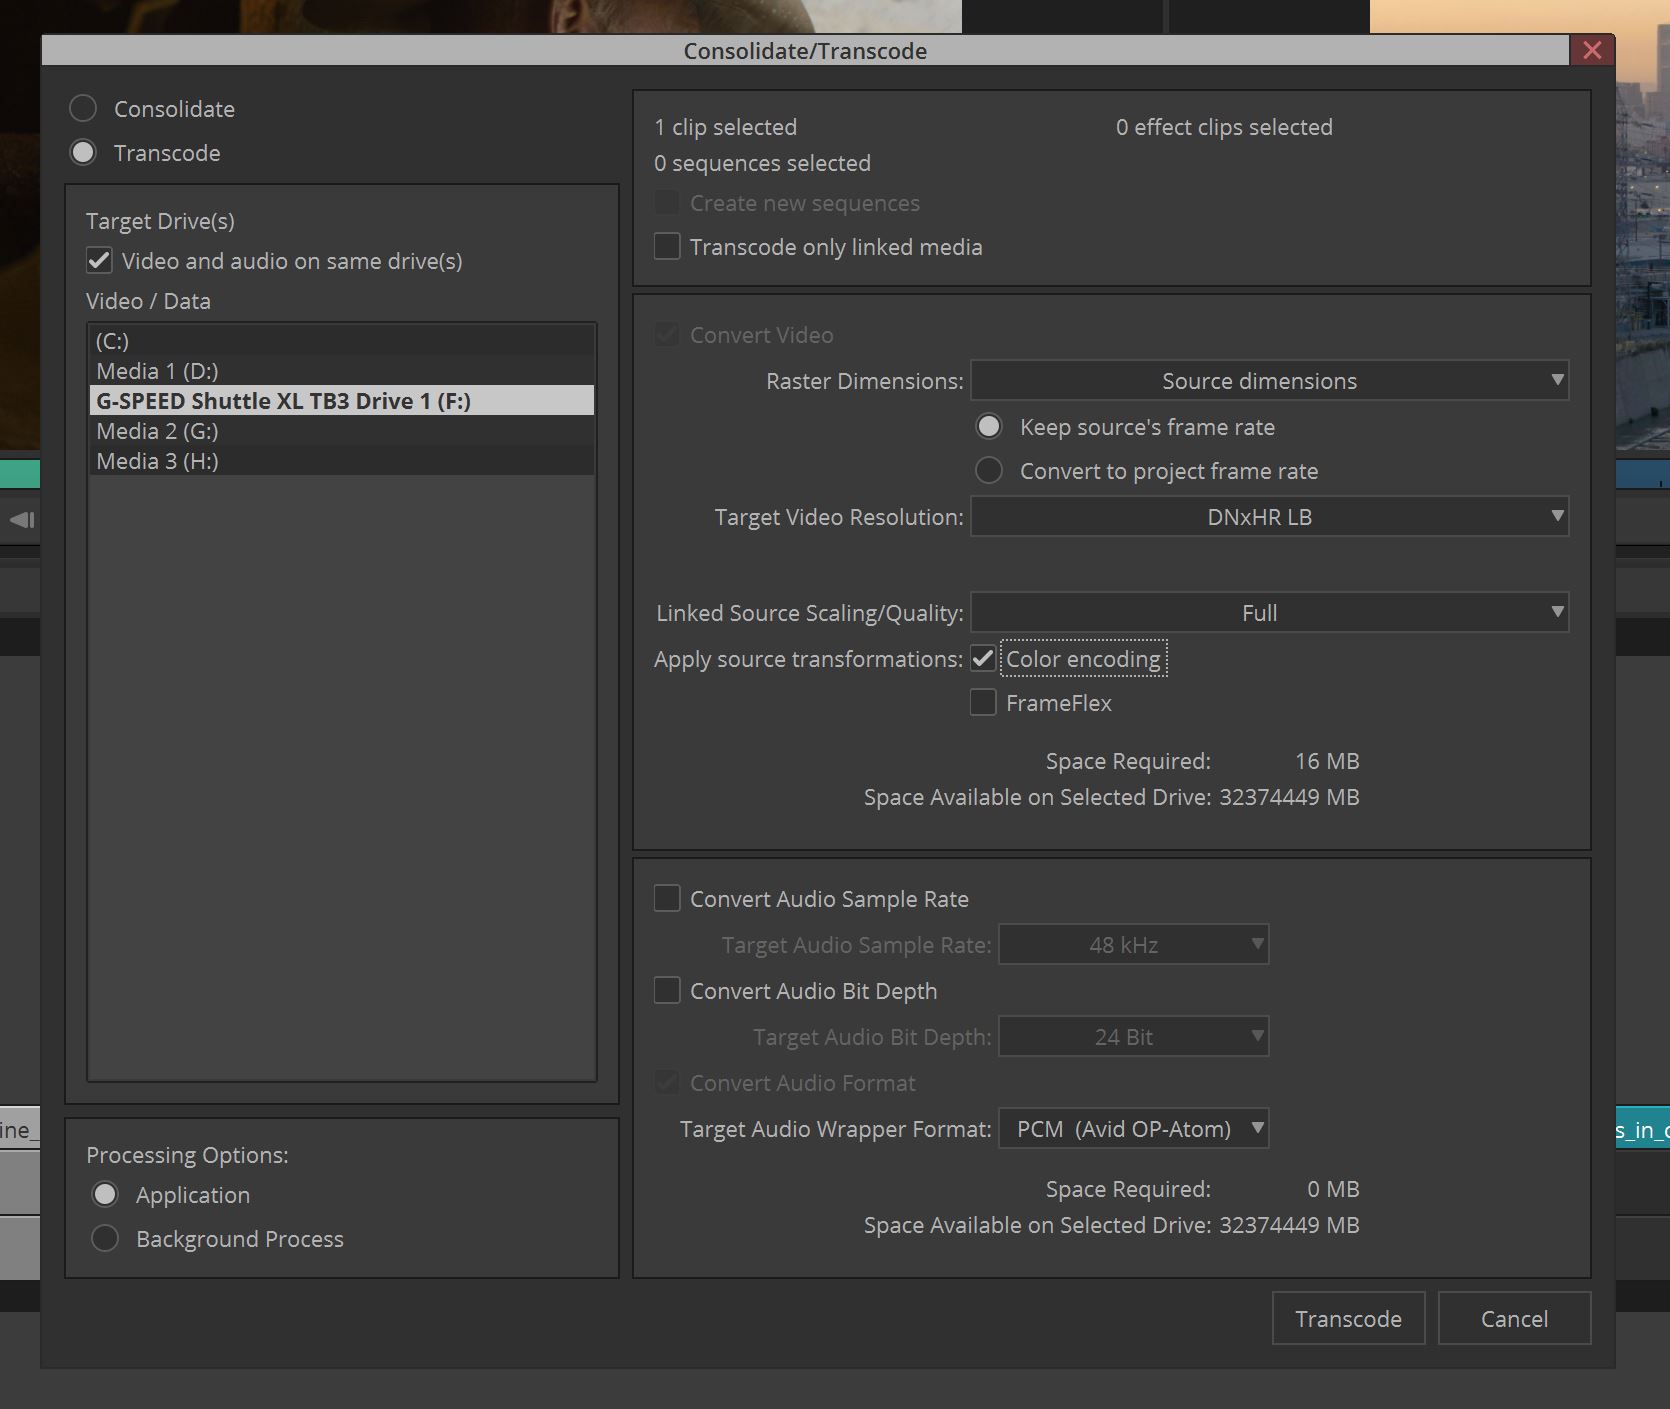
There are some audio options at the bottom of the window, such as to Convert Audio Sample Rate, and Convert Audio Bit Depth, but for the most part, I leave that as is, unless there is a specific reason I need to change it (as 48kHz and 24Bit matches the project that I’m currently working on).
Now, something to keep in mind is that when the transcoding is done, you’ll now have Master clips with the associated media, and the original linked clips in your bin. I recommend moving those linked clips into their own bin called “Original Linked Clips” or something like that, so in case the team will be relinking later, all the original clips will still be in the project.
I hope that this little insight into workflow helps you understand how critical this step of the process is. Most people still incorrectly assume that Media Composer has issues working with different frame rates in a project, and though it used to be like that, it’s not like that anymore, and I actually recommend you work with those different frame rates, utilizing the tools you have at your disposal in the Transcoding window, as there is no need to add extra compression passes to footage, converting it from one frame rate to another. I’m currently working on a large scale concert that has half the footage at 25p and half at 23.98, and I haven’t had any issues with the two living together in harmony, AND, we now have the ability to group clips of different frame rates together, in situations where (for some reason), a camera op has recorded an interview with two cameras at two frame rates or other bonkers issues like that. As I say to editors now, don’t be afraid of different frame rates in a project. Make sure you follow the right steps, and they’ll be just like any other clip you work with.
Anyways, AE, I hope this helps, and if you’d like me to answer one of your questions, one that requires a little more explanation than a simple e-mail reply, drop me an e-mail at [email protected] and check out the YouTube channel at youtube.com/letseditmc_avid .

Filmtools
Filmmakers go-to destination for pre-production, production & post production equipment!
Shop Now