Unless you’ve spent the past few years hiking the Appalachian Trail, you’ll be aware how much 3D animation has infiltrated the broadcast motion graphics world. Not so long ago, being an accomplished After Effects artist was enough to land a good job, but now employers and clients are also looking for good 3D skills (and in this economy, anything that increases the chances of landing a plum job can’t be ignored).
Surveys by us and others indicate that Maxon’s Cinema 4D is the 3D program of choice for After Effects motion graphic artists. In case there was any doubt, Cinema’s MoGraph module sealed the deal. In our report from NAB, we blogged how small studios are successfully integrating Cinema and After Effects, so how fortuitous for us that Cinema master Tim Clapham has released a fabulous training series on just this subject. Making It Look Great 6: Design and Production Techniques for Cinema 4D and After Effects is the latest release from John Dickinson’s company Motionworks. As Company Director of LUXX (and before that, HYPA), Tim Clapham’ credentials are impeccable – so you know that this will be the best $89 you’ve spent in a long time…
The MILG6 series consists of 8 hours of training: 6 hours spent in Cinema, the remaining 2 hours in After Effects. There is a long list of exactly what features are covered on the Motionworks MILG6 page, so you might want to peruse that first. Be sure to play the 2-minute introductory movie linked at the bottom of the list. (Spoiler alert: the Cloner object did it…)
When evaluating any training series, it always helps to know where the reviewer is coming from. After all, how much one learns always depends on how much one already knows! While I’ve used After Effects since version 1, my experience with 3D consists of a few years using Electric Image in its heyday. As Chris and myself got more involved writing books on After Effects, it’s been hard to find the time to master a different 3D program. So despite several years of poking Cinema 4D with a stick, and even taking a Maxon hands-on workshop, I never did wrap my head around its user interface. What I needed was to look over the shoulder of a true Cinema master as he/she creates a complex motion graphics project from start to finish. This meaty MILG6 series fits the bill perfectly.
Finding Treasures
If you have some experience with another 3D program, you probably won’t be too intimidated by re-learning how to use cameras, lights, primitives, materials, F-curves, and so on in Cinema. Many of the concepts are very similar. The danger is that you often try to adapt your old skills without discovering the strengths of a new program. Nothing beats having an expert show you where all the best treasures are hidden deep within a complex interface. After all, there might be a new or better way to do something, no matter how basic the task.
For instance, Tim is very fond of the Fresnel shader (previously known as the bhodiNUT Fresnel shader), which I hadn’t used before. This shader changes depending on the angle of the polygons pointing towards the camera. It’s useful for models needing realistic reflections or transparency, or for any materials that look different from an angle. Tim sez: “Think of a pane of glass: looking through it, it’s transparent; but from the side, it becomes more reflective.” I also wasn’t familiar with the Lumas shader, which can create cool brushed metal looks and elongated specular highlights.
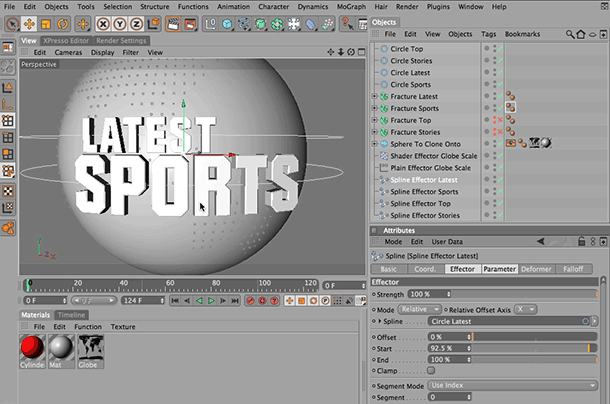
Illustrator text is imported and extruded and placed along a spline; later on, the text will rotate as it animates around the spline.
An expert guide can also help you avoid gotchas, and show how common problems can be worked around without panic (me, panic?). I particularly valued the advice for extruding Illustrator text files, starting with setting up the Illustrator file, combining the compound shapes, and extruding text. The workflow for aligning the text along a spline is something I would not have figured out on my own in a million years!
MoGraph
 If you’ve looked over the list of topics covered in MILG6, you’ll notice that Tim spends a fair amount of time covering MoGraph objects (namely the Cloner, Fracture, Matrix, and Tracer objects) as well as various Effectors that influence the clones (including the Random, Shader, Spline, and Plain effectors).
The Cloner object is a masterpiece and Tim puts it to good use in various parts of the project; he’ll often add an animated Plain Effector to affect the visibility and transformations of cloned objects. (If you’re familiar with using text animators in After Effects to affect the scale and rotation of characters, in Cinema you’d move the characters through the Plain Effector to achieve much the same result.) Tim also shows how to use luminance maps to affect the size and visibility of cloned objects.
Apart from creating the main globe and text elements, Tim also creates lots of graphical elements whizzing around using MoGraph. Despite that, you’re left with the impression that he’s only scratched the surface of what MoGraph is capable of. MILG6 includes a 5-minute bonus movie comparing the Cloner and Matrix objects that only whetted my appetite for a complete series on MoGraph tips and techniques.
I was particularly interested to see how MoGraph objects are organized in a project’s hierarchy (see figure below). By the end of the series, I’d just about grasped why some MoGraph objects need to be a parent (or a child) of another object, and why some effectors can seemingly be placed anywhere in the hierarchy. However, I would still have liked an overview at the beginning explaining the logic behind Cinema’s Object Manager, as I did find the hierarchy a bit of a “miss-me.” *
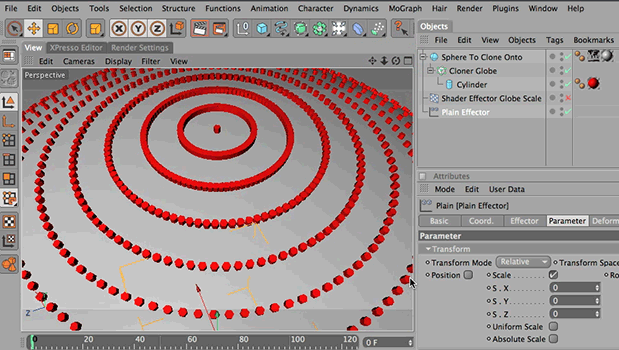
The Cloner object is used to duplicate thousands of cylinder objects around a sphere. Note how the Cloner is a parent of the Cylinder, and the Shader and Plain Effectors are loose in the hierarchy. (The Shader effect is toggled off right now; a b&w world map image is then used to effect the size of the cylinders.)
Expressions = XPresso
Tim is not shy about using XPresso in Cinema (or expressions in After Effects) when he wants to maintain an efficient workflow. If you’re familiar with using the basic pick whip expression in After Effects to make one property follow another property’s value, the concept behind XPresso in Cinema is very similar. You select the property that will “drive” the expression, and then connect this to the destination property. You can also scale the expression instead of using straight values, or reverse it so that it goes in the opposite direction.

The XPresso editor window in Cinema let you control how one property drives another, not unlike how expressions work in After Effects.
Later on in the After Effects section, Tim covers the basic pick whip expression along with the wiggle expression, so you get to compare both approaches.
/continued…
Integration
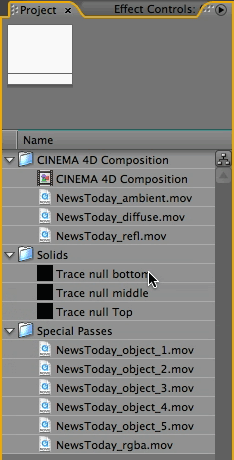 Since this series is all about using Cinema and After Effects together, Tim thoroughly explains how to render the Cinema project so that you have access to the camera data, lights, and the XYZ position of various objects in After Effects. It’s also common to separately render various special passes (such as the specular highlights and reflection passes) so you can do a final mixdown in After Effects. And if you want to effect individual objects in After Effect (to apply glows, color correction, etc.), you will also want to render additional grayscale animated mattes.
This is the Project panel (right) of the After Effects project that Cinema created automatically. Note the Composition (see next figure), and the various render passes. The five “NewsToday_object” movies are grayscale movies that can be used as track mattes (these were created by adding various text and graphics elements to different object buffers in Cinema).
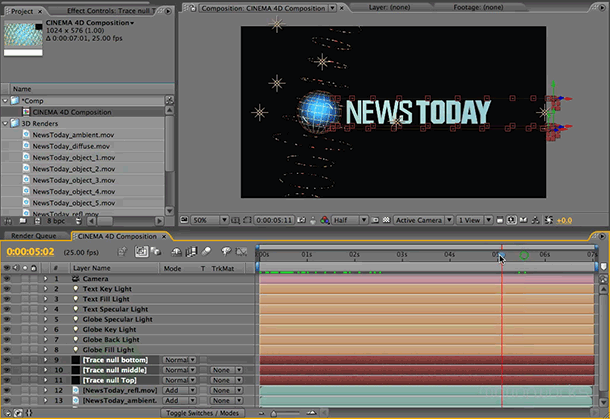
This is the starter composition that Cinema creates for you; note the camera, lights, nulls, and special passes (which are automatically set up using the proper blending modes).
Fortunately, all of the elements you need for the final composite can be rendered more or less automatically by Cinema 4D using its multi-pass rendering engine: Cinema outputs an After Effects project, which includes a composition with the final RGBA render, the camera, and the lights. Also included are any special render passes (ambient, reflection, specular, etc), as well as null objects placed wherever you’ve created External Compositing Tags in Cinema. Any mattes you rendered are imported into the After Effects project file, but not added to this starter composition. The only thing I’d like to see is a way to place named markers in Cinema that would transfer to After Effects named layer markers; these could serve as a “to do” list among other things.
Bear in mind that you only see the big picture when you get to the end of the tutorial. You might think halfway through that you are creating a great animation in Cinema, but the backgrounds and other graphical elements added in After Effects really finish it off.
Of course, part of the learning curve is figuring out which elements are best done in 3D and which are best done using 2D effects in After Effects. Accommodating client changes is also a factor: If you can quickly change something in After Effects, all the better, but you might need to be able to isolate this object with a track matte in order to make these changes.
Organization & Optimization
Apart from learning concrete techniques, I was very impressed how Tim manages to sprinkle good working practices throughout the tutorials. You’ll find advice for reducing the number of polygons in a scene (which speeds up rendering and allows you to render with less RAM), as well as optimizing the level of detail so that the scene is easy to manage and edit.
Tim also names all his objects in Cinema and assigns them to layers in the Layer Browser. This allows him to target groups of objects easily if he needs to solo, hide, or lock them.
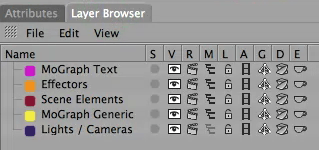
By adding objects to Cinema’s Layer Browser, you can solo and lock layers, as well as turn on/off visibility, rendering, display (in Object Manager), animation, generators, deformers, and expressions.
In After Effects
If you’re also looking to improve your After Effects skills, the last two movies cover more than just assembling the Cinema renders – there’s also lots of tips for using the built-in effects efficiently and creatively. Tim uses Fractal Noise (for backgrounds), Minimax (to create a border on text), CC Circle (for a vignette), as well as Turbulent Displace, Colorama, Hue/Saturation, Roughen Edges, Box Blur, Directional Blur, CC Light Rays and CC Image Wipe.

In After Effects, the background is created with Fractal Noise and Colorama, and still image graphics of the wireframe globe and the NewsToday title are added. Trapcode Particular and the wiggle expression join forces to create wiggling electricity and animated dots above and below the main title.
I was also glad to see Tim use Trapcode’s Particular 1.5 to add additional graphical elements (version 2 is shipping July 2009). If you don’t have Trapcode Particular, you can download a demo from Red Giant Software. If you are using Cinema and After Effects in a professional environment, Particular is highly recommended, though expect a bit of a learning curve (I often joke that if you master Particular, you’ll guarantee your job security!). Tim does a great job in a short amount of time to demonstrate some of its more powerful features. I’d love to see him cover Particular in a full series, as we could all use more help understanding this mega plug-in.
/continued…
Teaching Stuff
Trying to create a complex project that is both functional and realistic is a tricky balancing act. Tim manages to cover a wide range of useful and advanced techniques while still managing to create a good-looking project that makes sense. (He even throws in a few client changes to make it more realistic!) If he were to write this up with lots of figures, I dare say it would make a fairly substantial book!
All the source material and final project files are included with the training. MILG6 uses Cinema version R11, but accommodates users of R10 and R10.5 with additional movies or instructions where necessary. The After Effect section uses version CS3 (CS4 projects are not backwards compatible so that makes sense). I would have liked to have gotten intermediate Cinema project files after each section for comparison so that I could pick up the series in the middle using a starter file I know is correct!
I did have a problem with one of the Illustrator source files (MILG_TopStories.ai) not behaving as expected. Watch Tim’s explanation of how the rulers in the Illustrator file should be positioned in the center of the artwork, then open this file in Illustrator and check that the rulers are centered (they were not centered in the source I received). If you don’t fix the rulers, the text will be in the wrong position when imported into Cinema.
The tempo of the training is perfect for a spectator sport. Tim keeps things moving along nicely and there’s rarely a dull moment. When following along, the training is fairly easy to follow if you pay close attention. Mind you, the more experience you have using Cinema (or After Effects) the less likely you’ll be tripped up by actions that Tim performs on auto-pilot! At the bottom of the screen you’ll see symbols appear when Tim is pressing a key; if you can’t get something to work as expected, see if you’re missing pressing a modifier key. Similarly, in the first movie while setting up layouts, Tim says “just click” a couple of times when he really means to say right+click (which doesn’t show up as an overlay). And when he first tells you to “just duplicate” an object, press Control on Mac (Command on Windows) and drag the object in the Object Manager.
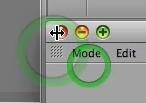 The only thing I did not enjoy was the method used to highlight the cursor click. On every mouse click a green “radio wave” animates out from the click point. It might sound like a small thing to gripe about, but it’s distracting and tiring on the eyes (particularly late at night). If Tim happens to click multiple times in quick succession, the cursor is swallowed up in a pond of green ripples (it’s like being hypnotized!). Each radio wave take two seconds to evolve and fade off, so a wave may be still animating while Tim has moved to another part of the screen – at which point you don’t know quite where to look! Granted, if there was no highlight at all, you might lose the cursor (Tim is a fast worker), but I wish he would have used something simple that quickly disappeared.
Learning Stuff
The six hours of Cinema training is broken down into 10 movies that are 30-45 minutes each, which I found was just the right amount before my head began to explode. (As with everything in life, learning a new program is hard before it is easy.)
You will get the best out of this (and any) training if you actually follow along. I did this for the first couple of movies, but then I realized that a 45-minute section took a few hours to complete. Since there were 8 hours of movies total and I had a review to do, I switched over to spectator mode and kept notes instead.
If you decide to follow along, be warned that Tim crams tons of information and tips into every minute. You might want to keep a notebook (or a text file) handy to write down a summary of the shortcuts you just learnt or things to explore in more detail later. My notes file was over 30 pages long; I even included a rough timeline of where features were covered so I could easily find them again by doing a quick search for a keyword.
Also allow some time for stumbling around as you figure out why something isn’t working as expected. It’s nearly always user error: I found as I scrubbed the movie back and forth, I could easily miss Tim clicking a switch or setting a popup that makes all the difference in how a feature works. If in doubt, rewind and watch the action more carefully.
While the financial investment is small, the time investment is large if you want to complete the project yourself. But most teachers will tell you that you can’t learn to drive by being a passenger – you need to get behind the steering wheel. A good approach might be to watch one tutorial movie in full, then rewind and follow along. At least you’ll know where Tim is heading. Occasionally Tim will go off on a tangent to demo additional features, so you’ll also know not to follow along if you’ve watched it through once already.
A good rule of thumb is that if your brain hurts, you must be learning something new. While my brain really hurt watching the Cinema sections, it practically sighed in relief as soon as it saw the familiar After Effects interface. If you’re a good Cinema user, you might have the same experience in reverse.
Summary
If you already have some experience with 3D in general, Cinema 4D and After Effects (i.e., you’ve made it onto the first step of the ladder), the instruction here is incredibly useful for intermediate/advanced users. MILG6 is not the only Cinema instruction beginners will ever need; if you’re relatively new to the program or to 3D, some of the concepts and shortcuts here go by a bit fast.
If you are evaluating which 3D program to use with After Effects, MILG6 is a small investment to check out if Cinema 4D is the right fit for you or your company. In particular, the last three movies will give you great insight into where Cinema gets its well-deserved reputation for After Effects integration.
If you’re a motion graphics artist wondering how Cinema is used in a real-world project, I’ve no hesitation in recommending this training series as it intelligently crafts a fairly complex project. Also check out the earlier MILG series if you are looking to improve your After Effects skills.
For futher Cinema tutorials, Tim maintains a great blog at HelloLUXX (formerly called HypaBlog) offering tips for Cinema and After Effects users. Maxon also offers Cineversity for a reasonable annual fee, although there are many free tutorials available as well.
Final tip: If your brain hurts, every time Tim says “Cool stuff!” it’s a reminder to hit Pause and have some tea…
footnote: “miss-me” (coined by Bottler, a character of Irish comedian Brendan Grace), means “mystery”.
The content contained in our books, videos, blogs, and articles for other sites are all copyright Crish Design, except where otherwise attributed.

Filmtools
Filmmakers go-to destination for pre-production, production & post production equipment!
Shop Now


