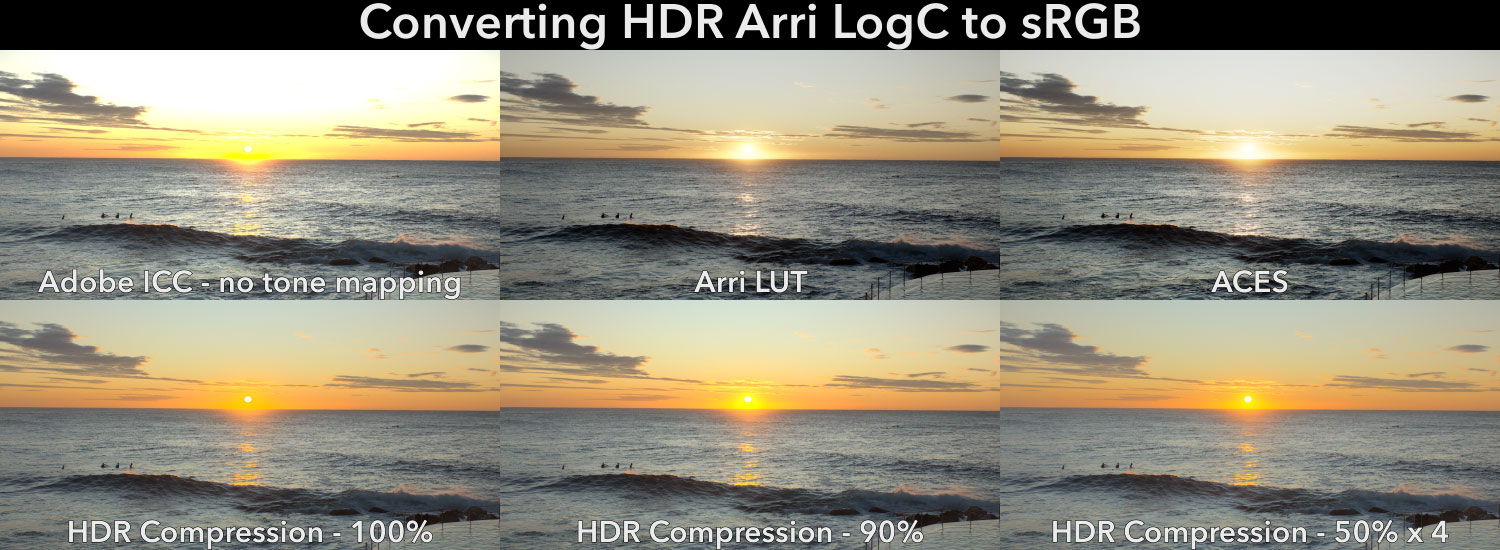
Tone Mapping is an integral part of modern video post production, but I didn’t even realise it was a thing for many years. After RED made history with their first High Dynamic Range video camera, it was only natural to experiment with the files they produced and try to see what benefits they offered within After Effects, although I didn’t really know what I was doing. Those early experiments lead to color management and tone mapping, and eventually lead to this series.
Since the launch of the RED One in 2007, every camera manufacturer has developed models that can record some form of High Dynamic Range video, but we’re still working in a world where the majority of video deliveries are Standard Dynamic Range – regular Rec.709. Bridging these two worlds involves Tone Mapping – adjusting the higher dynamic range of the source images to suit the lower dynamic range of the output.
When I initially planned this series I totally underestimated the significance of tone mapping. It’s not that the concept is difficult to explain, or even demonstrate. But once you get into ACES workflows, it’s easy to end up with videos that are darker than expected, or have corporate branding colors looking wrong. When I first started putting this video together, I soon found myself bogged down with over an hour of wordy explanations and convoluted examples. I almost gave up, and it’s one of the reasons why it’s been so long since the previous video.
For After Effects users especially, who are more likely to be dealing with corporate colours and other branding assets that need to be consistent, tone mapping is a significant but vital hurdle to cross. I ended up splitting my first draft into two parts to try and make the topic easier to digest.
In this video, I’ll start with a simple explanation of what tone mapping is, and demonstrate a few basic approaches. But I’ll also recap the philosophical issue of when we can tone map our assets in a post production workflow. Although some of the video covers topics from previous articles, this is all laying the groundwork for the next video, which looks at the more complicated side of tone mapping in an ACES environment.
At the beginning of the video, I demonstrate a few different methods to tone map videos in After Effects. To save you trying to pause the video at the right moment, here’s a gallery of those tests (which also includes a preview of an ACES example). While I have steered clear of making subjective comparisons, it is pretty clear that there are significant differences between using the Adobe ICC colour engine, and a LUT provided by the camera manufacturer. These differences will be further explored in the next video.

This is part 22 in a long series on color management. If you’ve missed the other parts, you can catch up here:
Part 4: Maxwell’s spinning discs
Part 6: Understanding the CIE 1931 chromaticity diagram
Part 8: Introducing Colorspaces
Part 9: The theory of a color managed workflow
Part 10: Using After Effects built-in color management
Part 11: Introducing OpenColor IO
Part 13: OpenColorIO and After Effects
Part 14: Combining OCIO with After Effects
Part 15: Logarithmic file formats
Unscripted: Looking at ACES and OCIO in After Effects 2023
Part 19: Introducing High Dynamic Range
Part 20: High Dynamic Range Compositing just looks better!
Part 21: HDR Formats, Colorspaces and TLAs
AND – I’ve been writing After Effects articles and tutorials for over 20 years. Please check out some of my other ProVideo Coalition articles.

Filmtools
Filmmakers go-to destination for pre-production, production & post production equipment!
Shop Now


