
Finally, we’d like to demonstrate ways to use expressions to manipulate text created with the new Type tool. We’ll show how to display time and parameter values as text, both for diagnostic purposes and to create graphical elements. On the second page we’ll show to how to manipulate strings of text, including using the Buzz Words animation preset to cycle through words in a list. Then on the last page we’ll talk about the Expression Selector to animate text created with the Type tool.
We admittedly will just scratch the surface here; you can then go much further employing standard JavaScript text “string” methods such as toUpperCase (although you cannot use JavaScript text formatting methods such as .bold and .fontsize on Source Text – you will just see the resulting HTML code, rather than re-style the After Effects text).
Type Tool Overview
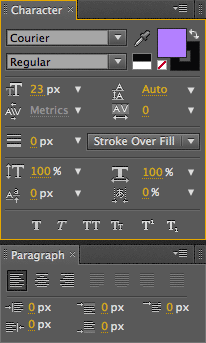 To use expressions with text, you need to have some familiarity with the Type tool (covered in Chapter 21 of the latest edition of our book Creating Motion Graphics with After Effects). As a starting point, you will need to create a text layer: Press Command+T on Mac (Control+T on Windows) to select the Type tool; adjust the Character and Paragraph panels for the font type, color, and size you want to use; click in the Comp panel; and type away. You can type anything right now for your text; we’ll be replacing it with expressions. Press Enter to accept what you’ve typed, and press V to revert to the normal Selection tool. (You can select the text layer any time later and change its formatting with the Character and Paragraph panels.)
Then twirl open the parameters for the text layer you’ve created in the Timeline panel, exposing Source Text (as shown below), which most of our examples here will be for. You can replace Source Text with a one-dimensional number, or with a “string of characters” (which need to be inside quotes to be recognized). If After Effects cannot process what you’ve created with your expression, it will display the word “undefined” in the Comp panel, or in some cases it will display the HTML code for what the JavaScript is trying to create.

Numbers to Text
One of the easiest things to do is have After Effects display a number you’ve generated, such as a Position or Rotation value. Aside from creating graphic displays, this provides an excellent tool for debugging expressions: It lets you display a value or string you are working on to see what your expression is really doing inside.
In our example below, we Option+clicked (Alt+clicked) on Source Text and dragged its pick whip to the value for Y Position. (Note that Source Text has one dimension, where Position has two dimensions – so you need to explicitly pick which dimension you want. See the third installment on arrays for a refresher course as to how and why.) Scrub the time indicator while watching the Position value in the Timeline panel and the result in the Comp panel. After Effects keeps a lot of internal precision when calculating values – and you get to see all that precision displayed, as seen below:
![]()
The purple value on the left shows the full numeric precision After Effects carries internally for Position; the green value on the right is the result of rounding it down to one decimal place.
Quite often, you want to display only some of this precision. When you’re using a plug-in like Effect > Text > Numbers, you get to choose how many decimal points you want to see. With expressions, you need to do a little more work: You need to multiply the value to get all the digits you want to keep to the left of the decimal point, use the Math.round method (as discussed in the first installment on useful math expressions) to get rid of the leftover digits, then divide the result by the same amount to move the original numbers back to their correct place to the right of the decimal point. To display just one digit to the left of the decimal point for Y Position, we needed to multiply the original value by 10, round it, then divide by 10, yielding the expression Math.round(position[1]*10) / 10.
For numeric displays, it is often good to use a font that keeps the same spacing per character, such as Courier or Monaco. Using fonts with proportional spacing will result in the displayed text changing width as the number being displayed changes.
Timecode
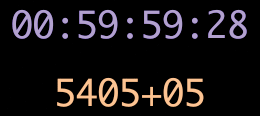 After Effects includes as set of expression methods that can convert the current time in a comp to either a timecode or a feet+frame format that Source Text can display, as shown at left. These expression methods include :
timeToTimecode, which converts time (in seconds) to SMPTE timecode
timeToNTSCTimecode, with switches for Drop Frame and Non-Drop timecode
timeToFeetAndFrames, which converts time to this common film ¬display format
timeToCurrentFormat, which uses the format chosen in File >
Project Settings > Display Style
As with many advanced methods, there are a variable number of values that may be contained inside parentheses that follow the method’s name. You must include at least the first one, which is time. If you use the word time – as in timeToTimecode(time) – After Effects will use the comp’s current time. (All of the After Effects time conversion methods ignore the Start Timecode or Frame value in Composition Settings; this setting is used only for display purposes in the Comp and Timeline panels. Inside expressions, the first frame of the comp always equals 0.0 seconds, and frame number 0.)
In the methods timeToFeetAndFrames() and timeToCurrentFormat(), the second value is the frames per second (fps) rate; if you don’t enter it, After Effects will use the comp’s frame rate. In timeToTimecode(), the second value is the timecode’s timebase (24, 25, or 30); if you don’t enter it, After Effects will use 30 (not the setting in File > Project Settings). In timeToNTSCTimecode(), the second value asks whether you want to use the Drop Frame counting method: Enter true if you do, and false if you want to use Non-Drop counting (the default).
The method timeToFeetAndFrames() has a third value which represents the number of frames in a foot of film; it defaults to the 35mm value of 16. Finally, the last number for all of these methods helps After Effects decide how to round numbers: If it might be negative, enter true so After Effects will always round away from 0; don’t bother entering it if the value displayed is always a positive number.
The timecode methods, among other things, can be used to create your own “burn in” timecode or feet+frame numbers for footage – or just cool numeric readouts.
Note that in earlier versions, After Effects could sometimes get in a state where the result generated by timeToNTSCTimecode would go awry just before the one hour mark. This is apparently fixed now. If you still manage to experience this problem, open the Comp settings, change the frame rate to 30 fps, click OK, open the Comp settings again, and change it back to 29.97 fps.
next page: managing strings of text
Strings of Text
In addition to numbers, you can have Source Text display text. To do this, put the characters you want inside quotes – like “Creating Motion Graphics”. This is referred to as a text string, or string for short. You can add together text strings to make a longer strings: For example, “Creating ” + “Motion ” + “Graphics” would give the same result (note the spaces after the first and second words; + does not automatically add spaces). You can also define the text inside expressions using ASCII character codes. For example, String.fromCharCode(50) produces the letter “C”.
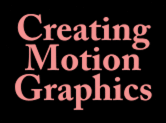 If you want to insert carriage returns between pieces of text, place the characters r wherever you want a return. An example of this is at left and below: “CreatingrMotionrGraphics” places each word on its own line. Select the layer and edit the Leading parameter in the Character panel to change the spacing between lines; use the Paragraph panel to change the justification (left, right, or centered).

If you want to display a single character in a string, you can “index” into it just as you would an array of numbers. If your expression for Source Text was my_text = “Creating”; my_text[0], just the letter “C” would be displayed. If the second line was my_text[5], the letter “i” would be displayed. (Remember that JavaScript thinks the first number in an array is 0, not 1!) Also, when you’re indexing into a character string, you must give After Effects a whole integer number – otherwise, it will display “undefined” in your comp.
In the example below, the second and third layers display individual characters, based on what frame it is in the comp. The second layer has an expression designed to go through the entire string once, then stop on the last character:
our_text = “Creating Motion Graphics “;
frame_num = timeToFrames(time);
frame_clamped = clamp(frame_num, 0, our_text.length – 1);
our_text[frame_clamped]
The first line creates the text string we’re using. The second line converts the current time in the comp into a frame number (an expression we discussed earlier). The third line uses the clamp method we discussed way back in the first installment on math operations: It says take the frame number and restrict it to the range between 0 (the first character) and our_text.length – 1 (our last character). You can add .length onto the end of any variable that holds a string to see how many characters are in the string; unlike most expression methods, .length starts counting at 1, instead of 0 – that’s why we had to subtract one from it to create the index we will need.
The last line says display the character that equals the frame number, clamped in the previous line to not go beyond the last character (which we entered to be a space). A variation on this theme would be to replace the clamp method with the modulus operator % (discussed earlier) so that we would keep repeating the same characters over and over again. These two respective expressions would look like:

You can also enter a number of words or characters as a string, then pick which one of them you want to display. To do this, use the .split()[] function. Pick a unique character to show where the breaks between individual words or phrases are. Then add .split()[] onto the end of any variable that holds your text string.
An expression for Source Text that said my_text = “Creating,Motion,Graphics”; my_text.split(“,”)[1] would tell After Effects to look for a comma to decide where to split your string, then index in to display the second word (remembering that [1] means the second, not the first, value in an array – again, most counting starts at 0!).
Here’s an example that puts that function to use:
posterizeTime(3);
our_text = “Creating,Motion,Graphics”;
word_num = Math.round(random,2));
our_text.split(“,”)[word_num]
- The first line uses the posterizeTime method which says to run the expression only three times a second.
- The second line is our string, using commas to divide our words.
- The third line creates a random number between 0 and 2 (there are three words in our string, and counting starts at 0), while the method Math.round says round this random number to the nearest whole number – After Effects will display “undefined” if it gets an index other than a nice, clean integer.
- The final line splits our string at the commas, then displays the random word chosen in the line above.
There is much more you can do, obviously, but this gives you the fundamentals of how to deal with strings, words, and characters. The rest, as they say, is limited only by your imagination (and JavaScript programming skills).
A clever use of expressions to manipulate text is the Buzz Words animation Preset (look in the Effects & Presets panel under Animation Presets > Text > Expressions > Buzz Words). Apply it to a text layer, and then type EE to reveal the associated expression:

Enter words you wish to step through in the first line, between the vertical bars (note that the | character is used to split the text string), adding or removing words as desired. This expression uses the expression method split_buzz_words_array.length to automatically determine how many words you entered. The preset also automatically adds an Effect > Expression Controls > Slider named “Buzz Frame Rate” to set the speed at which you cycle through the words.
Of course, you can use expressions to control virtually any other parameter of After Effects text – such as point size or tracking -?that you’ve added to your text layer using the Animate or Add > Property popup menus.
next page: Expression Selectors
Expression Selectors
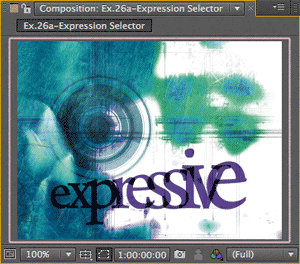 So far, we’ve discussed creating words and numbers using expressions for Source Text. With Expression Selectors, you will already have created the text with the Type tool. Expression Selectors give you access to each individual character in the text you created. You add an Expression Selector to an Animator (Add > Selector > Expression) in the same way you add a Range or Wiggly Selector. After doing so, you will find that it has only two parameters: Based On (where you choose to work on individual characters, words, or lines), and Amount. After Effects automatically runs the expression applied to Amount for every “unit” you’ve selected in Based On (we’re going to assume you’ve selected the default of Characters). Amount automatically gets the default expression selectorValue * textIndex/textTotal. This makes each character receive progressively more of the property or properties you’ve decided to animate, as shown at left and below:

When you Add an Expression Selector, the Amount parameter is automatically assigned the default expression selectorValue * textIndex/textTotal (above). In our visual example at top, this means the first character gets no additional scaling, the last character is scaled up to 232%, and the characters in-between are interpolated. Background courtesy Digital Vision/Data:Funk.
Let’s explain each of those expression values:
textIndex is the character (or word, or line, as defined by the Based On popup) being operated on. After Effects automatically steps through all of the textIndex values for you; you do not need to create a while loop (explained in the installment on Making Decisions). In other words, if your text has ten characters, After Effects will run the expression ten times per frame, incrementing textIndex each time it runs the expression assigned to Amount.
textTotal is the total number of characters (or words, or lines) in the source text.
selectorValue provides a way for Expression Selectors to interact with other selectors. It passes along the value created by any previous selector for the textIndex currently being operated on. If there is no prior Selector, then the selectorValue always represents 100% of the initial value being animated.
 At left and below is another simple example, where we created a line of ten characters: 1234567890. We added an Animator for Opacity, and set the Opacity value to 0%. We deleted its Range Selector and added an Expression Selector. We then entered the expression (textIndex / textTotal) * 100 for Amount. As After Effects automatically walks through the ten characters, increasing textIndex from 1 to 10 on each pass, this expression says apply 10% of the desired animation to the first character (1 ÷ 10), 20% to the second character (2 ÷ 10), and so forth. As our target animation is Opacity = 0%, this expression reduces the opacity of the 1 to 90%, of the 2 to 80%, and so on:

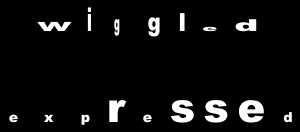 The figures at left and below demonstrate adding an Expression Selector to modify the results of a previous selector. The top line (“wiggled”) has a Wiggly Selector applied to Scale, resulting in each character having a random size. The bottom line (“expressed”) follows this Wiggly Selector with an Expression Selector, which has an expression that employs an if/then statement (again, discussed in the installment on Making Decisions): If the scale value passed along by the Wiggly Selector made a character larger than 50% in the X dimension (defined by selectorValue[0]), then scale the current character by 75%; otherwise, use an initial scale value we set up of 25%:

Express Yourself
And that concludes our series on getting deeper into expression in After Effects. As long as this was, it but scratches the surface as to what can be done; here are a few other resources you may want to take advantage of to further your knowledge:
This website teaching expressions and scripting was created by Dan Ebberts, a true expert in these areas. Indeed, Dan is the person I turned to review and improve this chapter when I originally wrote it for our book Creating Motion Graphics.
This community web forum includes discussions, tutorials, and a library of After?Effects expressions, scripts, and Animation Presets. An international roster of After?Effects power users regularly contribute expressions, scripts, and ideas.
After Effects Expressions by Marcus Geduld
This is the most thorough resource available dedicated to the subject of expressions in After Effects. It starts with simple applications, and progresses to advanced subjects including text expressions. Don’t be put off by simplest graphics; it’s actually deep.
JavaScript, a Beginner’s Guide
Most JavaScript books assume you want to use this language to program advanced web pages. But this book also contains some of the simplest, clearest explanations we’ve seen of the JavaScript language and how it works. Chris keeps it on his desk when he’s working with expressions.
This is the final installment in serializing the Deeper Modes of Expression bonus chapter from our book Creating Motion Graphics with After Effects into a set of 12 posts here on PVC.
The latest edition of Creating Motion Graphics – covering the updates introduced in After Effects CS4 and CS5 – is shipping now.
The content contained in Creating Motion Graphics with After Effects – as well as the CMG Blogs and CMG Keyframes posts on ProVideoCoalition – are copyright Crish Design, except where otherwise attributed.

Filmtools
Filmmakers go-to destination for pre-production, production & post production equipment!
Shop Now


