
Footage that imports into After Effects with its internal “601” luminance levels intact (left) looks washed out compared to how it really should look (right). Footage courtesy Isuzu and Perception Communications.
Have you ever received washed-out images from a client – or even yourself? Did you just let it slide (“well, that’s the way they shot it”), or cursed them for making you lose more sleep as you tried to make it look better? Well, we have two bits of news for you. One, the fault may not be in the footage, but in the way you’ve been handling it. Two, in Adobe After Effects 7, it’s now easier to handle it the right way. In this column, we’ll talk about video and the infamous luminance range issue; in the next column, we’ll turn our attention to still images and sRGB color space.
(Note: The workflow has changed in After Effects CS3; we discuss it in detail in Chapter 25 of our book Creating Motion Graphics 4th Edition. However, if you’re not ready yet to dive head-first into a color managed workflow, the technique in this column provides a workaround that works fine in After Effects CS3.)
“601” luminance range
This issue has existed since the earliest days of digital video, but unfortunately many users still don’t fully grasp on it – a situation not made any easier by many manufacturers. First, we’ll cover some history and the underlying behavior; then we’ll get to the new fix inside After Effects 7 – and a fallback fix in Apple’s Final Cut Pro.
Internally, most digital video streams are expressed as YUV, not RGB values. The “Y” is the luminance (brightness) component of each pixel. In an 8 bit per color system with values ranging from 0 to 255, these streams define black as having a value of 16 (not 0), and white as having a value of 235 (not 255); the values for 10 or 12 bit systems scale accordingly. This allows them some extra headroom for hot spots, and enables arcane techniques such as “superblack” keying where the alpha channel is defined by luminance values below 16. This 16-235 range is known as the “601” luminance range, based on the ITU-R 601 standard which much digital video obeys.
What happens to these values is determined by the QuickTime or Video for Windows codec they employ, and occasionally by the application processing these images. In the case of After Effects, it relies on the codec to translate between the stream’s YUV values and the RGB values that After Effects prefers. During this process, some codecs convert between their internal 16-235 range and the fuller 0-255 range most users expect – while some codecs don’t. Although a few have option switches to decide whether or not this range conversion happens, most manufacturers don’t go out of their way to let users know exactly what their codecs are doing, leaving users in the dark (or a slightly washed-out light, as it so happens).
Some codecs are known quantities. For example, Blackmagic’s DeckLink codecs, as well as the DV codec in QuickTime on the Mac, do this automatic conversion for you, so any footage captured to these systems appear to have their full contrast inside After Effects. Other codecs – such as the old Media 100 codec, and many DV codecs on Windows – do not do this luminance range conversion, so footage captured to those systems can appear to be lacking in contrast once in After Effects. Avid and Aurora codecs can have hidden switches that determine their behavior; Avid footage is usually converted, while Aurora footage usually is not.

Curing luminance issues
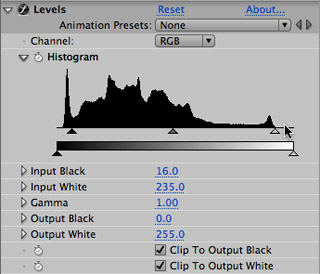
The way to verify – and fix – what is going on is to view a color range histogram display for the footage, and look for gaps at the top and bottom which would indicate whether or not the luminance range has already been stretched out to its full contrast. In After Effects, add the footage to a composition, and apply a Levels effect. The figure to the right shows what these gaps look like. Footage that has a 16-235 luminance range may still have values that creep above or below these numbers, as many cameras allow you to shoot out-of-legal-range values – so it can sometimes be a bit of a judgment call.
In most cases, the way to treat this footage and restore its contrast to full range is to use the Levels effect to set the Input Black to 16 and Input White to 235 (multiplying these values by 4, 16, or 256 depending if your parameter display is set to a 10, 12, or 16 bit range, respectively). You have to do this for every piece of footage from this codec, every time you use it.
If you know ahead of time what your codec is doing, and you have After Effects 7, you can now take advantage of an Interpret Footage option to make this easier: Select the footage item in the Project panel, type cmd+F on Mac (ctrl+F on Windows), and look at the bottom of this dialog for the Expand ITU-R 601 Luma Levels switch shown below. Enable this if your footage is coming in with the washed-out 16-235 range. However, note that if the footage includes illegally bright whites in the 235 to 255 range, these areas may now posterize as they get clipped; if it’s too obvious, treat problem shots by hand using Levels or Curves.

In After Effects 7, the Interpret Footage dialog had an option to specify 601 luminance levels for a given footage item. This option disappeared in After Effects CS3, replaced by the ability to apply more descriptive color profiles to footage items.
The nice thing about this option being in the Interpret Footage dialog is that it will be obeyed every time you use this clip in a project. Also, it is easy to copy and paste interpretation settings between clips in the Project panel: Set up one the way you like, select it, type Cmd+Opt+C (Ctrl+Alt+C) to copy these settings, select all of the other clips you wish to receive these settings, and type Cmd+Opt+V (Ctrl+Alt+V) to paste them.
Alas, After Effects does not have a similar function in the Output Module, so if you are rendering back to one of these 16-235 range codecs, you need to compress the luminance range by hand. The easiest way to do this is to add a Layer > New > Adjustment Layer to the final comp (making sure it stretches over the entire length of the comp), add a Levels effect, and this time set the Output (not Input) Black to 16 and Output White to 235.
Out-of-range whites
When we get footage from experienced shooters, they usually carefully monitor their white and black levels, and the video we capture from them safely falls inside the internal 601 16-235 range (0-100 IRE). However, as more clients started shooting their own footage using inexpensive DV cameras, we started getting footage that had out-of-range whites. It seems that many cameras – especially lower-end ones in auto mode – all too quickly exceed the normal 100 IRE white safe point that is mapped to 235 inside the DV codec. Try to use a camera that includes a zebra display (sometimes called a White-out Alert) that shows when you’ve exceeded legal whites.
If the codec used for the footage hands us the original 601 luminance ranges, we can manually pull the 16 level of black down to zero, and leave the whites alone – not entirely color accurate, but better than having posterized hot spots. However, when codecs auto-convert – like DV in QuickTime on a Mac – we can’t make these adjustments inside of After Effects, as it is already adjusting the luminance range for us.

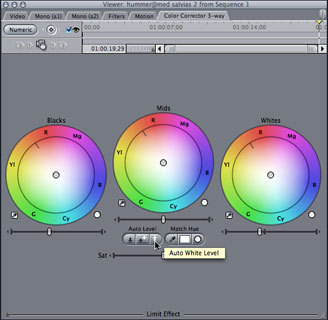
Fortunately, Final Cut Pro (FCP) reaches around the codec and can access the original internal values. Therefore, we’ve started taking problem shots into FCP, adding Effects > Video Filters > Color Correction > Color Corrector 3-way, and clicking on the Auto White Level switch (see Figure 3). This searches for the maximum white value in the current frame, and raises or lowers it as necessary to put it at the maximum legal white point. We then export this clip and use it in place of the original source.
That’s how we deal with the most common video color space issue; next column, we’ll tackle the most common still image color space issue: the sRGB color profile.
Postscript
As noted in the intro, Color Management in After Effects CS3 is far more advanced than it was in After Effects 7, allowing each source to be assigned a color profile in addition to being able to assign a profile as the working space for an entire project. You can also convert to the profiles of your choice when rendering to formats such as QuickTime. By using these in concert, you no longer need the Color Profile Converter. However, if you are not ready to jump into the deep end with Color Management, the Color Profile Converter is still a very useful tool for spot adjustments and corrections. Color Management in After Effects CS3 is covered in more detail in Creating Motion Graphics 4th edition, Chapter 25.
The content contained in our books, videos, blogs, and articles for other sites are all copyright Crish Design, except where otherwise attributed.

Filmtools
Filmmakers go-to destination for pre-production, production & post production equipment!
Shop Now


