The US$6500 (street price) Sony PMW-EX1 is a six-pound, high definition Handycam with three 1/2″ CMOS chips. It resolves a true 1920×1080 image; shoots both interlaced and progressive; records 1920×1080, 1440×1080 (HDV-compatible), and 1280×720 formats; and offers variable frame rates from 1 fps to 30 fps (1080p) or 60fps (720p). The camera records using long-GOP MPEG-2 on dual SxS solid-state memory cards, and provides a 10-bit SDI output with embedded audio and timecode. It is awkward to handhold, some controls are hard to use, and it lacks SD recording, but its excellent pictures, comprehensive image tweaks, and pin-sharp LCD make it a compelling HD camcorder.
Introduction
The EX1 is Sony’s response to Panasonic’s HVX200: an affordable variable-frame-rate HD handheld camcorder with solid-state recording. Like the HVX200, it offers true progressive scan including 24p, variable frame rates up to 60p in 720-line mode, and two solid-state card slots, allowing hot-swapping while recording. Unlike the HVX200, the EX1 allows variable frame rates in 1080p, 50Hz/60Hz switchable operation, and full-resolution 1920×1080 sensors with full-resolution recording. It uses rolling-shutter CMOS chips instead of the HVX’s frame-capture CCDs, long-GOP MPEG-2 instead of Panasonic’s more predictable DVCPROHD, it has no standard-definition recording modes, and it costs about $1300 more than the Panasonic.

The PMW-EX1 was first shown at NAB 2007 and started shipping late in the year. It’s the first fixed-lens camcorder built by Sony’s CineAlta group in Atsugi, the folks better known for the HDW-F900 HDCAM and PDW-series XDCAM camcorders. The CineAlta heritage is apparent in the EX1’s flexible frame rates, true progressive scan, comprehensive menu system, and excellent tonal control.
The camera carries a 14x Fujinon zoom with fully manual iris and zoom rings, and a dual-mode focusing system that allows both servo-driven auto and manual focus, and absolute-position manual focus complete with imperial and metric distance scales on the lens barrel.
The EX1 uses the latest iteration of the “EXMOR” CMOS sensors seen in the HVR-V1 HDV camcorder and the Alpha-series DSLRs.

These 1/2″ chips offer the best resolution (1920×1080 effective photosites per sensor) in this class of camcorder, combined with low noise and high sensitivity, and the ability to shoot progressive or interlaced video with equal ease.
The camcorder offers two modes of recording, both using the XDCAM long-GOP MPEG-2 codec. Images are recorded as 8-bit YCrCb with 4:2:0 color sampling. SP is a 1440×1080, 60i (or 50i) constant bit-rate (CBR) mode, compatible with 1080-line HDV. 24p is recorded using 2:3 pulldown in a 60i clip; 25p is recorded with 2:2 pulldown in 50i.
HQ records the full, square-pixel HD raster-1920×1080 or 1280×720-using 35 Mbit/sec variable bit-rate (VBR) recording at whatever frame rate is selected, thus there are no bits wasted on duplicated frames.
The EX1 records onto SxS cards: high-speed memory cards in the Expresscard34 form factor. Like Panasonic’s P2 cards, SxS cards are more than commodity memory cards; they’re designed for high-speed data transfer.
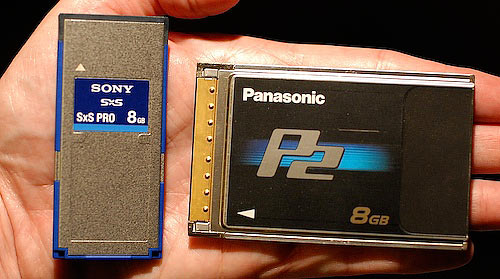
They also allow variable frame rate recording as well as international flexibility (“NTSC Area” and “PAL Area” frame rates) without the complications attendant on writing a steady data stream to tape, and without the size and weight of either tape or rotating-media drives. A single 8GB SxS card holds about 38 minutes of SP material, or 28 minutes of HQ recording, and the camera holds two cards. Both 8GB and 16GB cards are available, with street prices around $530 and $875 respectively.
The EX1 comes with an SDI spigot for output of either HD or downconverted SD video (the EX1 has no SD recording modes). Timecode and audio are embedded in the SDI stream, allowing a single cable connection to a display or capture card. Analog component is also available as well as analog stereo audio and a composite feed; Y/C video is available but requires the VMC-15FS cable, which must be purchased separately. i.Link (a.k.a. FireWire, or IEEE 1394a) is available for SP-mode, 1440×1080 video only.
The camera records two channels of 16-bit uncompressed audio, with comprehensive controls and both a built-in stereo mic and dual XLR connectors.
The EX1 sports a rotating handgrip, a flip-out LCD of exceptional quality, and 12-volt power: the stock battery is a 14.4-volt, 28Wh Li-Ion pack that runs the camera for about two hours.
I first looked at a prototype EX1 In October 2007 (on cinematographer.com, or dv.com with poorly-reproduced photos). That EX1 was a hand-built unit lacking a serial number and exhibiting anomalous lens behavior. In December I received a pre-production EX1, S/N 90127. This unit was built on the actual production line, but before the line went into full production mode, and is equivalent to a full production unit in every way except for the analog I/O board, which is said to be noisier than the final version.
I own a Sony HVR-Z1 HDV camcorder and a Panasonic HVX200 DVCPROHD camcorder; you’ll see them mentioned as I go along, as I was able to compare them directly to the EX1.
Design & Handling
The EX1’s basic layout is very similar to other Handycam style camcorders. At just over six pounds in shooting configuration, and sixteen inches from lens shade to eyecup, it’s comparable in weight and size to other HD handhelds like the Sony HVR-Z1 or Panasonic HVX200.
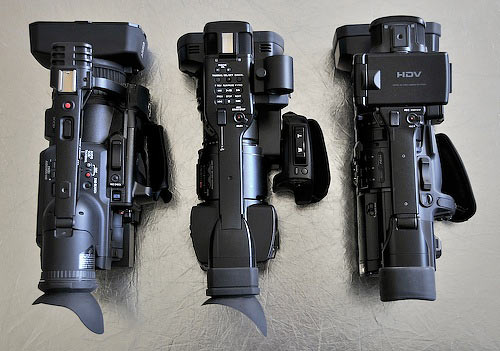
Left to right: HVX200, PMW-EX1, HVR-Z1.
The design marries a Fujinon-built lens to a Sony camera; this marriage led to off-center vignetting on a few early EX1s, but current cameras shouldn’t have the problem (owners of afflicted cameras can have their lenses recentered by Sony).
The combination of the new lens, solid-state recording, and other unique features results in a fairly standard package, but one with a few quirks. Perhaps because it’s the first “Handycam”from the CineAlta group, there’s a slightly awkward feel to the beast; it doesn’t balance as well as other Sony handhelds, and some of the controls and connectors aren’t as well implemented as I might have hoped. These aren’t fatal flaws by any means, the camera just requires a bit of getting used to.
Lens Section
The camera starts off with Sony’s unique lens shade / cap, where a slide switch opens and closes two “shutters” built into the shade to cap the lens. First seen on the DSR-PD170, this shade means you’re never without a lens cap, nor do you ever need to worry about where to put the cap when you take it off. The shade bayonets into the front of the lens, and will accommodate at least one 77mm filter behind it.
The 14x Fujinon lens has a knurled, rubberized focus ring that has two modes of operation. It’s like having two lens types in one, so those used to Handycam lenses and those used to broadcast lenses can both be accommodated.

When pushed forwards (“AF/MF”), it works like most prosumer focus rings: it free-spins without limit. It can be used in a manual mode, with a “Push AF” button available on the bottom of the lens barrel, or in auto mode with manual override. It will focus as close as 0.8 meters (about 2.6 feet) with macro off; with macro on (set with a slide switch), the minimum distance shrinks to the front of the lens shade for focal lengths up to about 20mm, then it creeps gradually out to 2.5 feet as you zoom in.
If you push the ring back (“Full MF”), it switches to an absolute-positioning manual mode, just like a “real” lens: it engages an engraved focus scale and turns 120 degrees to travel between infinity and the 0.8m near focus point (macro is not available in absolute mode). I found the focusing scale to be dead-on (the body has a focal-plane mark on it, but the lens scale is calibrated to the front of the glass in video style, not the focal plane as in film style). The focus ring is marked in both meters and feet and displayed through a window on the otherwise-stationary lens housing. It’s infinitely better than having no focus scale at all, but remember that it only works in Full MF mode: when you switch to AF/MF mode, the scale sits at its last position and doesn’t move as focus changes.
This dual-mode behavior appears to work like the servo/manual zoom on the HVR-Z1 and HDR-FX1 camcorders. The mechanism is always under servo control, but in “Full MF” mode the servo precisely tracks the position of the focusing scale. Even in Full MF mode, you can hear the focus servos running as you focus the lens. Servo tracking is so responsive that, in my experience, it never lagged the focus ring, so the practical effect is every bit as good as a full mechanical focus. Because it is not a traditional mechanical system, there is the chance that it may lose focus under severe vibration, as when using the camera hard-mounted on a vehicle. I was unable to cause any loss of focus in my tests, and I haven’t heard of any problems with it, but if you plan to use the EX1 as a crash cam or POV cam in harsh conditions-which its SxS recording suits it to-you’d be well advised to test it yourself.
Aft of the focusing scale is a mechanical zoom ring, which turns 90 degrees to traverse the zoom range. It operates as smoothly as any other broadcast lens’s zoom. It has a stubby zoom handle that can be unscrewed, and those preferring power zoom can flip a switch under the left-side lens motor housing to engage the servo.
Slide switches for auto/manual iris, macro on/off, manual/auto focus, and a “push auto” focus button follow, and then-wonder of wonders-a true, honest-to-goodness iris ring, calibrated in full stops from f/1.9 to f/16, plus C (closed), with perhaps 45 degrees of travel from f/1.9 to f/16. You can read off the stop with much higher precision than with an internal iris using only a viewfinder readout, since you can see exactly where the index mark falls relative to the two nearest stops (nonetheless, there is still a viewfinder readout, with half-stop precision). You can be very precise in your iris setting, as it has effectively infinite positions, and you can do aperture pulls during a shot as slowly as you please without worrying about the “stepping” that occurs with some cameras’ servo-driven irises. Backlash, at least on my unit, was well under 1/6 stop.
It may sound silly, but this manual iris ring is one of the things I most appreciate on the EX1, and feel the lack of most keenly when working with other handhelds (the Canon XH series cams have a ring, but it’s really just a glorified version of the free-spinning, uncalibrated servo thumbwheel found on most handheld cams). I like being able to set my aperture “just so”, and to be able to open or close it the tiniest amount, and to do it quickly and without bother, and the EX1 lets me do that as easily as any “real” lens on a broadcast or film camera does. In this price segment, only the JVC HDV cams with their interchangeable lenses let me set stops as quickly and precisely as the EX1.
Camera Section
On the camera body proper, there’s a three-position ND filter switch (off, 1/8, 1/64; each ND filter is worth three stops), flip switches for gain and white balance, pushbuttons for zebra, peaking, and full-auto modes (the latter contains a green LED that indicated when full-auto is engaged), and three assignable pushbuttons that default to LENS INFO (an onscreen focus and depth-of-field indicator), BRT DISP (a readout of the brightness of the center of the picture) and HISTOGRAM. A fourth assignable button, along with the white balance pushbutton and the shutter switch, sit beneath the lens on the front of the body.
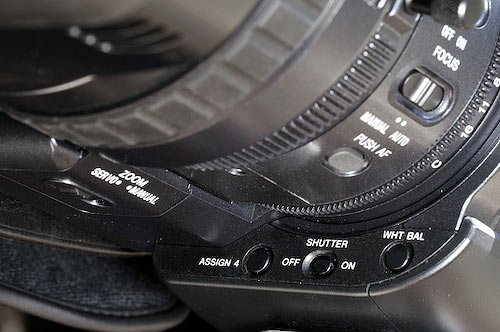
Unfortunately, these front-mounted buttons are flush-mounted and hard to find by feel; on several occasions I’ve reset the white balance while fumbling for the shutter switch. When the camera is tripod mounted, ASSIGN 4 is fairly inaccessible and hard to reach when you need it.
Atop the body, below the handle, are three pushbuttons used to control SHOT TRANSITION (a built-in two-position shotbox allowing preprogrammed changes in focus, zoom, and exposure), a slide switch to turn LCD backlighting on and off, and six membrane switches used to control viewfinder information and toggle colorbars on and off. The membrane switches are impossible to find by feel, and I frequently wind up turning the LCD brightness down while groping for the display on/off button. Sony has cleverly set up bars so that they can be turned off while the camera is running, but not on, so at least you won’t ruin a shot while randomly prodding these buttons.
The handle itself has a fat pod at the front containing stereo mics and the flip-out LCD, with volume and playback control buttons as well as a four-way joystick for menu selection, a lockable start/stop button, and a single-speed zoom rocker with a high/low/off slide switch. There is a shoe mount and a clamp for an external mic, but no 1/4″ threaded hole for screw-in accessories.

The 3.5″ LCD swings out from under the pod and can be rotated through 270 degrees, from facing forwards through facing straight down. However, it can’t be aimed to either side, for use in tight quarters or by an assistant.
Moving aft, there’s a discontinuity between the cylindrical camera section and the squared-off storage section: there’s a ventilation passage running completely through the camcorder.

The camera grows warm when it’s turned on, so be aware of this cooling feature when enclosing the camera in a rain cover or underwater case.
Storage Section

Two SxS cards slot in behind a sliding cover. Status LEDs light green when a card is inserted but removable, red when a card is being read from or written to. Cards can be hot-swapped and the active card can be selected with a SLOT SELECT button. Dual pots for manual audio control and a MENU button finish off the right side of the camera.
The rear of the camera has a thumbwheel for menu item selection as well as a CANCEL button to back out of menus. These controls are alternatives to the joystick on the top of the handle, and either set of controls may be used at any time. Likewise, either the thumbwheel or the joystick can be used with Direct Menus (discussed below); I’ve tended to use the thumbwheel over the past few weeks, and as a result the SEL/SET legend above it is nearly worn away, a problem I’ve seen on other EX1s.

Four small slide switches toggle the two audio channels between auto and manual gain, and between the internal mics and XLR inputs. A PICTURE PROFILE button pops up the menus for the six picture profiles (image adjustments). A DC IN jack accommodates the cable from the EX1’s AC Adapter and battery charger, while the battery snaps in below. Unfortunately, it’s either/or; the battery can’t be charged on the camera but must be removed, but you’ll want to do that anyway: leaving the battery on the camera will drain it after a couple of days, even with the power turned off.
Of course, that’s if you even manage to turn the power off properly. The power switch is a three-position slide switch: CAMERA/OFF/MEDIA (the latter being the equivalent of “VCR” on old-school tape-based cameras). In practice, it’s very easy to overshoot the central OFF setting, and switch the EX1 from CAMERA mode to MEDIA mode, or vice versa. As the camera shuts down and restarts in the process, the LCD and EVF go dark for five seconds before lighting up again, so if you overshoot the OFF position and don’t check that the EX1 really is off, it’ll wake right back up, probably after you’ve closed the LCD and packed up for lunch. I have become very aware of the switch’s position, and I wait a good, long time before closing up the LCD… yet I still wind up leaving the camera on by mistake at least once a week. I’d suggest pulling the battery out whenever you’re shutting down for more than ten minutes.
Right Side
The rotating handgrip dominates the right side of the camera. It rotates from completely flat, through the 30 degree forward tilt in the photos, through about 30 degrees past vertical-very useful when handholding the camera near the ground. The rear of the grip has the start/stop button as well as the rotation release; fortunately the two buttons are very different in feel so it’s easy to tell ‘em apart. Atop the grip are buttons for EXPANDED FOCUS, which works whether the camera is stopped or rolling, and REC REVIEW for seeing the previous shot. These two buttons are well placed for easy access (EXPANDED FOCUS in particular is very handy during run ‘n’ gun operations) but are too close together and too similar in actuation force; fortunately REC REVIEW can’t be activated while the camera is recording. The front of the grip has a multi-pin remote port for start/stop and zoom, similar to but not pin-compatible with a standard Fujinon controller.
The EX1’s handgrip is spaced out from the body, perhaps because of the need to clear the fat rear end of the camera. As a result, it’s a very lopsided support-about four inches off-center-and handholding the camera at eye level with the right hand alone is difficult. With the grip flat, it’s harder to keep level than the Panasonic HVX200, the previous winner in the hard-to-handhold sweepstakes; the smoothly rounded grip affords no purchase and the whole camera simply slumps to the left. I’ve found the best way to deal with it is to rotate the grip to about 30 degrees; this lets you use your thumb along the ridge of the handgrip as a leverage point, and also lets the leading edge of the rear section rest, somewhat uncomfortably, against the base of your thumb. The torque thus provided lets you operate with the right hand alone, at least for short periods, so that your left hand can toggle various switches, adjust audio gain, or reposition the LCD.

Normally, though, your left hand wants to be under the camera, supporting it and taking some load off your right wrist. I found it useful to leave my tripod plate attached; it gives me a shelf to park on my left palm while leaving my fingers free to fiddle with zoom and focus. Operating without the plate works almost as well, but cramps my left hand up against the body a bit more, limiting my reach.

Of course there are a variety of support rigs available from third parties, like shoulder stocks and body braces, that can help take the load off, and mounting the camera on a tripod, dolly, or Steadicam makes the problem go away. When transitioning between mounted and handheld operations, watch out for the grip: in some positions its leading edge projects below the plane of the camera’s baseplate, interfering with whatever the camera is mounted on.
The SDI BNC connector resides at the right rear corner of the camera. It comes with an untethered rubber cap that will fly off and become lost at the earliest opportunity. A 4-pin i.Link (1394) port and 1/8″ stereo headphone jack occupy the right side of the carry handle, near the EVF, and have tethered rubber caps. The analog outputs and USB connector all occupy space below the rotating handgrip, behind a stiff plastic cover. The cover is hard to snap open and closed and interferes with the handgrip; once you get it open, any cables plugged in interfere with the handgrip and prevent you from handholding the camera unless the grip is rotated to the fully forward position.
The USB connector is used for transferring clips to and from computers. The EX1 uses the same micro-D-shell connector used by most Sony HDV cameras for analog component outputs, and another micro connector carries stereo analog audio and composite video, and Y/C with the optional VMC-15FS cable. While the EX1 comes with breakout cables, the lack of any standard video connector other than the SDI spigot means you should carry those special cables with you on shoots-or simply abandon any external monitoring using analog signals.

The SDI and analog video connectors are output-only. The camera can record HDV-compatible inputs on i.Link, but it cannot record SDI or analog inputs.
Dual XLRs on the right side of the carry handle accept line or mic signals, and provide +48v phantom power. Each is individually switchable; in combination with the selections on the camera’s back panel, you can set up one input to use the internal mic on auto gain, while the other is manually controlled line level, or mic level with phantom, or any other possible combination of inputs you might desire.

Displays
The 3.5″ LCD is fully daylight readable, and it’s the best LCD I’ve seen on a handheld: it uses 480 rows of 640 RGB triads, or 1920 total elements per line. The dot structure on the LCD is so fine that I have to move to within six inches to see any pixelization at all. It resolves about 500 TVl/ph horizontally and 400 vertically. Even without the EXPANDED FOCUS pushbutton on the handgrip, which enlarges the image by 2x, this LCD is usable for HD focusing-at least, it’s the first such on-camera LCD that makes me feel reasonably confident I’ve got the focus right, even in its normal display!
The EVF, by contrast, is merely as good as the EVFs or LCDs of other handheld cams: the dot structure is plainly visible, and it resolves only 300 TVL/ph horizontally and 200 vertically. This is about what I see on HVR-Z1, and it’s better than the EVF and LCD on the HVX200. In practice I keep the EX1’s LCD on even when I’m using the EVF for eye-level shooting, because I can focus the EX1 with the LCD, while the EVF leaves me playing a dangerous guessing game-the same guessing game all the other handheld cams I’ve used heretofore have made me play.
Both LCD and EVF show the entire raster, without overscanning. You don’t have to worry about turning “underscan” on to see the borders of the image, because you can always see the borders. This is the way it should be.
The data overlays on the displays are among the best around. Almost every status readout you can imagine is available, and each can be enabled individually in the menus. There are also a histogram, dual zebras (differentiated both by direction and by thickness), and a digital peaking overlay offered in any of four colors-white, red, yellow, or blue. Any of a variety of markers can be overlaid.
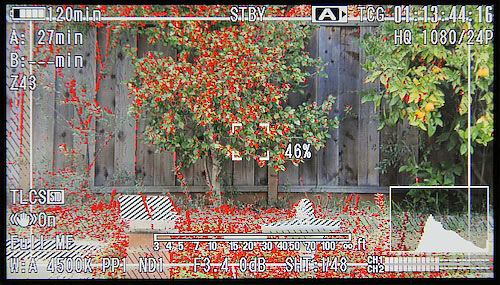
The LENS INFO button displays a focusing scale with a white bar indicating the depth of field for the current zoom and aperture settings. Unfortunately the bar itself has no thin black outline, as do the rest of the data display elements, so it can be hard to see against a bright background. On my sample camera, too, the focus readout was off: four feet measured between lens and test target, and four feet as read from the lens barrel, was shown as about 3.5 feet in the Lens Info display. Other distances similarly read about 10% too near. I don’t know if this is a discrepancy in this one camera or if others suffer from it, too.
When all this information gets in the way, a single push of the DISPLAY button makes it all go away-and I mean all of it. Nothing, not even a recording indication, is left on the screen. Another push of the button brings it all back.
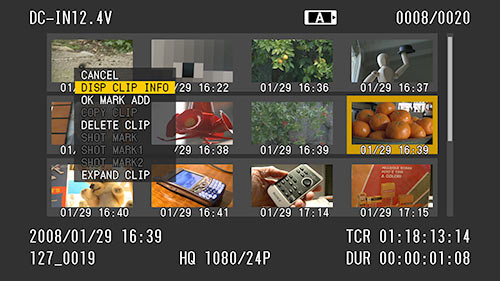
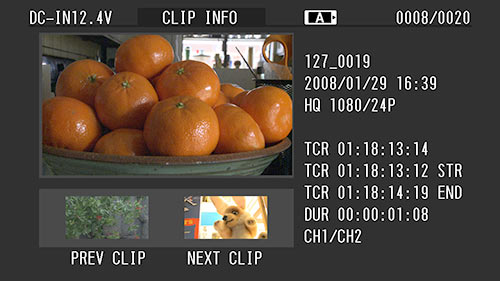
In MEDIA mode, the displays default to a 12-up thumbnail display, which handily shows up on the video outputs, too. Pressing the thumbwheel or joystick pops up a context-sensitive menu, letting you display clip info, add a shot mark, delete the clip, or “expand clip”: display 12 thumbnails spaced through the clip. Clip info shows you the more details about the current clip, and you can move to the previous and next clips without returning to the 12-up display.
Etc.
The camera comes with an infrared remote, capable of limited control: start/stop, zoom, momentary autofocus, and playback controls. Unfortunately, the camera is only sensitive when the remote is held in front of it, not behind, and the remote is ignored by default. You have to enable it in the menus, and you must repeat this whenever you cycle the camera’s power. These peculiarities limit the remote’s usefulness.
The power supply is an auto-sensing 110/220 V unit. It feeds the camera through a permanently attached cable, or charges a battery at the flick of a switch.
Menus and Settings
The EX1 uses the same sort of hierarchical menu system as other Sony Handycams, only with considerably more depth in certain areas. PD150, PD170, Z1, and V1 users will feel instantly at home with the EX1, while operators more comfortable with Digital Betacam or HDCAM cameras will be pleasantly surprised at how tweakable the EX1 is.
The camera’s settings are divided into two categories, overall options in the main MENU system and image tweaks in PICTURE PROFILE settings. Main menus are called up, not surprisingly, with the MENU button. They can be navigated with the four-way joystick atop the handle, or with the spin-and-push thumbwheel on the back of the camera. CANCEL buttons adjacent to both controls let you back out of menu selections, but MENU must be pressed again to dismiss the menus entirely. In similar fashion the PICTURE PROFILE button on the back panel opens up and dismisses settings for six different picture profiles-known as custom presets or scene files on some other cameras-while the joystick and thumbwheel navigate within them.
If you exit either set of menus while deep inside them, the next time that menu is opened the previous selection is displayed immediately, a nice touch.
Fiddling with deeply nested menus can be slow, so Sony provides “Direct Menus” on the EX1. Pressing the joystick or thumbwheel outside of the menus highlights one of several onscreen indicators: shutter speed, aperture, white balance, Picture Profile number, Steady Shot, focus mode, and TLCS (Total Level Control System, a.k.a. full auto mode) and S&Q (Slow & Quick) Motion when enabled. You can move between these, click on one, and select from a context-sensitive menu of options. For example, you can scroll to SHT (shutter) and choose its mode: speed, angle, ECS (extended clear scan), or SLS (slow shutter). Click on one, then scroll to the setting beside it, and choose from the list of speeds, angles, etc. that apply to that mode. It’s a very fast way to change shooting-related parameters that would otherwise require deep digging.
If Direct Menu is set to “Part”, then physical switch settings override Direct Menus: you can’t set the shutter speed if the shutter switch is off, for example. If you set Direct Menus to “All”, then the shutter, gain, and white balance switches are disabled, and those settings must be made with the Direct Menu.
The presence of an informational message in the viewfinder-any message with white text atop a gray background-disables Direct Menus. Messages appearing as a result of a thrown switch, like “Gain: 9dB”, disappear after three seconds, but those like “Media Near Full” or “Battery Near End” persist until the reported condition is cleared.
On-screen highlighting disappears after three seconds of inactivity; you don’t have to dismiss Direct Menus to get them out of the way. Three seconds is often a little bit faster than I’d like; while I’m evaluating the effects of a change, the menu goes away, and I have to double-click to get it back up. I can only hope that the next camera to use Direct Menus lengthens the delay to five seconds, or better yet, provides a menu option to set the delay time.
Since Sony doesn’t appear to have made the operating guide available on the ‘net, I’ve listed the menus here. In this summary, I show settings available when the camera is shooting 24p. Some of these settings will vary if you choose other frame rates. Except as mentioned, most of the numerical adjustments are on arbitrary scales, but the range of those scales-typically -99 to +99-will feel familiar to users of Sony’s larger cameras.
Main Menus
CAMERA SET
• Gain Setup – sets gain for each gain switch setting, -3db to 18dB in 3dB steps.
• Shutter: select between speed, angle, Extended Clear Scan (ECS) and Slow shutter (SLS). At 24p, no shutter is 1/24. Speeds: 1/32, 1/48, 1/50, 1/60, … 1/2000. Angles: 180, 90, 45, 22.5, and 11.25 degrees. ECS frequency: 31.98 – 1972. SLS frames accumulated: 2-8.
• EX (extended) Slow Shutter – Off, 16, 32, or 64 frames.
• Shot Transition – see Features, below.
• MF Assist – when enabled, and in MF mode (servo manual focus), MF Assist waits until you focus manually, then it momentarily auto-focuses within a narrow range to fine-tune your setting.
• Color Bar Type – choose between 75% and 100% full-field bars, or multiformat ARIB STD-B28 / SMPTE RP 219-2002 bars (http://www.arib.or.jp/english/html/overview/img/arib_std-b28v1.0_e.pdf)
• Flicker Reduce – choose on, off, or auto, and 50 or 60Hz. This is said to help reduce flicker from discontinuous lighting, e.g. from 60Hz lighting when shooting 50Hz rates, but I’ve never been able to see any effect from it whatsoever on any Sony camcorder. Instead, I use a shutter speed or ECS frequency that eliminates flicker.
• Zoom Speed – choose speeds for the Low and High settings of the top-mounted zoom rocker, and the IR remote’s zoom buttons, each with a range of 0-99.
• Interval Rec – intervalometer, shooting 1-9 frames at intervals ranging from once per second to once per day.
• Frame Rec – shoot single frames for animation (or you can shoot 3, 6, or 9 at a time)
• S&Q Motion – “Slow & Quick Motion”, a.k.a. variable frame rates; see Features, below.
• Rec Review – when the REC REVIEW button is pushed, see the last 3 or 10 seconds of the previous clip, or the whole thing.
• Fader – the EX1 allows two preset fades to be set up for assignable buttons. White and black fades are available, running1-10 seconds.
• TLCS – sets up the Total Level Control System, or auto-exposure mode. Choose from normal, backlight, or spotlight modes; define exposure levels and response speeds; fine tune AGC usage, maximum level, and aperture at which AGC engages; fine tune use of auto shutter, shortest shutter time, and aperture at which it engages.
• Shockless White – three settings, plus off, determine how smoothly white balance changes when you flick the white balance switch, from instantly to about one second.
• White Switch <B> – Select the B setting to be a memorized preset, or Auto-Tracking White Balance; see Features, below.
• ATW Speed – the speed of ATW tracking once it decides to rebalance the color. 1 is very slow (tens of seconds), 5 is faster (perhaps three seconds).
• Wide Conversion – tell Steady Shot to compensate for a wide-angle adapter.
• Steady Shot – turn stabilization on or off.
AUDIO SET: Audio Input
• TRIM CH-1, TRIM CH-2 – adjust external input sensitivity from -8dBu to -65dBu in 3dB steps.
• AGC LINK – auto-gain control can track both channels together, or separately.
• 1kHz Tone – turns tone on or off when bars are displayed.
• Wind Filter CH-1, Wind Filter CH-2 – enable a wind filter.
• EXT CH Select – you can send input 1 to channels 1 & 2 (for example, at different gain settings), or record each input on its own channel.
AUDIO SET: Audio Output
• Monitor CH – monitor a stereo pair, a mono mix, or either channel separately
• Output CH – select channels 1 & 2, or 3 & 4. The EX1 only has two-channel recording, and this option is grayed out in the menu!
• Alarm Level – the EX1 will beep at you when it’s upset, such as when recording space runs low. You can set the loudness of the beeping, or turn it off.
• Beep – enable or disable a beep sound for menu selection changes and pushbutton presses.
VIDEO SET
• YpbPr/SDI Out Select – the analog component and SDI outputs can be set for HD or downconverted SD outputs, or turned off. You must turn it off to use the composite output.
• YpbPr/SDI Out Display – show menu and status displays on the picture. Everything on the camera’s displays, with the exception of markers, histogram, lens focus and depth-of-field indicator, brightness indicator, zebras, and peaking (see image below)
• Video Out Display – show camera displays and menus on the composite output.
• Setup – add 7.5% setup to the composite output.
• Down Converter – set SD output for anamorphic squeeze, letterbox, or edge-cropped (4×3 center-cut) display.

Analog component on a 40″ Bravia LCD, complete with menus.
LCD/VF SET
• LCD – adjust color, contrast, and brightness from -99 to +99.
• EVF – adjust color, contrast, and brightness from -99 to +99; choose monochrome or color; set backlight high or low, and enable the EVF even when the LCD is opened.
• Peaking – choose white, red, yellow, or blue peaking indication; set peaking level to High, Mid, or Low.
• Marker – you can enable a safe-area marker and choose its size; turn on a center marker (a small box); show aspect-ratio markers (4:3, 13:9, 14:9, 15:9); and enable a “guide frame” dividing the image into thirds horizontally and vertically.
• Zebra – choose zebra 1, 2 or both. Zebra 1 is settable from 50% to 107%, and shows +/- 5% around its setpoint; zebra 2 is always 100%+.
• Display On/Off – choose from the wealth of onscreen indicators available; you can enable or disable almost every single item individually. I leave them all on, as I can declutter the screen entirely by pressing the DISPLAY / BATT INFO button, and see the raw image in its natural state.
TC/UB SET
• Timecode – all the normal timecode options are available: time-of-day, preset, or regen; manual setting.
• Users Bit – you can set a value for user bits, or have them record the date, e.g., “20 08 01 29”.
• TC Format – in 60 fps and 30 fps (but not 24, 25, or 50 fps) modes, you can choose DF or NDF TC.
OTHERS
• All Reset – resets camera to factory defaults, including Picture Profiles.
• Camera Data – you can save and recall all camera settings to an SxS card.
• Time Zone, Clock Set – set time and date and compensate for time zone changes.
• Language – warning messages can be shown in English, Japanese, or Chinese. Menus are always shown in English.
• Assign Button – four buttons on the camera can be assigned functions. Some functions, like Freeze Mix or Fader, must be assigned to a button to be usable.
• Tally – turn front and reader tally lamps on or off.
• Hours Meter – shows total operating hours as well as a resettable hours meter.
• IR Remote – turns on IR remote operation. Sadly, it always resets to off when power is cycled.
• Battery Alarm – You can customize the setpoints in capacity and voltage for the battery alarms.
• Battery Info – shows battery type, manufacturing date, charge cycles, voltage, capacity, and remaining charge.
• Direct Menu – set Direct Menu to off, all, or part.
• I.LINK I/O – in SP (HDV-compatible) modes, you can turn i.Link (FireWire) on. Doing so disables SDI output.
• Trigger Mode – start/stop recording to SxS cards only, external FireWire devices only, or both.
• Country – “NTSC Area” for 60Hz formats, “PAL Area” for 50Hz.
• Video Format – Choose between 1080i, 1080p and 720p formats, with field or frame rates appropriate to the Country setting: 24, 30, and 60 for NTSC, 25 and 50 for PAL.
• Clip – set clip name prefix to any four alphanumeric characters, dash, or underscore; reset the four-digit clip number; delete the last clip; delete all clips.
• Format Media – format the SxS cards in either slot.
Important selections, like changing the video format, resetting the camera, or deleting a clip, require an additional step: a confirmation question is diosplayed (“Change Video Format? HQ 1080/24P > HQ 1080/30P”), and you need to select an “Execute” option to proceed.
Picture Profiles
The EX1 has six Picture Profiles, similar to Custom Presets or Scene Files on other cameras. Picture Profiles contain all the image processing tweaks for the camera, and it’s these tweaks, every bit as much as the variable frame rates, that give the EX1 its uncommon flexibility.
You can select between these profiles (or deselect all of them) in the Direct Menus; you can also choose them by pressing the PICTURE PROFILE button, which is also the entry point for tweaking them. They all start off in STANDARD mode, in which all parameters are at a plain-vanilla default, just like turning profiles off. You can customize each one individually, copy one profile to another, or reset a profile to its defaults.
PICTURE PROFILE: SEL
• OFF – turns off profiles, and runs the camera in factory default mode.
• PP1: [NAME] through PP6: [NAME] – selects a particular picture profile.
PICTURE PROFILE: SET
• Profile Name – lets you assign a descriptive name of up to eight characters.
• Matrix – turns the color matrix on or off; selects between four presets as described in Performance; sets Level (saturation) and Phase from -99 to +99; and gives you full Linear Matrix tweaks: R-G, R-B, G-R, G-B, B-R, and B-G, all adjustable from -99 to +99.
• Color Correction – you can pick a hue in the scene and vary it by +/- 30 degrees, tweak its saturation from 0%-200%, and adjust the amount of color affected by up to about 35 degrees from the target hue.
• White – you can set up white-balance offsets for memories A, B, and ATW, and set the preset value to any point from 2100K to 10000K.
• Detail – Detail setting on the EX1 deserves its own discussion in Performance, below. You can set level, frequency, crispening, H/V ratio, white and black limiters, the signal used for V detail creation, and how much detail to apply above the knee.
• Skin Tone Detail – lets you undo excess detail on a selected skin tone. You can pick the hue, vary its width and saturation, and set the amount of detail in the range -99 to +99.
• Knee – you can select auto or manual knee. In manual you can vary the knee point from 50% to 109%, and its slope over a range of -99 to +99. You can also change the Knee Saturation Level-control color saturation in the knee region, from 0 to 99 (default is 50).
• Gamma – Choose from four STD gammas and four CINE gammas, as well as vary the midtone levels +/-20% within each gamma setting, i.e., a nominal 50% level can be moved between 40% and 60%. See Performance for more details.
• Black – adjust the master black level from -99 to +99
• Black Gamma – adjust the shadow gamma-essentially the gamma of the lower half of the tonal scale. The range of -99 to +99 will make a nominal 25% gray vary from 15% to 35%.
• Low Key SAT – vary shadow saturation from -99 to +99.
• Copy – copy the current profile to another one, e.g., overwrite another one with a copy of this one.
• Reset – reset this profile to factory defaults.
In the sub-$10,000 range, only the JVC HD100/200 series cameras provide a comparable level of tonal-scale adjustments, and only the Canons offer as much color flexibility. The EX1 trumps these examples with the most comprehensive detail controls around, as well as Sony’s Cine gammas, about which more will be said later. The broad range of most parameters, as well as the fineness of their setting (usually 199 steps), gives you a degree of control unparalleled in this class of camcorder.
Performance
Optics
The 14x Fujinon lens runs from 5.8mm to 81.2mm, or 31.4mm to 439mm in 35mm still camera terms. That’s just a bit wider than the HVX200’s 13x, and just slightly more telephoto, but not significantly so at either extreme.
The maximum aperture of f/1.9 holds until about 10mm, then ramps gradually down to f/2.8 at full tele. This ramping is not shown in the camera’s displays; it thinks it’s still at f/1.9 (maybe it is still at f/1.9; the transmitted light, however, decreases by a stop, and at full tele the iris can be turned between wide open and f/2.8 with no change in the levels). If you’re shooting wide open, bear this in mind.
The wide end of the lens shows the typical amount of barrel distortion for the wide angles of this class of camera, with a bit of moustache distortion present (the center of the image is barreled, while the corners seem rectilinear). Midway between 5.8mm and 10mm, the barreling is gone, though a bit of moustache remains, giving straight lines near picture edges a slightly wavy look. By 10mm and onwards the lens is quite rectilinear.
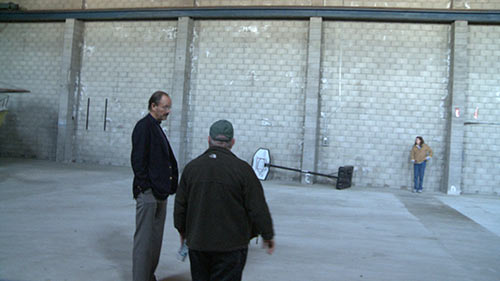
Full wide angle; this is as bad as the EX1’s distortion gets. It’s noticeable in images with this sort of rectilinear background, but without that cue, the distortion doesn’t draw attention to itself.
Sharpness is very good overall, even with the iris wide open, though stopping down to f/2.8 improves it a bit.
Chromatic aberration is insignificant through 45mm or so; either the camera uses chromatic aberration correction, or the lens is far better corrected than it has any right to be at the price. Only in the long telephoto positions from 45mm onwards does some red/green lateral fringing appear, and it’s minimal even then.
Bokeh is pleasing, a nicely soft defocus with no oddball artifacts. Vertical green/magenta fringing, the bane of defocused images on prism cameras, is present but subdued.
Flare is about average for lenses in this class of camera.
Vignetting of various sorts has been a controversial issue for the EX1; in my first look at the prototype camera, a mispositioned lens element caused severe vignetting at a variety of focal lengths. Fortunately, the pre-production camera shows no such problems. Portholing at full telephoto is only about half a stop; it’s visible on the ‘scope if you’re looking for it, but it’s very hard to see in the picture. Stopping down to f/4 eliminates it.
Some units from early builds had off-center lenses, causing sharp corner vignetting around the 10mm-15mm range. I find that with this unit, there’s the tiniest bit of corner darkening on three out of four corners around 8mm-15mm, mostly in the lower left corner. Vigorous shaking of the camera with Steady Shot on can make the corners crop in slightly more as Steady Shot steers the light. However, this cropping only affects the outermost 3% of the image at worst; it never even gets close to the 90% safe action area marker. In normal use it’s insignificant in both size and effect; it’s not noticeable enough for me to worry about (other cameras at this price point show similar corner darkening; my HVR-Z1 has it just as much as this EX1 does).
Manual zooming is as smooth as your hand can make it; the zoom ring is nicely damped with minimal backlash. Power zooming runs the gamut from two seconds to 30 or more depending on how carefully you mash the rocker. Focus and iris rings similarly “feel right” and offer fine control.
One nice feature: even with the iris in manual mode, the camera closes it when you shut power off-and it opens it back up to its last setting when you turn the camera on.
Resolution
The 1/2″ Exmore CMOS chips have an honest-to-goodness 1920×1080 resolution, and handle interlaced and progressive scanning with equal aplomb. There is no pixel-shifting, nor does the image coarsen when using shutters in progressive mode. Sony claims 1000 TVl/ph (TV lines per picture height) resolution, and I see that on the test charts. There’s a bit of aliasing past that point, but not so much as to be problematic. Picking an optical low-pass filter for a sensor is always a tradeoff: ensure attenuation at the sampling frequency and you risk losing too much high-frequency information; keep that sharpness and risk distracting aliasing and moir©. Sony seems to have split the difference finely; if I boost the detail setting the aliasing becomes apparent, but at the default setting (detail 0), or with detail off (roughly equivalent to detail -30) it’s hardly visible on the test charts-and in the real world it simply isn’t a problem.
This is one sharp camera. There’s nothing sharper in its class. Heck, there’s nothing equal to it in its class.
In 1080p, that 1000 lines is visible in both H & V directions. In interlace, vertical detail drops to “only” 800 lines, since dual-row summation is used to avoid frame-rate twitter (a distracting flicker of thin lines that appear in only one field). In 720p modes, resolution drops to roughly 700 TVl/ph in both H & V, as it should. Sony’s downsampling to 720p effectively squashes any aliasing at the smaller frame size.
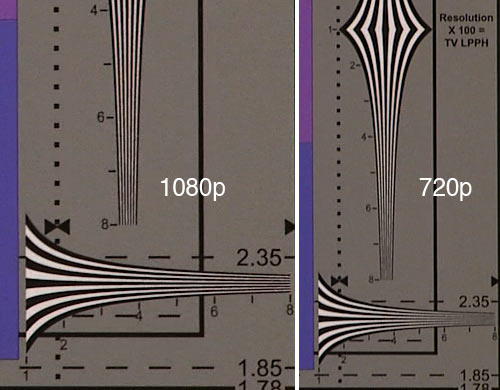
DSC Labs Chroma DuMonde resolution trumpets in 1080p and 720p (actual size)
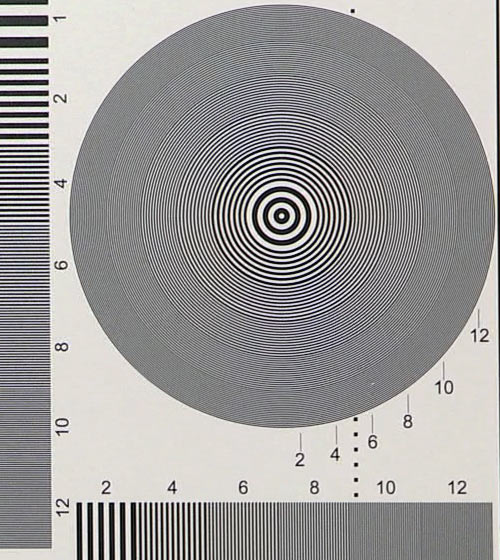
DSC Multiburst SquareWave details at 1080p (actual size; horizontal scale moved up to fit, but otherwise the image is unmodified)
Sharpness only drops off with high gain settings, down to about 800 TVl/ph at +18dB. It may be that Sony is employing spatial noise reduction at higher gains and that fine detail suffers as a result, or it could simply be that the gain noise is swamping fine detail.
Sensitivity
To measure sensitivity, I set the exposure of an 18% gray card at 50% on the waveform monitor with the camera in its default Standard Gamma 3. I metered the card with a Gossen Starlite and incident light with a Spectra Pro IV, and varied the ISO settings until the shutter speeds and apertures matched the camera (both meters agreed within 1/10 stop). I determined the sensitivity of the camera to be:
• ISO 400 in 1080p modes
• ISO 800 in 1080i modes (just as you’d expect: with dual-row summation, you get twice the sensitivity), and
• ISO 500 in 720p modes.
Apparently Sony is picking up some gain during downsampling to 720p, analogous to what happens in dual-row summation.
The camera can run at -3dB, useful if you want the lowest noise possible. The highest gain, +18dB, is noisy but not unusable; it’s comparable to the Z1 at +18dB or the HVX200 at +12dB. The noise is best characterized as colorful, fine grain: it’s perhaps a bit more colorful than noise from some other Sonys, but not annoyingly so.
CMOS Characteristics
CMOS chips use a “rolling shutter” readout, in which lines are captured sequentially, instead of the entire image being grabbed into a transport buffer simultaneously as occurs with CCDs. With fast-moving subjects, or high-frequency camera vibration, image distortion may occur, as the image moves across the face of the sensors between the times the top and bottom of the picture are grabbed.
I measured the delay between reading out the top of the image and the bottom at about 1/60 sec in 60Hz mode, and 1/50 in 50Hz mode, regardless of frame rate. Thus 25p frames suffer a 1/50 sec top-to-bottom delay, and 24p frames take 1/60 sec. Thus “rolling shutter” artifacts are no worse at film frame rates than at the maximum frame rate for the camera’s “country” mode.
Practically speaking, it’s not much of an issue. Very fast moving subjects show slight “tilt” in freeze frames, though in playback they pass by so quickly they can hardly be seen. I mounted the camera in my car using my oldest and flimsiest still-camera tripod and turned Steady Shot off, to get the most wiggle possible as the car bounced along the road. Frame-by-frame, there’s a bit of the “Jellocam” effect, where car bodies wobble like a cube of Jello, but it’s not apparent unless you’re actively looking for it. I have yet to shoot anything with the EX1 where “Jellocam” is a noticeable problem.
Bursts of light from strobes, photographic flashes, and emergency vehicle light bars may be split across frames instead of appearing entirely in one frame. If your work is heavily involved with such things, you’ll want to test this out, whether you’re using the Canon HV20, the EX1, or the RED ONE cine camera-all use CMOS sensors.
CMOS chips don’t suffer from vertical smear, the faint vertical line appearing at points of extreme overexposure on IT and FIT CCDs (the CCDs used by most camera companies other than Thomson/GVG). You can aim the EX1 at a bright light and no smear will appear.
Latitude
I shot a backlit Stouffer TLF4110 transmission wedge (www.stouffer.net ) to measure the camera’s dynamic range. I’ve done this with other sub-$10,000 cameras and, for the most part, obtained values of around 8.0 to 9.3 stops between shadows lost in the noise and white clipping. The 9+ stop readings all involve a fair bit of shadow stretching and wishful thinking; realistically, figure on 8.5 stops.
The EX1 gives me 10 stops of latitude on the chart, and that corresponds to what I see in real-world pictures.
Ten stops.
Y’know, maybe this CMOS stuff ain’t so bad after all.
Gamma
The EX1 offers four STD gammas and four CINE gammas. STD3 is the default and is the basis for my comparisons; I list the brightness for the middle gray on a chip chart in each gamma for the same exposure setting, with 50% being the default. The descriptions in quotes are my own characterizations of the gammas. In all except CINE2, whites peak at 109%.
• STD1 – “bright and contrasty”. Blacks slightly crushed, whites slightly crushed, increased contrast, midgray at 55%.
• STD2 – “deep blacks”. Blacks slightly crushed, rest of tonal scale stretched downward; midgray at 48%.
• STD3 – “standard video”. Normal, midgray at 50%.
• STD4 – “black stretch”. Blacks slightly stretched, increased shadow detail, midgray at 55%.
• CINE1 – “deep cine”. Compression starts around 80%; midgray at 37%.
• CINE2 – “broadcast safe cine”. CINE1 rescaled with whites limited to 100%.
• CINE3 – “brighter cine”. Compression starts around 65%; midgray at 45%.
• CINE4 – “video-bright cine”. Compression starts around 65%; midgray at 50%.
The std gammas are all fairly standard video gammas, while the cine gammas are something special. Instead of running linearly up the tonal scale and using the knee system to handle highlights, cine gammas apply increasingly more compression the brighter a highlight gets. Sony’s Juan Martinez says the cine gammas are directly descended from the HyperGamma settings of the F900/R and F23 cameras; David Leitner reports that these are the same HyperGammas used in the PDW series XDCAM HD camcorders.
In essence, cine gammas have a S-curve in the highlights, similar in effect to the soft shoulder of film’s DlogE curve. Highlights don’t clip as harshly as in the standard gammas, they roll off much more smoothly, with gradual desaturation instead of sudden hue shifts in color.

In the sub-$10,000 camera market, the closest comparison is with the HVX200’s Cinelike V gamma. The EX1, however, takes the Panasonic’s naturalistic highlight handling further. While the overall look is quite similar, side-by-side, I can see at least a stop more into the Sony’s highlights, possibly two, and specular reflections don’t block up as quickly.
I’ve switched entirely to the cine gammas on the EX1. I’d use standard gammas only when I want a “contrasty video punch” in the highlights as a special effect.
Once you’ve picked an overall gamma setting, the EX1 lets you fine-tune it with a level control. It varies standard gamma midtones by up to 20% (moving 50% gray between 40% and 60% brightness), but has a more muted effect on cine gammas.
A Black gamma control, similar to black stretch/compress on other cameras, affects the lower half of the tonal scale, letting you tweak shadow reproduction for more contrast of more transparency.
Knee
When using standard gammas, a tweakable knee is available. It defaults to auto, which varies the knee point based on picture content, but you can also switch it to manual for finer control and shot-to-shot consistency, or disable it entirely. You can control the knee point from 50% to 109%, adjust its slope over a broad range, and vary the saturation of colors in the knee region-this last control making its first appearance in this price segment.
I’ve found that the EX1’s knee does a fine job except when highlights are strongly colored. Saturated highlights show more hue shift and harsh clipping than I’d like. I’m exploring this further out of curiosity, but even if the knees were perfect I would still shoot with cine gammas, because I prefer the progressive compression to the look of a traditional knee.
Detail
The EX1 provides the most comprehensive detail control in its market.
The level control spans the range from super-sharpened at +99 through neutral (-30 is about the same as turning the knee off) to considerable blurring at -99.
A crispening control (similar to coring on other cameras ) lets you adjust the sensitivity of the detail circuit, trading off increased enhancement against increased visual noise. An H/V ratio control gives you varying enhancement vertically vs. horizontally. You can choose whether to derive detail from the luma signal, a non-additive mix of G and R, G alone, or G+R.
You control the detail frequency with equal finesse: +99 gives you a subtle, pixel-thin enhancement, while -99 is coarse enough to look like a crayoned outline, great for parodying the over-enhanced look of much TV news and sports. The EX1 also gives you white and black detail limiters: these limit the excursions of the detail signal, for control over the harsh contrast of the enhancement. With these controls you can tame the “electrified”, cartoonish look of high enhancement, and decrease the thick black outlines you might otherwise see around specular highlights. As with detail frequency, these tweaks let you run the gamut from garish to subtle with ridiculous ease. All cameras should offer these three controls.
You can also set the amount of detail applied to the knee portion of the signal, another aid in controlling black outlines around highlights, with the Knee APT Level control-so called because another term for sharpening or detail enhancement is “aperture correction”.
Of course, you can also turn the detail off entirely.
I encountered an odd bug: when Detail Level is set greater than +95, moving to a different Picture Profile and then back again loses the setting. It’s still shown in the menu, but it doesn’t affect the image. I had to run the setting down to +95, at which the detail jumped back up again. Settings from -99 through +95 were properly remembered and recalled, but settings from +96 through +99 were “forgotten” when the profile was switched away from and then returned to. I did some scattershot testing of other settings in various menus, and didn’t find any that had the same forgetfulness-but that doesn’t mean there isn’t one lurking somewhere. If you’re doing a critical shoot with non-default settings, you might want to test your settings for this “forgetfulness” before plunging into battle.
Color
The EX1 offers four standard matrices, as well as the usual saturation and phase adjustments. The presence of Linear Matrix parameters makes it possible to further fine-tune color response. I looked at the stock matrices on the vectorscope while shooting a DSC ChromaDuMonde chart, and here’s what I saw:
• Standard – the camera’s default color matrix.
• High SAT – boosts all colors by about 15%-20%.
• FL Light – boosts the red-cyan axis by 15%.
• Cinema – shrinks the red-cyan axis by 20%.
There’s no consistency between manufacturers when it comes to matrix definitions. On the HVX200, for example, the Cine-like matrix boosts all colors by roughly 25%. Look at pictures, don’t rely on names!
SxS recording
The EX1 uses SxS cards: ExpressCard34 memory cards using the faster (and more expensive) PCIe interface instead of the USB2 interface used by many commodity memory cards.
There’s not much to say here. They seem to work. I haven’t had a corrupted or lost clip yet, but I haven’t tried running an SxS card through the laundry, or driven over one with a truck, or dropped one into a fresh cup of tea. There’s an entire discussion of the desirability of solid-state vs. tape recording-are you going to hand a client your SxS card at the end of the day?-but that’s a topic for a different day.
The camera can be connected to a Mac (or PC) via USB 2.0. I found I could plug in the USB cable at any time, whether the EX1 was in CAMERA or MEDIA mode, and I’d get a prompt in the finder to enable the USB connection. The SxS card mounts as a drive on the Mac Desktop, and I can have my way with it. When I’m done, I can “eject” the camera and unplug it, and it returns to normal operation without having to be power-cycled.
Plugging the SxS card directly into the MacBook Pro requires Sony’s SxS Pro Device Driver, with which the card also appears as a removable drive. (The SxS driver is not compatible with the Duel Systems Adapter for P2 cards; you’ll need to uninstall the Sony driver before using the Duel Adapter. Fortunately the driver includes an uninstaller.)
To read SxS data on a Mac and wrap it in QuickTime for FCP, I used Sony’s XDCAM Transfer version 2.1, on a 2.33 MHz MacBook Pro running OS X 10.4.11 and Final Cut Pro 6.0.2. The EX1 ships with a CD containing the SxS device drivers for Mac and Windows, and Mac and Windows versions of the XDCAM EX Clip Browser application, but not XDCAM Transfer. I wasn’t able to find links to XDCAM Transfer on either Apple’s or Sony’s US websites, but Google pointed me to Sony’s UK website.
Via USB, a 35Mbit/sec HQ clip transfers at 1.7x real time speeds (that is, almost twice as fast as real time playback). When I plug the SxS card directly into the MBP, transfers occur at 6.8x real time speeds (nearly seven times faster than real time). 25 Mbit/sec SP clips transfer even faster, of course. These times include both transferring the essence, wrapping it in QuickTime, and handing it off to FCP-clips appear in FCP’s bin as soon as they’re transferred, because XDCAM Transfer notifies FCP of their availability.
Sony also has a USB 2.0 SxS card reader, which is supposed to be faster than the camera at USB transfers, but I haven’t tested it.
Codec Quality
XDCAM EX is an extension of XDCAM HD. Its SP mode is an HDV-compatible, 25 Mbit/sec constant-bit-rate stream using long-GOP MPEG-2: 15 frames are compressed in a single Group Of Pictures. HQ mode is a 35 Mbit/sec variable-bit-rate stream, also using long-GOP MPEG-2. Both modes record 8-bit data, and use 4:2:0 color sampling.
Long-GOP recording works because, for the most part, one frame is very much like the last. The first image in a GOP is compressed on its own; subsequent images are compressed with reference to adjacent images, and eventually to that first frame. If a scene is static, long-GOP is very efficient: many bits can be devoted to that all-important first frame, with the data for the following frames mostly being “no changes here”.
However, if there are a lot of cuts between dissimilar images, or if adjacent images have a lot of fine detail all moving in different directions (foliage blowing in the wind; extreme shakycam with zooms and dutch tilts; random noise; flashes and strobes), then more bits have to be allocated to recording the differences between frames, and less to the all-important first frame. As a result, the compression quality obtained with long-GOP MPEG at a given bit rate is highly dependent on the subject material.
At its best, SP looks very good, and HQ even better. Close examination of EX1 clips shows minor amounts of mosquito noise around sharp, contrasty edges, but the images are very usable. As spatial and temporal complexity increase, the EX1’s images can show posterization in gradients, coarse diagonals, and blockiness in areas of fine detail. These are, of course, common artifacts in highly compressed MPEG-2. I’m not singling out the EX1, I’m just saying that it’s not immune to these artifacts.
Seen in single-frame mode, these defects are apparent on close examination, but in normal playback they blend together and appear for the most part as a slight increase in overall image noise. Only when shaking the camera around violently, like a rat in the jaws of an angry dog, was I able to generate blocking or mosaic artifacts that were noticeable in normal playback. In regular use-POV driving footage, nature photography, run ‘n’ gun docco, and greenscreen tests-the resulting images were entirely unobjectionable.
Compared to other HDV and XDCAM HD tests I’ve done, the EX1 looks better than it should for the bit rate. Sony has obviously improved their codec quality.
After initial testing, I put the camera in HQ mode and didn’t look back. SP lets me record 1080i at 1440×1080, with 24p handled using 2:3 pulldown. HQ records interlaced or progressive, at native frame rates (no pulldown needed), and at full resolution: 1920×1080, or 1280×720.
This is a big deal: the EX1 captures and records a true, square-pixel 1920×1080 image, with no single-sensor (Bayer mask) artifacts. There are two other camcorders that can make the same claim: the $48,000 Panasonic HPX3000, and the $180,000 Sony F23. True, both of those camcorders offer better lens options, less compression, 10-bit recording, and 4:2:2 or 4:4:4 color sampling, but they do cost a wee bit more than the $7790 (list price) EX1, and besides, the EX1 comes with a lens at no additional cost.
But 4:2:0 isn’t bad, at least not in progressive mode. Compare these three images, all 2x enlargements:

24p captured via SDI to a 4:2:2 file using Apple ProRes422 HQ.

24p captured using 4:2:0 XDCAM EX HQ.

60i captured using 4:2:0 XDCAM EX HQ. The focus is slightly off, but the important bit is the edge of the red circle.
All 4:2:0 does in progressive mode is equalize the color subsampling on H & V directions (as we’ve seen with JVC’s 720p HDV cameras). It’s not much worse looking than 4:2:2. In Interlace, though, where the vertical subsampling happens on a field bases, watch out for those 4:2:0 “sawtooth edges”!
Playback
The EX1 happily plays clips regardless of format or frame rate. You don’t have to be in 1080p24 HQ mode to play back a 1080p24 clip, or a 720p60 clip, or anything else; there may be a brief disruption in the image when the format changes, but you aren’t locked out from playing a clip because it was shot in a different format than the one currently selected.
Clips can be paused, played at normal speed, and at 4x or 15x forward or reverse. You can jump to the previous and next clips. You can control playback with the joystick, the regular transport control buttons, or with the IR remote-if you’re remembered to enable it in the menus, that is.
There is no frame advance and no slow-motion playback. I have these on the HVX200 and I was surprised by how much I missed them on the EX1. With the HVX, I do a lot of detailed shot review on the LCD; on the EX1, I wind up waiting until I’ve transferred the clips to the computer. Yes, it’s harder to perform single-step and slo-mo with long-GOP MPEG-2 recording than with DVCPROHD, but it’s not impossible… perhaps they’ll be implemented on the EX2?
While there is SD downconversion available during playback (or during live monitoring), I found the quality to be poor. Analog component still showed 800+ lines of horizontal resolution-in standard definition! SDI showed vigorous aliasing setting in at about 400 lines, and composite showed both aliasing and tremendous amounts of cross-color. Clearly the HD signal is being downconverted without the resampling and low-pass filtering needed to keep the picture within SD bandwidth limits. I’d recommend leaving the camera’s outputs in HD mode, ignoring the composite output entirely, and doing all downconversions externally.
Audio
In my informal tests, audio is quite good, even with the built in mics (where the biggest problem is picking up handling noise and lens-motor noise), Reader Mark Weiss ran a formal analysis with interesting results.
Special Features
ATW
ATW (Auto-Tracking White) behaves in an unusual manner. When first engaged, ATW white-balances the scene. It then holds that white balance until the scene’s predominant color changes dramatically and remains that way for five or more seconds, and then it will smoothly white-balance again.
The change has to be fairly dramatic for ATW to kick in, on the order of 1000K color difference or so; this avoids false triggers from minor or transient color changes.
ATW is also reluctant to go warmer than 3500K or colder than about 6000K, probably since most normal lighting is within the 2500-7000K range. When I bring the camera into my 2600K office from outside and aim it at a white card, the ATW will ramp down to 2700K, and then back up to 3500K. If I aim the camera at a bit of brown cardboard (2100K) or my computer screen (11000K) ATW won’t even attempt to adjust for it, although I can manually white balance on either one perfectly well. Pushing the WHT BAL button resets ATW for the current conditions, even those outside its “comfort zone”, and ATW will hold the new setting until the light changes radically.
If you’re expecting the constantly changing ATW of some other cameras, the EX1’s ATW will seem broken at first, but I find it does a pretty good-and unobtrusive-job in run’n’gun situations where I’m moving between different lighting conditions but am too distracted to be checking my color balance the way I should be.
Shot Transition
Shot Transition lets you define two sets of parameters, and transition between them in a repeatable way. Each set stores focus, zoom, aperture, gain, shutter speed, white balance, color matrix (!) and detail (!!) settings. Two buttons atop the camera let you save and recall these parameter sets, and you can program the camera to transition smoothly between them. You can choose the speed or the time the transition takes; whether it’s activated on a button push or it’s automatically triggered a set time after you start rolling; and whether the transition starts and stops with hard bumps or gentle eases.
You can use Shot Transition as a simple form of motion control (pity there’s no data port for controlling a six-axis camera rig, eh?), or as a simple two-setting shotbox to store presets for fast recall.
Color Correction
The Color Correction option lets you single out a color in the scene and change it within certain limits.

It’s not a replacement for a full 12-vector color corrector (perhaps the only thing lacking in the EX1’s menu system) but it can be handy to have once in a while.
S&Q Motion
Slow & Quick Motion? Well, it’s easier to fit into the menus than Overcranking & Undercranking, I suppose. This is the variable frame rate capability, and it’s usable with HQ modes in both 720p and 1080p sizes. At 1080p, any frame rate from 1-30 fps can be chosen (1-25 in PAL mode); in 720P the range is 1-60fps (1-50 fps, PAL). When enabled, S&Q Motion appears in the Direct Menus, so you can dial in new frame rates without having to dig for them.
When your frame rate matches your mode setting, e.g., 24fps in a 24p mode, the camera operates normally. When you change to an off speed, say, 12fps or 55fps, the only immediately observable difference is that sound is not recorded (a little “not allowed” symbol appears atop the audio level meters in the display).
But that’s it. As on the HVX200 and HPX500, you shoot your undercranked or overcranked footage, and you can play it right back without any post-processing necessary. See if the speed was correct, ensure you caught the action; move on to the next setup without worries or questions. Hooray for solid-state recording!
Freeze Mix
Put Freeze Mix on an assignable button, and you can use it to play back the previous clip. When you find the frame you want, press Freeze Mix again, and that frame will
Conclusion
Pros
• Highest resolution and detail in its class, with minimal aliasing.
• 1-30fps 1080p, 1-60fps 720p, plus 1080i; 50Hz and 60Hz operation.
• Excellent tonal scale control with wide latitude.
• Cine gammas have superb highlight handling.
• True 1920×1080 sensors, true 1920×1080 and 1280×720 recording.
• 1440×1080 HDV-compatible mode with i.Link I/O.
• Linear Matrix for fine color control.
• Robust SxS solid-state recording; lightning-fast offloading.
• True manual iris and zoom; indexed manual focus with lens scale.
• Best LCD resolution in a Handycam; great status displays.
• True 10-bit SDI with embedded timecode and audio.
• Surprisingly artifact-free XDCAM EX HQ codec.
Cons
• Awkward to handhold.
• “Clock radio” power switch makes it easy to switch camera on by mistake.
• Many buttons and switches hard to operate by feel.
• Knee circuit in standard gammas doesn’t handle colored highlights well.
• “Mustache” distortion at wide angles.
• Steady Shot can cause slight corner vignetting during wiggly shots.
• No SD (480- or 576-line) recording. Poor-quality SD outputs; no Y/C cable supplied.
• Not all output connectors active simultaneously.
• No single-frame or slo-mo playback.
Cautions
• CMOS “rolling shutter”.
• XDCAM EX is still a long-GOP format (solid state recording eliminates dropout problems, but image quality varies with temporal complexity).
• No on-board tape (for archiving, or handing to the client at the end of the day).
• At least some EX1s show a back-focus shift when internal ND filters are used.
In 1995, I saw a then-new DCR-VX1000 DV camcorder hooked up to a 32″ CRT via Y/C. I stopped dead in my tracks: the pictures looked incredibly sharp and detailed, and when I tried recording a short clip and playing it back, playback looked just as sharp and detailed as the live signal. It was a pivotal moment: color-under analog simply wasn’t good enough any more.
I had a similar experience with the PMW-EX1. The first time I shot a resolution chart, my eyes popped: here for the first time was an affordable 1080-line camera that wasn’t compromising on resolution. Then I recorded and played back some HQ clips… there’s no longer a need to settle for anything less than full HD.
It may be a pain to handhold and some of its controls and connectors could use some improvement, but the PMW-EX1 has raw resolution, latitude, highlight handling, flexibility, and tweakability unmatched by anything else under $10,000.
Discuss in Forums
Other EX1 Info
My first look:
http://www.uemedia.net/CPC/cinematographer/articles/article_16640.shtml
David Leitner’s review:
http://digitalcontentproducer.com/cameras/revfeat/first_look_xdcam_ex/index.html
FreshDV’s EX1 coverage:
http://www.freshdv.com/index.php?s=PMW-EX1
Sony’s SxS and XDCAM Transfer software:
http://www.sony.co.uk/biz/view/ShowContent.action?contentId=1166605189229&parentFlexibleHub=1166605189820&site=biz_en_GB
The fix for PMW-EX1s with off-center lenses:
https://www.provideocoalition.com/index.php/awilt/story/pmw_ex1_lens_fix/
Sony’s (European) Shooting Tips for XDCAM EX:
http://www.sonybiz.net/biz/view/ShowContent.action?site=biz_en_EU&contentId=1193315622008
[Updated 2008.02.27 – Pointer to audio data from Mark Weiss; Y/C available using VMC-15FS cable (thanks to Adam Van Voorhis of Boston Camera for this discovery).]
[Updated 2008.03.22 – Verified that SDI output is 10 bits (with live pictures having true 10-bit depth); added caution about back-focus issue.]

Filmtools
Filmmakers go-to destination for pre-production, production & post production equipment!
Shop Now