One particularly nice feature that Final Cut Pro allows you to do is to apply a filter to only part of a clip or a sequence nest. I find this particularly useful if I’m applying a non-realtime filter to a longer nest of clips and the filter effect will only happen for a very short time. Though I don’t use it a lot it can come in handy. I don’t want to lose the realtime playback for the entire clip when a small portion will only receive the filter. Thankfully FCP allows you to change the length and/or placement of that partially applied filter after it has been applied.
First you have to apply a filter to only part of a clip or sequence nest. I use this technique mostly on nests so that’s what is illustrated here but it works the same on clips or nests. To apply a filter to only part of a clip mark both an IN and OUT point to define where you want to place the filter. Then use the option + A keyboard command of Select In to Out to only select from the IN point to the OUT point.
![]()
The option + A is defaulted to selecting from the IN to OUT
The option + A is defaulted to selecting from the IN to OUT
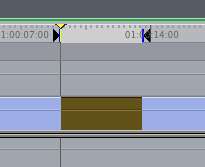
A clip where only the IN to OUT is selected and not the entire clip.
You can also make this kind of selection with the Range Selection Tool (ggg on the default keyboard layout) but I find it to be much less precise to click and drag to make the selection than to set IN and OUT points.
Once this is done apply the desired filter and turn on the Toggle Clip Keyframes button (option + T) in the lower left of the timeline to see the filters bar.
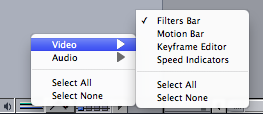
I’m turning on only the Filters Bar indicator in the timeline for this operation.
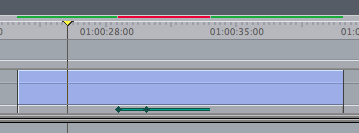
With the Filter Bar turned on you can see the filter is applied to only part of this sequence nest. It needs to be rendered while the rest of the clip does not. There’s also two keyframes that have been applied in the above example via the Filters tab in the Viewer.
Say I’ve setup the above effect but now I realize I want the filter to be longer overall than what I originally intended. To extend (or decrease) the filter length, open the clip in the Viewer and then click and drag one of the black edges of the filter bar indicator strip at the top of the Viewer. You can drag either edge to change the length as well as the IN and OUT points of where the filter begins.
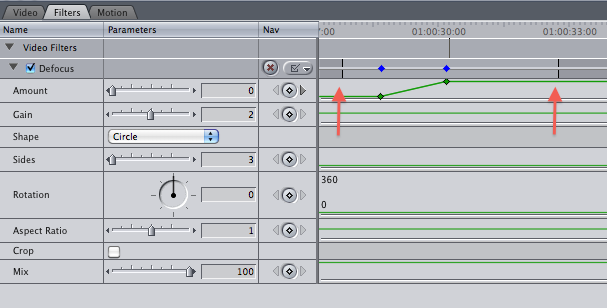
Those little marks pointed to by the red arrows above can be dragged to change the length of a filter applied to part of a clip.
If you move the mouse over the middle part of that same area the mouse will change to a slip roller tool (though actually I think of this more as a slide operations) and you can then change the actual placement of the filter and leave the duration the same. It’s a bit tricky to figure out but extremely helpful once you do.
Below is a short Quicktime clip of this very operation. On top you’ll see the black tic marks that indicate a filter is applied to the clip. At the bottom is a nested sequence in the FCP timeline with the filters bar exposed. Watch as the filter bar changes at the bottom as the filter is tweaked in the Viewer.

Filmtools
Filmmakers go-to destination for pre-production, production & post production equipment!
Shop Now


