As you are aware by now, we’re going through our book Creating Motion Graphics with After Effects 5th Edition (“CMG5” for short) and pulling out a few “hidden gems” from each chapter. These will include both essential tips for new users, as well as timesaving gems that experienced users may not be aware existed.
Chapter 14 covers creating and animating a camera, including creating camera rigs and taking advantage of auto orientation, as well as showing how to cut between multiple cameras. We conclude by discussing the camera’s parameters in more detail, including how to fake focus and depth of field effects.
This is the second chapter in Part 4 – Cameras! Lights! Action!. The next chapter in this series will cover tips for working with lights.
Before we get into details of using a camera, let’s go over some general issues related to using cameras in After Effects:
- Cameras only view 3D layers. If you enable the 3D Layer switch for an object, it will now be rendered in perspective based on how a camera is looking at it, with distance from the camera affecting how large the object appears.
- If the 3D Layer switch is off, that layer is rendered normally, regardless of the camera’s settings or where it is pointing. This ability to combine 2D and 3D layers in the same comp is a real boon: You can set up stationary background movies and foreground text or logo bugs in 2D, then fly around just the elements you need in 3D.
- Cameras appear as layers in the Timeline panel. If there is no camera layer in a comp, After Effects uses an invisible default camera.
- You can have more than one camera in a comp; if you do, After Effects looks at the in and out points of the camera layers and notes which one is highest in the Timeline panel layer stack to decide which is the “active” camera at any given point in time. This means you can cut between alternate camera views. (Sorry; you cannot dissolve between them – unless you use a trick we explain in the book involving nested comps and collapsed transformations.)
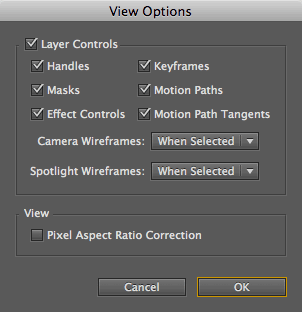 View Options
By default, when a camera is not selected, it is represented by a box. When it is selected, you will also see lines that represent its Angle of View and Zoom distance (and if you are using the two-point camera model, its Point of Interest), as well as Focus Distance if Depth of Field is enabled.
If you’d like to always see these extra lines – even when the camera is not selected – then open the View Options in the Comp panel’s Options menu (from the upper right corner). Click on the popup next to Camera Wireframes, and change When Selected (the Default) to On. You can also set this option to Off, if you find them distracting.
You can also set similar options for spotlights (discussed in the next chapter). These options can be set per Comp panel as well as per view; enable Share View Options from the Select View Layout popup to share options across views.
Don’t miss the “3D Views & Shortcuts” section in Hidden Gems for Chapter 13, as it contains tips on how to resize the 3D views so as to maximize the size of the camera icon. This also covered shortcuts to automatically zoom and center your view to see all of the desired layers.
One-node Camera
The two-node camera model makes it easy to precisely aim the camera: Just place the Point of Interest where you want to look. However, it can be difficult to coordinate both Position and Point of Interest for some motion paths, such as flying around objects when you need to make multiple turns. So After Effects also gives you the choice to create a one-node model whereby you orient the camera’s body to decide where it is looking.
There are two methods for creating a one-node camera:
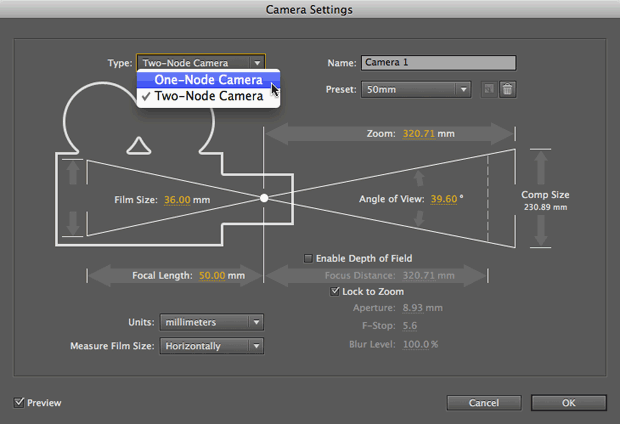
- In CS5, when you create a new camera, set the Type popup in the Camera Settings dialog to One-Node Camera. If the Preview option is enabled, the line leading to the Point of Interest will disappear, and the camera will snap around to face straight ahead. (You can also edit an existing camera by double-clicking the camera layer.) Click OK to close the dialog.
- In CS4 and earlier, this option can be set by selecting the Camera layer, and selecting Layer > Transform > Auto-Orient. When the Auto-Orientation dialog opens, choose the Off option, and click OK.
Whichever method you choose, you will need to point the camera using the Orientation and Rotation properties. Note that if you use the Rotate tool to alter Y Rotation or Orientation, there is a nasty glitch that if you go beyond +/-90 degrees, the X and Z values flip by 180 degrees (try it!). That’s why we prefer scrubbing the values directly in the Timeline panel.
When using a one-node camera, the Orbit Camera tool rotates the camera by changing its Orientation values – not Rotation. Whereas Orientation is good for posing a 3D layer, Rotation is far better for animating it in a predictable manner – so keep that in mind.
Another little gem or gotcha (depending on what you’re trying to do): Using the View > Look At menu options and corresponding shortcut keys alters just the camera’s Position, taking into account its current rotation and orientation.
Auto-Orientation
There are a couple of variations on auto-orientation that can be handy when animating a camera moving along a path in a complex 3D world.
First, you can have layers always face the camera so that they don’t appear skewed or distorted. To do this, with the layer selected, choose Layer > Transform > Auto-Orient. When the dialog opens, select Orient Towards Camera and click OK.
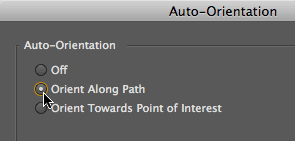 Another trick involves having a camera auto-orient along an animation path. It can be hard to set up sweeping motions that don’t appear to drift; this option points the camera for you. With the camera still selected, open its Auto-Orientation dialog, choose Orient Along Path, and click OK. You can also set the middle keyframes for the Camera’s Position property to rove in time (see Chapter 4) so that the speed will be fairly constant.
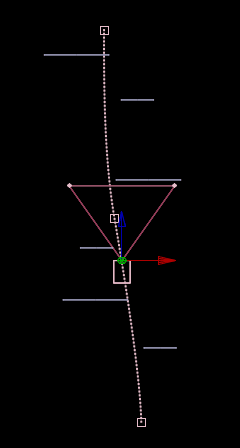
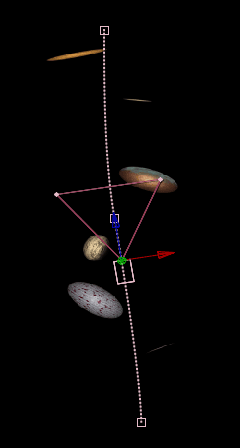
Normally, layers and cameras point where you tell them, which starts out as straight ahead (A). However, you can set layers to orient toward the camera, and also tell the camera to orient itself along its motion path (B).
The one shortcoming of Orient Along Path is that it does not cause a camera or layer to “bank” – rotate along its Z axis – while swooping about. Feel free to manually keyframe a little Z Rotation of your own to anticipate turns.
Handheld Camera

A little humanization can go a long way to make your movements seem more realistic. To create a handheld or floating “Steadicam” look, add a wiggle expression (Chapter 37) to a camera’s Position or Point of Interest. (For an in-depth discussion on the wiggle expression, see the corresponding installment of Deeper Modes of Expression.)
Separate XYZ
Editing motion paths and keyframing the result may not be the easiest way to create a smooth camera animation. Many users prefer to create “camera rigs” where individual dimensions of the camera’s movement are divided among a series of null objects. These independent nulls can be used to correspond to a camera’s dolly track and crane movement, for example.

As an alternative to building a camera rig, you can also take advantage of the Graph Editor and Separate XYZ option (mentioned in our Hidden Gems for Chapter 4) to create precise, refined camera movements, such as moving smoothly along an imaginary dolly in the X and Z dimensions, then later doing a crane elevator move in the Y dimension. To use this feature, select the Camera layer, then click the Separate XYZ button at the bottom of the Graph Editor (circled in the figure above).
Trish and Chris Meyer share seventeen-plus years of real-world film and video production experience inside their now-classic book Creating Motion Graphics with After Effects (CMG).
The 5th edition has been thoroughly revised to reflect the new features introduced in both After Effects CS4 and CS5. New chapters cover the new Roto Brush feature, as well as mocha and mocha shape. The 3D section has been expanded to include working with 3D effects such as Digieffects FreeForm plus workflows including Adobe Repouss©, Vanishing Point Exchange, and 3D model import using Adobe Photoshop Extended. The print version is also accompanied by a DVD that contains project files and source materials for all the techniques demonstrated in the book, as well as over 160 pages of bonus chapters on subjects such as expressions, scripting, and effects.
We will be pulling a few “hidden gems” out of each chapter to share on ProVideoCoalition.com roughly every week. These will give you a taste for the multitude of time-saving tips, not-obvious features, little gotchas, and other insider knowledge you will find in CMG.
The content contained in Creating Motion Graphics with After Effects – as well as the CMG Blogs and CMG Keyframes posts on ProVideoCoalition – are copyright Crish Design, except where otherwise attributed.

Filmtools
Filmmakers go-to destination for pre-production, production & post production equipment!
Shop Now