We’re going through our book Creating Motion Graphics with After Effects 5th Edition (CMG5) and pulling out a few “hidden gems” from each chapter. These will include essential advice for new users, plus timesaving tips that experienced users may not be aware of.
Continuing with Part 5, Precomposing is the second of three chapters that show you how to build a hierarchy of comps. In the previous chapter, we explained that nesting is used to group layers and fix visual problems caused by the default 2D render order. You’ll find that nesting is an intuitive way to create a chain of comps when you’re planning ahead. However, predicting exactly how many comps will be needed to build an animation is difficult; you may need to insert a comp in the middle of an existing hierarchy. That’s where precomposing comes in.
The third chapter in this series, Collapsing Transformations, will cover specific issues that arise when nesting and precomposing comps containing 3D layers.
Precompose for Grouping
Precompose is used primarily for the same reasons you would use nesting – grouping layers and manipulating the rendering order. The difference is that nesting implies moving up the hierarchy; when you precompose, you’re inserting an intermediate comp lower down in an existing hierarchy. You could think of it almost as nesting backward: The precomp created is always rendered first, before the original comp.
To try precomposing:
- Select two or more layers, then select Layer > Pre-compose.
- In the Pre-compose dialog, give the new composition a useful name, say “Title group”. (Note that when multiple layers are selected, Move All Attributes is the only option available; more on this next.) Make sure the Open New Composition switch is unchecked for now, and click OK.
- The selected layers will be replaced with one layer, a nested comp called “Title group”. You can now easily animate or apply effects to the group; you can also trim or apply a blending mode or mask to the group.
Just as with nesting compositions, all layers remain “live” for further editing. Simply double-click a nested comp layer to open it for further editing. You can switch back and forth between the precomp and the original comp using the tabs in the Timeline panel or by using the Composition Navigator (covered in Chapter 18). Note that if you need to open the Layer panel, Option+double-click on Mac (Alt+double-click on Windows) the nested comp layer.
 Move All Attributes
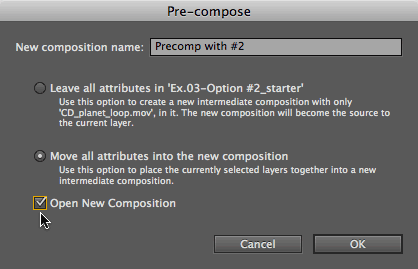
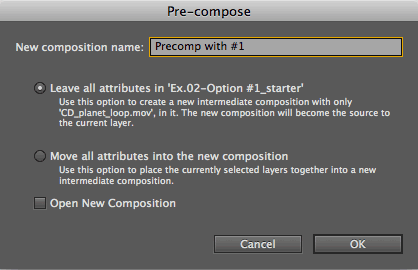
The Pre-compose dialog offers two options: Leave all attributes in “current comp”, or Move all attributes to the new composition. Attributes refers to the values and keyframes for masks, effects, transformations, blending modes, layer styles, trimming, and so on.
When you precompose multiple layers, only the second option, Move All Attributes, is available because the relationship between the layers can be maintained only if their attributes are kept intact. The layers that are precomposed will appear as one layer in the original comp so you can animate and effect them as a group.
To summarize Option #2, Move All Attributes:
- The Move All Attributes option is available for both single layers and multiple layers, including nested comps.
- The precomp will be the same size and duration as the original comp.
- Any attributes (masks, effects, transformations, blending modes, trimming, and so on) applied to the layer(s) before precomposing will be moved to the precomp.
- The layer in the original comp will have a fresh render order, and any attributes applied to this layer will render after the attributes in the precomp.
 Leave All Attributes
Precomposing a single layer is used to solve unforeseen rendering order problems. The solution to problems with the default rendering order is to reverse the order of some events by spreading the layer across two comps, so you can pick and choose which step happens in which comp.
To summarize what happens when you use Option #1, Leave All Attributes:
- The Leave All Attributes option is available for single layers only, including nested comps.
- After you precompose with Leave All Attributes, the precomp will have one layer in it, and the size and duration of the precomp will be the same size and duration as the original layer.
- Any attributes (masks, effects, transformations, blending modes, trimming, and so on) applied to the layer before you precompose will remain in the original comp.
- The precomp will have a fresh render order, and any attributes applied to the layer in the new precomp will render before the attributes in the original comp.
Numbering Precomps
Don’t name a precomp with a higher number than the current comp, as you might do when nesting. If the current comp is Comp 2, the precomp will be inserted between Comp 1 and 2 (so it’s a 1.5, not a 3!).
![]() Fixing a Clipped Layer
Fixing a Clipped Layer
Some effects – such as Simulation > Shatter or CC Pixel Polly (pictured) – can’t draw outside the layer’s original boundary, and instead are clipped at the layer’s edge. Fortunately most effects are now capable of drawing outside the layer’s edge, but if you do come across this problem, there are a few workarounds:
- First, check if the effect has a Resize Layer option, as offered by the Radial Shadow effect.
- If not, apply Effect > Utility > Grow Bounds and make it the first effect in the stack. Then increase its Pixels parameter until the effect no longer clips. (Note that if Tint is in the effects stack, place Tint before Grow Bounds. Don’t ask why!)
- The third option is to place the layer (or layers) in a precomp; this comp should be whatever size you need the layer to be so that the effect has enough room to draw into. Nest this into a second comp and apply the effect. The effect will think that the layer is as large as the precomp. If the effect still clips, return to the precomp and increase its size. This method also allows you to animate the layer(s) in the precomp (this animation renders before the effect).
Trish and Chris Meyer share seventeen-plus years of real-world film and video production experience inside their now-classic book Creating Motion Graphics with After Effects (CMG).
The 5th edition has been thoroughly revised to reflect the new features introduced in both After Effects CS4 and CS5. New chapters cover the new Roto Brush feature, as well as mocha and mocha shape. The 3D section has been expanded to include working with 3D effects such as Digieffects FreeForm plus workflows including Adobe Repouss©, Vanishing Point Exchange, and 3D model import using Adobe Photoshop Extended. The print version is also accompanied by a DVD that contains project files (CS5-only) and source materials for all the techniques demonstrated in the book, as well as over 160 pages of bonus chapters on subjects such as expressions, scripting, and effects.
We will be pulling a few “hidden gems” out of each chapter to share on ProVideoCoalition.com roughly every week. These will give you a taste for the multitude of time-saving tips, not-obvious features, little gotchas, and other insider knowledge you will find in CMG.
The content contained in Creating Motion Graphics with After Effects – as well as the CMG Blogs and CMG Keyframes posts on ProVideoCoalition – are copyright Crish Design, except where otherwise attributed.

Filmtools
Filmmakers go-to destination for pre-production, production & post production equipment!
Shop Now


