In the past few years, a barrage of new video acquisition formats and recording methodologies have sprouted like mushrooms after the rain. The major shift has come in the form of tapeless, file-based acquisition that uses equipment that has its roots in the information technology industry.
As video post-production has scrambled to keep up, editors have been left with little choice than to become ersatz compression specialists and computer technologists. We all wear a few extra hats these days, but there are times when you just want to do what you do without a lot of additional work.
Adobe Systems has heard the cries of editors everywhere, and kicked open the door on a completely different way of working with tapeless, file-based media. Adobe Premiere Pro CS5.5, which is available standalone or as the anchor application of the Adobe Creative Suite 5.5 Production Premium bundle for both PC and Mac, is the company’s latest gambit in the evolution of non-linear editing and post-production. If you tried and dismissed Premiere sometime in the past before the software received a ground-up rewrite and gained the “Pro” suffix, it’s time for a second look. In this article, I will review both the general theory of the tapeless native file format workflow, and also give specific instructions (including video demonstrations) on how to get up and running quickly.
Disclaimer: Yes, I am an unabashed fan of this workflow, and can’t help sounding like a kid in a candy store about some of it – but read on and you’ll soon understand why.
Native, tapeless workflows: Why?
In 2007 with the release of Premiere Pro CS3, Adobe introduced and has since refined and expanded what has become the cornerstone of the software and is arguably its strongest feature: native format support for tapeless, file-based post-production workflows. Right out of the box, Premiere Pro is ready to edit virtually any tapeless format available today, immediately and without limitations.
There’s no platform-specific rewrapping of camera files. No time-consuming transcoding. No quality-compromising recompression. No space-hogging intermediate files. No need to purchase and install third-party codecs. No excuses, no reasons to turn down work, no more coffee breaks – c’mon, we can’t have everything.
Native format support is all about giving you immediate access to the footage as the camera recorded it, removing the impediments to an efficient post-production workflow and letting you focus on creative editing.
In effect, Premiere Pro answers the question, “What happens when an NLE just gets out of the editor’s way?”
Choices, choices, choices
When native, tapeless format support first came to Premiere Pro during the CS3 cycle, the options were limited, but the technology was just beginning to spread, as well. Adobe saw the writing on the wall, and with each incremental update and major version release, Premiere Pro rapidly supported more and newer tapeless acquisition formats and technologies.
Now, in the fourth generation of the evolution of this technology and capability, Premiere Pro CS5.5 natively supports an incredible array of tapeless formats, all without waiting a single moment for a transcoding or rewrapping process to complete. As of this writing (May 2011), Premiere Pro CS5.5 supports the following tapeless acquisition formats, containers and codecs:
- Panasonic P2 (DV, DVCPRO, DVCPRO50, DVCPRO HD, AVC-Intra)
- Sony XDCAM, XDCAM HD, XDCAM HD422, XDCAM EX
- Canon XF
- Sony HDV
- JVC ProHD (both MP4 and MOV)
- Canon Digital SLR
- Nikon Digital SLR
- AVCHD and the Panasonic-branded equivalent, AVCCAM
- RED
If you consider that each of these formats supports several, if not dozens of bit rate, frame rate, and frame size combinations – all of which are supported by Premiere Pro CS5.5 – you start to get a sense of the magnitude of this capability.
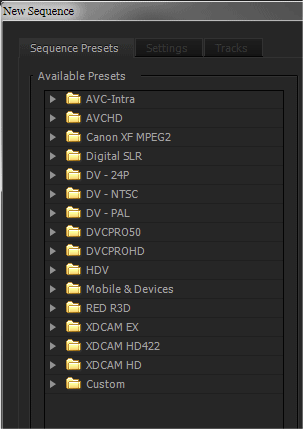 Premiere Pro CS5.5 ships with more than 160 sequence presets (see the category folders at right), each designed for a specific flavor of footage. Strictly speaking, any supported format can be edited in any sequence preset – but more on that later.
To reiterate, all of the above formats are supported natively in Premiere Pro CS5.5. Footage from any of these tapeless formats can be imported and edited immediately without the installation of any additional codecs, plug-ins, or import modules. You won’t be waiting for the camera files to be rewrapped or transcoded, either – you’re quite literally going straight to the source.
Let’s digress for a moment for an etymological expedition. Consider what “importing” has historically meant in non-linear editing parlance, or just the general connotation of the word: moving something from one place to another. With Premiere Pro, this isn’t the case at all. Instead, you are creating a virtual link to the media file, wherever it exists – nothing is copied, moved or otherwise altered on your computer. I’d submit that it makes more sense to call this process “linking,” but I also concede the desire to maintain uniformity of the established terminology, and that perhaps, “importing” just sounds sexier than “linking.” Whatever you call it, importing a file into Premiere Pro is practically instantaneous and involves no manipulation of the file.
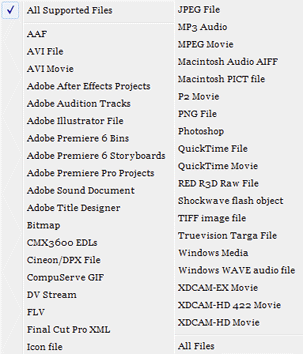 As an editor, you’re probably not always working with footage sourced from a video camera. Premiere Pro’s native format support capabilities have you covered. Have a PhotoJPEG QuickTime from a stock footage website? Import, and edit. Captured an analog tape to an uncompressed AVI using a third-party capture card? Import, and edit. Got an image sequence rendered from a 3D animation program? Import, and edit. The list at right gives you an idea of just how many file types (video and others) are supported.
There are a few considerations when dealing with files not directly sourced from a tapeless camera. For example, import of most MOV files on Windows requires installation of Apple’s QuickTime Player, and Mac OS X has limited support for AVI files (editor’s note: Telestream’s Flip4Mac can improve this situation). Certain files will require the installation of a third-party decoders. like Avid DnxHD or Cineform. Perhaps not as invisible as the native support of the tapeless formats, the fact remains that you’re working directly with the source files, without converting them before or during import. Look at it not as a limitation, but as a way to extend Premiere Pro’s editing capabilities.
Premiere Pro’s native format support is an excellent workflow enhancement – even a game-changing one – because you’re not spending precious time trying to hammer a variety of source files into a common, monolithic format. With the vast array of footage and media sources available today, it’s difficult to imagine a project that doesn’t draw from two or more.
Give me your tired, your poor, your huddled assets
The first time you import footage from a tapeless camera or any other digital media file supported by Premiere Pro CS5.5, you’ll experience a moment of shock. This will pass shortly, which is good because you’ll be able to work right away. Perhaps it’s an oversimplification, but if you can import it, you can edit it – this is the basis of native format support in Premiere Pro.
In many respects, what makes native format support in Premiere Pro CS5.5 so remarkable is that you’re doing something rather unremarkable: you’re simply importing files. There’s no button pushing, no changing settings, no picking import locations, no waiting. It’s as close to a hands-off process as you can get in a profession that, by its nature, demands hands-on interaction. Once it’s done – like, now – you can basically forget about native format support and focus on the actual task of editing.
With the preponderance of today’s tapeless acquisition formats writing recorded footage to multiple files with randomly-generated filenames, a complex, multi-tiered folder structure, a FAT32-formatted storage medium which limits file sizes and record times, or worse yet, all of these, navigating through the recorded media files is a daunting task. Each camera manufacturer provides tools to ingest footage from the recording media, log or add metadata to the footage, and backup the files. These tools can help you get your footage ready for Premiere Pro, but they’re bit deceptive in that they mask what’s really going on at the file level.
With the files copied to your local drives, you’re ready to import and edit with Premiere Pro. The Import menu command, standard keyboard shortcut (Command+I on Mac, Ctrl+I on Windows), or a double-clicking in the Project panel will launch the Import dialog with a fairly standard file browser (shown below). Select one or multiple supported files, and click the “Open” button (yeah, I know… no idea why it doesn’t say “Import”). Selecting a folder of media files and clicking the “Import Folder” button will simultaneously import the files and create a bin with the folder’s name. If you like to organize your files at the OS level, this can help you maintain parity between your file structure and your bin structure. Premiere Pro can also import an image sequence as a single master clip by checking the “Numbered Stills” option and selecting the first image in the sequence for import.
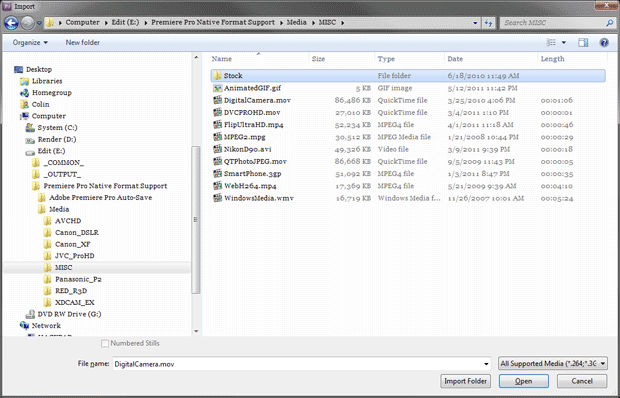
Let’s see that in action:
A quick way to import files is to drag-and-drop them from your OS’ file browser into Premiere Pro. Additionally, dragging one or more folders creates bins that use the folder names and imports any supported media contained within those folders.
Adobe Bridge can be used to preview certain file types and import them into Premiere Pro. However, Bridge is a little limited with most tapeless formats; it’s no better than your OS’ file browser when navigating tapeless media folder structures, and it has problems playing back certain containers and codecs. It’s an option, but there is a better way…
next page: the better way (using the Media Browser); working with memory cards
The better way
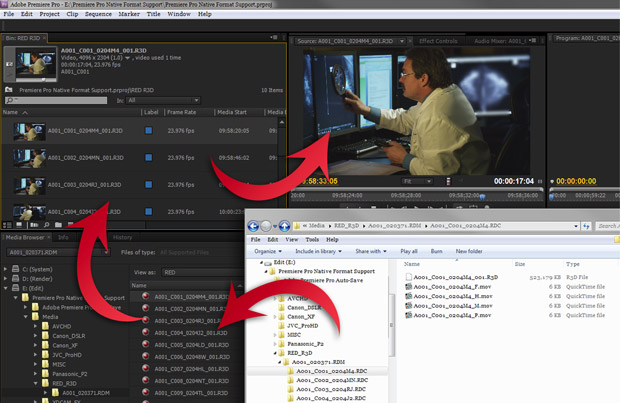
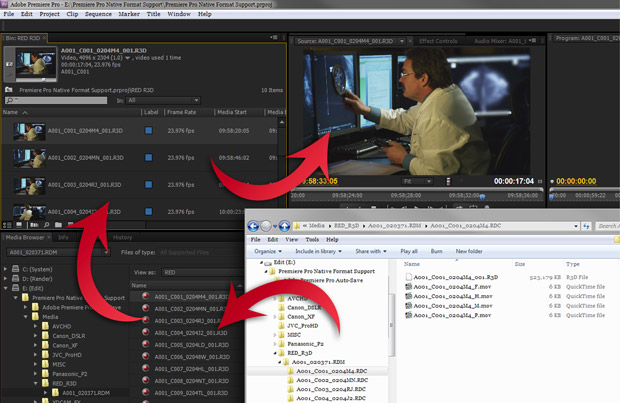
The Media Browser: the best and fastest way to work with tapeless formats in Premiere Pro. Implemented as a panel within the Premiere Pro interface, the Media Browser allows you to navigate through drives and folders accessible to your computer with a familiar folder tree display, and selectively preview and import media into your project. A file type filter lets you display one, multiple, or all supported file formats – great when your folders are a bit cluttered. The figure below compares using the normal operating system method (the white window) to using Premiere Pro’s Media Browser with P2 media; other formats can be just as messy:
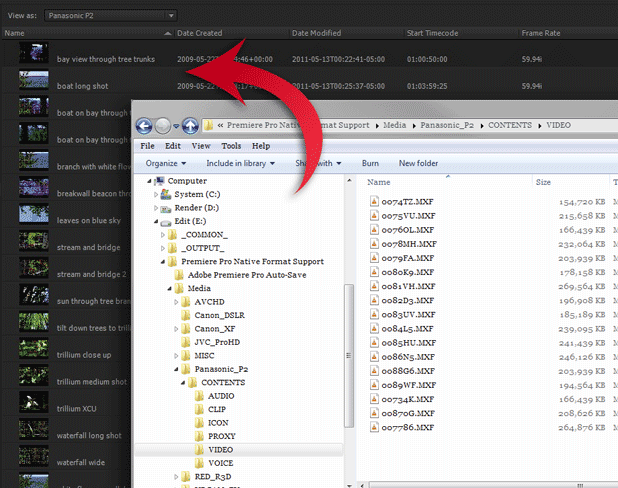
Files can be dragged from the Media Browser into a waiting bin, directly into a sequence (they’ll also be added to the bin), or loaded into the Source Monitor. This lets you review a clip, add marks, and log it before adding it to the project. Importing media into your project couldn’t get much faster and easier, but the Media Browser still has another trick up its sleeve.
The Media Browser has built-in intelligence: if it encounters an intact folder structure as written by a tapeless camera, it automatically flips into a specific view mode that deciphers that particular format’s folder structure, and displays the clips within a simple, unified flat view. In essence, the Media Browser turns a top-level folder into a virtual bin that aggregates the clips contained beneath it, eliminating the need to drill through tiers of cryptically-named folders and files.
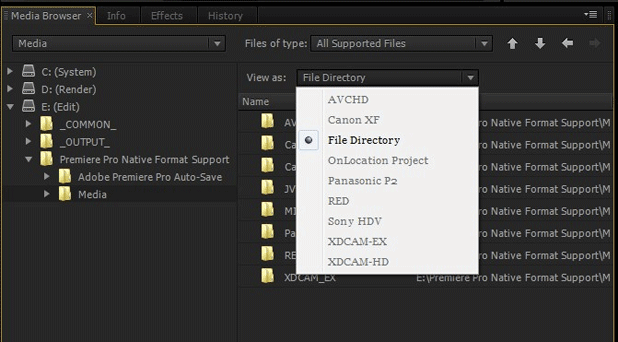
Again, let’s see that in action:
The Media Browser has specific view modes for AVCHD, Canon XF, Panasonic P2, RED, Sony HDV, XDCAM EX, and XDCAM HD. None of these formats are pleasant to deal with at the OS level, but the Media Browser makes them a snap. The “File Directory” view mode, which can be selected manually regardless of the automatic view mode, lets you quickly select and import any supported files; tapeless formats that record to self-contained files in a flat folder structure, like Canon and Nikon DSLR, use this view mode, as well. While these technically tapeless formats don’t record to labyrinthine folder structures or require tools like the Media Browser to make importing easier, the point is that Premiere Pro is able to work natively and efficiently with the files as recorded by the DSLR camera. Check out Mark Christiansen’s article on DSLR editing in Premiere Pro for more information.
Unlike the other methods of import that look directly at the media files themselves and force you to guess what each randomly-named file contains, the Media Browser is metadata-aware. This means that if the recording camera was preloaded with metadata, or if the footage metadata was edited after production, Premiere Pro and the Media Browser will display the relevant clip information instead of merely the filename; some tapeless formats are capable of displaying more information than others. No need to guess what “0030B9.MXF” is, when you could see useful clip names like “Scene 1 Shot 2 Take 3” or “zoom into pine trees.” Even if the Media Browser doesn’t display a particular bit of metadata, Premiere Pro is often able to read it after import, and display it in the project. This involves some work before, during, and after the shoot, but can make the time saved in post-production well worth it.
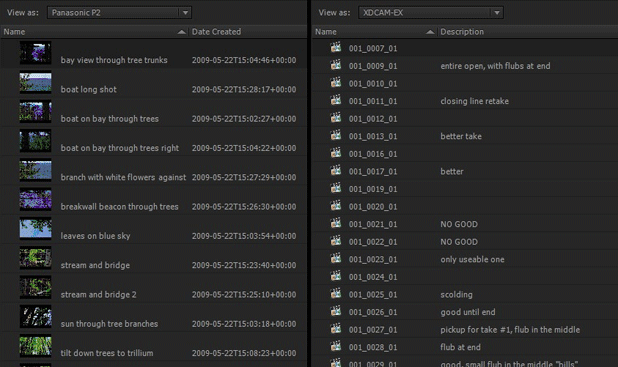
Finally, the Media Browser lets you overcome the limitations of the FAT32 file system used on most tapeless media. Formats like Panasonic P2 or Sony XDCAM EX automatically split longer, continuous takes into 4GB chunks, and roll over to the next recording medium when the first is filled. This is called spanning, and were it not for the Media Browser, would be a nightmare to deal with from a media management perspective. Here’s a quick video showing how to deal with spanning:
The Media Browser’s intelligence makes the difference here, because it can read the XML data written into the structure and seamlessly and virtually stitch the spanned files together into one master clip. This also applies to takes that span two or more cards, so long as the folder structures are preserved at the same folder level. When editing lengthy events or performances that were shot with these cameras, this capability is an incredible sanity-saver.
As with all native editing in Premiere Pro, you’re working directly with the original recorded footage – the master clip created when importing a spanned take is virtually stitching together the source files behind the scenes. A spanned master clip can be comprised of dozens of files, so the moral of the story is to preserve the tapeless folder structure as the camera recorded it.
If it’s a little overwhelming to consider the variety of import options provided by Premiere Pro, here’s the bottom line: you can import and edit whatever you want, and forget about so many of the compromises you’ve had to make in the past.
Pick a card… any card
While Premiere Pro’s native format support accelerates a standard post-production workflow, it can also be a powerful tool for anyone working in the field, on set, or in broadcast environments – wherever immediate access to just-shot footage would aid creativity and productivity.
Given that the majority of the tapeless formats use recording media that conform to computer storage formats and interfaces – PC Card, ExpressCard, Compact Flash (CF), Secure Digital (SD), USB or FireWire hard drives – any properly-equipped laptop or workstation can directly access the files on that media. This means that, if you can mount it, Premiere Pro can import from it.
Clearly, you shouldn’t expect stellar editing performance from something like an SD card, but some of the recording technologies provide enough bandwidth to permit editing of DV, SD, HD, and greater. At minimum, Premiere Pro allows you to quickly import and review footage for confidence and continuity checking or logging.
Shooting on set with a RED and want to review the last few takes? Mount the magazine, import the R3D files, and view the shots in living color on an external monitor. Working on an event or announcement that needs to be uploaded to the Web immediately? Slap an SxS card full of XDCAM EX footage into your laptop, import the MP4 files, and edit, encode, upload. Covering a breaking news story? Pop in a P2 card with AVC-Intra, import the MXF files, and have a news pack ready to air before you get back to the station. These aren’t technologies that Adobe pioneered, but Premiere Pro brings their workflows pretty close to perfection.
Note that since you’re working natively with the files directly on the recording medium, the moment you unmount the card or drive, your footage will go offline. Fortunately, it’s fairly easy to relink to those files (Premiere Pro will ask you where they are) once you’ve copied them to a more permanent medium – just don’t forget that part! Remember that Premiere Pro doesn’t move or create any files on import, so you will have to manually do so at the OS level or with a third-party application.
next page: the Mercury Playback Engine; combining formats; caveats; resources
Files loaded. Now what?
Importing a natively-supported video format is only half the story; actually editing that footage is the other half.
With the earlier release of Premiere Pro CS5, the application emerged as 64-bit application, for both Windows and Mac OS X. While many users had to upgrade to a 64-bit operating system and, sometimes, their hardware, this evolutionary bottleneck was well worth the price. Gone were the performance-stunting limitations of RAM and CPU core accessibility imposed by the software architecture, so that – for once – you could rack up your credit card balance on computer upgrades and see a real and direct impact on editing performance. This is especially important when working with highly-compressed acquisition formats like AVCHD, and greater-than-HD formats like RED R3D.
At the same time, Premiere Pro CS5 introduced the Mercury Playback Engine, a core set of technologies and enhancements that is frequently misunderstood. The Mercury Playback Engine (MPE) includes the aforementioned “64-bitness” along with other performance improvements, but is most commonly associated with the tastiest dish it brings to the table: GPU-accelerated playback using Nvidia’s CUDA processing technology.
With a supported graphics card/chip in your workstation or laptop, Premiere Pro can offload a great deal of video processing from the CPU and onto the GPU, providing real-time playback performance where there would otherwise be none. Most immediately visible in the interface are things like GPU-accelerated effects and transitions that render in real-time, but more important are the less-visible things processed by CUDA:
- scaling and other transformations
- interlacing and deinterlacing
- differences in frame size, frame rate, field order, and pixel aspect ratio
- speed changes
- frame blending (frame interpolation)
- color space conversions
These are things that you would ordinarily have to be conscious of, and take measures to account for in a mixed-format project. With Premiere Pro CS5.5 and the GPU-accelerated Mercury Playback Engine – a nod to Ron Popeil – you can “set it and forget it.” You might not see the benefits of all these accelerated processes when you’re working with a single video format, but you’ll quickly appreciate them the next time you have to edit two very different formats in one sequence.
The final aspect of native format support in Premiere Pro CS5.5 is its truly open timeline. While Premiere Pro ships with some 170 sequence presets that are designed for video of specific frame sizes and frame rates, there is no restriction on what footage you can use in any given sequence preset. Drop an array of mixed formats in a sequence, and edit in real-time. There’s no need to conform before you drop the clips in a sequence, or to wait while the program does this automatically; all footage in a sequence will playback at its native size and frame rate – or you can reinterpret or manipulate it anyway you like.
When the footage for your edit comes from a mishmash of different sources, it’s comforting to know that Premiere Pro unshackles you from the usual meat grinder approach you’d have to take to prep the footage. With the extensive native format support, accelerated editing capabilities, and open timeline, Premiere Pro is a clear response to a video production world gone mad.
But wait! There’s more…
You know you’ve had to do it, whether you like to admit it or not. At some point, you’ve had to edit footage from a source that was – ahem – less than professional. Don’t worry; I won’t judge.
By now, it should be no surprise that Premiere Pro’s native format support extends beyond the realm of professional video and into the dark corners of consumer-generated media. One look at the list of supported file types in Premiere Pro’s import dialog is proof. The videos generated by devices will frequently import without trouble, and so will a variety of Web delivery formats. When push comes to shove, even the VOB files created on a DVD-Video will import. Why you would want to or even have the need to do so is beyond me, but animated GIFs will import as video clips!
Now, before dismissing this as a freak-filled sideshow, consider the ramifications of being able to work directly with files of this type without needing to convert them. When is the last time you didn’t see a cellphone video or Web clip on broadcast or cable news? Creating a documentary on social upheaval, and the best angle came from a point-and-shoot digital camera? And who hasn’t wanted to pick up a few extra bucks for a simple lo-fi side job?
A few quick words about a couple of other items in the Adobe arsenal: the standalone version of Premiere Pro CS5.5 and the Production Premium CS5.5 bundle come with the Adobe Media Encoder. At its core lies the same native format support that exists in Premiere Pro. It’s a great tool to use to batch convert tapeless formats for your non-native-editing brethren, to generate low-resolution previews for clients to review, or to create offline proxies.
Finally, Adobe After Effects natively supports the vast majority of the tapeless formats supported by Premiere Pro. You can easily move your Premiere Pro edit into After Effects for motion graphics and compositing, and directly utilize the tapeless footage. This eliminates the need for large intermediate files or other time-consuming workarounds.
In short, the native format support for both professional and consumer flavors of video extends beyond Premiere Pro and into other motion media applications in the Adobe suite, providing an efficient end-to-end workflow and removing the frustrations of media handling that you might have just accepted as a matter of course.
Dr. Strangeedit or: How I Learned to Stop Worrying and Love Native Format Support
If it sounds like Premiere Pro is the best thing since sliced bread – well, it’s close, but it’s not perfect. In the spirit of full disclosure, let’s look at a few things that shouldn’t be absolutely construed as negatives, but that you should most certainly be aware of and consider carefully, especially if you’re moving from a platform that works in a wholly different way.
Codecs and chroma subsampling: While terrific advancements in video compression technology have made it possible to record high-definition video at astonishingly low bit rates, there are compromises that have to be made. Amongst these is the chroma subsampling used by some codecs and the subsequent loss of color resolution. Heavily-compressed formats, like AVCHD or DSLR (H.264), look fantastic as they come out of the camera, but when the color is pushed around in post-production, the ravages caused by the codec can quickly become evident.
What does have to do with native format support? With Premiere Pro, you’re operating directly on those recorded pixels, demanding more vigilance on your part when doing color correction and effects work.
Codecs and compression ratios: The codecs at work in these formats use advanced compression algorithms designed to provide high-resolution video at low bit rates. They’re also designed to torture your computer and test your patience.
Premiere Pro can do some pretty amazing things with codecs like this, but it still relies on the underlying hardware of your workstation to do the dirty work. An older or under-spec’d computer can make working with this type of footage a painful experience – editing DSLR footage on your four-year-old laptop is a recipe for frustration.
Important note: this is one area where the GPU-accelerated Mercury Playback Engine doesn’t have an impact. Decoding (and for that matter, encoding) is directly dependent on the CPU. The fastest processor you can afford will pay off dividends again and again.
Choosy editors choose clips: In workflows that involve rewrapping or transcoding tapeless formats to more platform-specific formats, you can be selective about which clips and how much of each you convert and import, creating a tidier project. When you discover that you can effortlessly drag hours and hours of video into your Premiere Pro project, you’ll have a compelling urge to do so. Try to resist the urge – yes, it’s fast and easy, but you can quickly fill up a project with a bunch of unnecessary stuff, making asset management awkward.
The Media Browser and the Source Monitor are there to help. Load a clip from the Media Browser into the Source Monitor, preview it, log it, and mark it – then import it into your project. Sure, it’s the boring grown-up thing to do, but you’ll be glad you did when you’re not trying to find those ten seconds of precious video in a pile of clips titled with runic alphanumeric names.
You complete me: If you value your sanity, repeat after me: “I will copy the entire tapeless folder structure to my hard drive.” Premiere Pro is usually able to import the media files from most tapeless cameras even when they are extracted from the folder structure, but “naked” files may behave unexpectedly or even prevent some of the functionality that makes working with these formats in Premiere Pro simple and seamless.
Premiere Pro relies on the tapeless folder structure to connect the audio and video to the other relevant files. The Media Browser loses its ability to use its magic view modes and defaults to the “File Directory” view when the files are removed from the folder structure.
Beyond that, the metadata written by these tapeless formats is what lets Premiere Pro stitch together multiple files that comprise a long, spanned clip. Some formats, like AVCHD, will experience video or audio dropouts if the spanned takes are manually assembled in a sequence. Worse yet, timecode is stored in the metadata file for a given clip. There’s nothing more disconcerting than a bin full of clips that start at 00:00:00:00.
Metadata: Now you see it; now you don’t: You’ve probably heard about the great promise of metadata: relevant and useful information about the content of your media files stored in or with the media files. Amazingly, with careful planning and preparation during production, certain cameras can practically log the footage as they shoot it. Clips can also be logged with a software utility designed for that particular tapeless format.

Premiere Pro can access and display most of the metadata information added to a clip, whether it’s in the Media Browser, in a bin, or in a sequence. Premiere Pro can also add metadata directly to certain kinds of files, and where that’s not possible, a sidecar XML file is created and linked to the media file. With all this metadata being searchable within the Premiere Pro interface, it’s obvious how this can be an incredible workflow accelerator.
The problem is that Premiere Pro is not capable of writing metadata back to the metadata files in the tapeless format’s folder structure. While this may not be a problem if you’re staying within the Adobe universe, don’t assume that the logging information you add to your clips will travel with those clips should you want to share them with another editor or use them in a non-Adobe application. The tools provided by the camera manufacturers are capable of adding or editing metadata which will travel with the clips. This is a “log once, edit many” mentality that would apply well when working with stock footage or any kind of material that you want to evergreen for repeated use.
Again, none of these differences about working in Premiere Pro should be regarded as showstoppers; rather, they should be assimilated as part of the give-and-take of any video production and post-production workflow.
Conclusion
Premiere Pro and its native format support has clearly been designed with a keen eye on today’s video production workflows, particularly when working with tapeless, file-based acquisition. Gone are the roadblocks, frustrations and compromises that have riddled your days and nights in the edit suite, and in their place is a faster, more natural, and more enjoyable editing experience. A few minutes working in Premiere Pro will have you saying, This just makes sense. Spending less time monkeying about with media ingestion technicalities and more time crafting the perfect edit is something that any editor can appreciate.
If you prefer liberation to limitation, now is a good time to look at Adobe Premiere Pro CS5.5.
Further Reading
For those who want to diver deeper into working with different formats of media and Premiere Pro in general, here are some additional links you might want to check out:
General Information from the online Help:
- Adobe Premiere Pro CS5 & CS5.5 * File formats supported for import
- Adobe Premiere Pro CS5 & CS5.5 * Importing assets from tapeless formats
Adobe workflow guides for specific formats (all PDFs):
- Using Adobe Premiere Pro with Canon Digital Video Cameras
- Using Adobe Premiere Pro with tapeless Sony XDCAM content
- Using Adobe Premiere Pro with RED Digital Cinema content
- CS5 Production Premium end-to-end editing workflows with Panasonic AVCCAM cameras
- CS5 Production Premium end-to-end workflows for Panasonic P2 and P2HD cameras
Adobe video on DSLR editing:
More on CUDA and the Mercury Playback Engine:
- CUDA, Mercury Playback Engine, and Adobe Premiere Pro
- Adobe Premiere Pro CS5.5 improvements in CUDA processing and the Mercury Playback Engine
FTC Disclosure: Creation of this article was partially subsidized by Adobe, and Colin works closely with Adobe. However, aside from suggesting the overall topic, Adobe has had no editorial control over its content; it’s all from candy-addicted perspective.

Filmtools
Filmmakers go-to destination for pre-production, production & post production equipment!
Shop Now