We’re going through our book Creating Motion Graphics with After Effects 5th Edition (CMG5) and pulling out a few “hidden gems” from each chapter. These will include essential advice for new users, plus timesaving tips that experienced users may not be aware of.
A compound effect is one that looks at a second layer to decide exactly how to treat the layer it is applied to. Examples of these vary from Compound Blur and its brethren, which can selectively blur one layer based on the varying luminance values of another, to Texturize, which is great for simulating those embossed station identity bugs most networks use these days, among other things.
Before we get into hidden gems on using Compound Effects, first we need to understand what is going on underneath the hood:
Rendering Order
When an effect is applied to the movie, and that effect is told to refer to a second “map” layer for data, it’s capable of seeing the modifying layer only at its “source” – before any masks, effects, or transformations have been applied to it. In other words, it uses the modifying layer as it would appear in its own Layer panel with View set to None – not in the Comp panel. Hence, no scaling or positioning of the logo layer is taken into account by the compound effect:
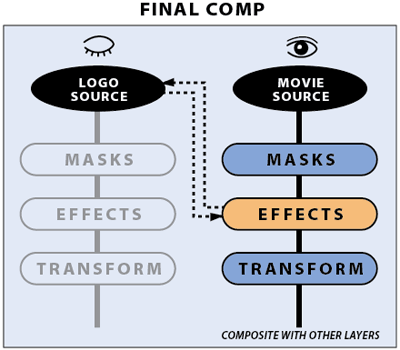
When a compound effect, such as Texturize, is applied to a layer, the effect looks at just the source of the modifying layer and ignores any masks, effects, or transformations that may be applied to the “map” layer.
The trick, then, is to present the effect module with a modifying layer that’s the same size (or at least the same aspect ratio) as the layer being effected, and with any attributes already applied to the modifying layer. You do that by preparing the map in a precomp that is the same size as the layer being effected. You can position, scale, and otherwise transform – as well as animate, mask and effect – the modifying source in this precomp, and the result will then be applied faithfully by the compound effect in the main comp:
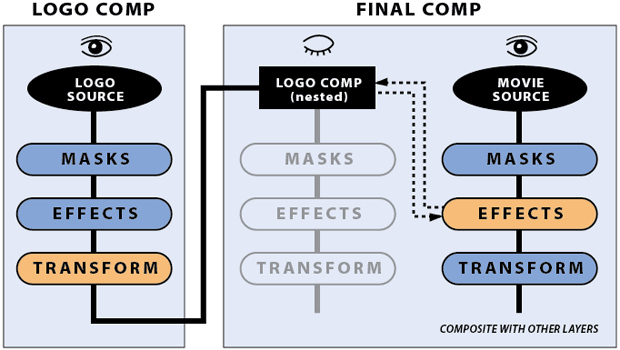
Apply any transformations (for example, scale and position the logo bug) to the modifying layer in its own precomp, and nest this into the comp with the layer that gets the compound effect (Texturize in this example). Now the effect will take the transformations applied to the bug into account when it processes.
If you have trouble following that explanation, perhaps the following movie will be more clear (this was included in our post last week of free movies we’ve created about effects):
Why Isn’t It Working?
If you’re having problems getting a compound effect to work as you expect, here is a summary of the most common reasons compound effects don’t seem to work initially:
- The modifier layer has been left at None, or it defaults to using itself; set the Layer popup to the desired layer.
- The modifier or map layer is not the same size as the layer the effect is being applied to, so the aspect ratio is being distorted. Solution: Place the map in a precomp the same size as the layer to be effected, and use this precomp in place of the original map layer in the Effect Controls.
- The modifier layer has effects or animation that is being ignored by the compound effect. Remember that the compound effect takes the map at its source before mask, effects and transform. Precompose the map layer, being sure to check the Move All Attributes option.
- The precomp has a white background color, but the precomp’s background color is always considered as “black” (zero alpha) by a compound effect. If this is causing a problem, use a white Solid or Shape layer as your background in the precomp, rather than relying on the Background Color.
A Better Compound Blur
Compound Blur can look a bit smudged and boxy. Far nicer-looking compound blurs include the SmoothKit > Gaussian effect from RE:Vision Effects, as well as Adobe’s own Lens Blur (After Effects CS5) or Camera Lens Blur (After Effects CS5.5). RE:Vision Gaussian is smoother; Lens Blur is more realistic. Note that you may need to use double or more the Blur Amount in Lens Blur than you did in Compound Blur for the same result.


Compound Blur (top) is a bit smooshy; Camera Lens Blur (above) yields a better simulation of an actual camera, providing a “squinty” sort of look.
(If you want to learn more about the new Camera Lens Blur effect aside from its compound blur applications, a movie on it was included as part of our After Effects CS.5 review – it’s the last video on this page.)
Edge Artifacts
The Displacement Map effect can cause pixels to be pulled away from the edges of the original layer, potentially exposing other layers or the comp’s Background Color underneath, as seen below. Enabling Wrap Pixels Around can help, but may still result in unsightly edge artifacts. If you can’t rely on the edges being cropped off by a monitor’s bezel, you might want to scale up the result slightly to let the composition boundaries crop off the undesired bits.
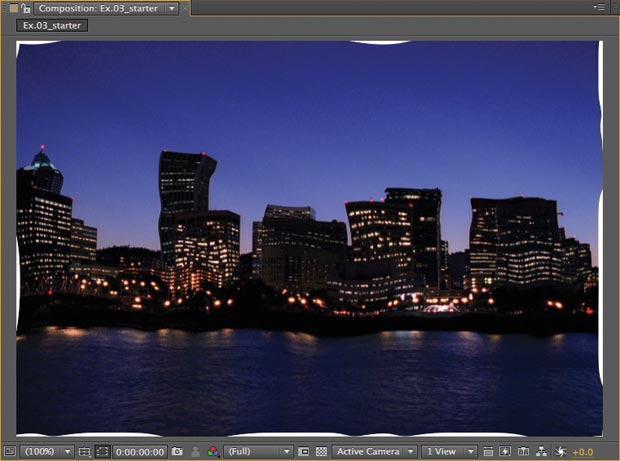
Footage courtesy Artbeats/Establishments – Urban
Smoother is Often Better
A map layer that has sharp, high-contrast transitions can sometimes cause aliasing-type artifacts as a compound effect switches its processing suddenly at those transitions. It is often helpful to add a slight blur to the map layer – in a precomp, of course (as compound effects don’t look at effects applied to map layers in the same comp).
In addition to the tips in Chapter 24 of CMG5, we also wrote an article for Artbeats.com on using the Displacement Map effect to make text appear to be projected onto the contours present in a video clip.
Trish and Chris Meyer share seventeen-plus years of real-world film and video production experience inside their now-classic book Creating Motion Graphics with After Effects (CMG).
The 5th edition has been thoroughly revised to reflect the new features introduced in both After Effects CS4 and CS5 (click here for free bonus videos of features introduced in CS5.5). New chapters cover the new Roto Brush feature, as well as mocha and mocha shape. The 3D section has been expanded to include working with 3D effects such as Digieffects FreeForm plus workflows including Adobe Repouss©, Vanishing Point Exchange, and 3D model import using Adobe Photoshop Extended. The print version is also accompanied by a DVD that contains project files (CS5-only) and source materials for all the techniques demonstrated in the book, as well as over 160 pages of bonus chapters on subjects such as expressions, scripting, and effects.
We will be pulling a few “hidden gems” out of each chapter to share on ProVideoCoalition.com roughly every week. These will give you a taste for the multitude of time-saving tips, not-obvious features, little gotchas, and other insider knowledge you will find in CMG.
The content contained in Creating Motion Graphics with After Effects – as well as the CMG Blogs and CMG Keyframes posts on ProVideoCoalition – are copyright Crish Design, except where otherwise attributed.

Filmtools
Filmmakers go-to destination for pre-production, production & post production equipment!
Shop Now