We’re going through our book Creating Motion Graphics with After Effects 5th Edition (CMG5) and pulling out a few “hidden gems” from each chapter. These will include essential advice for new users, plus timesaving tips that experienced users may not be aware of.
In this final chapter on motion tracking, we explore using the planer tracking system mocha from Imagineer Systems, which is bundled free with After Effects. After walking through the steps required to perform a typical corner pin track, we turn our attention to creating “shapes” (mattes defined using spline tools) that are linked to tracks, and bring the result into After Effects to use for targeted processing.
As mocha is a stand-along application with its own very different user interface, those unfamiliar with mocha can find it intimidating. However, we feel working through the simple exercises we created for you in CMG5 will get you a good distance down the road to feeling more comfortable with it. Imagineer also has a lot of tutorials available on their web site.
Editing Values
One of the differences in mocha’s user interface that seems to throw off many new users is the way you scrub values. Rather than dragging left and right, you drag in a circle as if turning a dial. If this drives you crazy, open Preferences > System and change the setting under UI Look and Feel from Rotational to Linear Controls. However, once you get used to it, it’s great to be able to dial in any value you need without dragging your mouse all the way across your desk.
Speaking of user interface, it’s worth noting that mocha’s user interface was overhauled for After Effects CS5.5 (the screen shots in CMG5 – and shown in this post – are from the CS5 version). The biggest change is that the View Controls – which used to appear along the right side of the mocha application window – are now accessed through a series of small icons near the top of the window. When in doubt, hover your cursor over the icons and read the tooltip that appears.
 Project Information
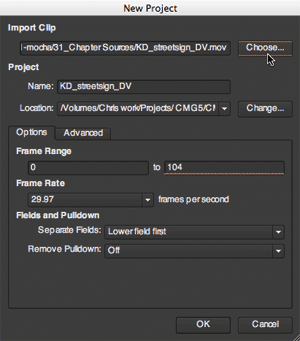
A project in mocha is based around the clip you want to track or stabilize. mocha will fill out the Project information based on the information it can derive from the clip you choose. It is worth double-checking the frame rate (especially for image sequences) and pixel aspect ratio (we tend to disagree with mocha’s choices for many formats such as DV; go here and look under the subhead The Real PARs for the correct values for common video formats). Fortunately, you can usually change both after you initially create a project.
The one area you can’t change after the initial project setup dialog is how fields are separated. Become familiar with your footage before you bring a clip into mocha, and if appropriate separate fields at this stage. (If you’re not fluent with the concept of interlacing and separating fields, read up on the subject here.)
Excluding Regions
Spline shapes may be used to define areas you don’t want mocha to track, such as a person walking in front of a sign, a hand that moves in front of a data screen, et cetera. If you draw multiple splines on the same layer, the area where they overlap will be excluded. It is also common to draw exclusion splines on a separate layer above the layer you wish to track; disable the Tracking switch – the gear icon – for these exclusion layers. In either case, the splines may (and should) be animated to follow moving objects.
Perfecting a Track
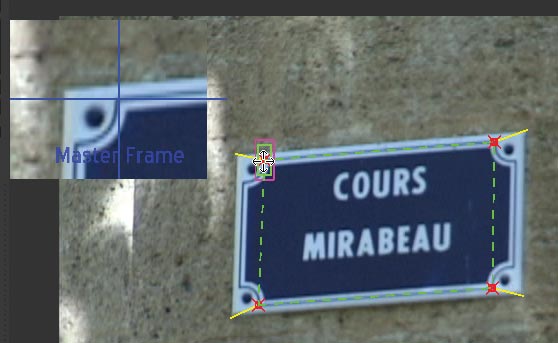
After you’ve performed a track with mocha, save your project, and take a trip into the AdjustTrack module by selecting the AdjustTrack tab in the Parameters section along the bottom. You will see four red crosses at the corners of your Surface rectangle. Drag these to nearby, sharp reference areas in the underlying footage, such as the corners of the blue outline stroke in the original sign. mocha will use these points as references to help you adjust the track. Make sure View Controls > Zoom Window is visible, and a helpful magnified view will appear to show you in detail what your reference looks like:
Choose one of the corners, and slowly drag the time indicator while watching the Current Frame display, comparing it with the Master Frame:
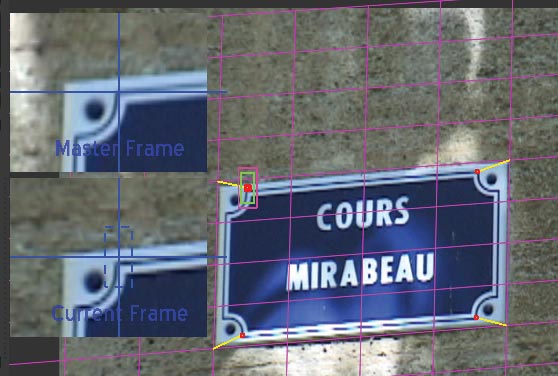
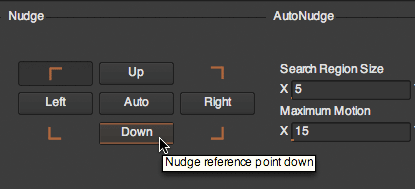
If you detect drift (as shown in the figure above), stop and click the Auto button in the center of the AdjustTrack > Nudge section. This will create a keyframe in the timeline. If this does not properly re-center your reference point, you can use the Up/Right/Down/Left nudge buttons or manually drag the reference point as needed:
Variable Width Feathering
One of the big attractions to using mocha with the After Effects mocha shape plug-in – also included free in After Effects CS5 and CS5.5 – is the ability to define a different amount of edge feathering for every vertex of the shape path you draw.
Rather than being centered around a spline, the feather happens between inner and outer paths, which is defined by pairs of vertices. This is where you need to be very aware of which tool you have selected. The normal “pick” (selection) tool is fine for selecting points to operate on; the tool with the I at its base is for moving the inner points; the tool with an E at its base for moving the “edge” (outer) points, as shown below; the tool with a B at its base is for moving both inner and outer points together:
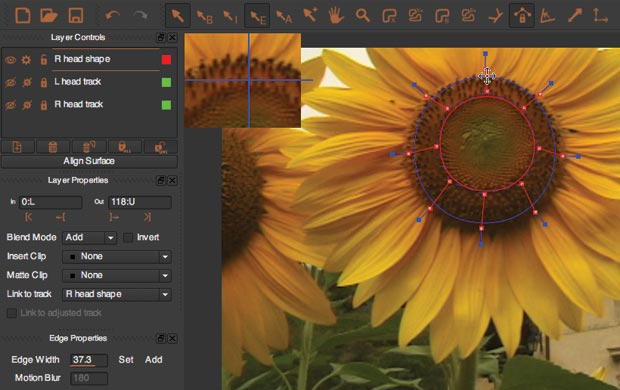
To set or offset the width for multiple points at once, select them (you can right-click a single point and choose an option to select all points), then use the Edge Properties panel (in the lower left corner of the figure above). Set an Edge Width value, then either click Set for all vertices to get this feather width, or Add to offset the current values of all selected vertex pairs. Note that after you’ve added this feather width, you can still select and move the inner or edge points individually or as a group.
Trish and Chris Meyer share seventeen-plus years of real-world film and video production experience inside their now-classic book Creating Motion Graphics with After Effects (CMG).
The 5th edition has been thoroughly revised to reflect the new features introduced in both After Effects CS4 and CS5 (click here for free bonus videos of features introduced in CS5.5). New chapters cover the new Roto Brush feature, as well as mocha and mocha shape. The 3D section has been expanded to include working with 3D effects such as Digieffects FreeForm plus workflows including Adobe Repouss©, Vanishing Point Exchange, and 3D model import using Adobe Photoshop Extended. The print version is also accompanied by a DVD that contains project files (CS5-only) and source materials for all the techniques demonstrated in the book, as well as over 160 pages of bonus chapters on subjects such as expressions, scripting, and effects.
We will be pulling a few “hidden gems” out of each chapter to share on ProVideoCoalition.com roughly every week. These will give you a taste for the multitude of time-saving tips, not-obvious features, little gotchas, and other insider knowledge you will find in CMG.
The content contained in Creating Motion Graphics with After Effects – as well as the CMG Blogs and CMG Keyframes posts on ProVideoCoalition – are copyright Crish Design, except where otherwise attributed.

Filmtools
Filmmakers go-to destination for pre-production, production & post production equipment!
Shop Now