We’re going through our book Creating Motion Graphics with After Effects 5th Edition (CMG5) and pulling out a few “hidden gems” from each chapter. These will include essential advice for new users, plus timesaving tips that experienced users may not be aware of.
The Roto Brush is a relatively new tool introduced in After Effects CS5 that helps automate creating a matte to separate a foreground from a background, such as isolating an actor from the room around him. To accomplish this, you draw brush strokes to teach After Effects the difference between the two. After Effects uses this information in conjunction with edge detection, motion tracking, and optical flow technologies to follow the changes in foreground and background over time.
Roto Brush is not perfect, but it’s a lot easier than hand drawing and animating precise mask shapes (plus you can use the Paint tools – the subject of the previous chapter – as well as masking to help clean up any problem areas that the automated Roto Brush may have misinterpreted). In this chapter in the Creating Motion Graphics book, we guide you through a preferred workflow for achieving good results with Roto Brush. Here are a few tips, hidden gems, and general advice from that chapter.
Painting Inside the Lines
We’ve seen many users start off using Roto Brush as they might use normal paint tools: They open their clip in the Layer panel, select the Roto Brush tool, set a very small brush size, and start carefully drawing along the edge of the object they wish to cut out. Not only is this unnecessarily fiddly, it runs the risk of accidentally including portions of the background as part of your foreground definition.
Instead, the preferred workflow is to start with a larger brush size (the Roto Brush may be interactively resized the same as the normal Brush tool, demonstrated in the previous Hidden Gems), and make a large stroke through the area you want to keep, as shown below left. This will give Roto Brush slightly better information to work with in defining the foreground, plus help save you from premature carpal tunnel syndrome! You may then optionally hold Option on Mac (Alt on Windows) and draw a broad stroke defining the background as shown below right; this is helpful if Roto Brush has difficulty finding the edge between foreground and background.
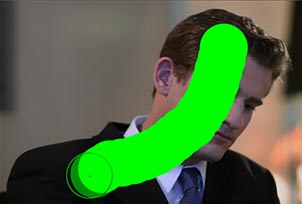
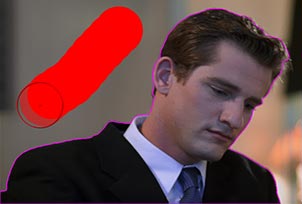
Footage courtesy Artbeats/Business Executives.
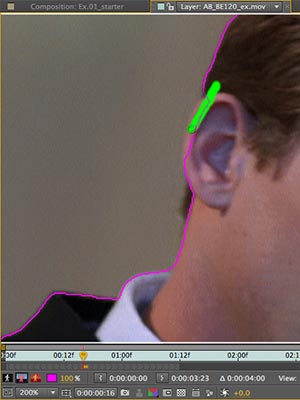 Once you’ve made these broad definitions, then you go down to a smaller brush size and paint in smaller details, such as the area around the man’s ear in the image at right.
When creating these foreground and background strokes, it is very important that you don’t accidentally cross over the edge between the foreground and background, as this will confuse Roto Brush’s internal engine that is trying to find these edges automatically based on the information you’ve given it. If you accidentally cross over with, say, a foreground stroke, don’t make a background stroke to correct it (that will just make things worse); undo and then re-draw your originally intended stroke.
In general, don’t worry about giving Roto Brush too much information; worry about giving it wrong information.
Propagate Before You Leap
The second most common mistake we see with Roto Brush is that after creating an initial “base” frame, users then immediately start stepping through adjacent frames and making corrective strokes. After potentially finding themselves having to make corrections on nearly every frame, many give up, declaring that Roto Brush doesn’t work.
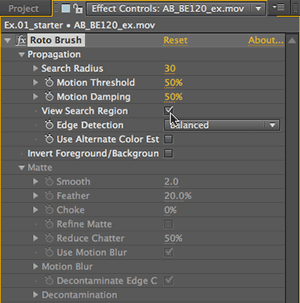 In reality, though, creating the base frame only gives Roto Brush part of the information it needs – your next step is telling Roto Brush how to propagate this information outward from the base frame before you make additional corrective strokes. This is where the Propagation section of the Roto Brush effect (pictured at right) comes in: Step about 2-3 frames away from your base frame, and adjust these parameters to minimize any tracking errors you see. If nothing else, try out the different choices for the Edge Detection popup: The Favor Current Edges option puts an emphasis on edges found in the current frame in isolation, which may be more accurate if the image changes a lot from frame to frame. The Favor Predicted Edges option tries to predict where the edge should be based on the location of those edges in adjacent frames (which helps when the footage is noisy, or the foreground and background are very similar). Balanced considers both equally.
Focused RAM Preview
Often while working on a rotoscoping type of job, you don’t need to preview the entire clip to check your work; you’re usually focused on a particular set of frames around the Current Time Indicator. Well, there’s a app modifier key for that: Press Option (Alt) when initiating a RAM Preview, and just a few frames up to and including the current frame will cache and play. The number of frames defaults to 5; this may be changed in Preferences > Previews > Alternate RAM Preview.
This command behaves slightly differently under some circumstances with Roto Brush: If the current frame is within a backward-propagating Roto Brush span, and the Layer panel View menu is set to Roto Brush, then invoking this command while in the Layer panel will preview the specified number of frames including and after the current frame.
Deleting Strokes and Spans
If you have created multiple base frames and corresponding span, and are unhappy with one of them, right-click on it and select Remove Span – this deletes the span, but leaves the strokes. Note that if you have only one Base frame, Remove Span will be grayed out. To delete all strokes on the frame you are viewing in the Layer panel, press Command+A (Control+A) to select all, then press Delete. To delete a specific stroke, type PP to reveal the strokes in the Timeline.
Lock Segmentation
Roto Brush can take awhile to calculate – especially if you jump to a frame that’s some distance from a base frame, as it must track and re-calculate the Segmentation Boundary for every frame in-between.
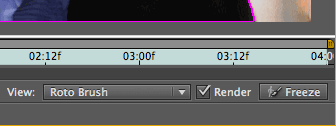 Good news: You can click the Freeze button in the lower right corner of the Layer panel (shown here) to lock the Segmentation Boundary in place, save it with your project, and prevent time-consuming recalculations later. Just remember to unfreeze if you want to make a correction to the segmentation!
Trish and Chris Meyer share seventeen-plus years of real-world film and video production experience inside their now-classic book Creating Motion Graphics with After Effects (CMG).
The 5th edition has been thoroughly revised to reflect the new features introduced in both After Effects CS4 and CS5 (click here for free bonus videos of features introduced in CS5.5). New chapters cover the new Roto Brush feature, as well as mocha and mocha shape. The 3D section has been expanded to include working with 3D effects such as Digieffects FreeForm plus workflows including Adobe Repouss©, Vanishing Point Exchange, and 3D model import using Adobe Photoshop Extended. The print version is also accompanied by a DVD that contains project files (CS5-only) and source materials for all the techniques demonstrated in the book, as well as over 160 pages of bonus chapters on subjects such as expressions, scripting, and effects.
We will be pulling a few “hidden gems” out of each chapter to share on ProVideoCoalition.com roughly every week. These will give you a taste for the multitude of time-saving tips, not-obvious features, little gotchas, and other insider knowledge you will find in CMG.
The content contained in Creating Motion Graphics with After Effects – as well as the CMG Blogs and CMG Keyframes posts on ProVideoCoalition – are copyright Crish Design, except where otherwise attributed.

Filmtools
Filmmakers go-to destination for pre-production, production & post production equipment!
Shop Now


