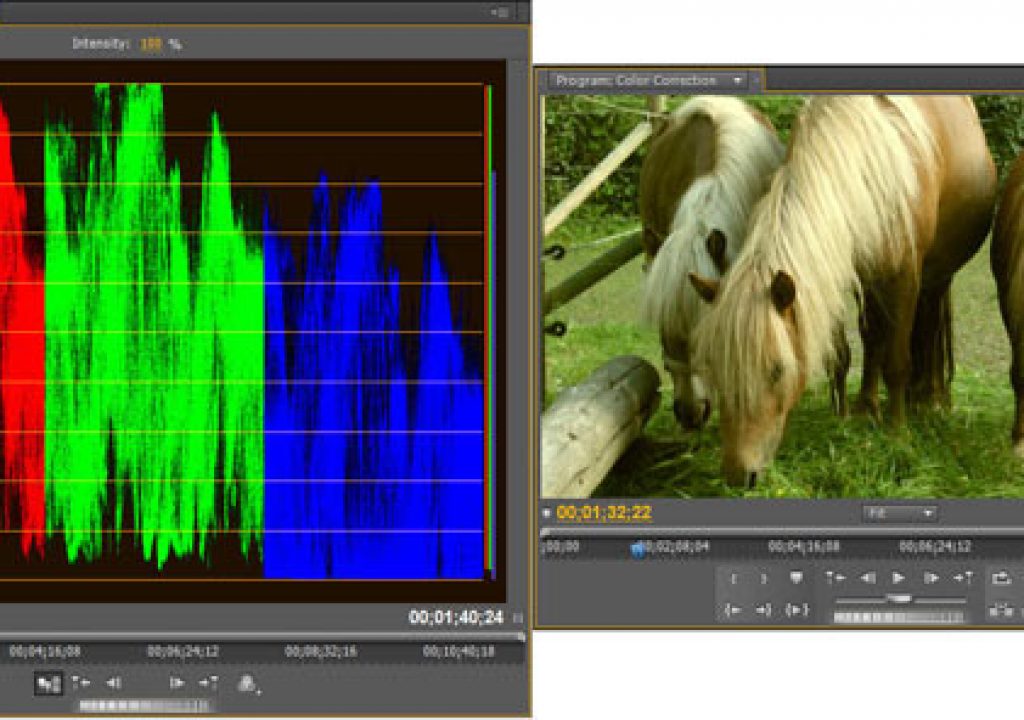
Color correction falls into three categories: primary, secondary and “looks.” Primary color correction changes all pixels in a clip’s frame. Secondary corrections are limited to a region within the frame; be it an object, a person’s face, or a tonal or color range like the sky. Looks are moods you try to set using color. For example: harsh and cold or soft and warm.
Secondary color correction and looks are methods you might use on occasion and have extra levels of complexity. Primary color correction, the focus of this tutorial, should be used on virtually all video projects and is easier to do than you might think.
One reason some editors take a pass on color correction in Premiere Pro, is that they are overwhelmed by the product’s plethora of color correction video effects. The other is what some consider to be incomprehensible scopes. Fortunately, both are non-issues.
Premiere Pro has about 30 color correction effects. But you can accomplish all your primary color correction tasks in Premiere Pro with, at most, only two video effects: the Fast Color Corrector and RGB Curves.
You don’t need to work with most other Premiere Pro color correction effects because they are subsets of the two you will work with, have automated features, or don’t work well. A couple video effects do have more features than the two we’re using and are used for secondary color correction. But that is not the focus of this tutorial.
Working with the YC Waveform scope
To check your work as you make color correction adjustments, you rely on two or three scopes. Yes, you must use scopes, but they are intuitive and helpful. Really.
The Premiere Pro scope workhorse is the YC Waveform. You use it as you perform the first of two primary color correction steps: adjusting tonality – brightness and contrast. You use one or two other scopes – the Vectorscope and possibly the RGB Parade scope – when you perform the second primary color correction step: adjusting color (aka chroma or hue).
Your goal, when adjusting tonality, is to give your clips a full breadth of contrast from deep black to bright white. Exceptions to this goal include clips shot in fog or in low-light.
To ensure your clips have a full contrast ratio, you need to use the YC Waveform scope. To view the YC Waveform scope (or any of the other three scopes that come with Premiere Pro) choose Window > Reference Monitor to open that monitor in a floating panel, as shown below. I prefer this approach over choosing Workspace > Color Correction because that latter method opens the Reference Monitor in a frame. It’s easier to resize and position a floating panel.
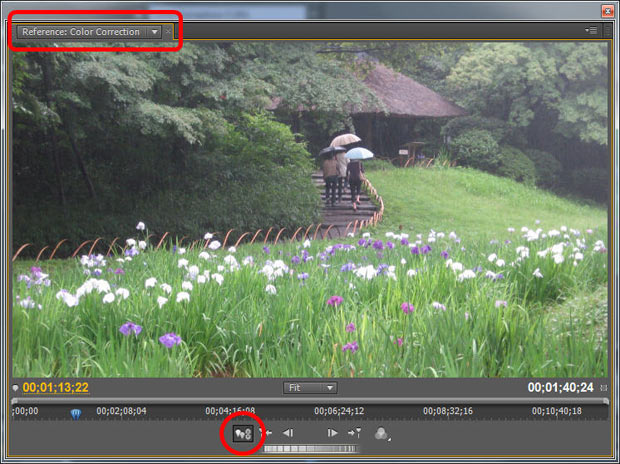
The Reference Monitor with the Gang to Program Monitor button selected.
By default, the first time you open the Reference Monitor, it’s “ganged” to the Program Monitor. That is, it displays what’s in the Program Monitor, which is what you want. If it’s not ganged, click the Gang to Program Monitor button at the bottom of the Reference Monitor, as seen above.
Display the YC Waveform by opening the Reference Monitor menu (shown below) and choosing YC Waveform. The YC Waveform scope displays Y (luma) and C (chroma). Uncheck the Setup (7.5 IRE) and Chroma checkboxes. Neither are needed for tonality adjustments. Note: the Intensity numeric value refers only to the brightness of the scope display.
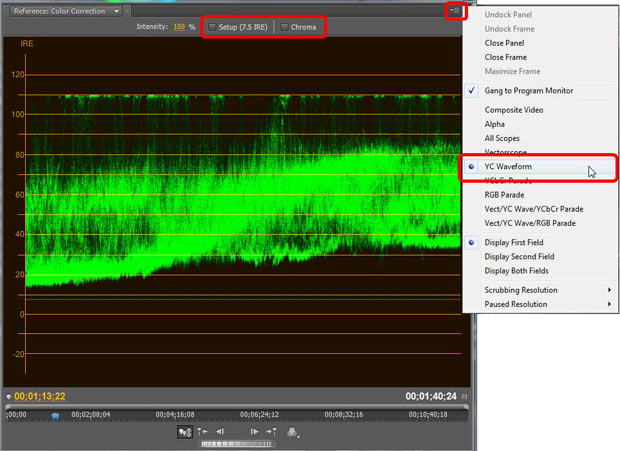
Open the YC Waveform scope via the Reference Monitor menu. Uncheck Setup (7.5 IRE) and Chroma.
The YC Waveform scope displays luma values from left to right across your clip. Bright areas are at the top of the graph and dark at the bottom. Your goal, when adjusting luma is to have the darkest areas in the clip rest on the 0 IRE (Institute of Radio Engineers) line and the brightest areas just reach up to the 100 IRE line (.3 V and 1.0 V if you’re working in PAL).
Any pixels on or below the 0 IRE line will display as solid black with no detail. Any pixels on or above the 100 IRE line will be pure white and will also have no detail.
Using levels-style controls
If you’ve worked with the Levels effect in Photoshop then you might be tempted to use the Levels effect in Premiere Pro. Don’t. It doesn’t work properly. Instead, apply the Fast Color Corrector to a clip. Scroll down past the color wheel (you’ll use it later) until you see the Input Levels and Output Levels sliders, shown here:
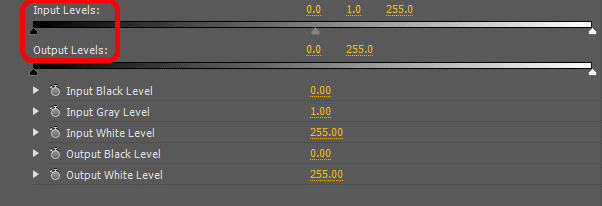
The levels-style slider controls in the Fast Color Corrector video effect.
First, adjust the black levels. If the waveform “trace” is above the 0 IRE line (the most likely scenario, as is the case in the figure below), drag the Input Levels black slider control to the right to pull the trace down until it just touches that line. If the trace starts out below the 0 IRE line, drag the Output Levels black slider control to the right to lift the bottom of the trace up to that line.
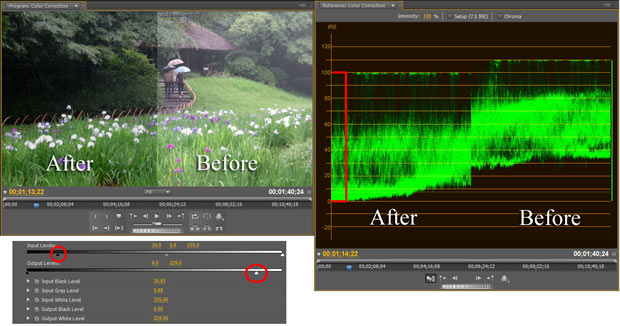
A split-screen view, showing how the YC Waveform trace should look after making tonality adjustments using the levels-style controls in the Fast Color Corrector. Note that the bottom of the trace just touches the 0 IRE line and the top touches the 100 IRE line.
Second, adjust the white levels. If the trace is above the 100 IRE line (the clip is too bright, as in the figure above), drag the Output Levels white slider control to the left to pull the trace down until the top of the trace just touches the 100 IRE line. If the trace starts out below the 100 IRE line, drag the Input Levels white slider control to the left to lift the trace up o that line.
Third, adjust the gray (aka gamma or midtone) levels. This final step is less exacting. Move the Input Levels gray control slider to the right to brighten the clip or to the left to darken it. Your call. The figure above shows a split-screen view of the before and after images, levels slider settings, and YC Waveform display.
Using curves controls
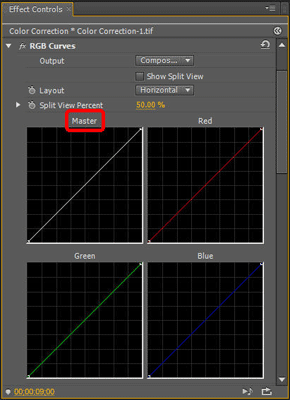 Using curves to control tonality is a little more complex. The upside is that the RGB Curves effect gives you more control over contrast. But adjusting points in the RGB Curves graphs is an inexact process (versus the numeric readout you get below the levels-style controls in the Fast Color Corrector) and you can’t keyframe values. So, if you need to change tonality over time in a clip, such as when following action from sunlight to shade, you can’t do that with RGB Curves.
The RGB Curves video effect. Make tonality adjustments using only the Master graph.
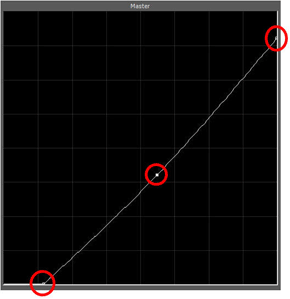 Add RGB Curves to a clip, as seen in the figure at left. To adjust tonality you work only in the effect’s Master graph. To lift blacks, drag up the point in the bottom left corner of the graph. To pull blacks down drag that point to the right. To drag whites down, drag the point in the upper right corner of the graph down. To lift whites, drag that point to the left. Finally, to adjust midtones, click in the center of the graph line to add a point and drag it up to brighten the clip and down to darken it.
The RGB Curves video effect Master graph with the blacks and whites pulled down. Add a point near the center of the curve to adjust midtones.
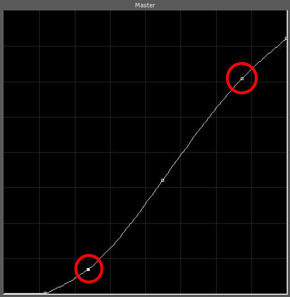 To further refine contrast, something you can’t do in the Fast Color Corrector, add a point near the bottom of the curve and another near the top (shown at left). Drag the point at the bottom down slightly. Drag the point near the top up slightly. That creates a slightly steeper curve between those two points, increasing the contrast in that zone of luminance.
Adding two more points on the RGB Curves Master graph and then slightly pulling down darker areas and lifting brighter areas can enhance contrast.
next page: working with scopes; adjusting color channel curves; taking a spin around the color wheel
Checking out the Vectorscope
Many times fixing tonality takes care of color issues. But if your clips still have a color cast, you can use the Fast Color Corrector color wheel or the RGB Curves graphs to fix it.
First you need to determine the nature of any color cast. To do that, open the Reference Monitor menu and choose Vectorscope. To help you get a handle on how the Vectorscope works, take a look at the color wheel in the Fast Color Corrector effect, shown below:
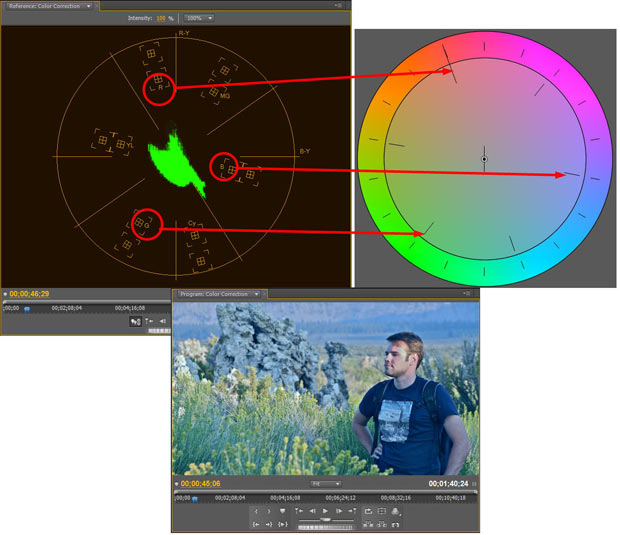
Vectorscope hue angles match those of the Fast Color Corrector’s color wheel. This Vectorscope’s trace is angled toward blue, representing the bluish cast in the clip.
The Vectorscope displays hue and saturation. The trace shows hue values for the entire clip. The angle from the center matches the colors around the color wheel. The little boxes in the Vectorscope are for the primary colors (red, green, blue) and secondary colors (cyan, magenta, yellow). The distance the trace graph is from the center of the scope denotes saturation. Values near the center are desaturated (white, gray or black). The farther from the center, the more saturated, or intense, the hue.
Sometimes simply using the Vectorscope to display hue within the entire frame of a clip is enough to see a color cast. The figure above, for example, has a blue cast and the Vectorscope trace is primarily between blue and cyan.
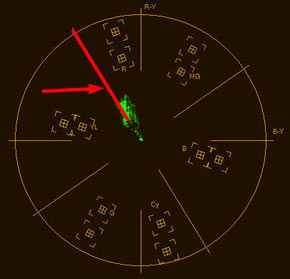 More times than not, determining the nature of a color cast requires looking at a small area of a clip that you know should be a certain color, usually gray or skin tone. To do that, add the Crop video effect to a clip and use it to display only an area of a known color.
If the cropped area is gray, its trace should be centered in the Vectorscope. If it’s skin tone (no matter the race), the trace should be along the line that runs between the red and yellow boxes – sometimes referred to as the “skin tone line” (shown at right).
Using the color wheel
To make color adjustments, use the Fast Color Corrector’s color wheel. To fix a color cast, drag the center point of the wheel in the direction away from the color cast, as can be seen below. If you are using a gray area within your clip as a reference and your clip has a bluish cast (as in the figure below), drag the center point away from the blue toward yellow/red until the Vectorscope trace moves to the center – meaning the area that is supposed to be gray is now, in fact, gray. If the skin tone is slightly left or right of the skin tone line, you can rotate the color wheel’s outer Hue Angle ring slightly to fix that.
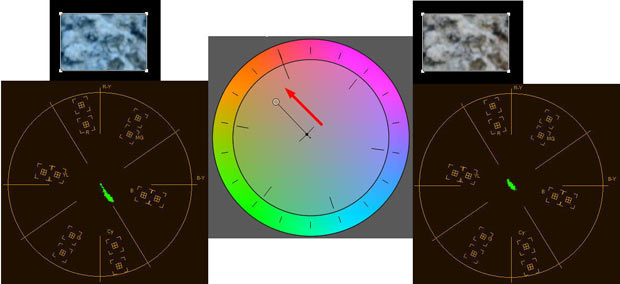
Use the Crop video effect to isolate a known color (in this case gray) and check its hue in the Vectorscope. To correct the bluish cast in this example, pull the color wheel center point away from blue until the Vectorscope trace is centered.
Examining the RGB Parade scope
Sometimes a clip’s color cast can be seriously out of whack. In that case, the color wheel might not be all that helpful. So you can turn to the RGB Curves effect and check your work with the RGB Parade scope.
Open the Reference Monitor menu and choose RGB Parade, shown below. This effect has three graphs, each of which resembles the single graph in the YC Waveform. The graphs display a combination of color intensity and luma within each color channel: red, green and blue.
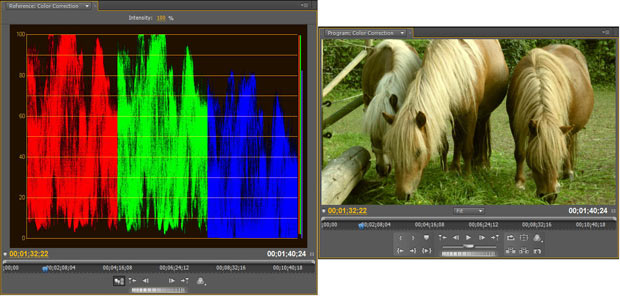
The RGB Parade scope displays a combination of color and luma for each channel. This clip has a preponderance of red and green.
Adjusting color channel curves
RGB Parade works hand-in-hand with the RGB Curves video effect. To see that in action, select a clip with a color cast and use the Crop video effect to isolate an area in a clip that should be gray (shown below). Note: in the RGB Parade scope there is no equivalent to the Vectorscope’s skin tone line.
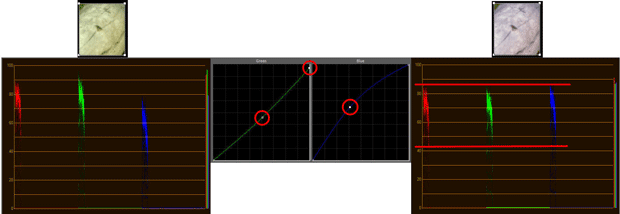
Using the Crop video effect to isolate an area of gray in this clip shows that there is slightly more green in this clip than red, and much more green than blue. Using RGB Curves to drop green a bit and bring up blue neutralizes the color cast.
Your goal, in this case, is to use the red, green and blue graphs in the RGB Curves effect to adjust the color channel values such that the three graphs in the RGB Parade scope line up left-to-right and are equal in height. The best approach is to adjust only one or two color channels. Start by adjusting the black and white points of the RGB Curves color channel graphs to have the three sets of traces in the RGB Parade be more or less equal in height. Then add a mid-point to one or two graphs and pull the graphs up or down to line them up.
There is one minor “gotcha” when working with RGB Curves. Moving the color channel curves changes both color intensity and luma. So, after making your adjustments, you should look at the YC Waveform and make any needed tonality adjustments.
Bottom line
To do basic primary color correction in Premiere Pro, all you need to use are the Fast Color Corrector effect and the YC Waveform and Vectorscope. If you want slightly more control, step up to the RGB Curves effect and the RGB Parade scope.
Jeff Sengstack is a video producer, a junior college instructor, and creates video training for lynda.com, including the tutorial Premiere Pro – Color Correction and Enhancement
FTC Disclosure: The creation of this article was partially subsidized by Adobe. Although they approved the general subject, they had no control over its editorial content.

Filmtools
Filmmakers go-to destination for pre-production, production & post production equipment!
Shop Now