In our last article, we talked about the conversion process for taking our footage from our our NLE (Avid, Premiere, FCPX), opening it in DaVinci Resolve, and using it as the intermediary between your NLE and your DCP creation application, as we need to get our footage into, not only, XYZ color space, but also as a JPEG 2000 sequence as well. Most DCP creation applications will do the conversion to XYZ and JPEG 2000 for you but, to be honest, you would rather have that control, as you can see from the previous article(s), there are some luminance differences between REC709 and XYZ. Now, with all that being said, many editors don’t want to go through the headache of learning Resolve for the conversion process, when they already have Adobe’s After Effects on their system. In this article, we’re going to cover the conversion process for both XYZ and JPEG 2000 in After Effects.
Before we get rolling, there is a third party effect you will need to install on your system called simply J2K from FNord, and it doesn’t matter if you’re on Mac or Windows, as the utility works on both platforms. I did a write up on it a while back on PVC that you can check out at the included link. Needless to say, when you download the plug-in (that works for both After Effects and Photoshop), you will have to install it manually, to get it going, but once you have it installed in your Plug-Ins folder, it will appear in both AE and PS.

Ok. Now that the installation of the plug-in is out of the way, we can get down to converting our footage. Keep in mind that, especially with this technique, we’re going to working with a finished, exported master from your NLE (Avid, Premiere, FCPX, Vegas, etc), and not one that was sent to After Effects (via Premiere, ProImport AE, etc). Import your clip into After Effects, and drop it into a new composition that matches your timeline. Now, here’s where we decide what 2K resolution we want to go with. Either 2K FLAT or 2K SCOPE. If you’re coming from HD, chances are you’ll be going with FLAT, so let’s use that as our point of reference for this article. Since your footage is HD and your composition, once you change its raster dimension, will be 2K, you will need to do a minor scale adjustment (5% or so), so that your image fills the frame. Hit CMD/CTL+K on the keyboard to adjust your composition size, and then select your clip and hit “S” on the keyboard, to make the scale adjustment. Alright, now we have our composition sized correctly, and we’re going to assume for the sake of argument, that your footage is already 24 frames per second, so we don’t need to be making any timing adjustments. One last thing that we’re going to need to do is to change our project’s Color Settings to 16 bits per channel, from 8 bits per channel, as that is the spec for our JPEG 2000 export.
Now, speaking of JPEG 2000, one thing that differs inside of After Effects, as opposed to inside of DaVinci Resolve, is that when you make a JPEG 2000 sequence inside of After Effects, it does NOT do the color conversion for you. We have to do that manually, which is fine, as we want to make sure that all our luminance levels are correct before exporting. The effect we’re going to use to do our conversion is the Color Profile Converter effect that can be found in the Utility category of the Effects & Presets window. Once dragged and dropped onto your clip, nothing will happen, because we need to tell the effect what color space we’re starting with, and what color space you’re going to. Since we’re working in REC709 color space, we’re going to use the HDTV (Rec. 709) 16-235 option for the Input Profile, and DCDM X’Y’Z (Gamme 2.6) 5900K (by Adobe) for the Output profile (NOTE: If you’re using the 2017.2 update to After Effects, you will choose the DCDM X’Y’Z” D60 Gamma 2.6 profile, as the before mentioned profile has, sadly, been removed). As soon as you set the output profile, you’ll immediately notice the color of your image change.
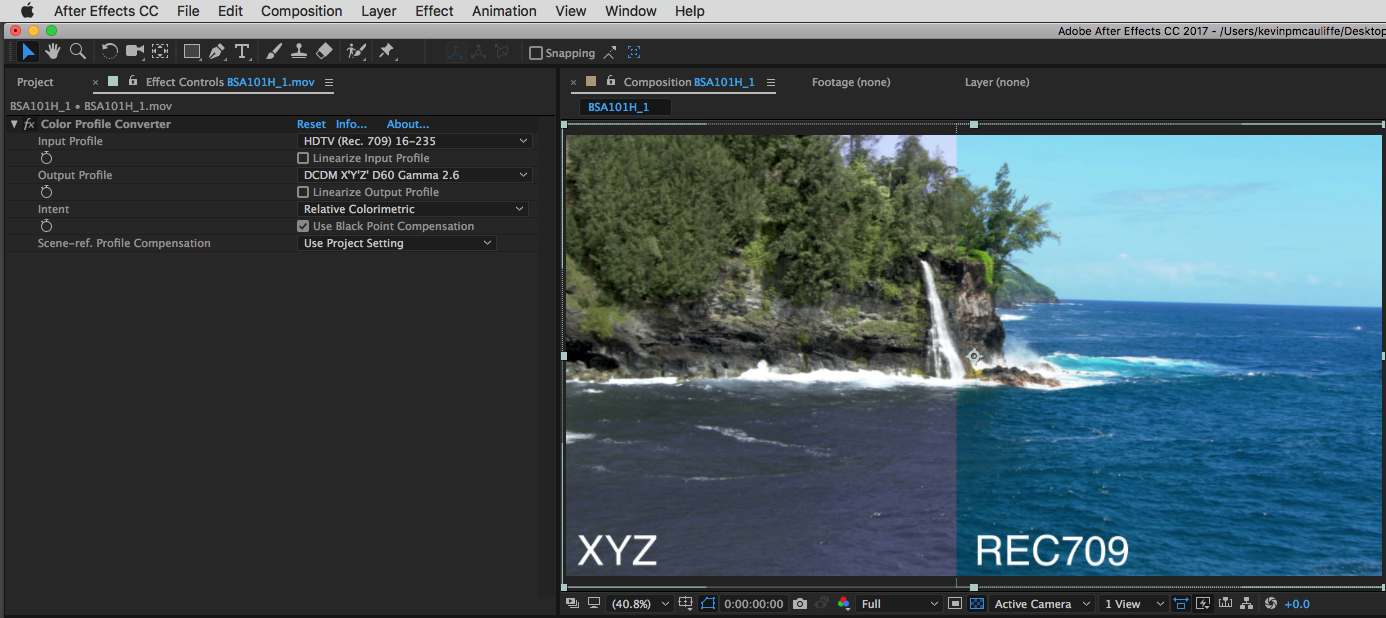
Here’s where things get interesting, and you’re going to want to set things up correctly, before moving forward, as we want to make sure that all our color and luminance values carry through into XYZ color space, so we don’t end up losing image information. First thing to do is to duplicate your layer, so you now have two layers in your composition, and on the bottom layer, you’re going to remove all the effects, so that the clip is just as it was when you originally imported it. Now, go back to the clip with the Color Profile Converter effect on it, and duplicate the effect. What we’re now going to do is convert back from XYZ to REC709, so we can see what’s going on with the image. Take the Input Profile of the second effect (called appropriately enough Color Profile Converter 2), and swap the Input and Output profile (Input is now XYZ and Output is now REC709). To see any changes that are happening in the conversion process, simply turn the layer on and off in your timeline to see the “before” (the original clip), with the one that has gone through the XYZ conversion process. This now does bring up the big question, how do you make adjustments to the clip in your timeline, so it trickles through the XYZ conversion process. Depending on your workflow, you might want to add an overall color change, or maybe add stylistic elements like Vignettes, etc, and you can do this here, by add all of these before the XYZ conversion. Leaving both Color Profile Converter effects on your clips, simply add whatever effect you want to add above both of them, and you’ll see the results, after it’s gone through the REC709 > XYZ > REC709 pipeline.
With all of this being said, there is something that I want to mention here that is very important. After Effects, and this workflow specifically, has saved my butt on more than a few occasions with final DCP’s that have been delivered to me that had some kind of an issue with them, like maybe a shot was cropped incorrectly, or there was a color issue that needed to be fixed on one shot. Most DCP creation applications will let you export your clip out as a ProRes or JPEG 2000 sequence in XYZ color space (I normally never let the DCP application do the conversion, as I would rather have control over that, so I can see exactly what is going on at all times). This workflow will let you import your clip/image sequence, drop the Color Profile Converter effect on your footage, and convert it back to REC709, so you can fix whatever needs to be fixed, and then re-export your timeline in XYZ, to rebuild your fixed DCP.
Okay, so at this point, what you need to do, assuming everything is to your liking, is to remove the Color Profile Converter effect to change your timeline from XYZ to REC709, and your timeline is now in XYZ color space with any effects you might want/need on it, so, now it’s time to do the export to a JPEG 2000 image sequence, so we can import it into our DCP creation application. You can hit CMD/CTL+M with the timeline selected, to add it to the Render Queue, and once done, it will automatically open it for your to see. Now, we’re going to assume that you do not have a preset for making JPEG 2000 files, so let’s go about creating one. The Render Settings will be left as is, unless for some reason you hate constantly adjusting your Color Depth in the composition window, and you can set it here and save it as a preset if you want but, to be honest, I’m not that lazy. So, let’s set up our Output Module. Click on whatever setting is currently selected, and you’ll be brought to the Output Module Settings Window’s main options. Change your format to JPEG 2000 sequence. Now most people, at this point, think they are done and ready to go, but we actually need to get in and adjust the Format Options for our JPEG 2000 export. The default window that opens for you to work with is pretty bare.
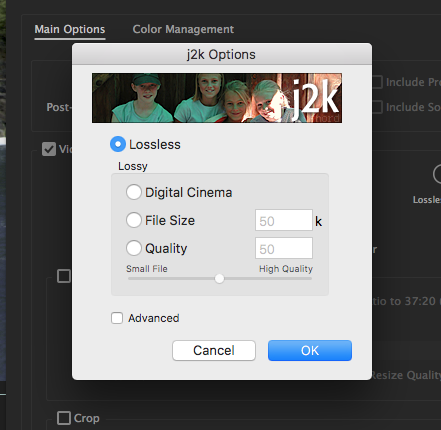
But we actually don’t want a “Lossless” export. What we want to do is to export for the “Digital Cinema” (shocker). It’s hard to tell exactly what the difference is, until you click on the “Advanced” option at the bottom of the dialogue window.
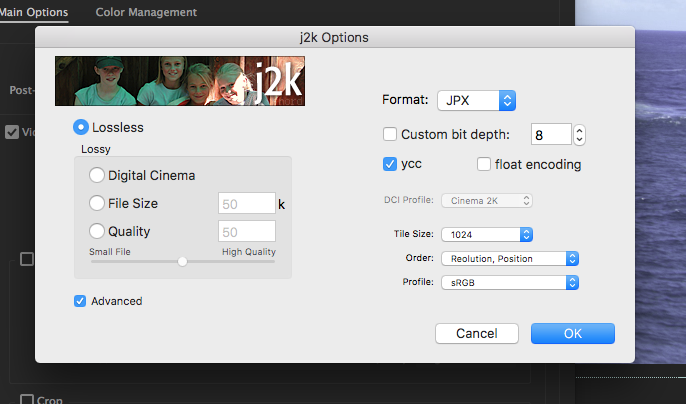
Now, with all these new options and parameters, it might be a bit confusing as to what to set your j2k output paramters to be, but believe it or not, it’s actually very simple. All you’re going to do is choose the “Digital Cinema” option, and you’re now all set to export your JPEG 2000 sequence.
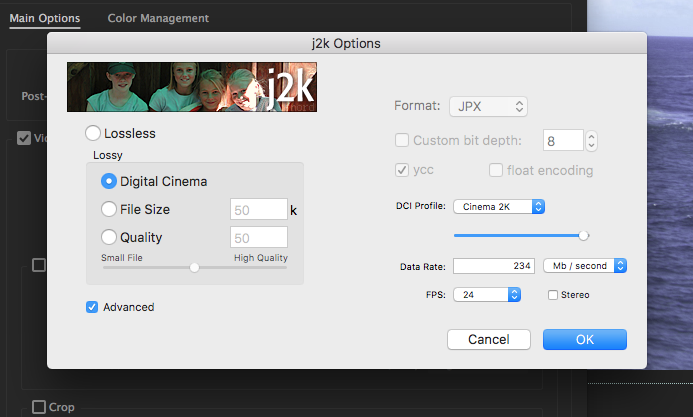
At this point, you can set the destination you want your JPEG 2000 sequence to go, and you’re all set to export.
So, this does bring up the big question, where are we going from here. Well, since I received a few e-mails from people asking about the DaVinci Resolve workflow, I actually put it in before the article I was going to do about setting up and exporting from Final Cut Pro X, for DCP creation, so we’ll be covering that topic next. Then, It’s onto Easy DCP to actually create our DCP. As you can see from this series of articles, there are a lot of steps that goes into creating a proper DCP, and the workflow for the actual DCP creation itself is no different. If you’ve just come to this article from Google, I want to make sure you have the links to the previous articles, so if you need to figure out a workflow, you can start from one of the main NLE’s (and yes, I consider Media Composer, Premiere and FCPX to be the main three applications:
For the Introduction Article, you can find it here:
https://www.provideocoalition.com/creating-dcps-getting-started/
For Media Composer editors, you can get yourself started at this link:
https://www.provideocoalition.com/creating-dcps-media-composer-setup/
Premiere Pro editors can get started with their DCP creation process here:
https://www.provideocoalition.com/creating-dcps-premiere-pro-cc-setup/
FCPX editors, don’t worry, your link will be coming shortly!
DaVinci Resolve editors, or editors wanting to use Resolve as an intermediary between their NLE and their DCP creation application, or for Resolve editors in general, you can check out that article here:
https://www.provideocoalition.com/creating-dcps-davinci-resolve-14-setup/
And before I wrap up this article, I want to remind you that once you’ve created your DCP, you’re going to want to take it to a facility with a DCP playout machine, so you can import your DCP, to check to make sure that you created the package properly. I’ve been bugged by some people telling me that you don’t need to do that, and checking things on your computer is good enough, but I have to 100% disagree. It’s always best to make sure that your DCP package is good to go, as theatres can be VERY picky and particular about how they accept DCP’s, so it’s always a good idea to make sure that things are 100% correct, before you take the time delivering (uploading) your final product! And one final thought. If you keep in mind that your NLE is for setting up your timeline (i.e. – Raster Dimensions – 2K FLAT/SCOPE, Frame Rate) and adding your XYZ LUT for color correction reference, you intermediary (After Effects/Resolve) is for REC709 > XYZ conversion, as well as JPEG 2000 export, and Easy DCP (or which every DCP creation application you happen to choose), you will have a pretty solid workflow for creating DCP’s. My biggest problem with the JPEG 2000 codec/effect that I downloaded, was that it’s not supported in the one application that it should be supported in, and that is Adobe’s Media Encoder. However, Media Encoder does have both the Wraptor DCP creation option, as well as the JPEG 2000 MXF OP1a export option, that we’ll cover in the articles about creating your actual DCP’s.

Filmtools
Filmmakers go-to destination for pre-production, production & post production equipment!
Shop Now