There are some certainties in the industry we work on, and one of them as become the yearly (or so) updates to our favorite applications and/or effects packages, and a lot has happened for a certain company, namely Boris FX, in the last few years. In this article, we’re going to be taking a look at the new release of Continuum from Boris FX, version 11 for AVX (BCC 11), and see what this year’s offering has for editors out there.
I wanted to get the introduction out of the way to talk a little bit about the journey that editors (especially Media Composer editors) have been on with Boris FX in the last few years. Effects, and the effects pipeline for us was a little disjointed. We had Boris FX on one side, offering use effects, but more importantly important workflow tools (Chroma Key, Flicker Fixer, Magic Sharp) that we need for any situation we run into. But, there was a gap. I pretty big gap when it came to things like Motion Tracking and Roto work which, to be honest, was a huge pain in MC, as the motion tracking tool was terrible, and you can only get so far with Animatte. Well, one of the biggest shockers in post production in longer than I can remember happened a couple of years ago, when Boris FX decided to purchase Imagineer Systems, makers of Mocha, and not only integrate Mocha tracking into almost every effect in the package, but they took things a huge leap ahead of that, and released a stand alone effect version of Mocha Pro for Media Composer editors to use directly in their timelines. This brought an unprecedented new workflow for Media Composer editors who, from time to time, can be very stubborn, and not want to leave their MC timelines. Now you can do all the tracking and roto work you need to do, without having to export a single frame from your timeline. So, that does beg the question, along with Mocha Tracking, what was added in BCC 10? Well, here’s a quick breakdown:
- Beauty Studio – A state-of-the-art skin retouching/digital makeup tool to make your talent look perfect.
- Title Studio – The next generation of 2D/3D titling and motion graphics tool for designing and animating at any resolution. Includes support for MAXON CINEMA 4D models.
- BCC Remover fills in missing pixels & removes objects with clone and auto-fill options.
- BCC Dropout Fixer restores tape based damaged footage with field dropouts.
- BCC Reframe reformats and stylizes “vertical cell phone footage” into 16 x 9 for broadcast.
- BCC Light Leaks adds organic & naturalistic “in-camera” light and exposure effects.
- BCC Video Glitch recreates the distressed look of compression artifacts, signal loss & corrupt digital video.
- BCC Cross Glitch mimics abrupt digital signal transitions.
- BCC Cross Melt conveys a new organic look and feel.
- BCC Lights Leak Dissolve creates a light exposure-based transition.
- BCC Cross Zoom combines zoom, glow, and dissolve into one simple transition.
Okay, let’s be honest. That’s a lot. You had the Imagineer Team working with the BCC team to get that integration working, and you had the BCC team developing these new effects. This release was a home run. So the big question is, how do you follow it up? Well, it’s simple. You take a look at an effect or effects you might not be completely happy with, and you improve on them, and that’s the main focus of the BCC 11 update. Let’s take a look at what’s new in BCC 11.
BCC PRIMATTE STUDIO
When I first heard that this was going to be the main focus of the BCC 11 release, the light bulb clicked on in my head. It makes perfect sense. As I always say, there are two things that editors hate doing more than anything. Tracking/Roto, and Chroma keying. Well, we got half that solved in BCC 10 with the Mocha integration/Mocha Pro plug-in, and now in version 11, we’re going to focus on keying. Awesome, but I wasn’t really ready to have to re-teach myself Chroma keying, but it was definitely worth it. Here’s what you need to know about Primatte Studio (PS).
It’s all about the details in PS. The details and the tools at your disposal. With PS, about 65% of your keying work can be done automatically by pressing the “Auto Analyze” button in the new HUD of the effects window.
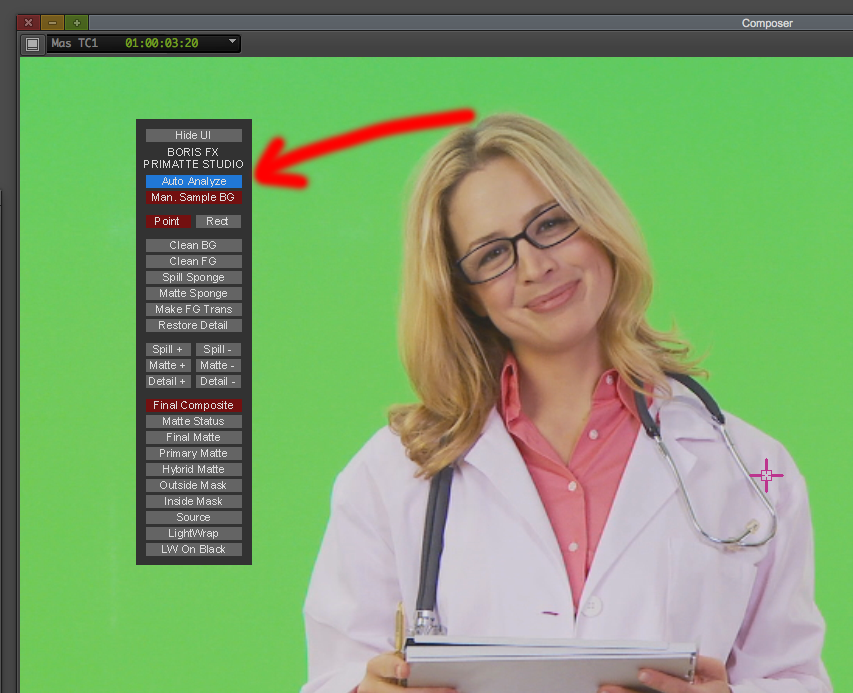
Once that’s done, you normally assume that you’re going to head over to the “Final Matte” view, where you’ll get a look at what your matte looks like. Well, not in here. We’re going to head over and check the “status” of our matte in the “Matte Status” view, and you get something that looks a little like this:
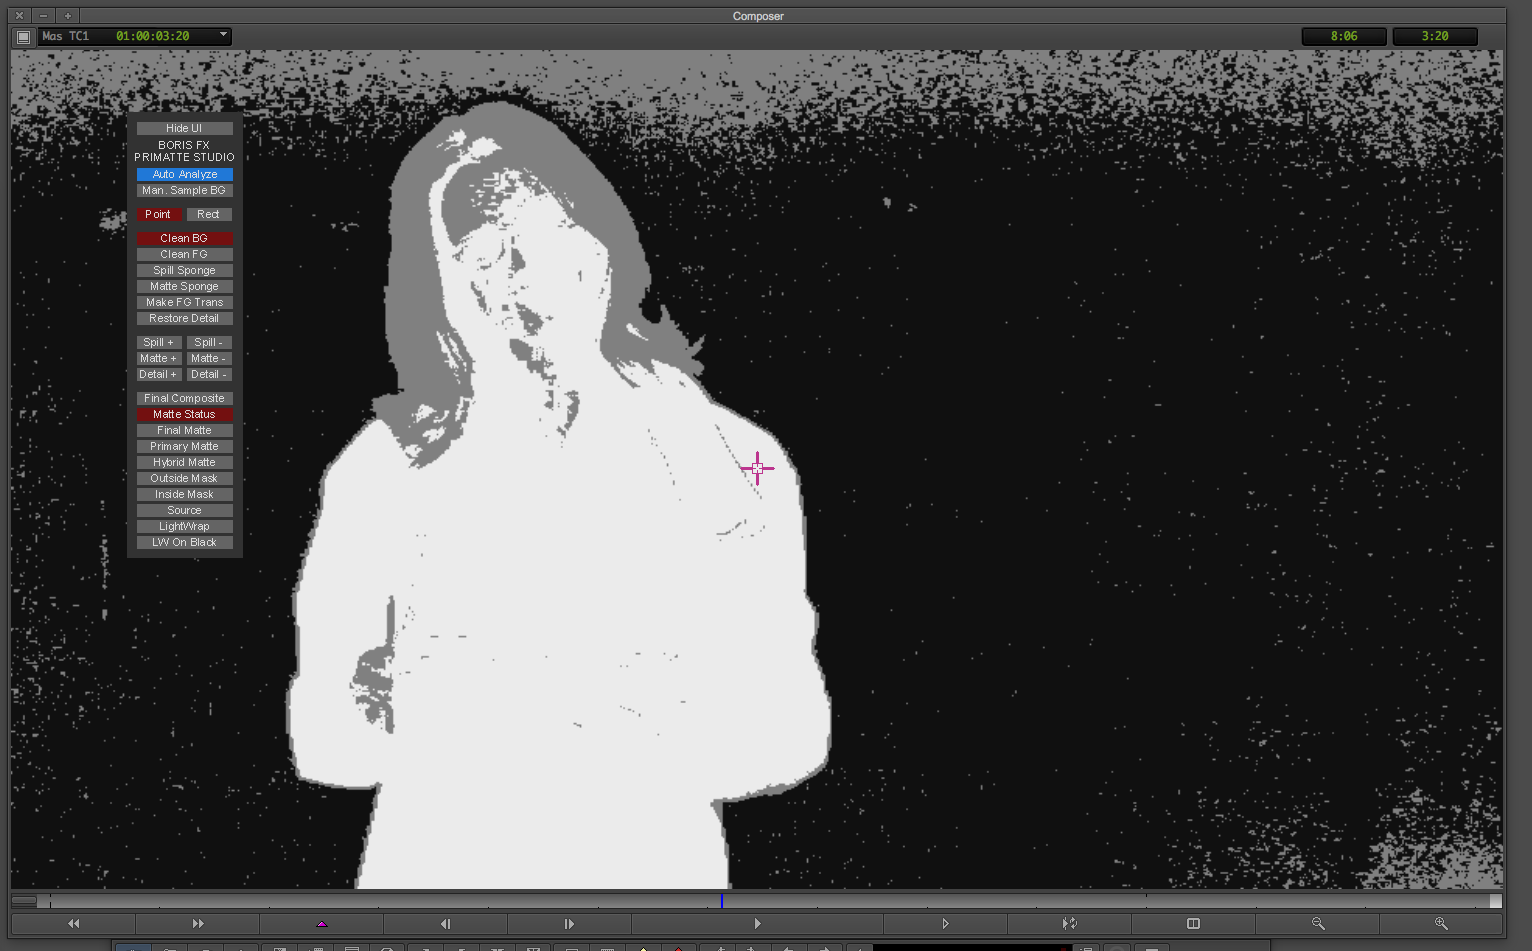
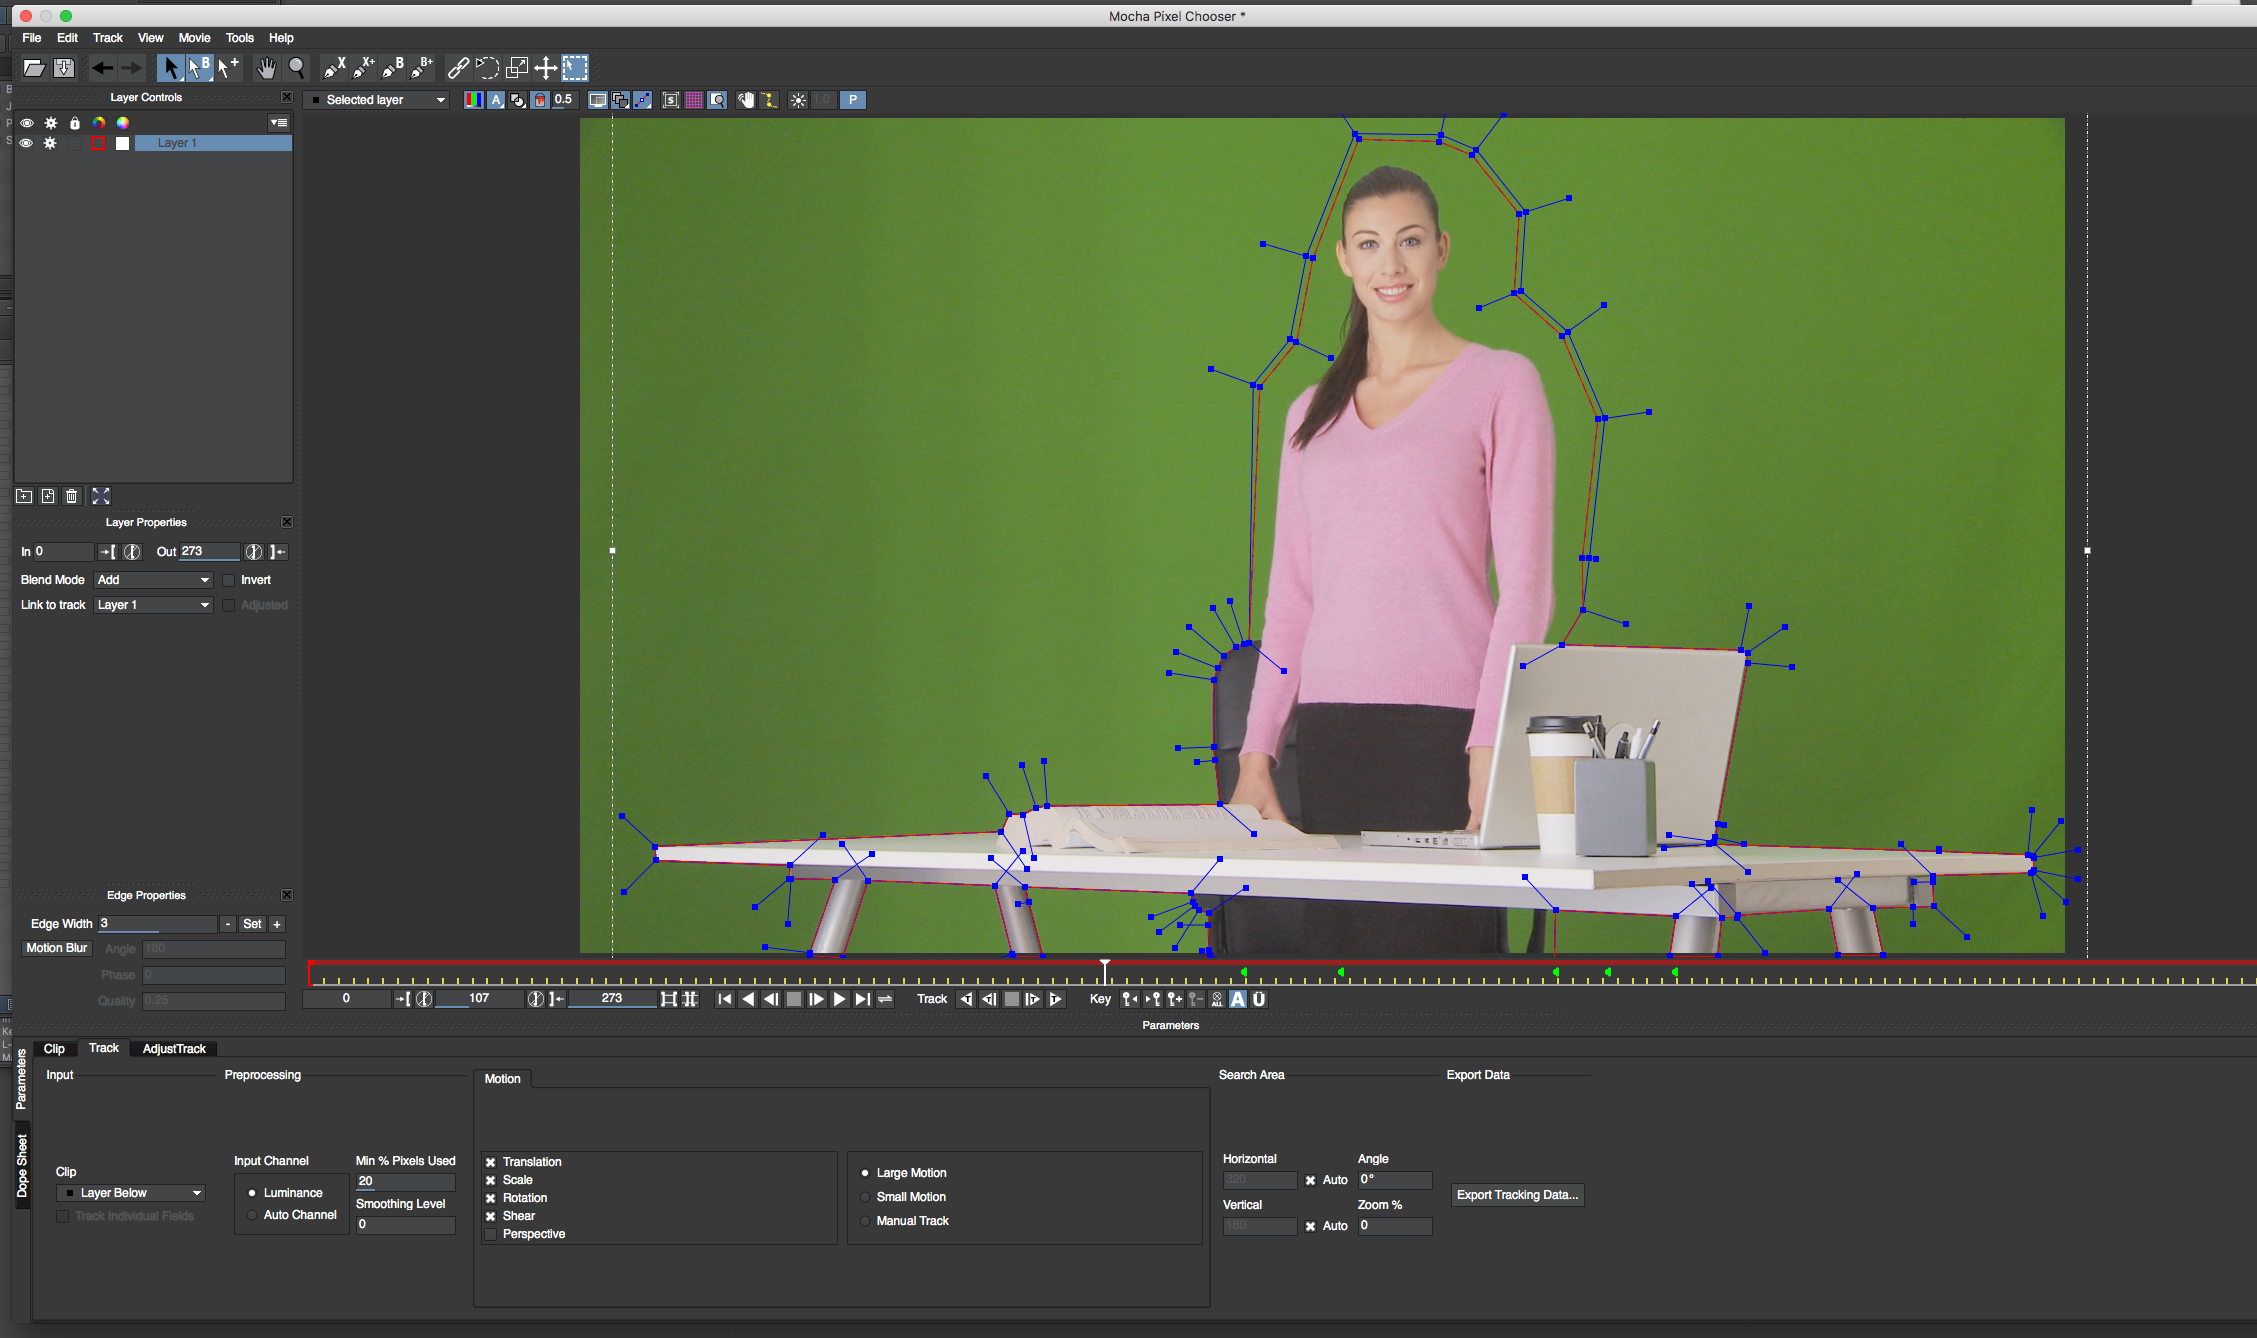
To be honest, this just looks almost like digital noise, but what it actually is, is PS telling you what is opaque (white) semi-opaque/transparent (grey), and completely transparent (black). What’s very interesting about this slightly different workflow is that if you switch over to your “Final Matte”, you won’t notice about 90% of the problems going on here, but if you switch back to your “Final Composite”, chances are you’ll notice issues right away with all they grey “semi-transparency” going on with you key. Now you can go in and start to clean things up, and you can go with the rectangle tool for this. Dealing with the background first, make sure you tell PS you want to “Clean BG”, and then simply lasso over the grey in the background, and it will mostly disappear with a few strokes of the mouse. Now you can do the same with the foreground by choosing “Clean FG”, and doing the same technique. In many cases, this might be all the work your matte needs, and once you’ve done this, you’re good to go, but let’s be honest, if you do any type of keying work, on even a semi-regular basis, you know that garbage matting is the easiest way to eliminate most of unneeded key area, so you can focus in on just the green directly around your talent. Well, you guessed it, Mocha is integrated directly into PS, and you can create not only outside masks (a garbage matte around your talent to eliminate as much green screen as possible, to get the best looking key possible), but you can also do inside masks as well (mask drawn around the inside of your talent to eliminate areas that are unnecessary to the keying process, and you want to force PS to make them completely opaque), and they can be either keyframed inside of Mocha BCC, or you can obviously do a completely motion track of the area as well, and save yourself a ton of time in the process as well.
With all this being said, you can create pretty good keys, but one thing that just about every editor does their best to avoid, and that is hair. Especially strands of hair that will probably get completely lost in the keying process. Well, believe it or not, not only do you have the ability to bring back those lost hairs by using the “Restore Detail” parameter, but you also have the ability to “Make FG Transparent”, which is the PS way of letting you remove green coloring in small areas like hair, or around other small think details, even on the most compressed footage, to give you a key like you’ve never seen before. Now, I did mention the rectangle tool, and that tool is perfect for larger tasks like cleaning up the FG and BG, but for more specific and detailed tasks, like restoring detail, or working make the FG transparent, and removing all the green from any key attempt, you can use the point tool which, much like it sounds, is simply a pointer that you can draw on the screen with, to give yourself pinpoint accuracy, to make sure only the details you need altered are. I’ll be honest with you here. If you had asked me before working with PS if I was a good keyer, I would have told you yes, but with everything that I’ve learned from working with PS, I’d say that my keys are now easily ten times better than they were before.
There are a few more things I want to talk about in PS before we move on, and the first is the “Adjust Light On” parameter. Many people would overlook this parameter, as it’s not really clear about what it does. Something about turning a light on. Well does it ever do that. In many cases, when you do an auto analyze of a green screen, it might look something like this:
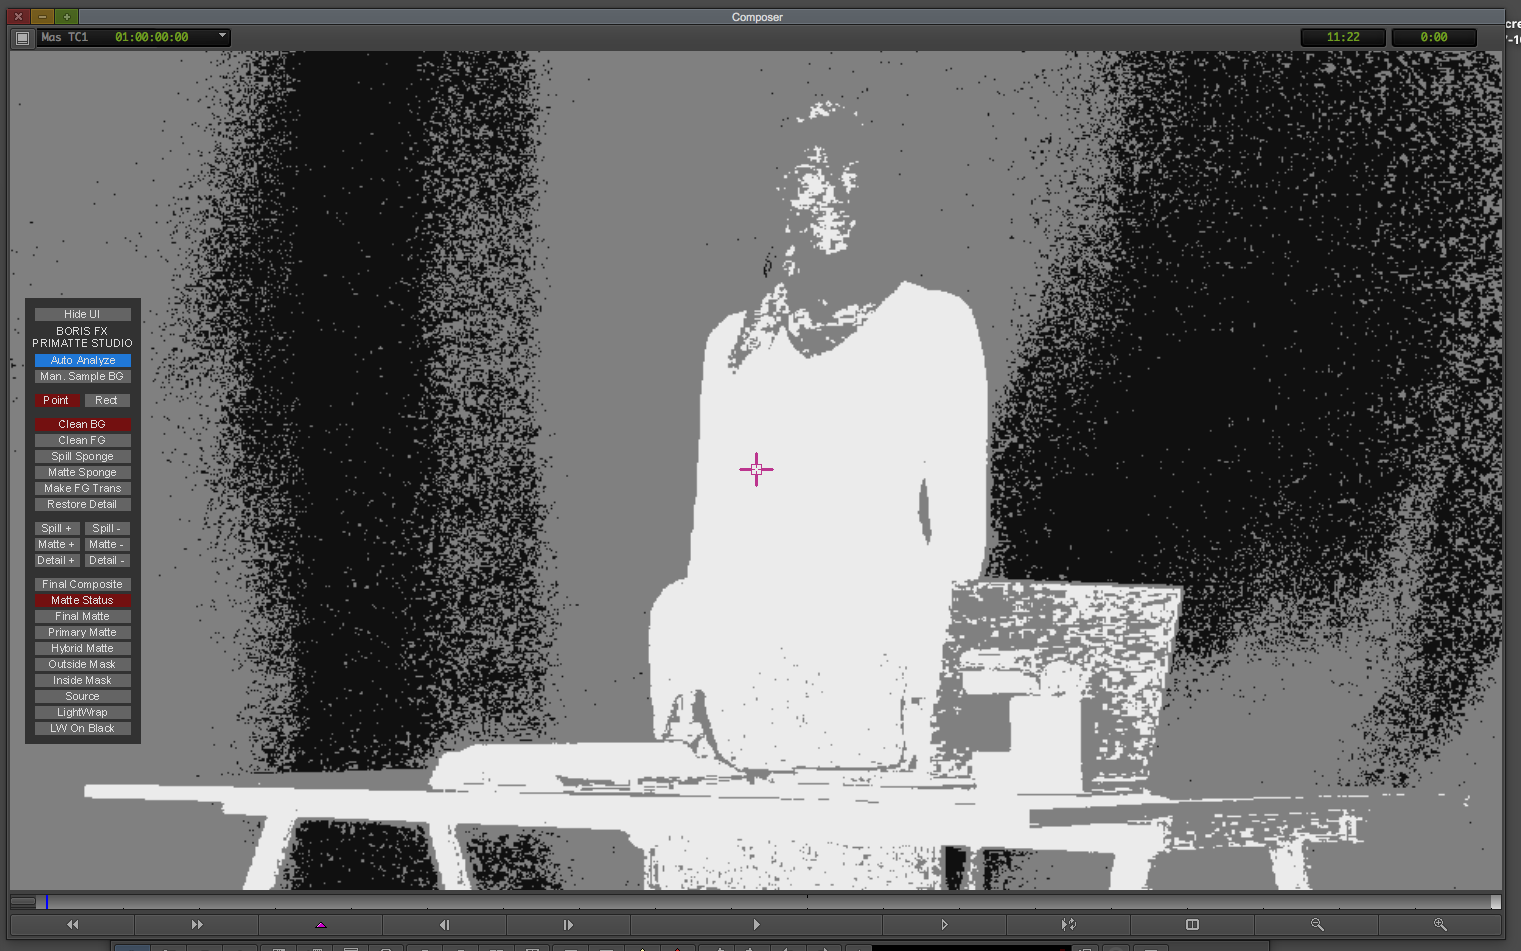
What the Matte Status window is showing you is how uneven your background green screen is lit. Wouldn’t it be nice if you could adjust the light on that green screen to even it out a little? See where I’m going here. Yes, that’s right. You can even use PS to even out poorly shot green screens, to make your keying job that much easier,. Here’s the same shot with the “Adjust LIght On” parameter selected.
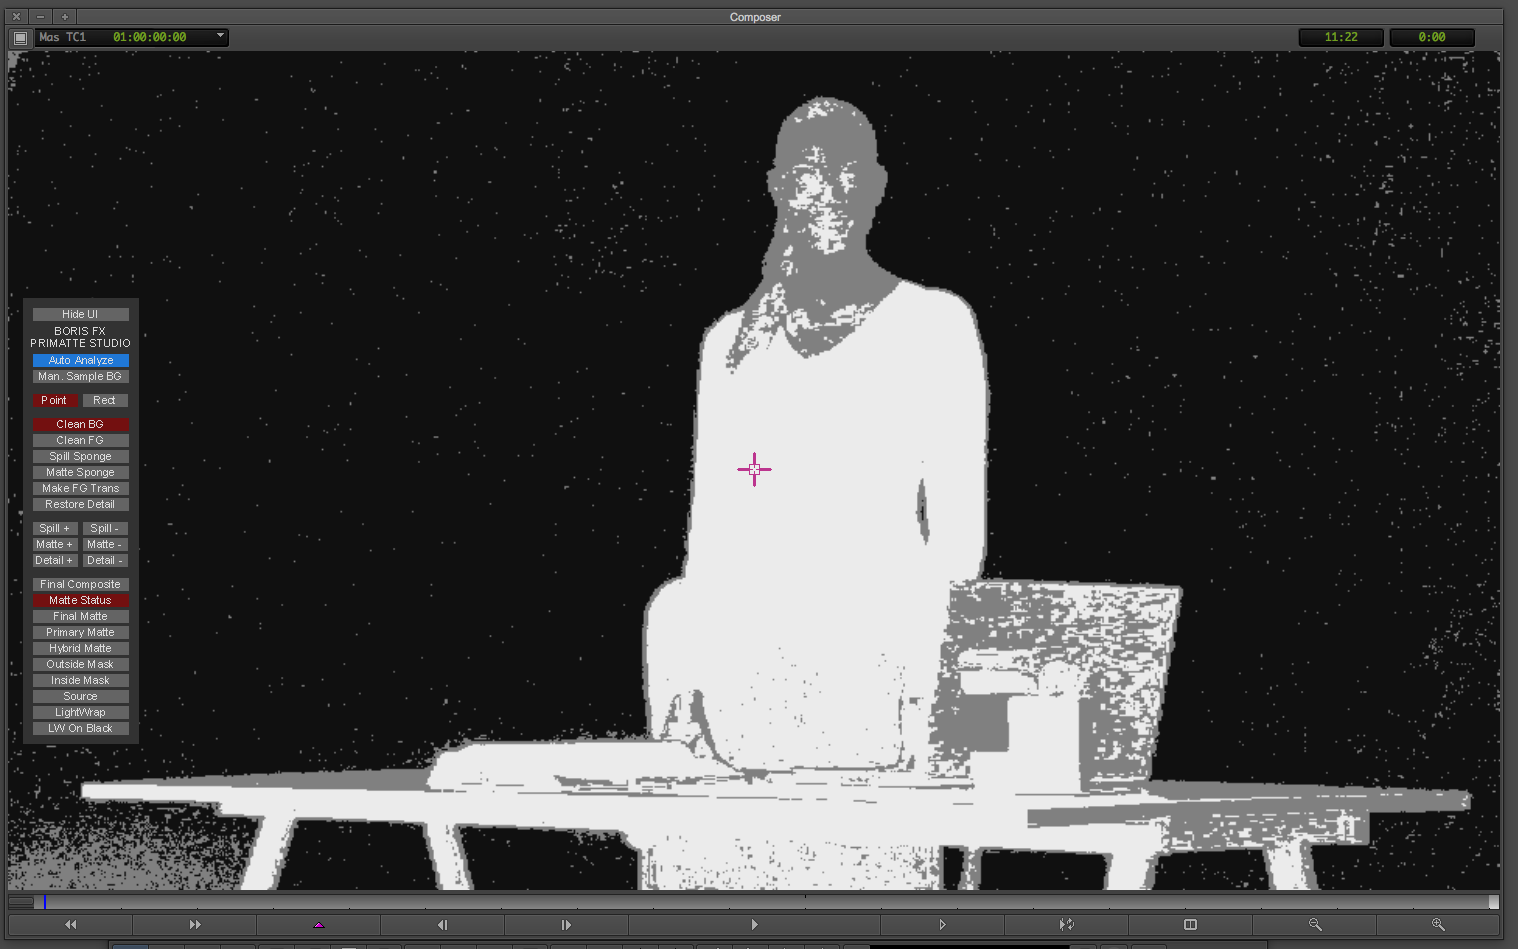
An absolutely staggering difference. Now, there are other parameters here you can adjust like Color Correction (basic CC, but CC none the less), Light Wrap and some Matte Refinement tools as well, but the last feature I want to talk about is the Edge Color Correction, and how it works, and how you can make it work for you. My biggest problem with a parameter like this, is that i never really know how much of an edge I’m adjusting, even though I can go in and adjust the edge width first thing. It still doesn’t tell me exactly how wide the edge is, which would be a big help. Well, a great trick and workaround is before you worry about adjusting your edge size, crank the brightness all the way up, and as soon as you do, you’ll get a white halo around your talent, showing you the actual edge that’s being adjusted. Now you can adjust your edge width to the exact size you want it to be, bring that brightness back down to zero, and you can now start making adjustments to the other parameters like Tint Edge, Temperature Edge, ect. All of these parameters, plus the ability to make Geometric changes (Scale, Rotation, Position, etc) and even adding Drop Shadows, makes BCC 11’s Primatte Studio the new gold standard for keying inside of Media Composer. Alright, let’s move on and talk about another new effect in BCC 11, and that is the new Broadcast Safe filter.
BCC BROADCAST SAFE
It’s funny that this effect has taken as long as it has to get into BCC 11, but again, it’s a welcome one. Editors are accustomed to working with footage that is outside of legal video ranges, and they fix this problem the way most people do, by color correcting their footage to bring either the white levels down, or the black levels up, to keep everything inside of a legal range. Well, what happens when you’re at the eleventh hour and a show that you stepped into a the last minute has been rejected, because video levels in it were too hot? Well, you don’t have time to go back through the whole show to fix them, so you go with the standard “Color Effect Clip”, which is when you apply the Color Effect effect, it clips all your video at one hundred and zero, so everything in the show is now legal, sacrificing quality, as any detail that was in those over exposed areas has now been clipped out. Well, that’s where BCC Broadcast Safe comes into play. Not only do you have the ability to clip from within the effect if you want to (which you don’t), but what this effect is designed to do is to give you the ability to use a preset to confirm all your footage to by actually lowering (or raising) the luminance values, as opposed to clipping. A uniform raising/lowering of those levels will keep the details in your footage, and let’s you do the job in about five seconds, as opposed to having to go through the entire timeline looking for problematic shots. Simply apply the effect to the top most layer in your timeline, make any adjustments that you need to, and the effect will trickle down to the layers below it. Genius!
BCC VR
With many editors coming across VR workflows in their current projects, the Continuum team has developed five effects to help you deal with common VR issues you’ll run into, and all of these are available in your Media Composer timeline. The effects include:
- VR Reorient
- VR Insert
- VR Blur
- VR Sharpen
- VR Flicker Fixer
What’s also very cool is that if VR is your thing, and you’ve already purchased Mocha VR, you get the VR unit free.
There have also been some updates to the Title Studio effect including adding 3D render options including depth-of-field and many more presets & templates.
Alright, let’s get specific now, and talk about a workflow update that is almost worth the price of the upgrade itself. With GenArts now completely part of the Boris FX family, editors will be wanting to incorporate Sapphire effects into their current BCC 11 effects pipeline. So how does this new pipeline work? Well, in the past, users of BCC AVX have been accustomed to having to work with a “Multi-Filtered” workflow. What that basically means is that you would apply an effect, and turn on the “Multi-Filter Start”, to get things rolling. For every effect you add, you need to keep the “Multi-Filter” going by selecting “Multi-Filter Mid”, until the last effect you apply, which would be the “Multi-Filter End”. Now, the big issue with this workflow is that it’s completely limited to BCC effects, and nothing else. Now keep in mind that this workflow is the same whether you’re applying the effects to footage or to titles.
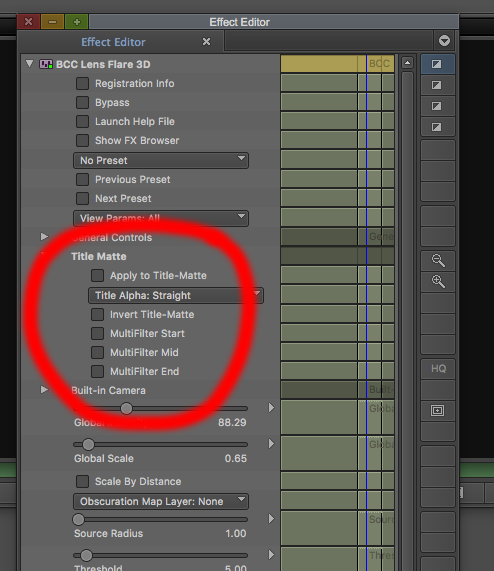
So, what’s the big update you ask? Well, editors in Media Composer are accustomed to adding multiple effects to footage/titles by alt dragging different effects onto a clip to create a stacking order. The concept now works the same with BCC 11 with one major difference. With every effect you apply, the “Background” will be set to “None”.
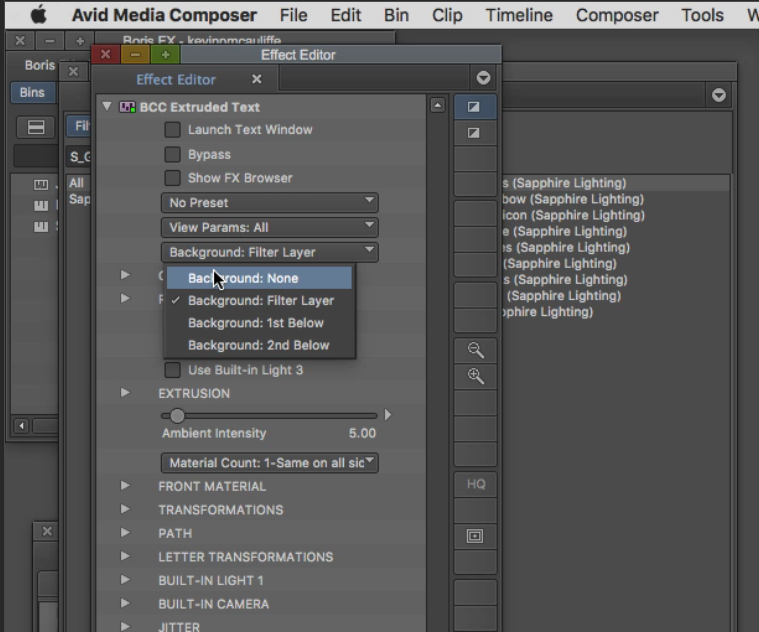
Now you can stack any effect you want, from either BCC 11 or Sapphire 11, to create the exact look you want, with each effect’s background set to none. When you get to the last effect, simply switch the “Background” to be “Layer Below”, and you’ll now see the BCC/Sapphire effect stack in your timeline. Editors in other NLE’s might not think this is a big deal, but for Media Composer editors this is huge, and opens up a big door for us to be able to do more in our edits, without having to go to After Effects.
PRICE
A new BCC 11 AVX licence will run you $1695 US which, for me, is pretty steep, but what’s great to know is that Boris FX has a few different licensing options to keep the price as low as possible. That $1695 will get you version 11 with all the updates that come for it, but once version 12 rolls around, you’ll have to pay an upgrade cost of $595 US. This upgrade cost is the same if you’re currently running BCC 9 or 10. If you’re running BCC 8 or earlier, you’re looking at an upgrade price of $695. Now, here’s where you can start to save some money. You can subscribe to BCC, with an annual subscription cost of $695 which, assuming you keep your subscription going on a yearly basis, will get you upgrades for BCC past version 11. Now keep in mind, we’ve been specifically talking about the BCC 11 AVX license, but if you’re like me, and are using After Effects, Resolve, etc, you really want one license to encompass everything, and Boris FX has an option for that. If you want to go the subscription way, I’d suggest an AVX, Adobe and OFX license that is the same price ($695 US) as the AVX only subscription license, but you obviously get the effects for all the host applications (Avid, Premiere, After Effects, Resolve/Fusion) for the one price.
So that does ask the question, should you spend your hard earned money to upgrade or subscribe to BCC 11 if you’re a Media Composer editor? Well, the first question to ask yourself is, do you wish you could add effects to your timeline titles? If the answer is yes, then you should subscribe. The second question to ask yourself is, do you do any type of flashy titling work that would look even better in 3D? If the answer is yes, then you should subscribe. Do you want to take your keying work to the next level level in Media Composer, and not have to export all your footage to After Effects to do it? If the answer is yes, then you should subscribe. I’m sure that you can see where I’m going with this. With the staggering amount of tools, effects, “studio’s” (Beauty, Primate, Title, etc), Mocha Integration and workflow enhancements, if you don’t have BCC, you’re absolutely doing your clients a disservice. If you even plan on doing one keying job this year, Primatte Studio is worth the upgrade to version 11. One thing that’s important that I mention, before I wrap things up is that if you are working with Media Composer | First, and you want to work with Boris Continuum Complete (current or otherwise), Sapphire or Mocha Pro, you will need to purchase it through the Avid Marketplace, as if you don’t, the effects won’t appear inside your application. If you want to go this route, once you’ve made your purchase through the Avid Marketplace, check in your account where your MC|F license is, and you should see the license for BCC. Once you do, you should be able to launch, and you’re off to the races. For everyone else you can head over to the Boris FX website, and make your purchase there. You can get more information, and download a free two week demo of BCC 11 for Media Composer at www.borisfx.com .

Filmtools
Filmmakers go-to destination for pre-production, production & post production equipment!
Shop Now