Way back when I shot film I was a serious devotee of The Zone System. I lived and died by my spot meter. I have a much harder time doing this in HD, however, so I’m rediscovering the joys of using an incident light meter. I’ve picked up a few new tips and tricks, and now I’m going to share them with you.
A DP once told me, “I put all the important stuff within a five stop range, +/- 2.5 stops from middle gray. Everything else can do what it wants.” He’d light by eye, make sure that the important stuff (flesh tone, important set pieces, etc.) fell within that five stop range, check the bright areas and dark areas with a spot meter to see if they would retain detail, and shoot.
I became very good at using The Zone System, which is a great way to pre-visualize what you want and then determine an exposure that will allow you to capture it just that way. Better yet, I’d light a set by eye, place the values that I saw by eye on The Zone System, and then calculate an exposure to preserve that. For example, if I lit a set in a way that looked great by eye I’d look for something in the set that appeared to be middle (18%) gray, measure it with my spot meter, and then put that stop on the lens. I’d then measure a few other things, like important highlights and shadows, and see what zones they landed on. If they fell within the range of the film stock (I discovered +/- 3 stops was usually safe) and then judged the rest by eye I generally got great results.
When I say I “let the other stuff go” I mean that I didn’t worry too much about the extreme highlight and shadow values unless they took up a huge part of the frame. A small area of highlight was no big deal, but a row of windows that were +7 stops might be a concern.
One trick that helps in judging shadow contrast is to squint. Shadows become darker and you’ll get an idea as to how film will see them. Over time you can become very good at determining fill levels just by squinting.
HD doesn’t really work the same way. Film’s great advantage is that it is predictable: once you learned the limits of a film stock they would never change unless you processed the film differently. The gamma curve and contrast were set chemically in the factory. HD cameras vary in contrast and gamma not only by manufacturer but also by setting, so unless you’re willing to memorize ten cameras with five gamma curves each it becomes very difficult to judge exposure with a spot meter.
The five or six stop rule still applies to some extent. If you’re shooting for broadcast you’re still working with a six stop container in Rec 709. While most cameras will capture much more dynamic range than that (typically at least ten stops from noise floor to white clip) you’re really only going to see the middle three or four stops clearly. This is where the S-curve of color correction comes in: by stretching out the mid-tones so that contrast is high in the mid-tones, and compressing the extra stops in the highlights and shadows to make them fit in the Rec 709 container, we’re reproducing how our brains see the world, which is to see the middle tones most clearly while compressing tonal ranges in extreme highlights and shadows.
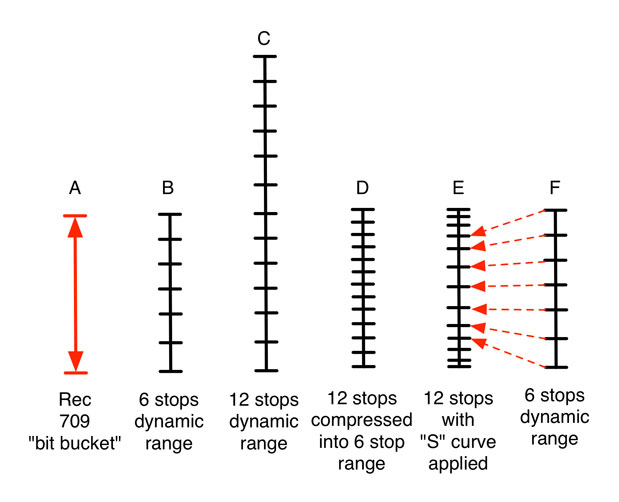
This graphic hopefully illustrates what I’m trying to describe:
“A” shows the Rec 709 “bit bucket.”
“B” shows that the bit bucket was designed to encompass roughly six stops without any sort of contrast compression at either end: a difference of one stop in brightness in front of the lens resulted in a difference of one stop on the screen.
“C” is the dynamic range of an average modern camera.
“D” shows what happens when we try to cram those 12 stops into a six stop “bit bucket” without any contrast modification. The steps (or “stops”) are much, much closer together, which results in a flat looking image. If your container is designed to show six stops of dynamic range with appropriate contrast, and you cram twice as many steps into that container, your contrast is going to drop by half. This results in a flat-looking image, because there’s not enough contrast between each step to be pleasing to the eye. (In a very simplistic way this describes why log curves can look so flat.)
“E” shows what happens if we apply an “S” curve to increase contrast. The middle stops are stretched back out so that they match more closely the spacing between the original steps in the Rec 709 example. The higher and lower stops are pushed closer together, or flattened out, because that’s what our eyes do anyway: they compress shadows and highlights and give the mid-tones the most contrast.
“F” shows that those middle six stops have more contrast than those above or below, and are the “sweet spot” of exposure for any HD camera.
Every camera made can see the Rec 709 six-stop dynamic range easily, so it’s fairly simple to pre-light if we know that the really important stuff should appear within that range: flesh tones, important shadow detail, and important highlight detail. We’ll typically light for a greater dynamic range because bright highlights and dark shadows make images much more interesting, but for ballpark pre-lighting of a set before the camera arrives it’s safe to put everything important within that range.
This brings me back to incident meters. What I discovered recently (and maybe I’m a bit dense for not figuring this out earlier) is that Rec 709’s roughly six stop limit encompasses typical highlight and shadow detail under normal circumstances. The easiest way to see this is to look at a color chart, either a DSC Labs Chroma du Monde or a Macbeth Color Checker.
In both cases, white is 2-2.4 stops brighter than middle (18%) gray because that’s how bright something is when it reflects 100% of the light hitting it. Here’s the math:
18% * 2 = 36% reflectance (average caucasian flesh tone, one stop brighter than 18% gray)
36% * 2 = 72% reflectance (bright caucasian flesh tone, two stops brighter than 18% gray)
72% + (.4 * 72%) = 100% (white, or 2.4 stops brighter than 18% gray)
The standard for 100% reflectance is barium sulfate, which is a very white powder indeed. (The only time you’ll see an object lit brighter than 100% reflectance is if there’s another light hitting it, or if the surface of the object is reflective.) The white chip on a Chroma Du Monde chart, due to its glossy nature, is whiter than can be printed on a matte surface and reflects about 85% of the light hitting it. Matte white and matte black generally end up being about two stops brighter and darker than 18% gray, both of which are well within range of even the cheapest and most crippled camera.
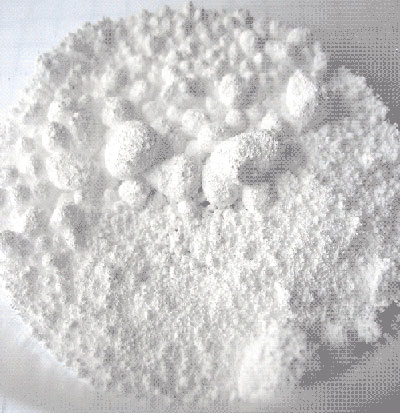
Barium Sulfate. A diffuse surface will never reflect more light than this.
What this means is that if you’re outside with an incident meter and the sun is at your back, an incident meter will tell you an exposure that will allow any HD camera to capture the dynamic range of everything you can see, excluding specular highlights and deep shadows. Everything the sun touches that has a matte surface can be captured with the exposure information on your meter. The brightest highlight that you will see off a matte surface will have a reflected value of no more than 2.4 stops brighter than your incident meter reading.
It’s important to note that highlights and deep shadows are the exception to this rule. Excluding fabrics like deep black velvet, there are very few materials dark enough to go completely black on a modern camera; similarly, any recent camera is easily able to hold detail in highlights that are 2.4 stops brighter than 18% gray. Any shiny surface, though, will reflect the light source and will be MUCH brighter than a matte surface; similarly, a shadow is likely to be much darker than -2 stops below 18% gray simply because the amount of light in that area is dramatically reduced.
This is important to know because the incident meter measures how much light is falling on it, so it really has no idea how light affects the objects within the frame. All it knows is how to tell you what the exposure is to make matte surfaces appear roughly the same to the camera as you see them by eye as long as they are bathed in the same light as the meter. As long as you know how bright the things in the frame are, an incident meter can tell you what stop to put on the lens to reproduce the scene so that it looks as close to what your eye sees as possible.
An incident meter is most effective within that six stop dynamic range that every camera, no matter how crippled, can see–assuming that everything in the frame is lit by the same light, at the same intensity. This rarely occurs.
In the past I never trusted incident meters because they didn’t tell me what was actually happening in the scene. They predicted how “normal” things should look when lit “normally,” but that kind of lighting tends to be very boring. An incident meter didn’t tell me how bright the window in the background was, or how dark a distant wall was. Reflected meters tell me, more or less, exactly what’s happening in the shot, and as long as I intimately understand the gamma curve used by either my camera or film stock I can calculate an exposure that will capture the scene exactly the way I want it to appear.
As cameras increase in complexity, however, reflected meters become less predictable: one built-in gamma curve may hold highlight detail in a distant window, for example, but another gamma curve may not. The number of possible settings is so great that unless one works with the same camera with the same settings constantly it can be very difficult to use a reflected meter to predict what the camera will see.
HD cameras are a lot less predictable than film.
What I do know is that if I hold an incident meter at a point in space and measure the light falling on it, it will tell me an exposure that will capture anything that falls within the Rec 709 six-stop range… which is most everything, barring specular highlights and deep shadows.
Of course it’s a bit boring to light a scene that way as it’ll turn out to look very flat and two dimensional, so the meter alone doesn’t give us great results. We have to know how to interpret what it tells us. Turn the page…
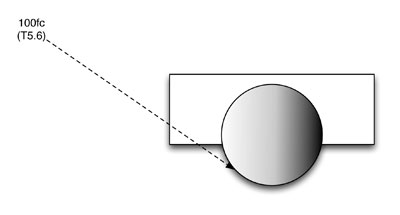
In film school we’re taught that incident meters are best at averaging light. The method most often taught is to measure key + fill by aiming the ball at the camera. This assumes that key and fill are both fairly frontal, which is not always the case.
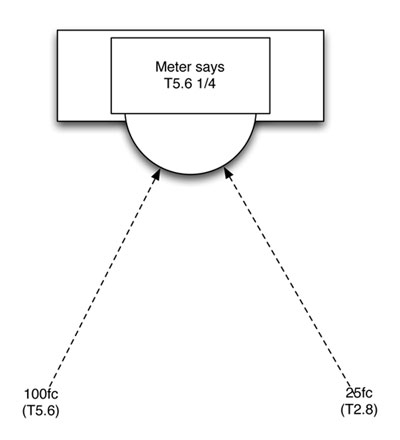
In this case, with a key of 100fc and fill at 25fc, and a camera or film stock rated at ISO 400, we’ll end up with a stop of T5.6 +1/4. (The next stop up from 5.6 is 8, which requires twice the light at 200fc, so one quarter of the way from 100fc to 200fc–25fc–is 1/4 stop.) If the light meter is held in front of a face then the part of the face that is brightest, in that it is being hit by both key and fill, will be rendered fairly accurately at T5.6 +1/4.
It’s generally best to denote stops in positive terms, such as T4 +2/3 or T8 +1/2. If we start throwing in negative values, like T8 -1/3 or T4 -1/2, we take the risk of our assistant misunderstanding us and setting the stop incorrectly. If we ALWAYS speak in terms of a stop PLUS a fraction then that removes a significant source of error. Otherwise we risk our assistant mishearing “T5.6 -1/4” as “T5.6 +1/4”, resulting in a half stop underexposure.
One of my mentors told me years ago that the human eye can detect a brightness change of 1/3 stop but it has a hard time seeing smaller changes. I’ve met DPs who will dial in their exposures to within 1/10th stop, but I think that’s overkill. I stick to full stops, 1/2 stops, 1/3 stops and occasionally 1/4 stops. Often 1/3 stop is close enough. It’s easy to get caught up in the details, so making your T-stop decisions coarser will make your life a little bit easier.
It’s important to know that T-stops are different from f/stops. F/stops measure the actual diameter of the aperture, or iris, in a lens whereas T-stops (“transmission stops”) compensate for light loss as light passes through a lens. F/4 on one lens might really be T2.8 +2/3, because the T-stop accounts for the fact that about 1/3 stop worth of light is lost between the front of the lens and the film plane or sensor.
T-stops are measured and set at the factory and are always more accurate for exposure than f/stops, although f/stops are always more accurate for determining depth of field. Nearly all modern lenses are calibrated in T-stops.
While we’re talking about techie things, it’s always best to set the lens aperture by opening it up all the way and then closing it down to the intended T-stop. If the iris leaves have any slop in them you’ll be erring on the slightly open side by doing that, and a little more exposure is generally better than a little less.
The incident meter merely averages the light hitting its dome, so it can be deceptive if we always read it with the dome facing the camera, as taught in film school. Here’s an example you can try with your meter:
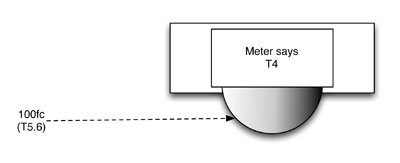
Imagine a situation where you’re in a dark room lit by one very distance light source that’s at 90 degrees to the subject. Aiming the dome of the incident meter at the camera means that one side is lit by 100fc of light, and the other side is completely dark. The meter will average both sides of the dome and tell you that the proper exposure at ISO 400 and 24fps is T4, because half way between 100fc and 0fc is 50fc.
If you then use that exposure then half the subject’s face will be one stop brighter than normal and the other side will be black. The meter won’t tell you what the “proper” exposure is because that’s a creative choice. It’ll give you whatever information it can, but you have to determine how to use that information creatively.
For example, if someone is sitting by a window it may be appropriate to overexpose their skin by a stop, especially if they are sidelit, because we’ll often accept overexposure as long as only part of the subject is overexposed. Our eyes do this naturally by averaging the amount of highlight and shadow within our vision and showing us a decent compromise between the two, usually by overexposing the bright side a little bit while allowing the dark side to remain a little dark.
In that case it’s useful to know that flesh tone usually falls somewhere between middle gray and two stops brighter than middle gray. If the person near the window has very light skin and you’re shooting with a camera that doesn’t have a lot of overexposure latitude you may not want to overexpose them at all, as you can guess that their pale skin is already at +2 stops reflected and another stop of exposure may cause their skin to clip. If you’re using a camera with a lot of overexposure latitude, say five stops above middle gray, overexposing the person by two stops won’t clip their skin tones, although they may become flat and compressed by the top of the gamma curve.
You still need to know, basically, how your camera responds to light with whatever settings you have dialed in, but you can rough in lighting very quickly without running around and spot metering everything in the frame. Too much data can get in the way of the creative process, so it’s often better to light by eye first and then use a meter to see if your eye and the camera will see the same thing. If not, then you can adjust. Over time you’ll get a sense for how to light for that particular camera and your setups will come together much more quickly.
If a scene is dark and moody then it may be appropriate to create this feeling by reducing the level of fill light dramatically or by underexposing the shot overall, although overall exposure can look “wrong” unless it is justified by the appearance of something bright in the scene. A bright highlight tells our brains that the dimness isn’t a mistake, as if our brain wants the darkness to be balanced by a highlight so it can “average” the scene the way a meter does.
The important things to remember are:
Caucasian flesh tone is normally one to two stops brighter than 18% gray. Dark skin is normally 18% gray or, occasionally, one stop darker–although that may be a bit too dark for some cameras and may require a little lighting boost.
The brightest matte surface in the shot that is being lit by the same amount of light as your light meter can only be 2.4 stops brighter than 18% gray. (This does not apply to shiny or reflective surfaces, which can be much brighter.) That brightness level appears as white, but probably not a really bright white depending on the camera. A camera with crappy dynamic range will probably put this value close to 100% on a waveform monitor, while a better camera will probably place it at 80% using a WYSIWYG gamma curve or even 60-70% on a log curve. That leaves lots of room for bright highlights. (Sony’s S-Log log curve places an object with 100% reflectance at around 62% on a waveform monitor.)
The darkest matte surface in the shot that is being lit by the same amount of light as your incident meter is generally 2-3 stops darker than 18% gray, unless it is made of a material that is known to absorb light such as black velvet. (This does not apply to shadows, which can be much darker.)
Incident meters can allow a more intuitive way of working than spot meters because too much analysis can often result in confusion and distract from the point of lighting a set, which is to use technical tools toward a creative end. For example, with a bit of experience it becomes fairly easy to light a set by eye so that it looks good and then hold an incident meter in the area where you want tonal values to look “normal.” As people move around a set they naturally become brighter and darker, and you can take control over that by using an incident meter to determine where those “normal” spots are and make sure the “non-normal” highlights and shadows fall within the camera’s dynamic range.
For example, a person with average caucasian skin will normally appear one stop brighter than 18% gray. If they wander over to a window and catch 1.5 stops more light then we know they’ll be at 100% reflectance, which is effectively white but still with texture. Modern cameras can hold at least that much overexposure; most can hold more and some can hold a LOT more.
The trick with incident meters is that you have to know the brightness of the thing you’re measuring. For example, if one person’s skin tone is one stop brighter than middle gray and another’s is one stop darker than middle gray, an incident meter will tell you how to expose them so that they look roughly the way they do in real life: one has much brighter skin than the other. It doesn’t actually tell you how bright their respective skin tones are, it just gives you an exposure that will make them look “correct” within the 5-6 stop range within which most matte surfaces will reflect light.
That’s why it’s handy to know that the dynamic range of the average Chroma Du Monde or MacBeth chart is easily within range of the average camera, and that exposing that chart with an incident meter will result in an image that looks “correct.” Not artistically “correct” but technically “correct.” You’ll see all the patches, and none will look terribly over- or under-exposed.
The artistic part is knowing how far to shift things away from the meter’s exposure in order to capture different looks. That takes a bit of practice.
For example, filling at two stops below the T-stop set on your lens means that average caucasian skin will drop from 36% reflectance to 9% reflectance, or one stop darker than 18% gray. That’s still perfectly visible, and in fact it’s probably too bright for most dramatic purposes. Fill levels of 2.5 to 3 stops under the lens T-stop often look very nice indeed. (Our brains like contrast as we’re programmed to appreciate changes in our visual field over sameness. Flat white walls are boring, but walls textured with shadow are quite compelling.)
Filling a person with dark skin at the same light level may not yield desirable results.
Note that I say “two stops under the lens T-stop” instead of “two stops under key” as many people phrase it. The key is variable. Sometimes you’ll expose it a bit hotter than normal if someone is standing very close to a light source, like a window. Sometimes you’ll expose it darker, for a moodier feel. There is no rule as to how the key light–whatever it may be, or however it falls across the set–should be exposed.
I also never talk in terms of key-to-fill ratios, because those tell us how bright the fill light is in relation to the key but they say nothing about how I’ve exposed the scene. If I expose the key at T4 and fill at T1.4, that’s technically a key-to-fill ratio of 8:1, but it doesn’t tell you whether I’ve set the T-stop on the lens at T4 or T2.8 or T2 +1/2, all of which will yield different looks.
The best part about using an incident meter is that you can determine the exposure for a position in a set without having a person standing there. I don’t know about you but I rarely get to work with stand-ins anymore. An incident meter helps me dial in the exposure for the parts of the set where I know an actor will stop and deliver a line–and I can do this long before the actor gets there.
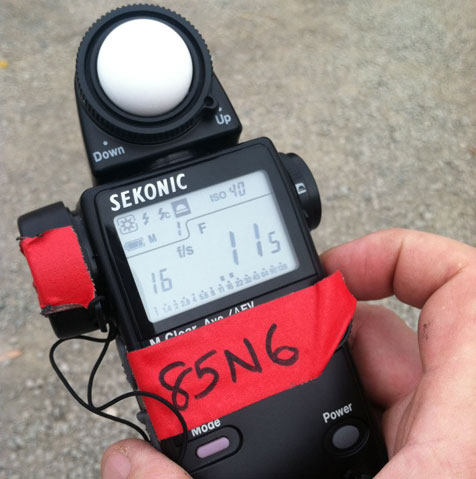
If actors have dramatically different skin tones then I’ll put a piece of camera tape on the back of my meter and make notes as to how bright or dark to light them, based on how the first few shots of the day look on the monitor, and I’ll refer to that over the rest of the shoot to rough in lighting before the actors step in.
Turn the page for a final trick or two and a closing thought…
Backlight is a bit tricky to meter. Once, while shooting second unit on a feature film, the first unit DP and I compared metering tricks. For a backlit scene in the sun he held up his incident meter so that the sun lit just a bit of the dome from behind. I help up my incident meter and shielded it from the sun, reading only the ambient daylight, and decided that underexposing the shadow side by 1.5 stops would give me the look I wanted.
We both arrived at the exact same T-stop.
The other guy’s method.
His method is fairly reliable. I, on the other hand, prefer not to blindly trust how the meter is averaging light in the scene so I’ll read the “fill” level (the sky) and decide how dark I want it to be based on experience. In this case I wanted the shadows to go a bit dark, so I read the ambient skylight and closed down a stop and a half. The sunlight went a bit bright but in strong backlight that looked just fine: I simply made the camera do what our eyes do, which is to average between the shadows and the highlights so that one goes a little dark and the other goes a little bright.
I recently worked on a project where I found myself on a flatbed railroad car shooting a steam train that was chasing us at about 30mph. We were shooting black-and-white film. The train started out in front light so I held my incident meter in the sunlight and put that exposure on the lens. Shortly thereafter the track turned significantly, putting the train in backlight, and I realized that a black steam engine in the shade was going to lose all detail at my current exposure. I made an educated guess and opened up the stop on the lens by three stops, hoping to hold detail in the dark train engine without losing detail in the sunlit background. My incident meter told me that my newly-chosen stop was roughly correct for ambient skylight, so I went with it.
When the train and the “speeder” I was riding came to a stop I did a bit of checking with my spot meter and I think I nailed the exposure. We haven’t seen dailies yet, as the two U.S.-based labs that still process black-and-white film wait until they have enough of it to process before running a batch, so I’m still waiting to see how things turned out–but I’m fairly confident that it’s all okay.
It would probably have been more accurate to read the train with a spot meter and determine exposure that way but the sunlight was variable and shade the only constant. It made more sense to make an educated guess as to what the “correct” stop was and then quickly confirm it than to spend a lot of time analyzing the scene.
Also, the platform we were riding bounced so much that parts fell off the camera, and under those circumstances an incident reading was much easier to obtain than a reflected spot reading as I couldn’t actually keep the train in the meter’s “spot.”
Lastly, incident meters are great for matching looks. If I create a look in one part of a set and then have to match that look in another part of the set, an incident meter will quickly tell me how much light is hitting the actor so that I can replicate that exact look elsewhere. You do that with a spot meter or with a waveform monitor, but it’s awfully nice to be able to gather the necessary information without inconveniencing the actor. If you’re matching looks with a different actor you may not want to rely on a reflected reading anyway as the other actor’s flesh tone may not be the same, but an incident meter will make it look “normal” relative to the other actor.
I’ve written a lot about how incident meters can help you nail down an exposure for the things that fall into the middle of a camera’s dynamic range, but not much about the other stuff. That’s where you do have to know a bit about your camera to get by. Mid-tones alone do not a pretty picture make. You have to know how far you can push the lighting for a given camera. If I’m shooting with an Arri Alexa I know that I can light by eye, use an incident meter to calculate an exposure for a key part of the set, and shoot-and, most likely, I’ll be very happy with the results. If I did that with a Panasonic AF-100 I most likely would NOT be happy with the results, because the AF-100 is a very contrasty camera without a lot of highlight latitude.
I mostly use an incident meter for consistency between lighting setups, roughing in lighting before I can see an image on a monitor, and making sure that my eyes aren’t deceiving me. (Our eyes-or, rather, our brains-are always adjusting to compensate for lighting and color changes. We are nature’s most fantastic autoexposure and auto white-balancing device. Brains are easily fooled, but meters aren’t.) I use a reflected meter to determine whether an extreme highlight or shadow will cause me problems later, and also to see how bright backgrounds are in relation to foreground talent.
Flat images are rarely pretty. Most experienced cinematographers will tell you that they do their best work when they’re a little nervous as to whether they’ve pushed things too far. The best way to create images like that is to light by eye. A meter can tell you how to go about reproducing what you’ve created, but the creative process itself is often crippled by having too much objective information. Metering is important, but the more readings you take the more confused you’ll get. Learn to meter the important things, and judge the rest by eye, and you’ll be way ahead of your competition.
I spend a lot of time trying to understand how my tools interact with my brain. I hope you’ve found this helpful.
Note: I have worked as a paid consultant to DSC Labs.
Art Adams | Director of Photography | 11/13/2012 | www.artadamsdp.com

Filmtools
Filmmakers go-to destination for pre-production, production & post production equipment!
Shop Now


