Parenting is the ability to link one object to another. Once this bond has been established between parent and child, if you move, scale, or rotate the parent, the child is affected in the same way, grouped together as one complex object. A child can still have its own animation; if the parent happens to be animating as well, the child follows it around while it also does its own thing.
In this way, parenting is similar to nesting compositions. Before parenting was introduced in After Effects version 5, the best way to group objects was to place them in their own composition, and then nest this entire comp into a master comp. We could then animate this nested comp as a group, with all of its objects dutifully following along and executing their own animations just as if they had already been pre-rendered as a movie.
Parenting is useful to people who have trouble getting the hang of nesting comps, or who like to keep everything in one comp to more easily coordinate keyframes. Unlike nesting comps, however, applying effects to or altering the opacity of the parent will not affect any of the children. Read on to learn how to set up these chains yourself.
Adoption Services
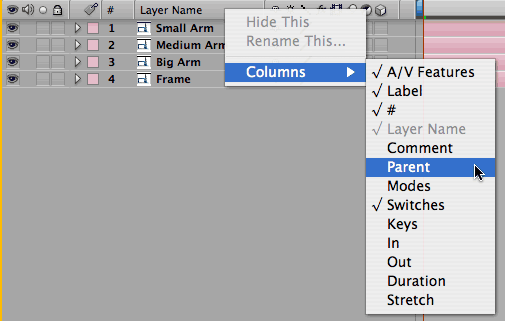
Setting up these relationships is easy. First, expose the “Parent” column in the Time Controls panel. If not already visible, context-click (right-click on Windows, Control-click on the Mac) on another column such as “Source Name” and select Columns > Parent from the resulting pop-up menu. The shortcut is Shift+F4.

To reveal the Parent column, right-click on any other column header, or press Shift+F4.
Remember that you can re-arrange panels by dragging them left or right; we tend to drag the Parent column to be alongside the Layer/Source name column.
Second, you need to link a child to its prospective parent. There are two tools to do this: a “pick whip” that allows you to drag a pointer from the child to the layer in the same window you wish to be its parent (the first image below), or a pop-up menu where you select the parent by name (the second image below). “None” is also an option, to un-parent a layer.


To parent one layer to another, you can either use the pickwhip tool next to the parent popup (top), or use the popup menu itself (above).
You can link multiple children to one parent. A nifty shortcut for this is to select all the prospective children and then use the pop-up menu for one to select a parent; all the selected layers will get the same parent. A parent can also be linked to another parent (we’ll get to an example of that in a bit).
Parents cast a kind of “reality distortion field” around their children. For example, after linking you could scale a parent to half its size and rotate it 45?; the child’s numeric parameters won’t change, even though it will now appear half it size and rotated in the Comp window. The flip side of this is you may notice some interesting jumps in the child’s parameters at the time you parent it. For example, if the prospective parent was scaled 50% and the child 100% before you link them, the child’s scale will jump to 200% when you establish the link. (There’s some other stranger side effects we’ll discuss at the end.) Your animation itself will not have changed; After Effects just fudges the child’s keyframe values to keep track of the parent’s transformations.
To unlink a child from a parent, you have two choices. If you just select None from the child’s Parent pop-up, the child will keep all the reality distortions placed on it by its parent at the point in time where you unlinked them.
This can be a handy tool to create new keyframes that are too difficult to calculate in your head: for example, if you like a layer’s animation, but now wish it was doing it offset to the left and rotated 60?, link it to a parent, offset and rotate the parent, and then unlink it. After Effects will calculate the new keyframe values for you. If this is not what you want, hold down the Option key when you unlink (Alt on Windows), and the child will forget the transformations the parent placed on it.
next page: a sample parenting chain, and a gotcha to watch out for
Family Trees

Parenting comes in handy for tasks ranging from being moving one layer and having another move with it (such as two lines of text), to creating complex animations where a number of children pirouette around an animating parent. But the real fun comes when you have chains of children.
The first figure on this page shows a multi-jointed robot arm we built by parenting. The smallest appendage was parented to the medium-sized one, which was parented to the largest one, which was parented to the base.
This linkage can be seen by looking under the Parent column in the Time Layout panel below. We can now create simple rotation keyframes for each child, knowing it will automatically stay attached to its parent without having to track it or set position keyframes. Previously, the would have required a chain of nested comps – one per appendage. This makes all sorts of character-style animations significantly easier.

The parenting chain for the robot arm in Figure 1: Each limb is parented to the next larger one in the chain. As a result, we only need to animate their rotations; their positions track automatically.
The golden rule to remember is that life is much easier if you set up the relative positions of the children and parent before you link them together. This is especially true of setting up the anchor points in animations like our robot arm: the anchor point for each arm was set to its pivot point, then the arms were aligned, and then we set up the parenting chain.
Skewing
Parenting usually works like you would intuitively expect. However, there is a nasty gotcha: non-uniform scaling. Remember, the parent casts a reality distortion field over its children. If the parent is non-uniformly scaled – for example, 100% wide but 50% tall – the children will become skewed if they are then rotated on their own, as demonstrated below.

Problems occur when a parent is non-uniformly scaled – i.e. 100% wide but 50% tall – and then a child is rotate. The result is the child being skewed by parent’s scale factors.
It you unlink them in this skewed state, they’ll jump to yet a different size.
The solution to this, and a great tool in general, is the Null Object. A Null is a solid that is invisible. If you link a Null to a parent, and then a child to the Null, the Null acts as a buffer between the two. In the above example, you don’t care if the parent’s non-uniform scale skews the Null, because it’s invisible. As long as you don’t also scale the Null, the child object will be unperturbed. Nulls also make great master parents to group multiple objects to.
In a future column, we’ll introduce the wonderful world of Expressions. At their simplest, they can be thought of as very selective parenting; at their most complex, they allow you program operations you wouldn’t dream of keyframing. Initially daunting, they might be one of the most significant features added to After Effects since it was created..
The content contained in our books, videos, blogs, and articles for other sites are all copyright Crish Design, except where otherwise attributed.

Filmtools
Filmmakers go-to destination for pre-production, production & post production equipment!
Shop Now


