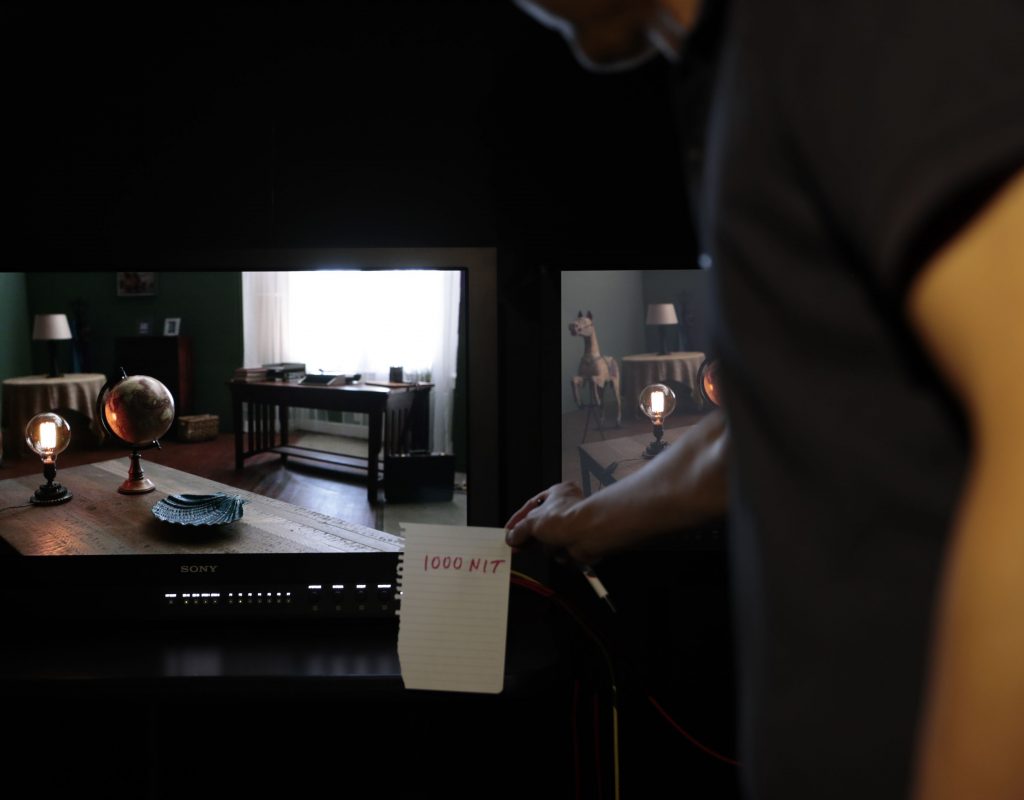
This is the fifth installment of a six-part HDR “survival guide.” Over the course of this series, I hope to impart enough wisdom to help you navigate your first HDR project successfully. Each day I’ll talk about a different aspect of HDR, leaving the highly technical stuff for the end. You can find part 4 here.
Thanks much to Canon USA, who responded to my questions about shooting HDR by sponsoring this series.
SERIES TABLE OF CONTENTS
1. What is HDR?
2. On Set with HDR
3. Monitor Considerations
4. Artistic Considerations
5. The Technical Side of HDR < You are here
6. How the Audience Will See Your Work
As a result of the research that went into writing this article, I’ve developed some working rules for shooting HDR content. Not all of it has been field tested, but as many of us will likely be put in the position of shooting HDR content without having the resources available for advance testing, we could all do worse than to follow this advice.
SDR VS. HDR: THE NEW “PROTECT FOR 4:3”
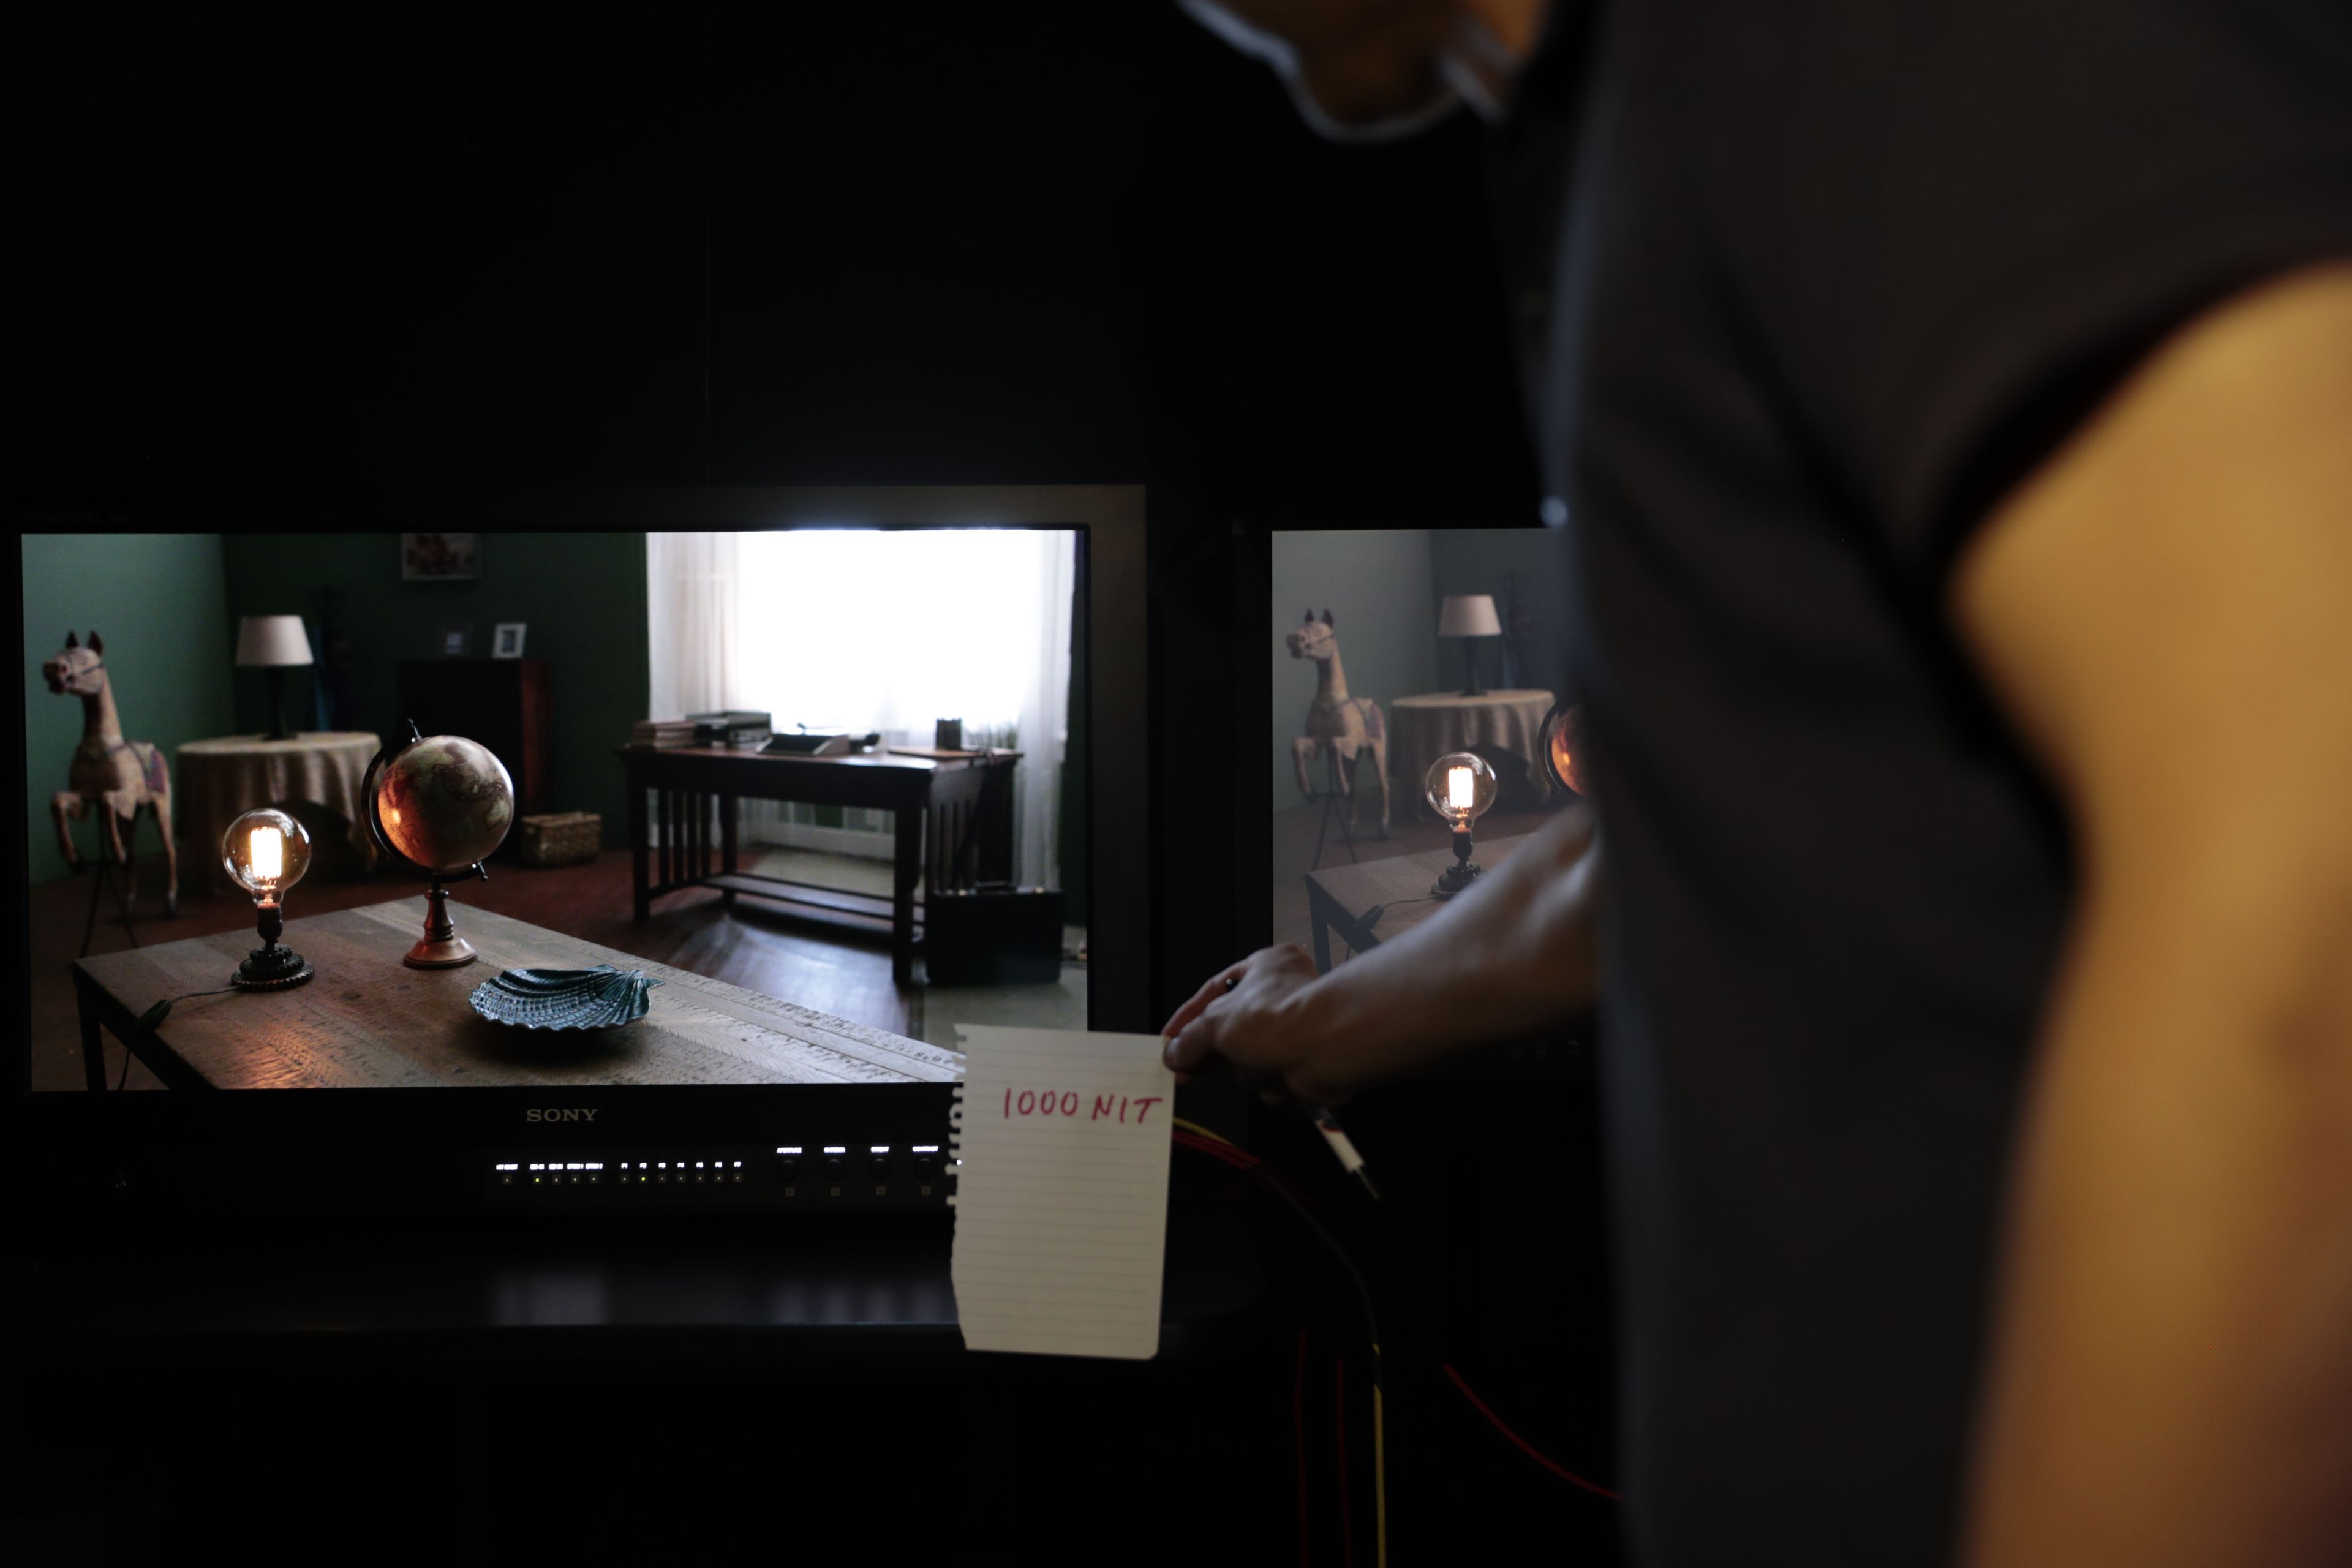
A lit candle in SDR is a white blob on a stick, whereas HDR can show striking contrast between the brightly-glowing-yet-saturated wick and the top of the candle itself. Such points of light are not just accents but can be attention stealers as well. The emotional impact of a scene lit by many brightly colored bulbs placed within the frame could range anywhere from dazzling to emotionally overwhelming in HDR, depending on their saturation and brightness, whereas the same scene in SDR will appear less vibrant and could result in considerably less emotional impact.
The trick will be to learn how to work in both SDR and HDR at the same time. As HDR’s emotional impact is stronger than SDR’s, my preference is to monitor HDR but periodically check the image in SDR. Ideally we’d utilize two adjacent monitors—one set for HDR, and the other for SDR—but few production companies are likely to spend that kind of money, at least until monitor prices fall considerably. One monitor that displays both formats should be enough, especially as HDR monitors tend to be a bit large and cumbersome for the moment.
We saw this comparison earlier:

Compare the highlights on the C-stand post, and then look at this diagram:
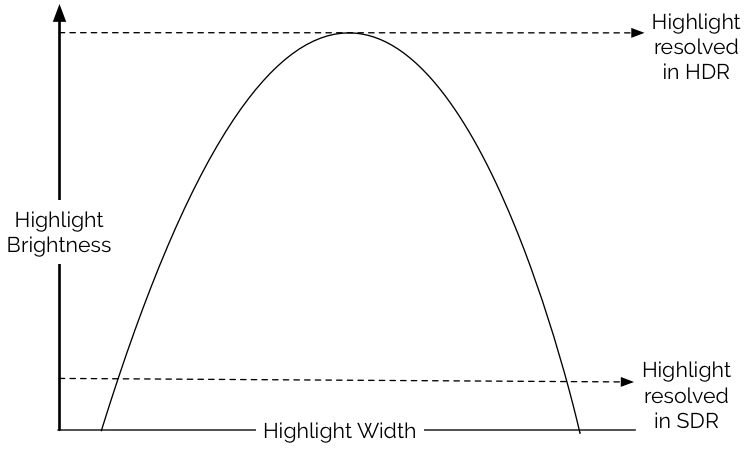
(above) SDR compresses a wide range of brightness values into a narrow range. HDR captures the full range, which can then be reproduced with little to no contrast compression on an HDR monitor.
Specular highlights appear larger and less saturated in SDR than in HDR. They are also much less distracting in SDR. Highlight placement and evaluation will be critical. Most importantly, highlights should be preserved as they will retain saturation and contrast right up to the point of clipping.
Shadows respond in much the same way:
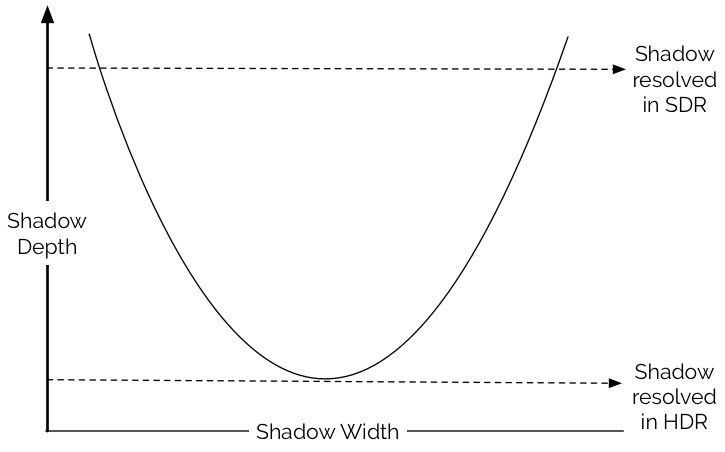
SDR sees only the broadest strokes. HDR sees the subtleties and the shape.
In the absence of a monitor, a spot meter and knowledge of The Zone System become a DP’s best friend. A monitor will be helpful, however, as it takes time to learn how to deploy highlights artistically and learn to work safely at the very edges of exposure. There are technical considerations as well: large areas of extreme brightness within the frame can cause monitors to reduce their own brightness on a shot-by-shot basis (see Part 3, “Monitoring Considerations”) and the end result can be difficult to evaluate with a meter alone. It’s also difficult to meter for both HDR and SDR at the same time, and much easier to light/expose for one and visually verify that the other works as well.
It might be possible to create an on-set monitoring LUT that preserves your artistic intent in SDR.
My suspicion is that monitoring SDR on set will become positively painful, as cinematographers will inevitably be disappointed at seeing how their beautiful HDR images will play out on flat, desaturated SDR televisions. Nevertheless, this will likely be necessary for a few more years. HDR is coming quickly, but SDR is not going away at the same pace. “Protecting for SDR” will be the new “Protecting for 4:3.”
Canon monitors are able to display both SDR and HDR. Canon will shortly release the DP-V2420 1,000 nit monitor for Dolby-level mastering, but the 2410’s price and weight may make it the better option for on-set use. Even with a maximum brightness of 400 nits, HDR’s extended highlight range and color gamut are clearly apparent, and the monitor’s size is still very manageable. The user can toggle between SDR and HDR via a function button.
TEST, TEST, TEST
Every step in the imaging process has an impact on the HDR image. This is true of SDR as well, but the fact that SDR severely compresses 50% or more of a typical camera’s dynamic range hides a lot of flaws. There’s no such compression in HDR, so optical flaws and filtration affect the image in previously unexperienced ways.
Lens and sensor combinations should be tested extensively in advance. Some lenses work better with some sensors than others, and this has a demonstrable impact on image quality. Not all good lenses and good sensors pair optimally, and occasionally cheaper lenses will yield better results with a given sensor.
Lens flares and veiling glare can be very distracting in HDR, and will in some cases compromise the HDR experience. Testing the flare characteristics of lenses is good practice, especially when used in combination with any kind of filtration. Zoom lenses may prove less desirable than prime lenses in many circumstances.
Additionally, strong scene highlights—especially those that fall beyond the ability of even HDR to capture—can create offensive optical artifacts.
It is strongly suggested that the cinematographer monitor the image to ensure that highlights, lenses and filters serve their purpose without being artistically distracting or technically degrading.
CUT THE CAMERA’S ISO IN HALF
This is something I do habitually, as the native ISO of many cameras tends to be a bit too optimistic for my taste, and I’ve learned that Bill Bennett, ASC, considers this a must when shooting for HDR. Shadow contrast is so high that normal amounts of noise become both distinctly visible and enormously distracting.
Excess noise can significantly degrade the HDR experience. The best looking HDR retains some detail near black, and noise “movement” can cause loss of shadow detail in the darkest tones. Rating the camera slower, or using a viewing LUT that does the same, allows the colorist to push the noise floor down until it becomes black, while retaining detail and texture in tones just above black.
SHOOT IN RGB 444 OR RAW
Most recording codecs fall into one of two categories: RGB or YCbCr. Neither of these is a color space. Rather, they are color models that tell a system how to reconstruct a hue based on three numbers.
In RGB those three numbers represent values for red, green and blue. Y’CbCr is different in that it is a luma-chroma color model that stores three values but in a different way:
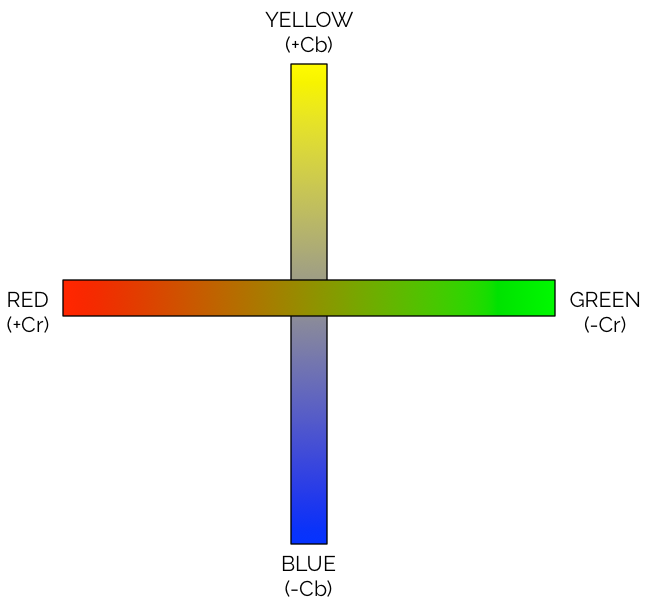
Color and luma are completely detached. Y’ is luma, which is not shown above because it stands (mostly) separate from chroma, but all other colors are coded on one of two axes: yellow/blue (warm/cool), or red/green. This is how human vision works: blue and yellow are opposites, and red and green are opposites, and each make natural anchors between which we can define other colors. Nearly any hue can be accurately represented by mixing values from specific points that fall between blue/yellow and red/green.
The real reason this is used, though, is because of chroma subsampling (4:4:4, 4:2:2, 4:2:0, etc.). Color subsampling exists because our visual system is more sensitive to variations in brightness than variations in color. Subsampling stores a luma value for every pixel, but discards information in alternating pixels or alternating rows of pixels. Less chroma data equates to smaller file sizes.
The Y’CbCr encoding model is popular because it conceals subsampling artifacts vastly better than does RGB encoding. Sadly, while Y’CbCr works well in Rec 709, it doesn’t work very well for HDR. Because the Y’CbCr values are created from RGB values that have been gamma corrected, the luma and chroma values are not perfectly separate: subsampling causes minor shifts in both. This isn’t noticeable in Rec 709’s smaller color gamut, but it matters quite a lot in a large color gamut. Every process for scaling a wide color gamut image to fit into a smaller color gamut utilizes desaturation, and it’s not possible to desaturate Y’CbCr footage to that extent without seeing unwanted hue shifts.
My recommendation: always use RGB 4:4:4 codecs or capture raw when shooting for HDR, and avoid Y’CbCr 4:2:2 codecs. If a codec doesn’t specify that it is “4:4:4” then it uses Y’CbCr encoding, and should be avoided.
BIT DEPTH
The 10-bit PQ curve in SMPTE 2084 has been shown to work well for broadcasting, at least when targeting 1,000 nit displays. Dolby® currently masters content to 4,000 nit displays, and they deliver 12-bit color in Dolby VisionTM.
When we capture 14 stops of dynamic range and display them on a monitor designed to display only six (SDR), we have a lot of room to push mid-tones around in the grade. When we capture 14 stops for a monitor that displays 14 stops (HDR), we have a lot less room for manipulation, especially when trying to grade around large evenly-lit areas that take up a lot of the frame, such as blue sky.
The brighter the target monitor, the more bits we need to capture to be safe. It’s important to know how your program will be mastered. If it will be mastered for 1,000 nit delivery, 12 bits is ideal but 10 might suffice. Material shot for 4,000 nit HDR mastering should probably be captured at 12 bits or higher. (It’s safe to assume that footage mastered at 1,000 nits now will likely be remastered for brighter televisions later.)
When in doubt, aim high. The colorist who eventually regrades your material on a 10,000 nit display will thank you.
I’ve spoken to colorists who say they’ve been able to make suitable HDR images out of material shot at lower bit depths, and while they say it’s possible they also emphasize that there’s very little leeway for grading. More bits mean more creativity in post.
Dolby® colorist Shane Mario Ruggieri informs me that he always prefers 16-bit material. 10-bit footage can work, but he feels technically constrained when forced to work with it. ProRes4444 and ProRes XQ both work well at 4,000 nits.
Linear-encoded raw and log-encoded raw both seem to work equally well.
One should NEVER record to the Rec 709 color gamut, or use any kind of Rec 709 gamma encoding. ALWAYS capture in raw or log, at the highest bit depth possible, using a color gamut that is no smaller than P3. When given the option of Rec 2020 capture over P3, take it.
In some cases, a camera’s native color gamut may exceed Rec 2020, so that becomes an option as well.
THE ULTIMATE TONAL CURVE: SMPTE ST.2084
There are three main HDR standards in the works right now: Dolby VisionTM, HDR10 and HLG. They are similar but different.
As broadcasting bandwidth is always at a premium, HDR developers sought a method of encoding tonal values in a manner that took advantage of the fact that human vision will tolerate greater steps between tonal values in shadows than in highlights.
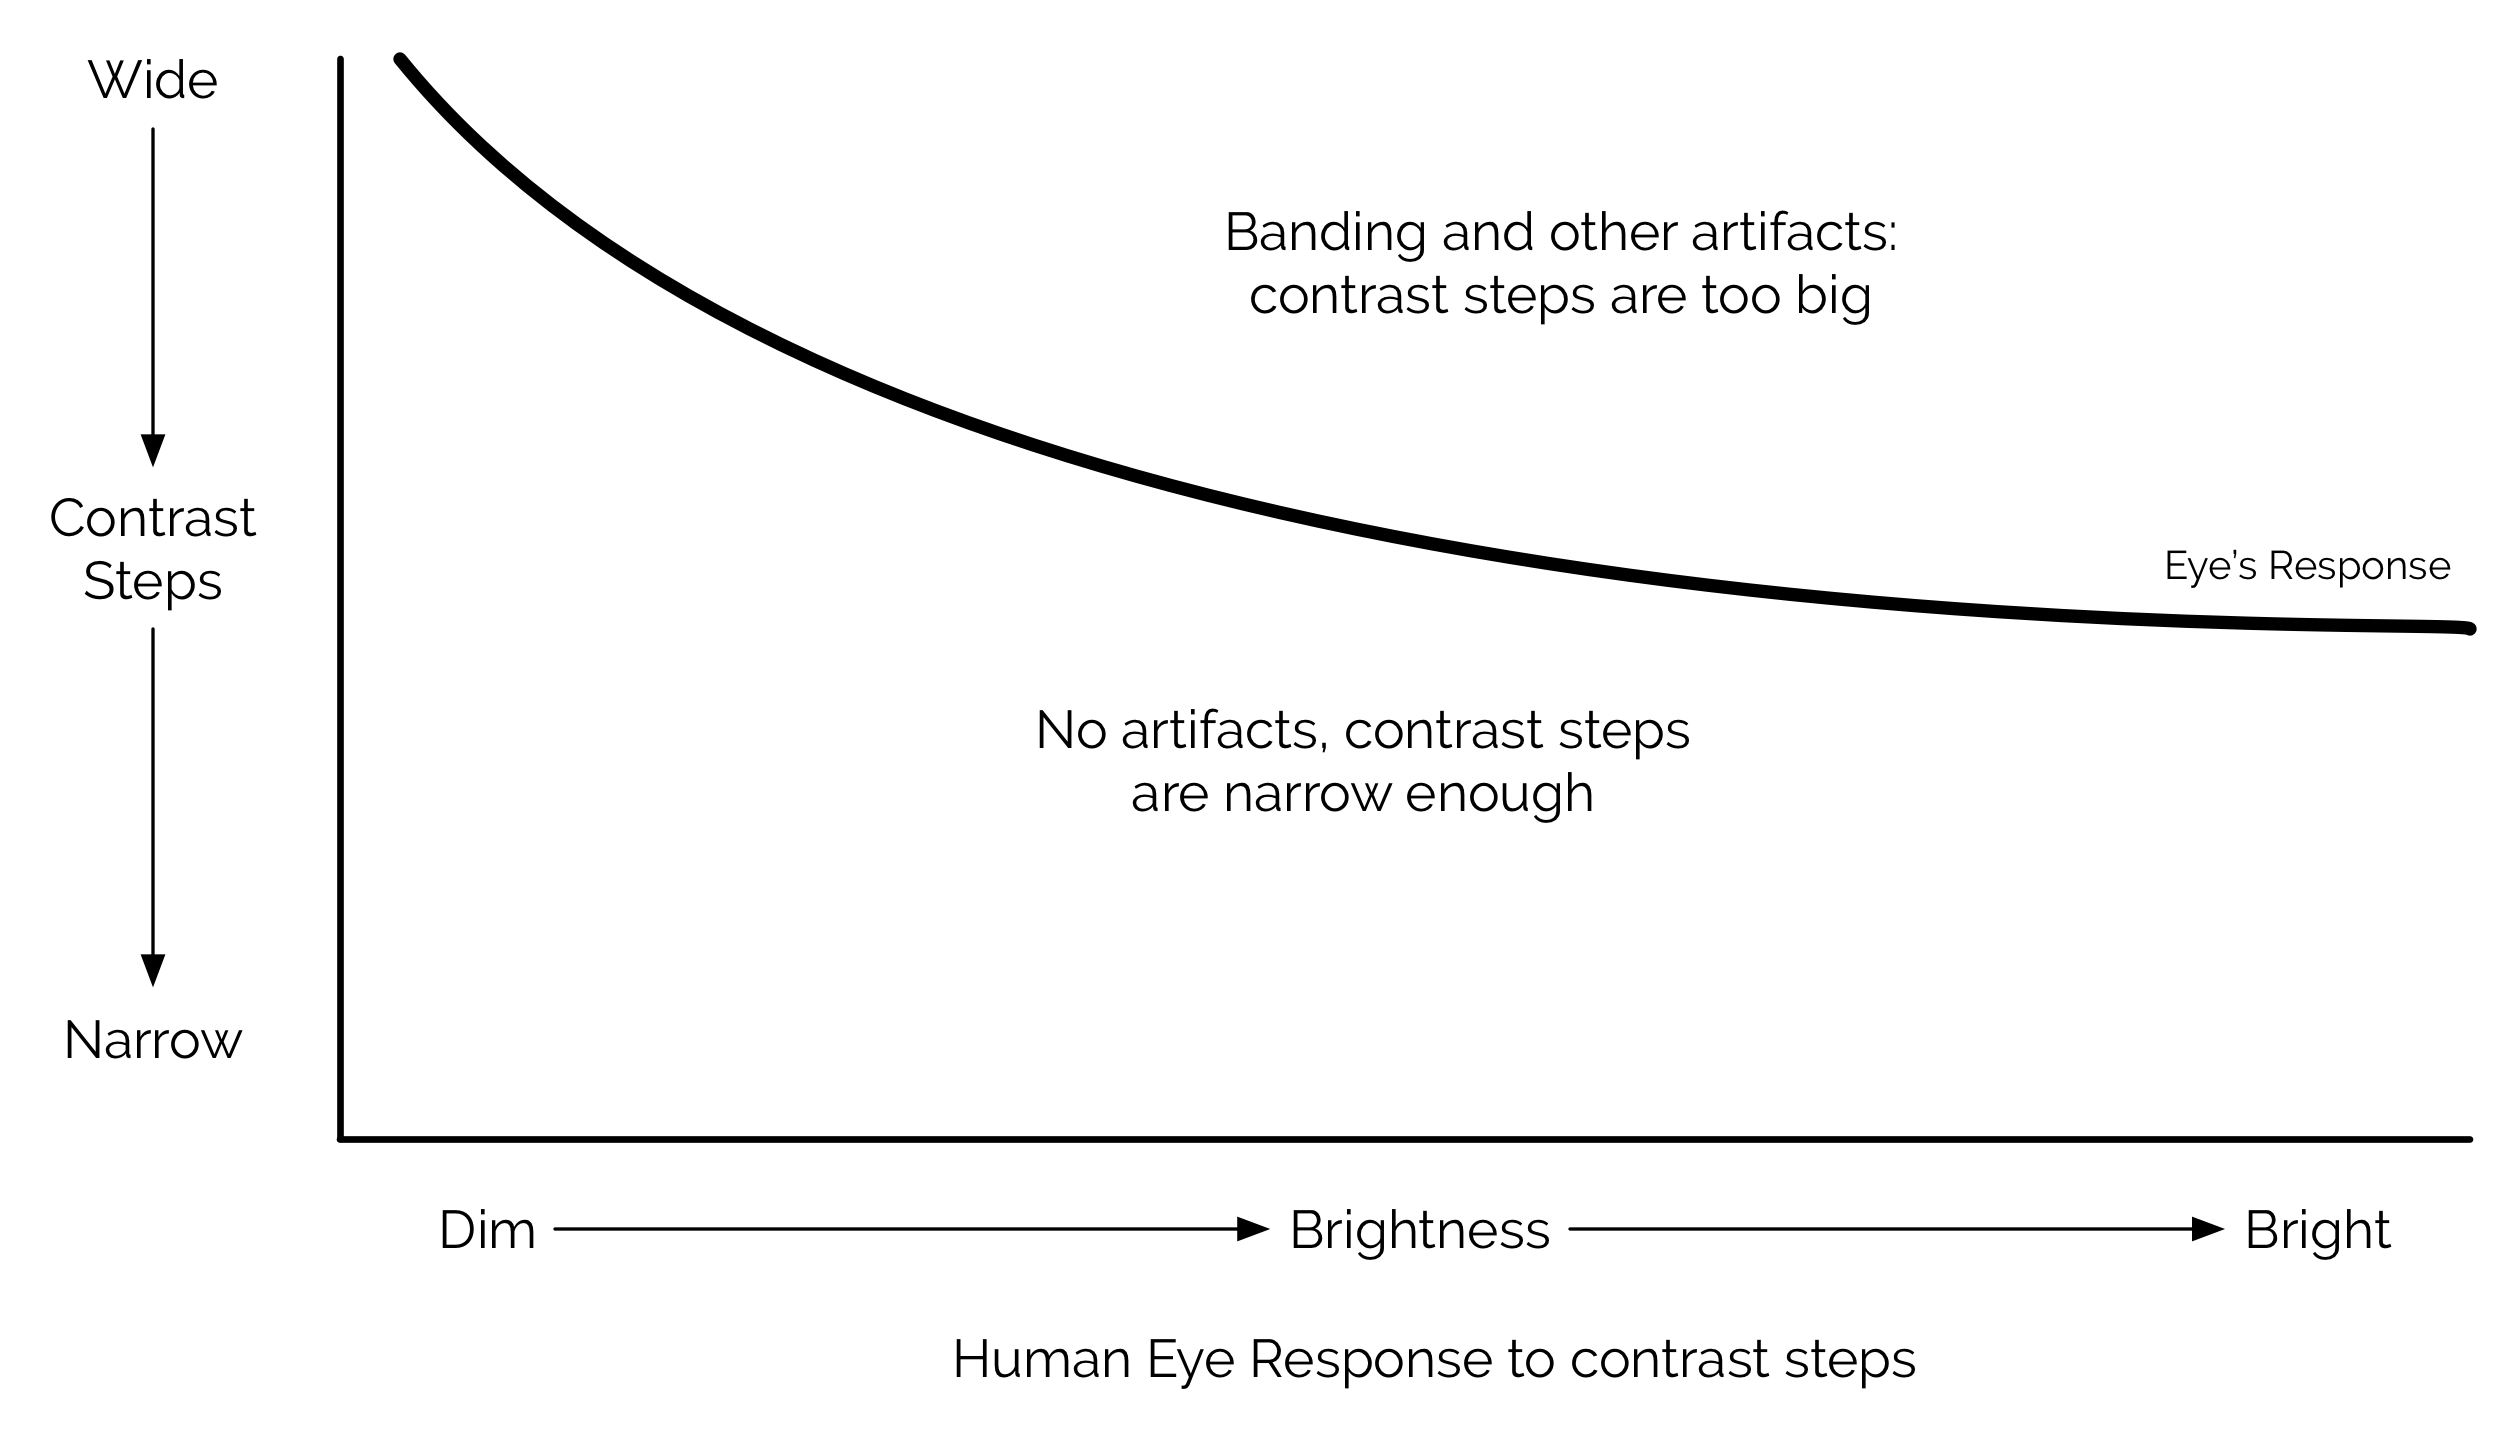
This is a simplified version of a graph called a Barten Ramp. It illustrates how the human eye’s response to contrast steps (how far apart tones are from each other) varies with brightness. We visually tolerate wide steps in lowlights, but require much finer steps in highlights. Banding appears when contrast steps aren’t fine enough for the brightness level of that portion of the image.
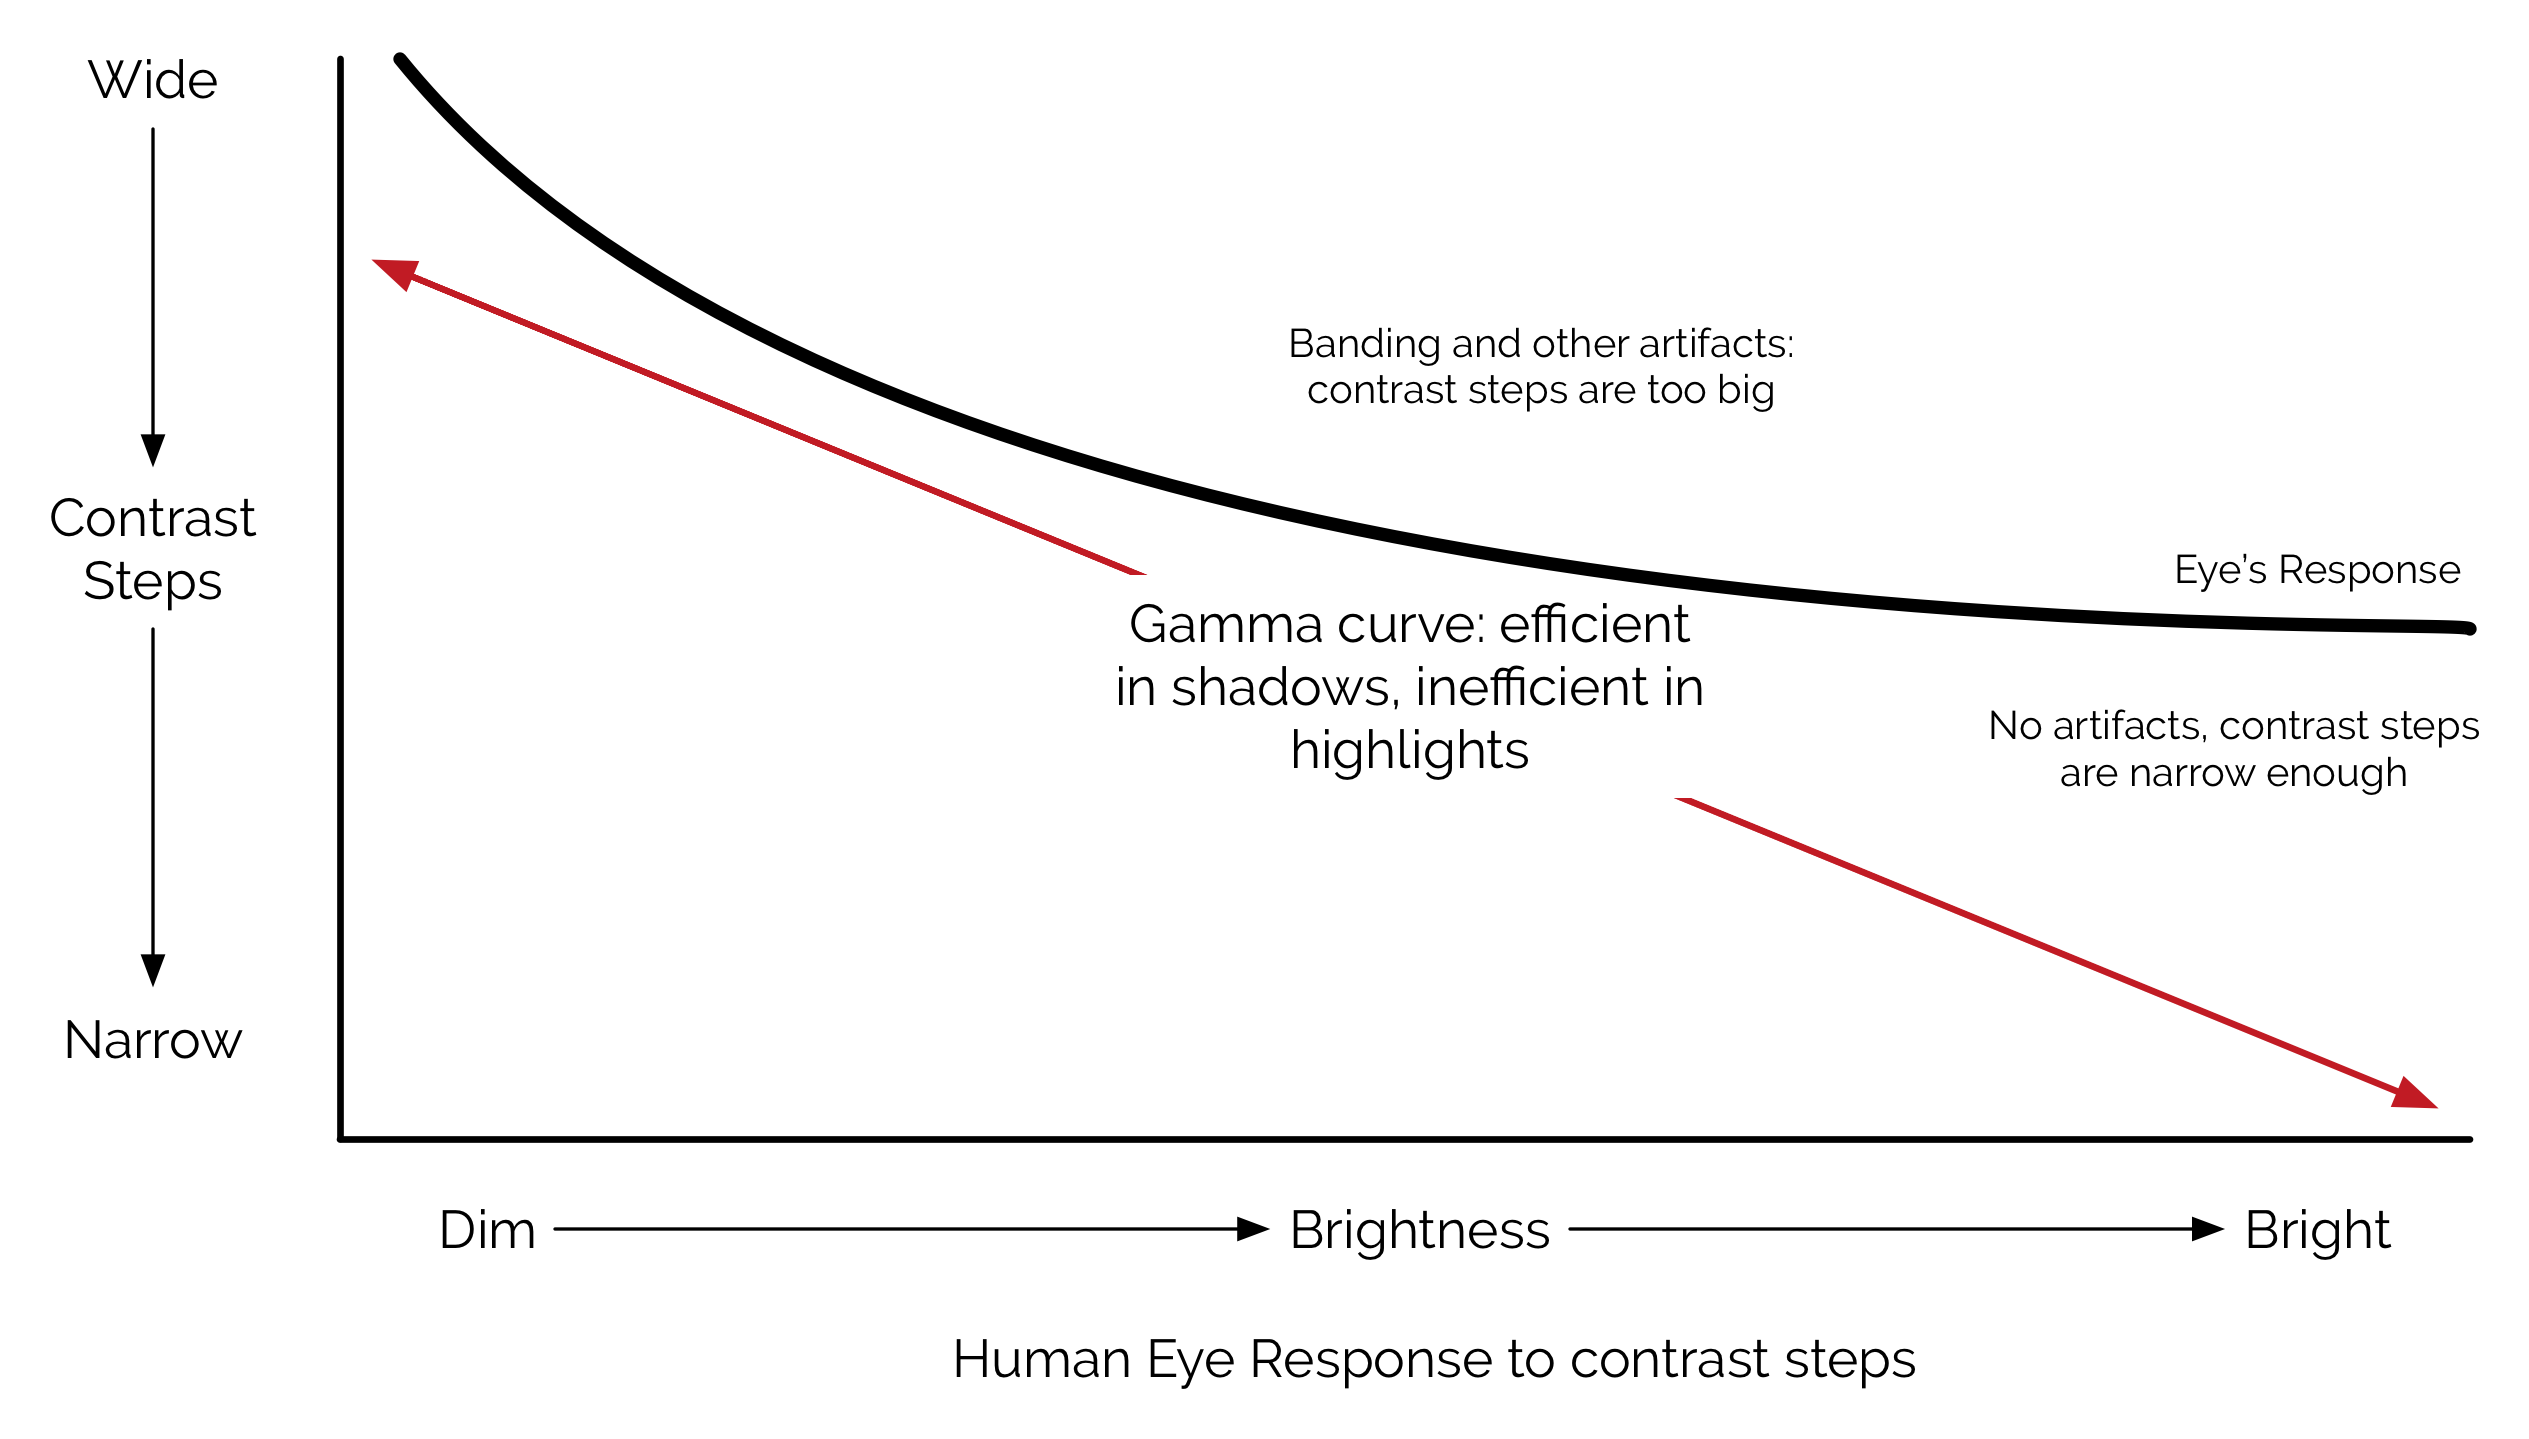
Gamma curves (also known as power functions) capture more steps than necessary in the highlights, so more data is transmitted than is necessary. Gamma also fails across broad ranges of dynamic range, so while traditional gamma works well for 100 nit displays it fails miserably for 1,000 nit displays. Banding and other artifacts become serious problems in HDR shadows and highlights.
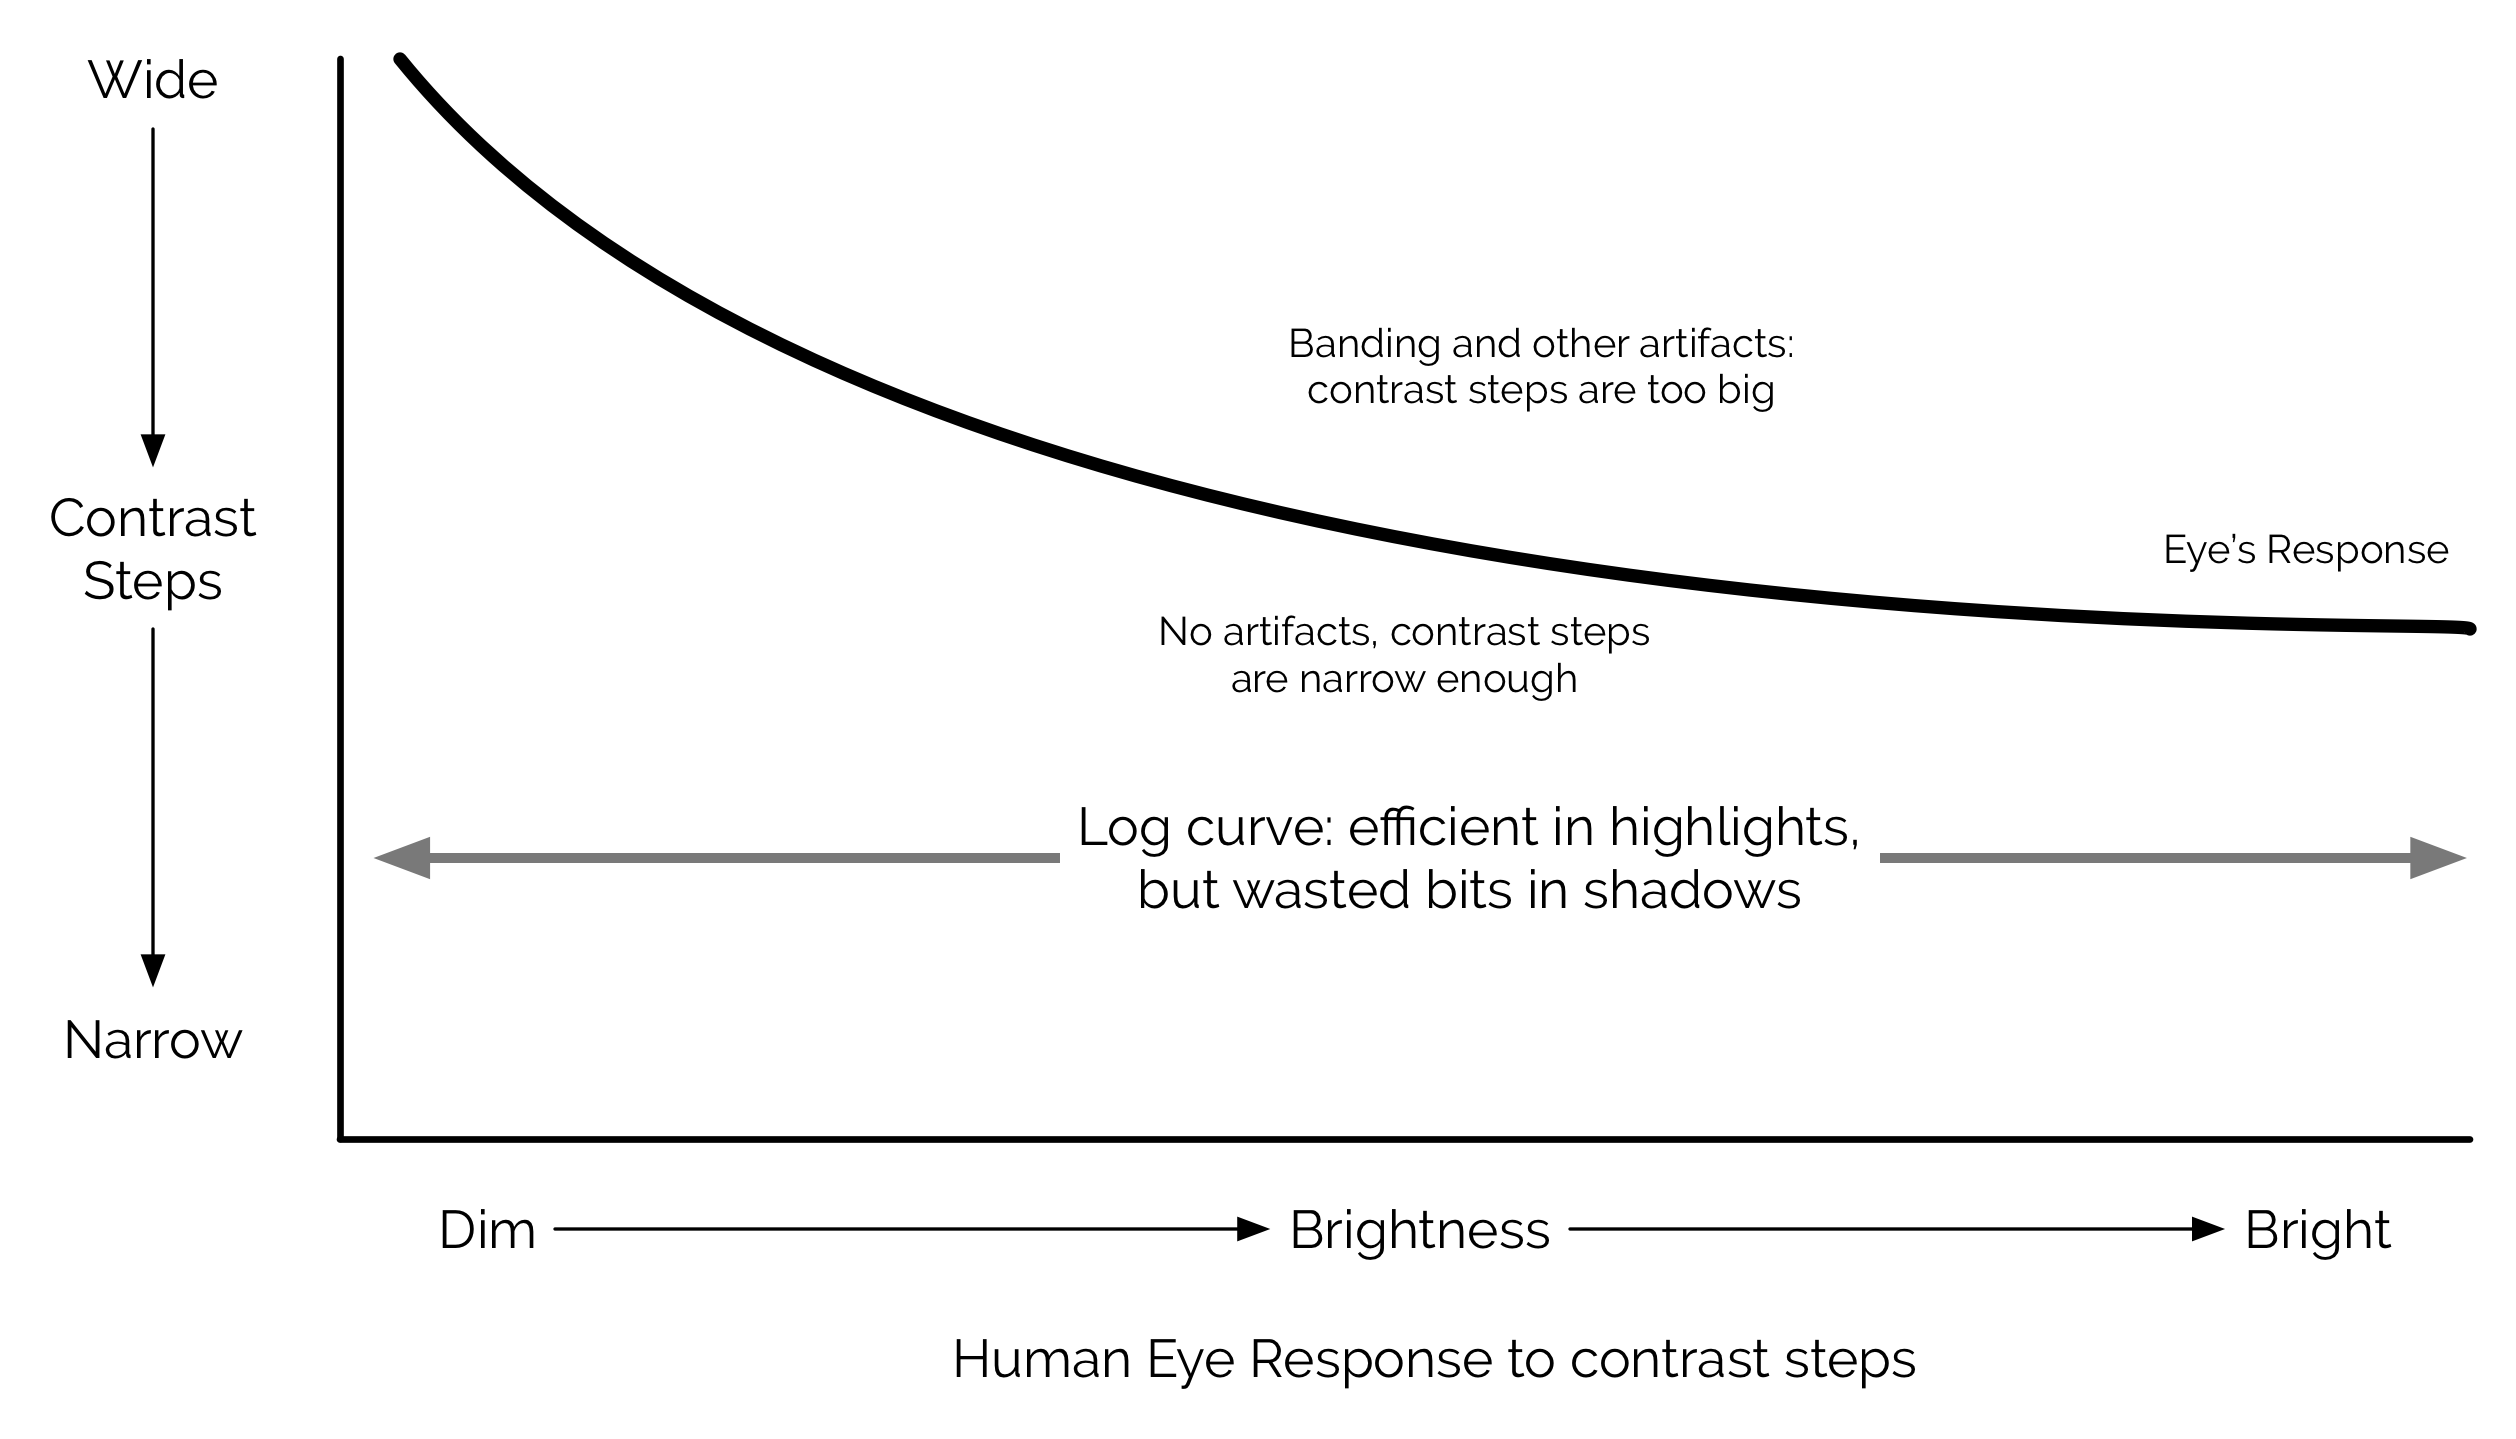
Log curves fair better, but they waste too many bits on shadow areas, making them an inefficient solution.
For maximum efficiency, Dolby® Laboratories developed a tone curve that varies its step sizes. It employs broader steps in the shadow regions, where our eyes are least sensitive to contrast changes, and finer steps in highlight regions, where we’re very sensitive to banding and other image artifacts. This specialized curve is called PQ, for “Perceptual Quantization,” and was adopted as SMPTE standard ST.2084. It’s the basis for both Dolby VisionTM and HDR10.
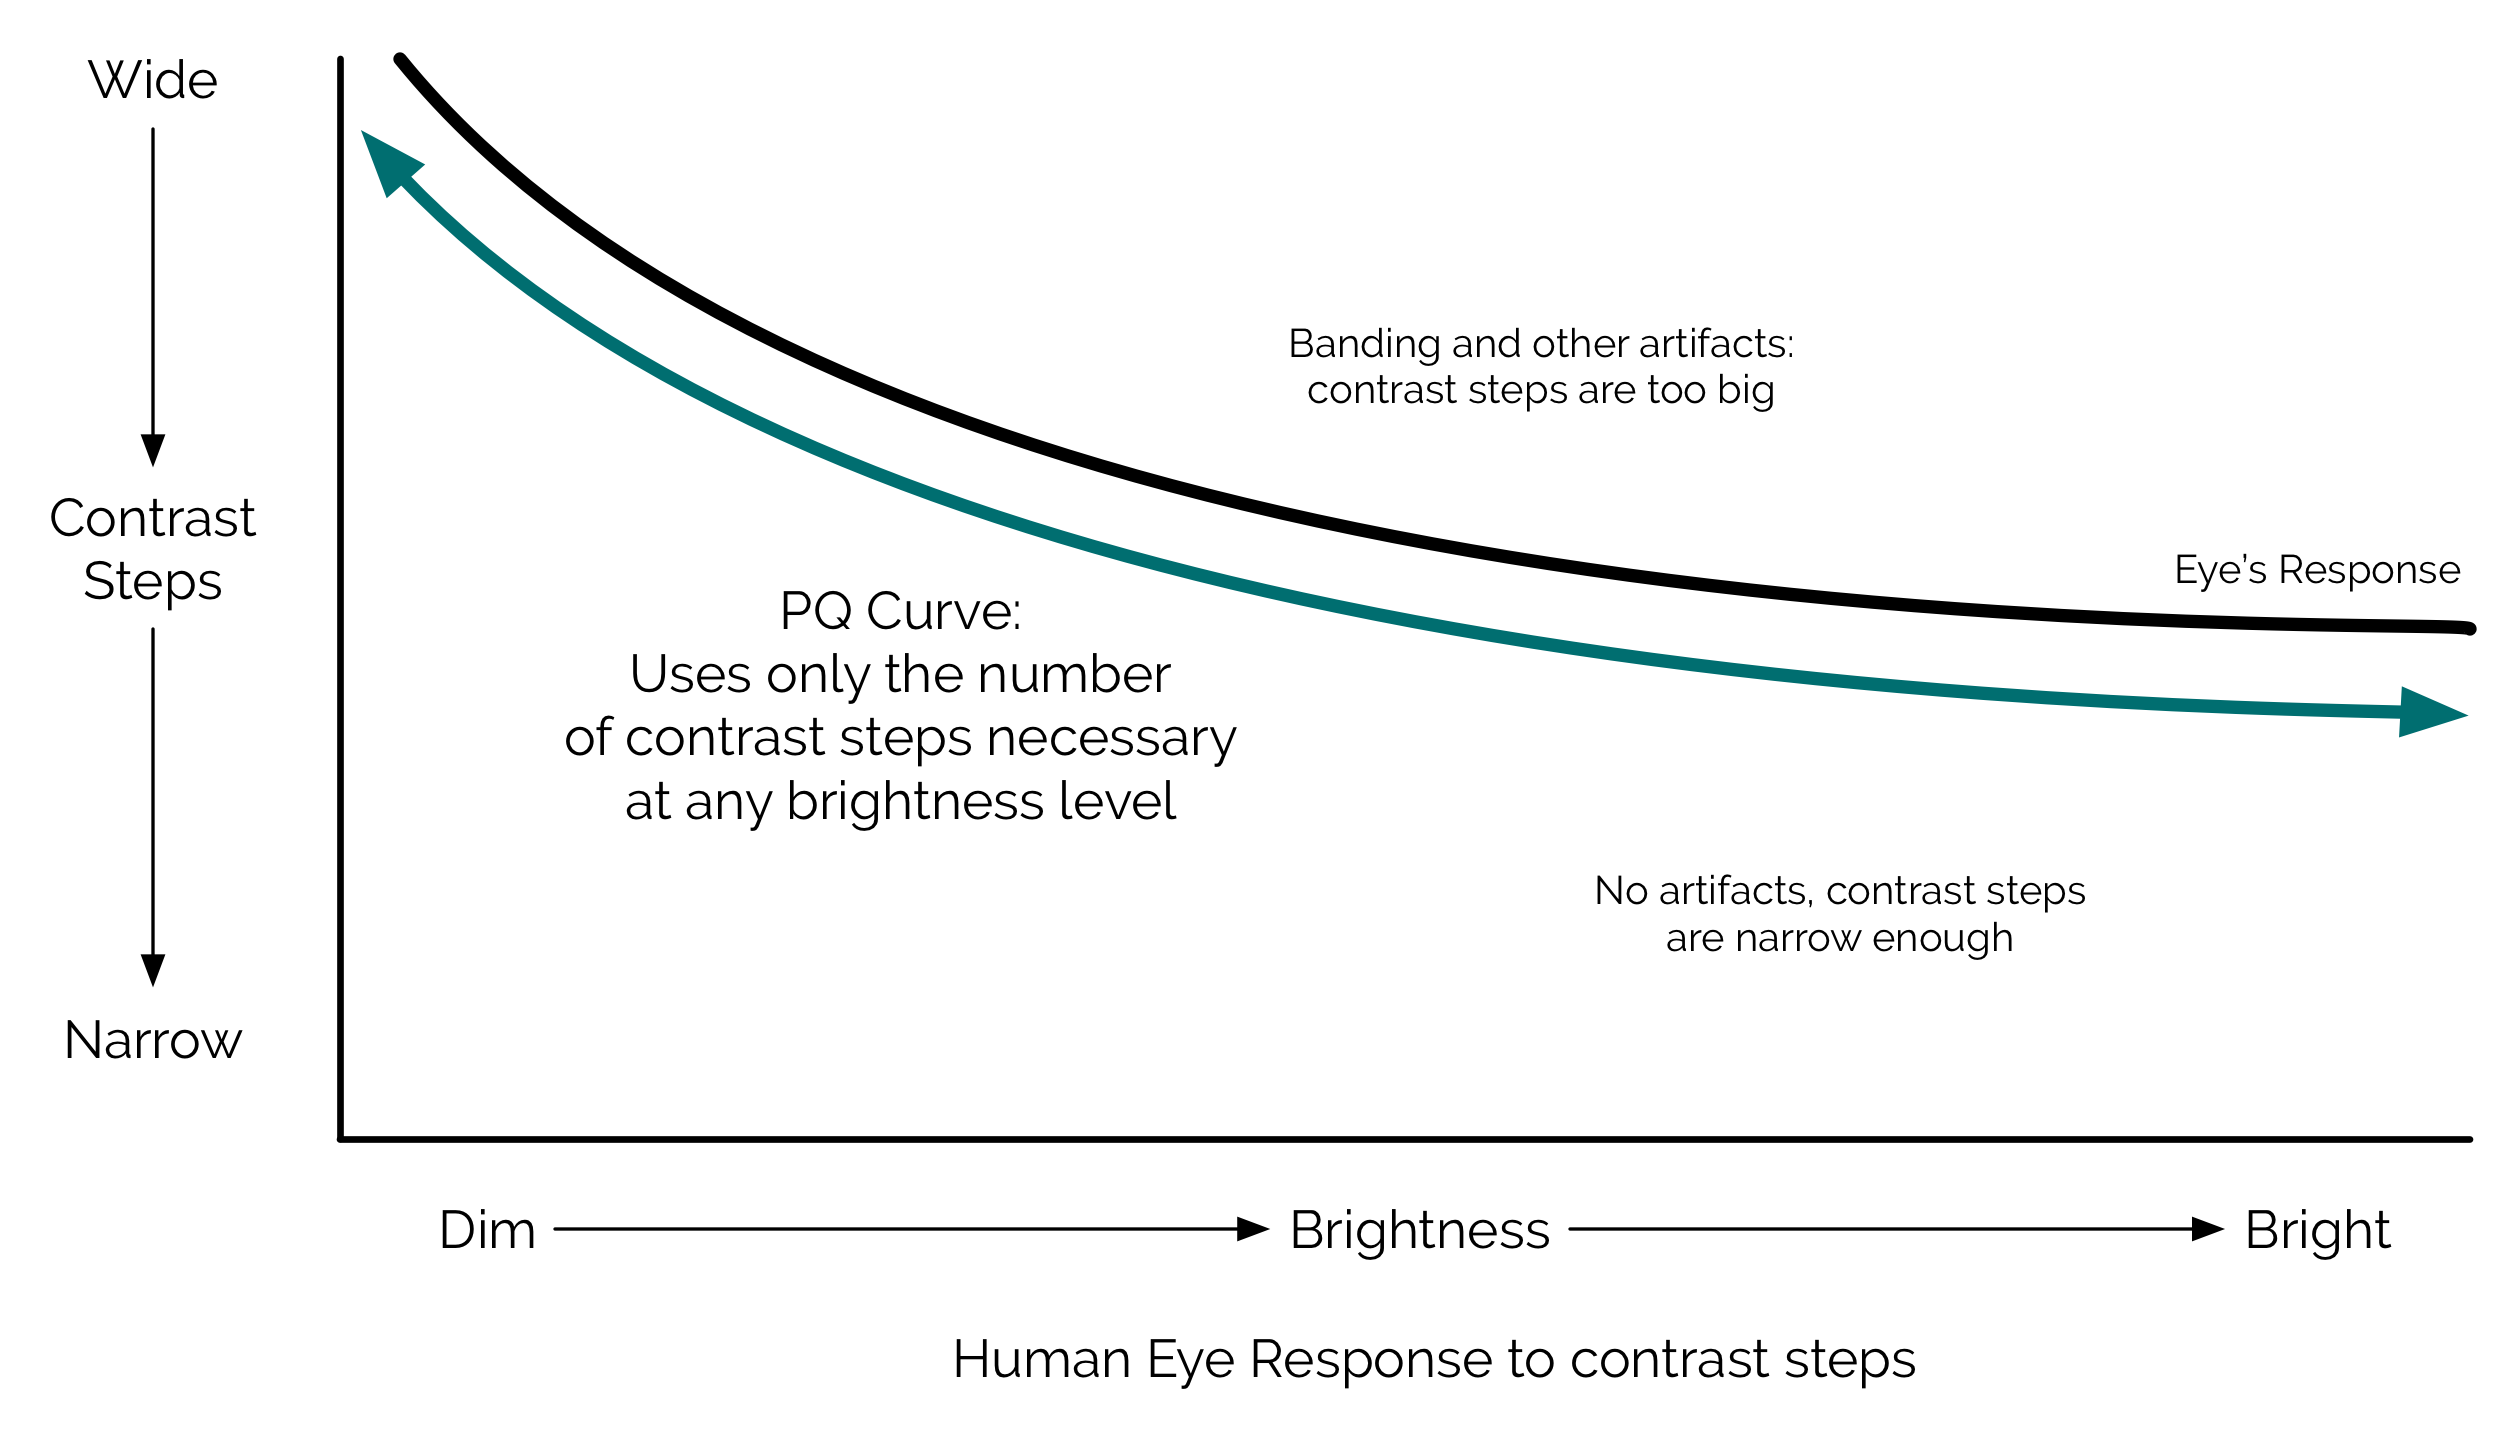
This curve is only meant to reduce data throughput in distribution or broadcast, where severe limitations exist on the amount of data that can be pushed down a cable or compressed onto a BluRay disk. One should never need to record PQ on set.
UPDATE FROM DOLBY LABS
“Never shoot PQ on set” really is a movie based phrase. Broadcasters seldom refer to “sets”; they think more in terms of “studios” but some disambiguation might be useful.
If the aim is scene capture (movies/episodic TV series) that will be significantly post produced, then capturing in PQ is sub optimal compared to camera raw.
If the goal is to work live or “as live” (common for news shows, game shows, etc.) then the look is baked-in at capture by the shader and by definition the content is display referred. PQ is the ideal format in this instance.
As always there will be exceptions: movies with inserts from newsreels, for example, or Saturday Night Live, which is live apart from the inserted post produced skits. As such there can be no hard and fast rules. For example, the bonus material of how-the-movie-is-made on a Blu-ray is often created using portable broadcast cameras on set.
For non-post produced content of any genre, cameras recording PQ will provide the best results and we have worked in many standards and with many manufacturers to get PQ adopted.
Much UGC is also for immediate live consumption, so using PQ in cell phones also makes a lot of sense. Don’t forget that PQ offers a very efficient way of packing high dynamic range content before any compression takes place and UGC content needs to use very efficient solutions to minimize bitrate. Of course, there is a lot of UGC content on YouTube, some of which has been edited, but very little of which has been graded.
WORK WITH CAMERA NATIVE FOOTAGE FROM SHOOT THROUGH POST
Canon recommends working with Canon Raw or log footage up to the point where the final project is mastered to HDR. Canon HDR monitors have numerous built-in color gamut and gamma curve choices, and they are all meant to convert Canon Raw or log footage into HDR without entering the realm of PQ.
PQ is the final step in the broadcast chain. The only circumstance in which you might use it on a film set is when you’re working with a camera that is not natively supported by your HDR monitor. For example, if a Canon monitor does not natively support a camera’s output, it can still display an HDR image as long as the camera outputs a standard PQ (ST.2084) signal.
Alternately, an intermediate dailies system will often translate log signals through a LUT for output via PQ to on-set or near set displays.
PQ is now commonly used in the broadcast world for recording live events, when the image is shaded/graded live and immediately broadcast in HDR.
Currently Canon HDR monitors work natively with both Canon and Arri® cameras. Future monitor software upgrades will add native support for image data from additional vendors, enabling Canon HDR monitors to work with a wide variety of non-Canon cameras.
CREATE YOUR LOOK IN THE MONITOR
Canon HDR monitors contain the core of ACES in their software. The image can be graded through the use of an attached Tangent Element TK Control Panel, or via ASC CDL controls located on the front of the monitor itself.
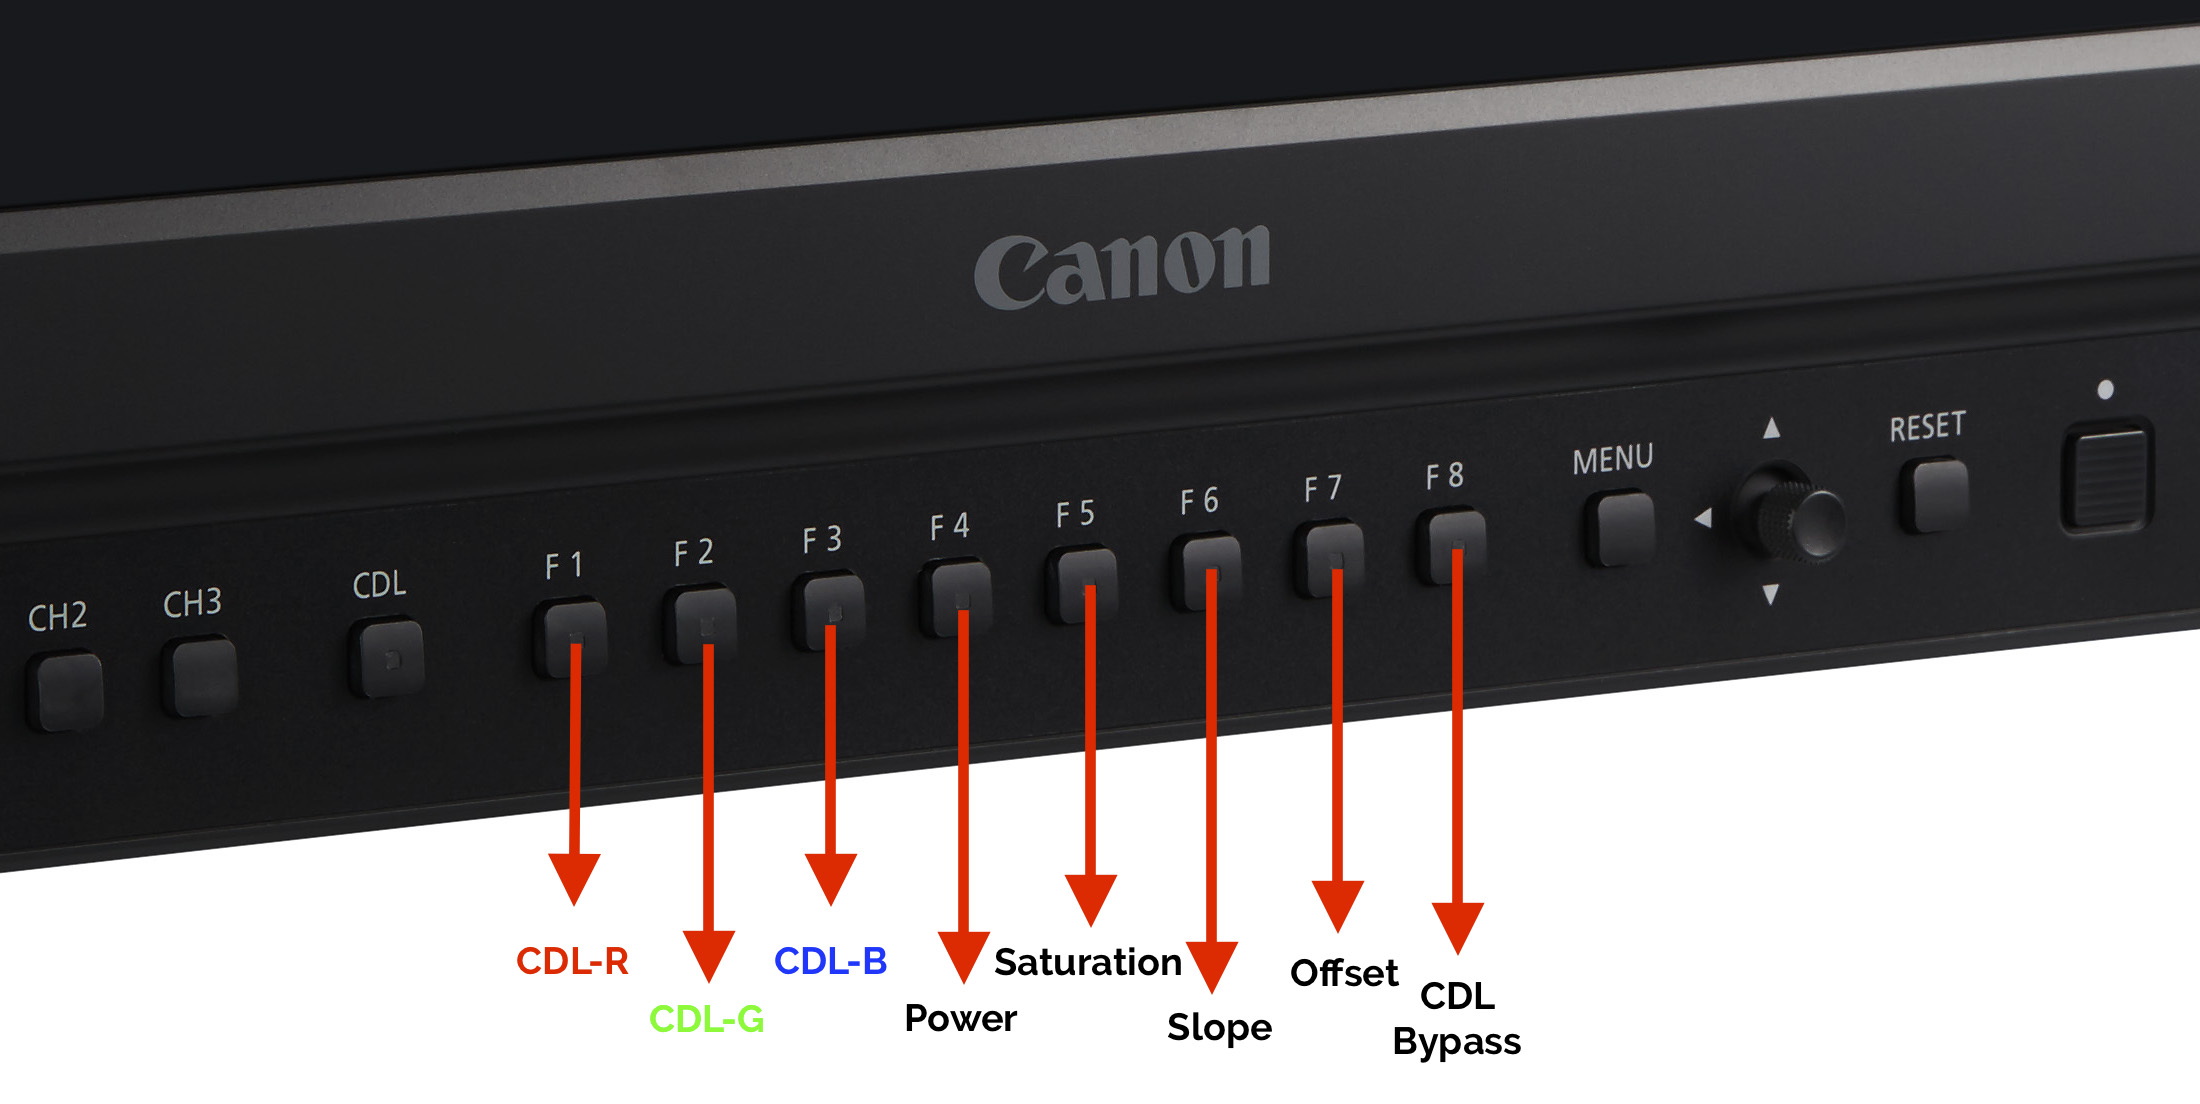
(above) Function key mappings for DP-V2410 in-monitor CDL control.
WAVEFORMS
In the SDR world, log images are not meant to be viewed directly. Exposure is much more easily evaluated by looking at a LUT-corrected image as tonal values are displayed correctly instead of arbitrarily.
In HDR, though, a log waveform may be the best universal method of ensuring that highlights don’t clip. Most log curves place a normally exposed matte white at around 60% on a luma waveform, so any peak that falls between 60% and white clip will end up in HDR territory. This “highlight stretch” makes for more critical evaluation of highlight peaks.
It’s important to know, however, that log curves don’t always clip at 109%. Log curves clip where their particular formula mathematically runs out of room, and this varies based on the curve’s formula and the camera ISO. Rather than look for clipping at maximum waveform values, it may be more prudent to look for the point where the waveform trace flattens, indicating clip and loss of detail. This can be found anywhere from 90% to 109%, depending on the camera, log curve, LUT and ISO setting.
A tiny bit of clipping may be okay, but this can only truly be evaluated by looking at a monitor on set. In general, any highlight clipping should be avoided.
A better option for examining highlights, and one found in both the Canon DP-V2410 and the upcoming DP-V2420 monitors, is a SMPTE ST.2084 (PQ) waveform that reads in nits. It’s divided into quarters: 0-10 nits, 10-100 nits, 100-1,000 nits and 1,000-10,000 nits. The log scale exaggerates the shadow and highlight ranges and shows exactly when detail is hitting the limits of either range.
DOLBY VIDEO® SOURCE FORMATS
The following is an excerpt from a December 1, 2015 paper released by Dolby Laboratories on the subject of original capture source formats.
For mastering first run movies in Dolby Vision, before other standard dynamic range grades are completed, wide-bit depth camera raw files or original scans are best.
Here is a list of Original (raw camera or film scan) Source Formats from best at top to not so good for Dolby Vision at the bottom (the first three in the list are of equal quality):
- Digital Camera raw*
• De-bayered digital camera images – 16bit log or OpenEXR (un-color-corrected)
• Negative scans – scanned at 16bit log or ADX OpenEXR (un-color-corrected)
• Negative scans – scanned at 10bit log (un-color-corrected)
• IP scans – scanned at 16bit log or ADX OpenEXR (un-color-corrected)
• IP scans – scanned at 10bit log IP scans (un-color-corrected)
• Alexa-ProRes (12bit444) – under some circumstances we’ve gotten good results from this format
• ProRes-444: This can provide a better looking image than you’d get in standard dynamic range but it can be limited. Results may vary.
*”Raw” means image pixels which come straight out of a digital motion picture camera before any de- bayer operations. [Art’s note: Photo sites on a sensor are not “pixels.” A pixel is a point source of RGB information (a “picture element”) that is derived from processing raw data. “Raw” is best defined as a format that preserves individual photo site data, before that data is processed into pixels.] For the current digital cameras, this format has 13-15 stops of dynamic range – depending on the camera make and model.
You can consider raw format images the same as original camera negative scans, which also have lots of dynamic range. Either of those formats, if available, will give good Dolby Vision performance because they have wide dynamic range.
Anything less than the above will not give good Dolby Vision performance. HDCAM SR will not provide acceptable quality Dolby Vision. A good Dolby Vision test scene is one that has deep shadows and bright highlights with saturated colors. If a compromise on these characteristics must be made, use a scene that has at least two of those attributes. For Dolby Vision tests and re-mastering projects, content owners should provide a master color reference (DCP, Blu-ray master or broadcast master) for use as a color guide.
THINGS TO REMEMBER
- Your HDR imagery will also be seen in SDR. Be sure to check your images periodically to make sure they work for both formats. It might be helpful to craft a separate LUT for SDR to try to preserve your creative intent.
- Test every part of your optical path to ensure that lenses, filters and sensors compliment each other. Verify these combinations using a 4K HDR monitor.
- Rate the camera at half its native ISO, or create a viewing LUT that will do the same. Noise is your enemy.
- Always record in raw or log at the highest bit depth possible. Never use a WYSIWYG or Rec 709 gamma curve.
- 16-bit capture is the best option (currently). 12 bits will work. 10 bits can work but will leave less leeway for significant post correction. 8-bit capture is never advisable.
- Record to the largest color gamut possible, which is either the camera’s native color gamut (such as Canon’s Cinema Gamut) or Rec 2020. Never record to Rec 709.
- Always record to an RGB 4:4:4 codec. Avoid Y’CbCr. Any codec that is subsampled (less than 4:4:4) is a Y’CbCr codec.
- It’s a good idea to work with camera original data all the way through post. PQ transcoding should only happen as a final step when producing deliverables.
- Support for a broad selection of multiple camera formats should appear shortly in on-set monitors. If a monitor is incompatible with a camera native signal (such as Canon Cinema Gamut/Canon Log 2) then a PQ feed from the camera should bridge the gap. (Not all cameras will output PQ.)
- Waveforms are critical in avoiding clipped highlights. Some monitors, like the DP-V2410, will display a logarithm waveform in nits, which greatly expands the highlight range for high precision monitoring. If this isn’t available, viewing a log signal will dedicate nearly half of a standard waveform’s trace (above 60%) to highlight information.
SERIES TABLE OF CONTENTS
1. What is HDR?
2. On Set with HDR
3. Monitor Considerations
4. Artistic Considerations
5. The Technical Side of HDR < You are here
6. How the Audience Will See Your Work < Next in series
The author wishes to thank the following for their assistance in the creation of this article.
Canon USA
David Hoon Doko
Larry Thorpe
Dolby Laboratories
Bill Villarreal
Shane Mario Ruggieri
Cinematographers
Jimmy Matlosz
Bill Bennett, ASC
Disclosure: I was paid by Canon USA to research and write this article.
Art Adams
Director of Photography

Filmtools
Filmmakers go-to destination for pre-production, production & post production equipment!
Shop Now