Back in April, we gave a preview of the major new features planned for what is now known as After Effects CC 2015 (also known as 13.5). Now that this version is available for download to Creative Cloud subscribers, we thought we’d flesh out those thoughts a bit based on more time using this new version, including important installation advice as well as other user gems and gotchas with the major new features.
Back in April, we gave a preview of the major new features planned for what is now known as After Effects CC 2015 (also known as 13.5). Now that this version is available for download to Creative Cloud subscribers, we thought we’d flesh out those thoughts a bit based on more time using this new version, including important installation advice as well as other user gems and gotchas with the major new features.
To set the overall scene, here’s the overview from our new video course on lynda.com After Effects CC 2015 Updates, and then we’ll dive into a few details:
Keep Both CC 2014 and 2015
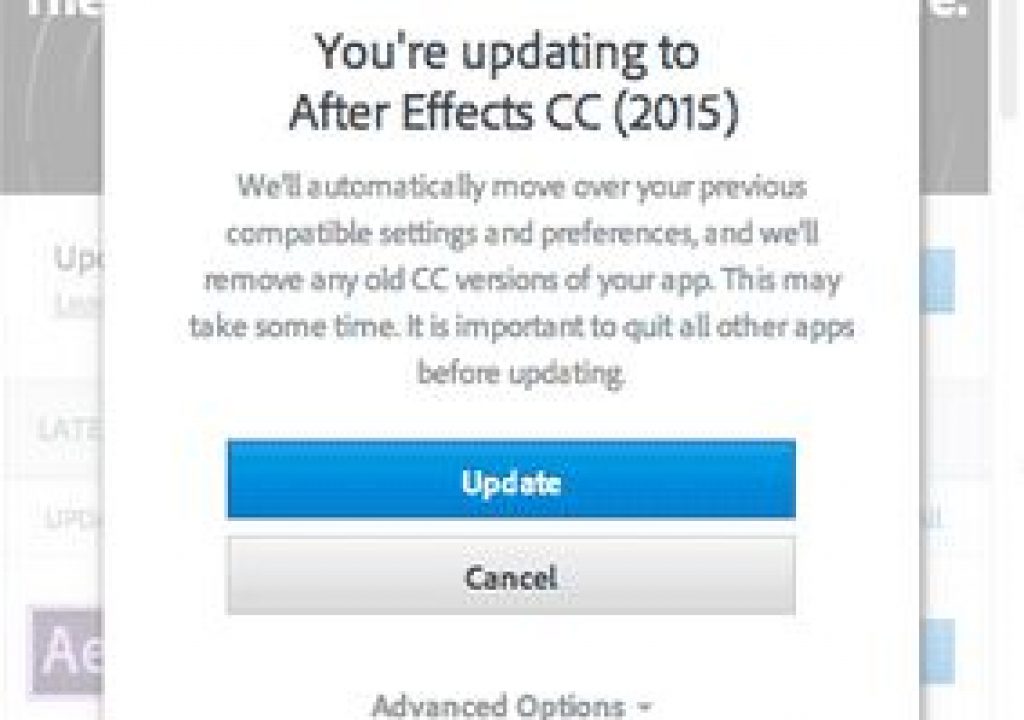
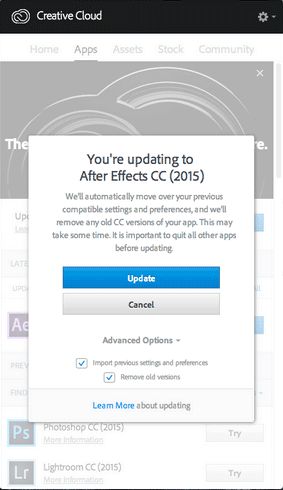 There are reasons to migrate to CC 2015, and reasons to continue to use CC 2014 (which we’ll touch on throughout this article). Therefore, the After Effects team strongly recommends that you keep both versions installed on your computer. That’s not the default behavior. Therefore, when Creative Cloud gives you the opportunity to download this new version by clicking Update, before you click the second Update button inside the Update dialog box, first click the arrow to the right of Advanced Options to twirl them open, and then disable “Remove Old Versions” before you click Update. You disable or enable this on an app by app basis – doing it for one CC program will not automatically do it for all. Adobe goes into more detail about this in their own blog post on the subject.
Note that removing the prior version is enabled by default for all Creative Cloud programs (as shown here); by contrast, After Effects users often have to deal with multiple versions due to client idiosyncrasies. If you got this advice too late and already overwrote your copy of AE CC 2014, Creative Cloud subscribers can download and install prior versions back to CS6.
The good news is that AE CC 2015 shares the same project file format as CC 2014, so you can start a project in 2015 and continue in 2014 if you wish – no “Save As” required. This will also make it easier to exchange projects with clients and other users who may be slow to update.
Unified Preview
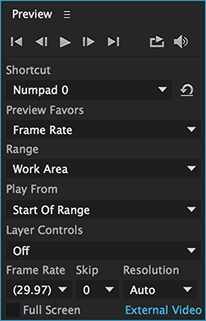 As noted in our preview article and the video above, the biggest changes in this release are underneath the hood: After Effects has been substantially rewritten to separate the user interface processing thread from the rendering thread.
A side effect of this is that previewing has been reworked, with some new behaviors and a greatly expanded Preview panel. The settings for Numpad 0 (numeric keypad 0) preview are shown here, and have been tweaked between our April sneak peek and now to more closely resemble how After Effects has worked in the past.
The big change is with Spacebar preview, which has been reworked to more closely resemble how a normal video editor or player responds: With the new defaults, pressing the spacebar plays back video (and if possible, audio) as close to real time as it can; pressing the spacebar again causes the Current Time Indicator (CTI for short) to stop at the point in time where you pressed the key.
Which key you press to stop a preview has taken on new importance. As noted above, pressing the spacebar causes the CTI to jump to where you pressed it. (The same is currently true with pressing Numpad Decimal Point – the key combination to start an audio-only preview – although that might change.) Stopping a preview by pressing Numpad 0 or the Escape (Esc) key, by contrast, will cause the CTI to return to where you started the preview. These “stop” behaviors cannot currently be edited in the Preview panel. Pressing almost any other key will no longer stop a preview, because you can now edit your project while preview is taking place – which is our next topic.
(Sort of) Uninterrupted Preview
The most obvious benefit from the separation of user interface and rendering in After Effects CC 2015 is that you can keep a preview running while you edit your project or composition. This isn’t limited to just editing parameters on the fly; you can also add layers and effects or even import new footage items without stopping playback. The frame rate may bog down as the rendering operations catch up with your changes, but in general it means working and making changes are a lot more fluid.
One concept that takes some rethinking is the relationship between time and editing. Previously, editing a parameter changed its value at the current time, creating a new keyframe if the parameter had already been enabled for keyframing. Now that time can keep moving while you’re editing, you have two different time indicators to keep track of: a headless red Playback Time Indicator (PTI) line, and a blue Current Time Indicator (CTI) line with header, as shown below:

During preview, the red PTI indicates which frame is being displayed in the Comp panel, and the blue CTI indicates where in time you are editing a parameter. If you scrub a value, it will be changed at the location of the blue line. If you click and drag the header on top of that blue line, preview will stop as you move the CTI. But here’s the trick: If you hold the Shift key while dragging the head of the blue CTI, preview will continue, meaning you can edit or create keyframes at different points of time without stopping playback.
We use audio extensively in After Effects, so we’re probably more sensitive than most to the way it’s handled in AE – and it’s a mixed blessing in CC 2015. On the positive side, as soon as a preview achieves real-time playback, audio will start playing back too. In many cases, this happens before your work area has been played all the way through, so it’s a big improvement over waiting for the entire work area to cache before hearing audio.
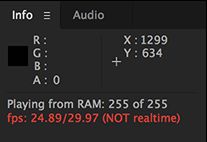 On the downside, too many things can cause playback to drop below real time, which means audio will drop out as well. For one, in version 13.5.0 the playback rate does not stabilize until a few frames into playback – even if the entire preview time span has already been cached – meaning you currently will not hear audio from the start of any preview. (Unfortunately, this currently applies to audio-only previews as well.) Scrubbing many parameters or even just bringing different panels forward will currently slow down playback and cause audio to drop out. The biggest current disappointment is that pressing Numpad * during preview to place layer or comp markers in real time during a preview will also slow down playback and cause audio to drop. As a result, some of you might want to drop back to using AE CC 2014 (13.2) when working on a project that uses audio. Fortunately, the After Effects team feels our pain, and fixes for many or most of these problems should appear sooner rather than later.
In the meantime, there is a workaround of sorts: If you open Preferences > Previews, there is a new preference called Mute Audio When Preview Is Not Real-Time. It defaults to On. Unchecking it means you will get stuttering audio rather than silence if the frame rate drops below real time. Some will find this an acceptable compromise for the time being. Again, this applies to those who work with audio; many After Effects users don’t for the majority of their projects.
Adobe has also created their own exhaustive blog post on the subject of previews in AE CC 2015, which can be read here. In general, the new system will take some getting used to, and is a work in progress, but at the end of the day it should be a more efficient way to work.
Creative Cloud Libraries
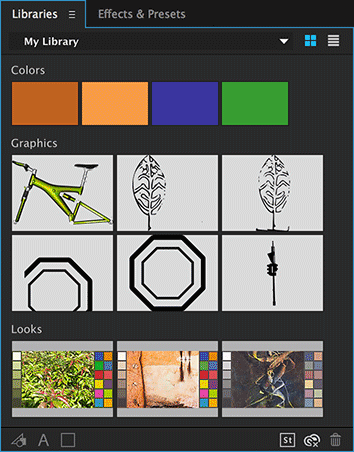 We discussed the inclusion of Creative Cloud Libraries at some length in both the overview movie above and in our preview article in April, so we won’t repeat it all here. The short version is that as of After Effects CC 2015, the Libraries panel is read-only – you cannot add an asset from After Effects into the panel. That said, there are two situations where the Libraries panel comes in very handy.
The first is if you are sharing a Libraries folder with a remote user, where they are creating Photoshop or Illustrator assets for you to use in After Effects, or creating color swatches for you to eye dropper for reference. There are a couple of small gotchas, such as the alpha channel must be integrated into the Photoshop Layer rather than a separate Channel as part of a Background (detailed in this piece over on the lynda.com Article Center), and SVG format vector files must be run through Illustrator to convert them to .AI files. We also have an issue where the eyedropper currently does not work right with other panels inside After Effects on our Retina Macs (this bug exists in 13.2 as well).
The other situation is if you are using the Adobe mobile apps Shape or Hue, and want to get their results directly into After Effects. For those not familiar with these apps, Shape uses your device’s camera to shoot an object, find its edges, and create filled shapes out of the results. Hue (originally known as Project Candy) uses the camera to shoot an object and pick from a selection of colors derived from the photo to use as the mid-tone color in a simple “tritone tint” color lookup table. Both apps also allow you to load images rather than shoot them via Creative Cloud.
Face Tracking and Adobe Character Animator
Adobe Character Animator (originally known as Project Animal) is a powerful new animation tool to record real-time performances for anthropomorphic puppets created in Photoshop, Illustrator and the such. A Preview version of it is installed alongside After Effects CC 2015.
We can hear you saying “I don’t do character animation – so this doesn’t apply to me.” What does apply is that its ability to track details in a person’s face with virtually no preparation (no tracking dots etc.) has been brought over to After Effects in the form of the Face Tracker, which makes it easy to mask a face in moving footage for color correction and other treatments. The advanced version of it will also extract measurements – such as how wide the smile is – that can then be used to drive other animations (we’ll post another article about that in the near future as well). In general, we’ve been told to think of Character Animator as “Motion Sketch and Expressions on steroids,” implying there is far more to come in the area of translating gestures into motion graphics animations.
![]()
A gotcha we’ve found in this initial release is that if the actor or actress blinks, the mask above their forehead gets pulled down in sympathy. The workaround is to isolate the mask keyframes where this happens, select them, choose Layer > Mask and Shape Path > RotoBezier (this inoculates you from another bug), and then delete them. By doing so, After Effects will interpolate the masks shapes before and after the blink through the offending frames.
And Then There’s…
We’ve covered just the major new features above. As mentioned up top, we just released a new course on lynda.com called After Effects CC 2015 Updates that goes into detail on using these features, and more. If you’re not currently a lynda.com subscriber, you can get a 10-day free trial before your credit card is billed by using the link http://www.lynda.com/go/ChrisAndTrish.
For a comprehensive list of additions, changes, and deletions, we urge you to read After Effects Project Manager Todd Kopriva’s blog post providing an overview for this release. Some of those deletions – such as network rendering, cache in background (both hopefully just on sabbatical and due to return in a future release), Brainstorm, and more – may provide additional reasons to keep both After Effects CC 2014 and CC 2015 installed; Adobe has created a separate blog post about those deletions here.
In short, this is a significant update, while also being the first version of some new technologies such as the new preview scheme, CC Libraries, and Adobe Character Animator – with the expected “version 1.0” shortcomings. Fortunately with the Creative Cloud subscription scheme introduced a few years ago we’ve been getting a few updates a year instead of having to wait a year or two between releases. As such, we expect these features to be further refined in upcoming releases based on user feedback – so make sure you send them your feedback! We’ll also be updating our course on lynda.com (and no doubt, Todd will be updating his blog) as these updates are released.

Filmtools
Filmmakers go-to destination for pre-production, production & post production equipment!
Shop Now