Adobe has officially launched Creative Suite 5, which includes major updates to virtually all of their applications. Adobe has seeded us with preliminary versions, and hired us to help create some documentation on the new release; we wanted to share with you our own impressions plus insights into the new features in After Effects CS5.
In addition to this preview, we also have a 2.5 hour course we’ve created for lynda.com on AE CS5 called After Effects CS5 New Creative Techniques. (If you don’t have a subscription, click here for a free 7-day all-access pass.) Finally, we have completed on the fifth edition of our book Creating Motion Graphics with After Effects (“CMG5” for short), which covers the major new features in both CS4 and CS5. Meanwhile, here’s some of the significant new features in After Effects CS5:

Native 64-bit Application
The largest fundamental change in After Effect CS5 is rewriting it to be a 64-bit native application. This brings several pros and a few provisional cons:
Pros
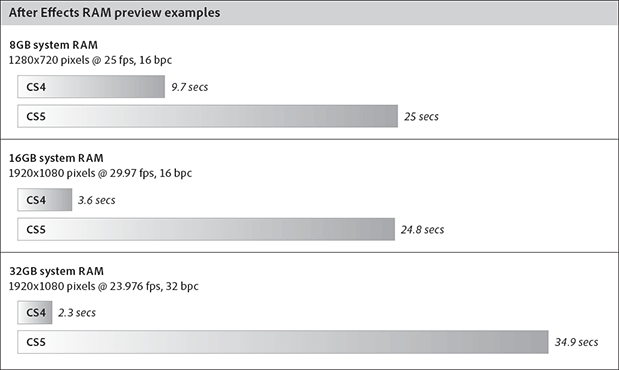
+ After Effects can take advatange of all of the available memory in your computer, instead of being restricted to 2-4 GB per instance of the application (depending on OS). The most obvious advantages are longer RAM Previews, the ability to handle larger media and create larger comps without out-of-memory errors, and the option to work at higher bit depths than you normally would for improved color fidelity. The chart below provides some typical scenarios for the types of improvements you should see with varying configurations; note that the more RAM you have, the bigger the difference:
+ Performance is improved. Michael Coleman (After Effects product manager) recently posted some benchmarks; a 30% improvement is typical.
+ Linked in with this rewrite, multiprocessing is greatly improved. For one, there is now almost no time lag to launch a multiprocessor preview or render; this lag used to negate the advantage of enabling Render Multiple Frames Simultaneously for shorter comps and previews. There have also been other refinements to multiprocessor rendering, including better RAM utilization and the ability to access virtual cores.
Cons
– You must be running a 64-bit OS, or AE CS5 won’t even install. (If you install Adobe CS5 Master Collection on a computer with a 32-bit OS, After Effects and Premiere Pro CS4 will be installed instead.) On the Mac, OS 10.5.7 or later is suggested. On Windows, you need to be running a 64-bit flavor of either Vista 64 with Service Pack 1 or Windows 7, and at least the Home Premium version or higher. We recommend at least Business/Professional, as Home Premium is restricted in the maximum amount of RAM it can access.
– All plug-ins must be updated to 64-bit versions (also previously reported by Michael Coleman). Fortunately, many third-party developers have already announced plans to release 64-bit versions around the time AE CS5 ships. However, if you have any mission-critical plug-ins that you rely on, check with the vendor before upgrading to CS5.
Adobe has created a video as well as a web page with more information on upgrading your computer to get the most out of Production Premium CS5 (which includes After Effects).
Roto Brush
Aside from the 64-bit issue, the other major new feature in After Effects CS5 is the introduction of the Roto Brush tool. This tool allows you to create broad strokes defining where the foreground is (the green stroke below) and where the background is (the red stroke below). From these, it automatically determines where the transition between the two is, creating an alpha channel in the process:
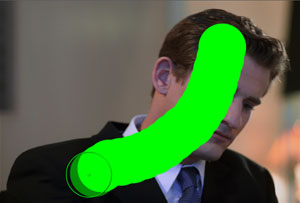

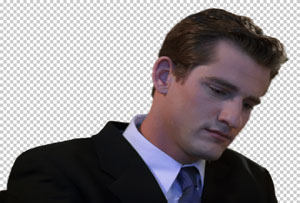
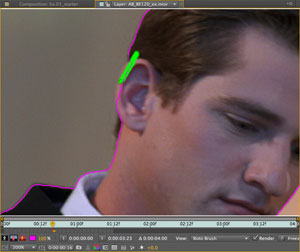
In contrast to traditional rotoscoping methods which required the creation of very precise brush strokes or mask shapes, the new Roto Brush tool allows you to make general strokes defining foreground (green) and background (red), from which it creates an alpha channel. Smaller strokes are used to clean up areas missed by the automatic edge detection routines. Footage courtesy Artbeats/Business Executives.
Roto Brush then uses motion estimation to auto-track and animate the boundry between foreground and background from frame to frame. You can use smaller corrective strokes to fix any places where it got the boundary wrong, including holes that open up as a person moves their arm away from their body and so forth. These corrective strokes are also used by Roto Brush to predict edge movement in subsequent frames. Although it is heavily automated, Roto Brush does give you access to parameters and diagnostic displays that help you refine how the boundary is calculated and propagated across frames.
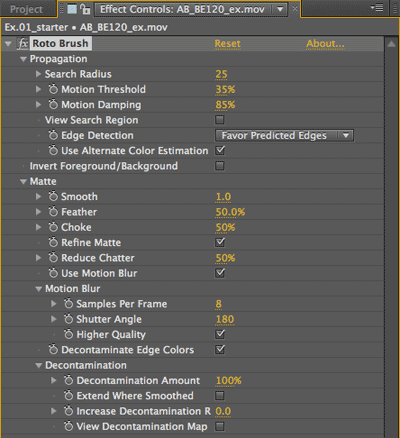 In addition to edge detection, Roto Brush also features a Matte section which processes and refines the output of the edge detection engine. This includes the ability to smooth, feature, and choke the matte, dampen “edge chatter” for areas that are not actually moving, calculate motion blur for edges that are moving, and to remove background color contamination from around the edges – particularly useful for partially transparent or motion blurred edges.
What is particularly nice is this section is also available as a 32-bpc stand-alone effect in CS5 called Refine Matte, which can be applied to any matte including those generated by keying, masking, painting, mocha shape, etc. (application note: you may need to precomp the matte so that Refine Matte can properly detect the motion).
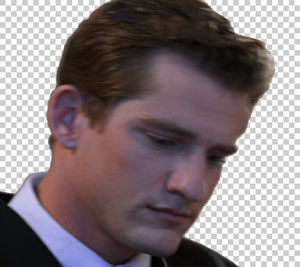

Above left shows the output of the edge detection portion of Roto Brush. Above right shows the result of enabling the Matte section, which detects motion and generates a corresponding amount of motion blur (and edge color decontamination) for the moving edges.
Roto Brush is hardly perfect; it particularly has trouble if there is low contrast between foreground and background (such as an actor emerging from the shadows), if there is a lot of dust or other atmospheric effects, if there is excessive motion blur, etc. However, even if you need to create a lot of corrective Roto Brush strokes – or augment the results with AE’s paint and masking tools – you can often achieve a good result much more quickly than by using traditional rotoscoping methods. Its ease of use may also encourage you to create traveling mattes more often for less-critical applications, such as focused color correction and other image enhancements.
Below is a tutorial from Adobe on using Roto Brush; we also have a much more extensive tutorial as part of our After Effects CS5 New Creative Techniques course for lynda.com, plus a new chapter dedicated to Roto Brush in CMG5.
next page: mocha & mocha shape; Digieffects FreeForm; Adobe Repouss©
mocha and mocha shape
For some users, one of the biggest reasons to upgrade to After Effects CS4 was the inclusion of the excellent planar motion tracker, mocha for After Effects by Imagineer Systems. After Effects CS5 comes bundled with mocha for After Effects v2, plus the mocha shape plug-in.
mocha shape provides a way for you to generate traveling mattes with the aid of mocha’s tracker. After you track a feature of your footage, you can define a matte shape (such as the outline of an object in the footage), and link this shape to your track. You can also hand-animate the shape’s outline to match changes in the underlying object. The result can be exported from mocha and pasted onto a layer in After Effects CS5. This causes the mocha shape effect being added to the selected layer (one copy of the effect for each shape you defined and exported), which can either be used to generate an alpha for that layer, or as a high-contrast matte which can then be used in conjunction with AE’s track matte feature. Alternatively, a new companion menu option in After Effects CS5 allows you to convert this shape into an animated mask. You can use this feature to help automate rotoscoping, create motion-tracked “power windows” for color correction, separate foregrounds from backgrounds to create artificial depth of field and atmospheric effects, and so forth.
One of the nice additions in mocha v2 (and reasons to use the mocha shape effect rather than convert the shapes to After Effects masks) is that it supports per-vertex feathering (i.e. you can adjust the width of the matte’s feather at each shape vertex point). They’ve also refined the workflow for exporting shapes from interlaced sources into After Effects (no more time-stretching keyframes or hand-editing the exported file). Finally, support for motion blur for tracked objects using either traditional corner pin or Red Giant’s Warp effect is also in the AE CS5 version. (Note that shapes are not motion-blurred; you will need to use the Timewarp trick or the new Refine Matte effect to introduce motion blur – we’ll write those up later in a separate article on PVC.)
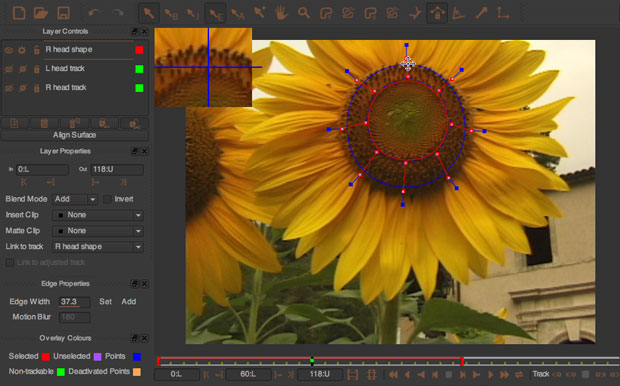
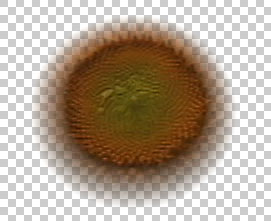

mocha for After Effects CS5 allows you to create motion-track-linked shapes with independent feather widths per vertex points (top), and transfer the result in After Effects to use as alpha or luma mattes (above left) for selective color correction (above right) or other rotoscoping-related techniques. Footage courtesy Kevin Dole.
Below is a video from Adobe on the new features in mocha and mocha shape; we also have a tutorial as part of our After Effects CS5 New Creative Techniques course for lynda.com, plus a new chapter in CMG5 dedicated to mocha and mocha shape.
Digieffects FreeForm
A new addition to the After Effects bundle in the inclusion of Digieffects FreeForm (formerly known as Forge FreeForm, by mettle.com). This effect allows a layer to be freely warped in 3D space, plus also allows one layer to displace another in 3D:
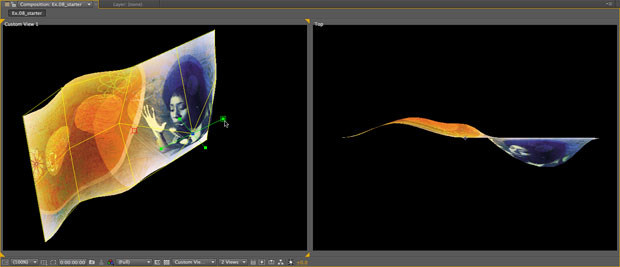
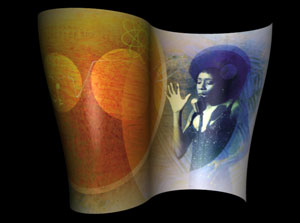
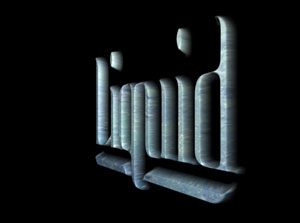
Some of the many uses of FreeForm include the ability to arbitrarily warp a layer (top), curl it (above left), or to use another layer to both displace/extrude it and to stencil-cut it based on the second layer’s alpha (above right). Footage courtesy Digital Vision/Music Mix and Artbeats/Water Effects.
FreeForm can be mildly daunting to master. Therefore, Digieffects will be releasing a series of “enhancement packs” with animation presets and template projects. We’ve also included a pair of tutorials on using FreeForm in both our lynda.com course on AE CS5 as well as our book CMG5.
Adobe Repouss©
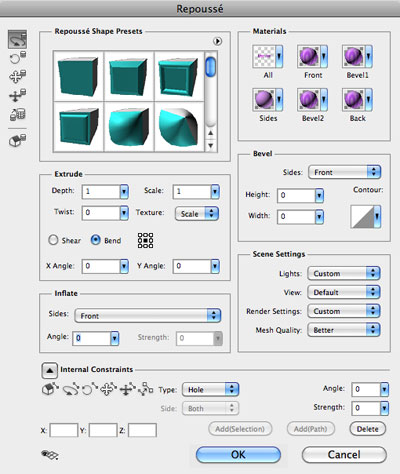
One of the technologies we sneak-peeked in our report on the Adobe Community Leaders Summit was Adobe Repouss©: an engine to extrude and inflate selections in Photoshop, which can then be imported as 3D objects to use in After Effects. It’s a pretty robust extrusion engine, with control over beveling, twisting, shearing, and scaling along the extrusion, inflating (or deflating) the faces, texturing sections differently, choosing different render styles (including wireframe), and adding lights.
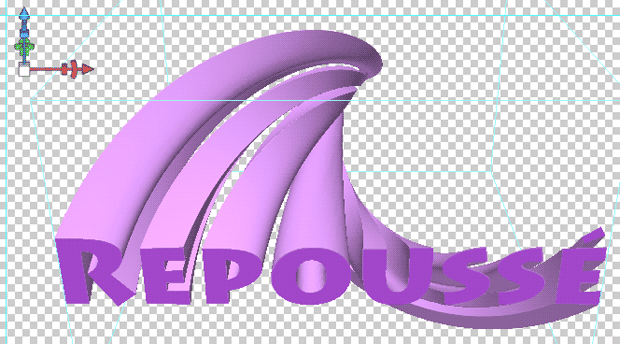

Since it works on selections in Photoshop, anything with an alpha channel is fair game to extrude or inflate:
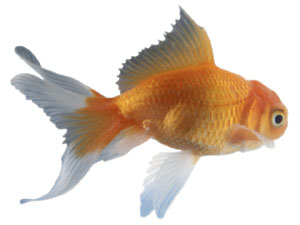
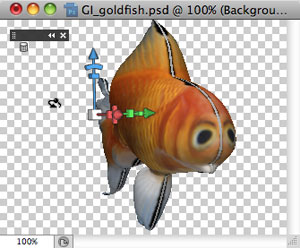
Goldfish courtesy Getty Images.
Once you save this file from Photoshop, it may be imported into After Effects as a composition that includes a layer that uses the Live Photoshop 3D effect, akin to the 3D model import workflow introduced in AE CS4. This means it also has the same limitations, including no ability to change lighting in After Effects (it only responds to the After Effects 3D camera), separate render & controller layers to manage, the inability to map an After Effects layer as a surface texture, etc. The biggest caveat has to do with performance: With the stock NVIDIA GeForce 8800 that came with our PowerMacs, interactivity was very sluggish; with the NVIDIA Quadro 4800s that Adobe and NVIDIA have been seeding us with (and which is a great card if you’re also upgrading to Adobe Premiere Pro CS5), performance is fine. At the end of the day, if you have a budget for third-party plug-ins, you’ll be happier with Zaxwerks Invigorator Pro (once it gets updated to be 64-bit); if you don’t, but your employer does buy either Adobe CS5 Production Premium or Master Collection, you’ll be happy to have this capability thrown in.
As with many other new features, we cover Repouss© in more detail in our lynda.com course and in our book CMG5; you can also click here to watch an Adobe TV video on the new video-oriented features in Photoshop CS5 (including Repouss©).
next page: Color Finesse 3, Apply Color LUT, RED R3D support, and other color management changes
Color Finesse 3
Synthetic Aperture’s Color Finesse has long been a valued part of the After Effects install; AE CS5 includes Color Finesse LE 3. There are many enhancements inside, including a Vibrance control (a tamer way of boosting or removing saturation), a Highlight Recovery tool (especially important for 32-bpc sources and projects), HSL curves (pictured below), and the ability to export Color Look-Up Tables (LUTs) to a wide variety of formats. This makes it possible to create color treatments inside Color Finesse and After Effects, and export them for use on other systems – or back in After Effects itself (more on that next).
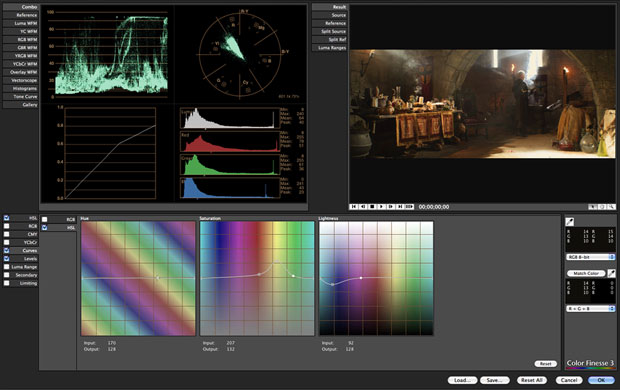
The new HSL Curves section in Color Finesse 3. Footage courtesy Adobe Systems.
Apply Color LUT
A few effects in AE CS5 will appear obscure to many, but absolutely essential to some: Apply Color LUT (Look-Up Table). Color LUTs are an alternative to using standard ICC color profiles (which also contain LUTs); ICC profiles often represent specific devices, while LUTs are used to accomplish specific tasks. Some of those tasks include :
* You have created a color treatement in Color Finesse (bundled with After Effects), and you wish to either share this treatment with another user on a different system. Or, you might prefer to apply just the resulting LUT to other clips inside After Effects rather than re-apply the entire Color Finesse effect.
* Someone has created a specific color treatment or “look” in another system, and you wish to apply this treatment to footage in After Effects.
* Someone has created a LUT that represents how a particular display device or film stock will change the colors of sources you output to it, and you want to preview the resulting transformations in After Effects.
The Apply Color LUT effect allows you to apply a LUT directly to a piece of footage, or to an adjustment layer. The latter is the preferred approach if you want the same color treatment applied to a composite or edit of several clips, or if you are simulating playback through a particular device.

When simulating a particular display environment, use Apply Color LUT on an Adjustment Layer for proofing, and set it to be a Guide Layer so the treatment will not render.
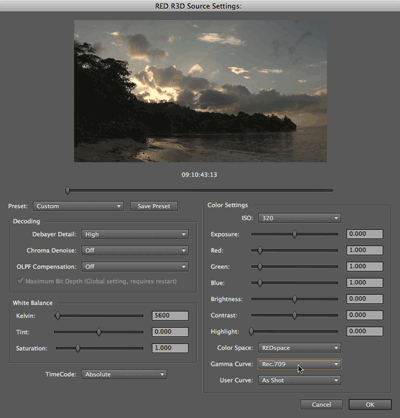
RED R3D Support
Remember the RED plug-in offered as a beta for After Effects CS4 version 9.0.2? This has now been integrated into the Interpret Footage dialog of After Effects CS5, and supports the most recent RED color science. It’s great having these adjustments inside After Effects, although there are two caveats I’ve discovered so far.
One is that, like the Camera Raw dialog, even though your source may be raw (with full-range and beyond colors), any overrange or underrange values get cut off upon exiting the dialog. Therefore, I have found it occasionally prudent to reduce the exposure inside the RED R3D Settings dialog, and boost it back up using the After Effects Exposure effect, giving me access to some of those overbrights to manipulate as I see fit (for example, by using the HDR Highlight Compression effect). However, RED’s exposure works differently than AE’s Exposure, so additional work with Levels and/or Curves will be necessary to regain the original look.
Speaking of original look, we would love to hear your stories on what settings for Color Space and Gamma Curve you feel to be most true to “as shot.” The conventional wisdom we’ve heard so far is that REDSpace matches the LCD viewfinder and is an acceptable “one light” quick color correction, whereas Rec.709 may be more accurate (for example, that was Alex Lindsay’s opinion on the image his Pixel Corps here). As we don’t have our own RED camera (we’re 5D people), we can’t run our own tests to verify.
Color Management Improvements
One subtle improvement under the hood of After Effects CS5 is that it has taken over both encoding and decoding of most YUV-based QuickTime codecs, as well as some RGB codecs (did you know the Canon 5D shoots in Rec.601 color space, and saves it as an RGB – not YUV – file when compressing to H.264?). A very positive result of this that far more codecs now round-trip accurately in and out of After Effects, including a loop through Final Cut Pro – even with Match Legacy Gamma turned off (although you should still not rely on QuickTime Player – 7 or X – as an accurate way to proof colors). A small negative side effect of this is that you have less control over changing the color profile assigned to many types of footage; hopefully that will be altered in a not-too-distant update.
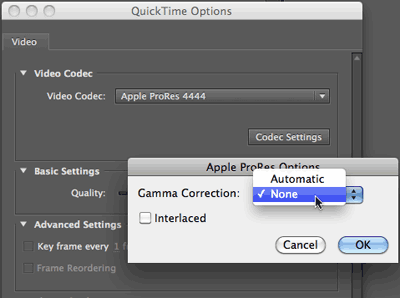 There are still a couple of issues with round-tripping codecs like ProRes 4444 (when you render, you need to go into Format Options > Codec Settings and set Gamma Correction to None); regularly check Todd Kopriva’s most excellent After Effects blog for the latest answers and recommended workflows. (For example, it was Todd who posted how to handle ProRes 422 and ProRes 4444 footage in AE CS4.)
last page: new effects, new blending modes, and more
New Effects
In addition to Refine Matte (spun off from the new Roto Brush feature), Digieffects FreeForm, and Apply Color LUT, a trio of simple but useful Color Correction effects adopted from Photoshop adjustment layers have made their way into After Effects CS5:
Vibrance (familiar to users of Adobe Photoshop Lightroom as well as the Camera Raw dialog) is a kindler, gentler version of Saturation. It is less prone to clip individual color channels when boosted to high levels, and leaves traces of residual color when turned down. We prefer it to Saturation, and try to remember to reach for it instead of the normal Hue/Saturation effect.
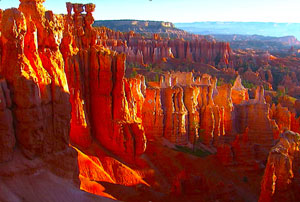
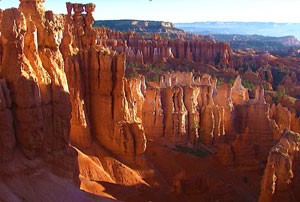
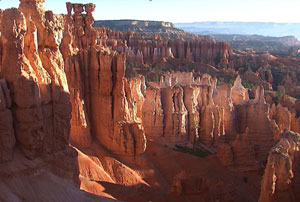
Above left is Saturation = 100; Above right is Vibrance = 100; the original image is at left. Footage courtesy Artbeats/National Parks West.
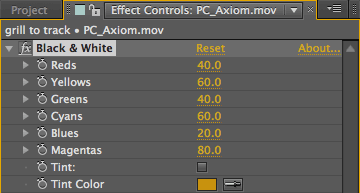 Black & White is a version of Photoshop’s Black & White adjustment, which allows you to blend the individual strengths of the red, yellow, green, cyan, blue, and magenta channels to fine-tune the resulting grayscale image. This result is followed by an optional color tint, which behaves akin to the Tritone effect affecting just the midtones.
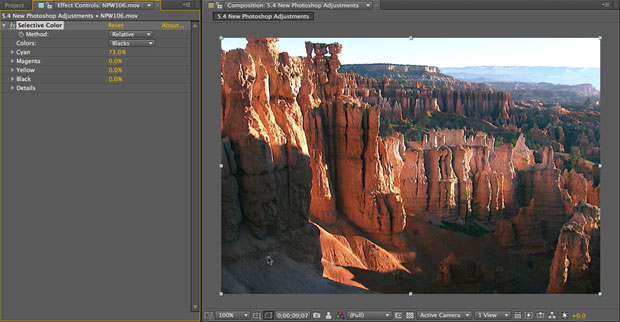
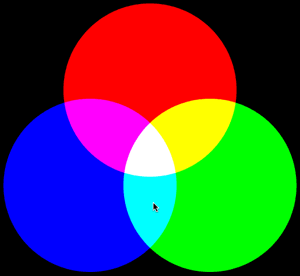 To get the most out of the Selective Color effect, it helps to have a background in print, or to at least understand the relationship between RGB primary colors and the intermediate CMY (Cyan Magenta Yellow) colors. When you add colors across from each other on the color wheel, the result is gray. On the other hand, when you subtract a color, it makes the color across from it appear more strong or pure. Selective Color allows you to add or subtract cyan, yellow, magenta, or black from the red, yellow, green, cyan, blue, and magenta channels as well as from the whites (highlights), neutrals (midtones), or blacks (shadows).
In the example below, we have chosen to operate on the Blacks, and have added Cyan to the shadows. This neutralizes the red in the shadows (see the original image in the Vibrance example above), making them more gray than red, enhancing the resulting contrast.
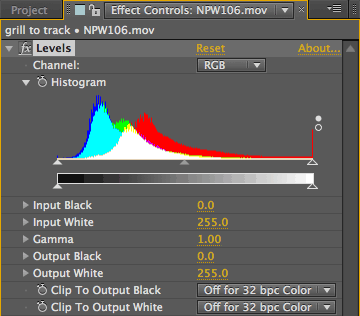 Although its not new, Levels has also received a nice upgrade in After Effects CS5: Its histogram is in color, akin to what you may have seen in the Camera Raw dialog. This makes it easier, for example, to spot precisely which color channel may be clipping (such as red in the histogram at right), or if there is a color imbalance in the midtones (again looking at the histogram at right, we can see that the shadows have a blue cast while the midtones have a red cast). Knowing the RGB/CMY relationship in the color wheel above will also help you read this histogram (i.e. cyan shows the presence of green plus blue). You can toggle between the new and old display styles by clicking on the histogram display.
New Blending Modes
There are also two new blending modes in After Effects CS5:
Subtract does what you thought Difference did: subtract the color values of one layer from another. However, if the result would be less than zero, Difference wraps around (take an absolute value of the difference) the resulting value and therefore give psychedelic results; Subtract simply drives the resulting colors toward black. If you’re in 32-bpc mode, you will even get negative color values (which you can then turn positive again by putting another layer in Add mode on top, by boosting exposure, etc.).
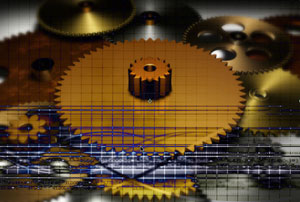

Difference on the left; Subtract on the right. Footage courtesy Arbeats/Gears and Digital Biz.
Divide is the opposite of Multiply, driving the resulting composite toward white instead of toward black. If you’re not already familiar with node-based editing systems and advanced compositing techniques, it may be hard to imagine a use for Divide, but an area where it really shines is in removing a color cast: Divide a solid color from an image tinted with that color, and the result is an untinted image.


Take an image with a strong color cast (above left), eyedropper the color cast when creating a solid (above right), and place that solid in Divide mode. The result is a removal of that color cast (left). Footage courtesy Artbeats/Industry Scenes.
And There’s More
This preview has just scratched the surface of the new features in After Effects CS5 – for example, there’s native support for AVC-Intra footage, a one-node or two-node switch in the Camera Settings dialog, Live Preview of changes in many modal dialogs (including Interpret Footage, Composition, Camera, and Solid Settings), and many more. A few features have also been cut, including Vector Paint (we’ll miss its wiggly strokes) and Clip Notes (to be replaced by a promising new online service: Adobe CS Review). And for those with old archives they need to open, the cutoff has unfortunately been moved on how old of a project you can import: 6.0 is the oldest through the normal Import menu item; CS4 is the oldest project embedded in a movie which can be read.
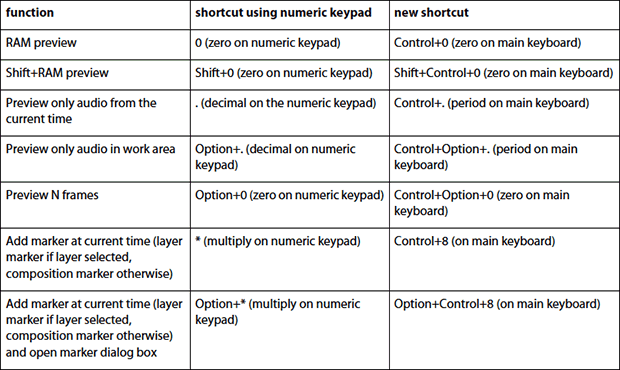
One additional positive new feature worth mentioning will be welcomed by owners of newer Mac laptops: shortcut keys to replace some of the vital functions reserved for the numeric keypad:
 For a complete list of changes between After Effects CS4 and CS5, we strongly recommend you check out the new features list in the online Help file for After Effects CS5. As mentioned earlier, we are also in the process of creating the 5th edition of Creating Motion Graphics (10th anniversary edition!). All of the new features discussed in this post are covered in the book and/or our After Effects CS5 New Creative Techniques course for lynda.com.
The content contained in our books, videos, blogs, and articles for other sites are all copyright Crish Design, except where otherwise attributed.

Filmtools
Filmmakers go-to destination for pre-production, production & post production equipment!
Shop Now