Whereas some effects process every pixel in a layer more or less evenly (think blurs or color correction), others generate new pixels based around a specific point on a layer (for example, particle systems and lens flares). You can define where that Effect Point is on a layer, and even animate it – but unlike a normal Position path, the path between the keyframed positions for Effect Points are not visible in the Composition panel. This has led more than one After Effects user to assume they have no control over the shape of that path.
Whereas some effects process every pixel in a layer more or less evenly (think blurs or color correction), others generate new pixels based around a specific point on a layer (for example, particle systems and lens flares). You can define where that Effect Point is on a layer, and even animate it – but unlike a normal Position path, the path between the keyframed positions for Effect Points are not visible in the Composition panel. This has led more than one After Effects user to assume they have no control over the shape of that path.
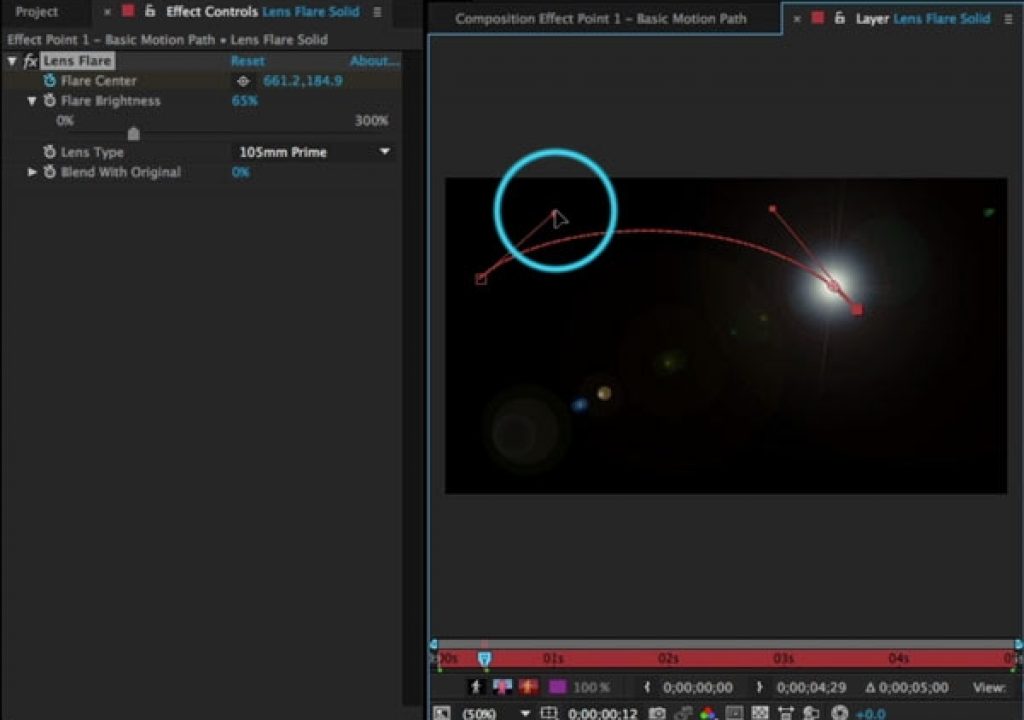
Good news: You can indeed edit the effect point path, with the Bezier handles you’re used to for normal Position paths. The catch is you need to double-click the layer with the effect to open it in the Layer panel, and do your path editing there:
To edit an Effect Point Path in Adobe After Effects, you need to use the Layer panel – not the normal Composition panel.
Why can’t you edit this path in the Comp panel, just a normal motion path? Because they exist in two different worlds. The Position of a layer is relative to the overall composition; that’s why you edit it in the Comp panel. However, an effect’s coordinates are relative to the specific layer it is applied to, regardless of where that layer is positioned inside the composition. That’s why you need to edit Effect Point paths in that layer’s own Layer panel. Furthermore, you need to make sure the View popup along the lower right edge of the Layer panel is set to the effect you’re editing, as you may have more than one effect applied to that layer.
In this week’s free movie from our After Effects Hidden Gems Weekly course on lynda.com, Trish goes into more detail about editing effects and their Effect Point paths, including re-arranging your workspace to view both the Comp and Layer panels simultaneously. After the week of July 27, this movie will only be visible to their subscribers (along with all of the other gems to date). If you’re not already a subscriber, you can get a 10-day free trial before your credit card is billed by using the link http://www.lynda.com/go/ChrisAndTrish.

Filmtools
Filmmakers go-to destination for pre-production, production & post production equipment!
Shop Now


