When discussing the history of After Effects and performance, there’s one single, critical, all encompassing factor that we have to begin with: what After Effects actually does. Perhaps more significantly: what After Effects was designed to do.
In part two of this series, we’re looking at two main points. The first is to establish the difference between the way After Effects works, and the way 3D applications work. Because there’s been so much focus on 3D performance over the past few years, with “graphics cards” evolving into GPUs, and introducing GPU acceleration and GPU rendering, it’s fair enough to feel as though After Effects is being left behind. A lot of the discussion of “performance” relates to the difference between After Effects and 3D rendering. The second main point is that no matter how complex an individual After Effects timeline might appear to a user, the actual rendering process is pretty simple.
In the same way that it’s pointless to complain that After Effects isn’t as good as Maya for 3D animation, it’s pointless to complain that After Effects isn’t as fast as Unreal or Unity when it comes to rendering. After Effects was designed to do specific things, with specific priorities, and those goals all relate to how it performs.
Yesterday Adobe announced the latest version of After Effects: CC 2020. The main focus for Adobe over the past year has been improving the performance of After Effects, and we’ll look at what they’ve done in future parts of this series. But to understand how After Effects arrived at where it is now, let’s look back to where it all began. After Effects version 1 was released in 1993, and thanks to former Adobe employee Todd Kopriva, you can still watch the original After Effects promo video on YouTube. For some of us, 1993 is a distant memory and for others it’s just a date before they were even born. Before we start looking at real-time 3D engines or mention GPU acceleration, it’s important to look back and remind ourselves that After Effects was designed before any of those things existed.
Let’s consider some of the following After Effects features that you may have taken for granted:
- After Effects renders are identical on Mac and Windows
- After Effects renders are identical across all types of hardware
- After Effects renders are identical across all versions of software
- After Effects lets you choose between 8, 16 and 32 bit modes
- After Effects can work with resolutions up to 30,000 x 30,000
You can open up an After Effects project that was made in CS3 on a Mac, re-render it with CC 2014, CC 2017, CC 2019 on Windows, and the result will be the same. If you rendered as an image sequence in 2009, you’ll be able to open up the same project in the latest version of AE, re-render individual frames on a completely different computer, and they’ll perfectly match the original sequence from 10 years ago.
This is not the case for other graphics applications, especially when it comes to 3D. While it’s well accepted that the same game will look different on a Playstation when compared to an Xbox and a PC, games can also look different depending on what type of graphics card you have, and even what version of driver you have installed. Changing a graphics card in your PC won’t just change the performance of a game, but it will also change the appearance.
This doesn’t bother gamers too much, but the same is also true of 3D rendering engines. All 3D rendering engines, including VRay, Arnold, Redshift and Octane, can produce different results when updated to newer versions. GPU based renderers such as Redshift and Octane may even produce different results with different graphics cards or drivers. This has proven to be an issue at some of the studios I’ve worked for, where render farm outputs were inconsistent because different machines on the farm were running different versions of the renderer. Another problem for 3D studios is that some GPU renderers haven’t always been backwards compatible – meaning that once you upgrade you cannot open a project that was made using an earlier version. If you need to revise an older project made with an earlier version of the renderer, you either begin the process again with the new version or roll your software back to the old version so you can open it. This is, to put it bluntly, a huge PITA.
While these examples might not seem directly relevant to the topic of After Effects and performance, they serve as reminders that different applications are created with different features and different priorities. I suspect that After Effects users would be pretty upset if they updated AE to the latest version but couldn’t open or render any of their old projects.
So consistency across OS, hardware and software is one core strength of the After Effects rendering engine. It’s an example where we need to acknowledge what After Effects was designed to do, before we analyse how fast it’s doing it. It’s also fair that if we begin to complain about things which After Effects cannot do, for example render 3D in real-time, then we acknowledge some of the limitations and tradeoffs made by other software which can. The grass is not always greener with a different renderer – would you be happy if you updated After Effects but the renders looked slightly different?
Once we accept that all software has strengths and weaknesses, or pros and cons, the next step is to go further and understand exactly what After Effects does.
After Effects and 3D: Worlds apart
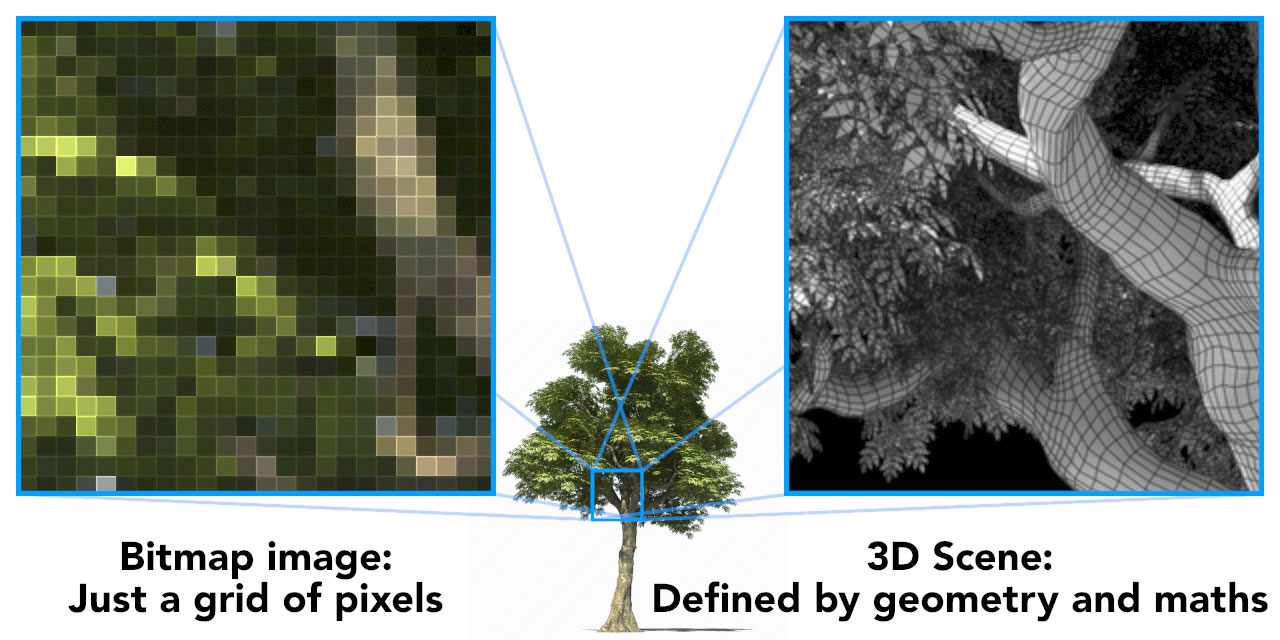
If you’ve ever been asked “what is After Effects?” then you might have answered with something along the lines of “it’s like Photoshop for video”. When it comes to the way that After Effects renders, this is a good analogy. At its heart After Effects is a program that processes bitmap images. This is very different from a 3D application like Maya or Cinema 4D, in which scenes are created using geometry.
After Effects can import vector artwork, ie Illustrator files, and masks, text and shape layers provide a way to create artwork inside of AE using vectors. However the resulting layer is always converted to a bitmap image so that we can see it on the screen, a specific type of rendering called rasterisation. Likewise, there are 3rd party plugins that work as though they’re 3D applications, including Element, Stardust, Plexus and the Trapcode suite, but no matter how complex they are internally, they only ever output a flat 2D bitmap image. If you apply Element and Stardust to the same layer, the 3D worlds within each plugin are completely separate. There’s no way for the 3D objects inside Element to interact with those inside Stardust. After Effects has no idea what’s going on inside those layers, all it ever sees is the “flattened” output.
If you’re an After Effects user, then at some point you’ll come across the difference between bitmap images and vector artwork. Designers who regularly use both Photoshop and Illustrator understand the difference well; in After Effects terms video is a bitmap image while masks, shape layers and text layers are vector. As a million tutorials will explain, vector images are defined by lines and curves and can be scaled to any size without losing quality.
The difference between a bitmap image and a vector image is a useful analogy to the difference between the way After Effects works (combining 2D bitmap images) and the way 3D images are rendered (objects are defined by geometry).

A 3D scene consists of objects that exist together in a 3D world. In a 3D application, elements interact with each other – objects cast shadows and light on other objects, and appear in reflections and refractions.. The more objects you add to a scene, the larger and more complex the world becomes. Most significantly: when a 3D scene is rendered, the overall world is rendered together, calculating the interactions between all of the objects within it.
After Effects is not like that.
At its very heart After Effects only deals with a grid of pixels – a bitmap. Unlike a 3D application, AE has no sense of a “world” in which layers interact with each other. Layers in After Effects are not affected by how many other layers are in the same composition. When it comes to rendering, After Effects doesn’t load up and process all of the layers in a composition simultaneously – each layer is rendered one at a time.
After Effects compositions are not “worlds” in the way that a 3D scene in Maya or Cinema 4D is. No matter how many layers your composition has, or how many items you’ve imported into your project, when it comes time to render After Effects just combines layers together, one image at a time. Your composition might contain 10, 100 or 1000 layers, but when it comes to rendering After Effects doesn’t look at them all together as some sort of complex, interacting scene. It just starts at the bottom and works through them one layer at a time. While it’s possible for certain effects to use another layer for additional control, eg a matte or a z-depth pass with a camera blur effect, in a general sense adding a new layer to a composition does not have an impact on the way that other layers are rendered.
Step by Step
The rendering process in After Effects is quirky enough that no-one’s created a video tutorial explaining all of the intricacies, although you can get started here thanks to Chris & Trish Meyer. In the past, Chris & Trish Meyer have published articles on the After Effects rendering order, and their “Creating Motion Graphics” books were my introduction to some of the more unusual idiosyncrasies. The way After Effects handles 2D images with “3D layers” is unique. But there’s a crystal clear distinction between the way After Effects works and the way 3D applications work, and in this modern era with GPUs and real-time gaming engines, understanding this distinction is central to the topic of performance.
There are two separate topics here – the rendering order and the rendering engine – and I’m hoping to make the distinction between them clear. The rendering order is related to the user interface – it’s how the timeline that we work and animate in corresponds to the end result. The rendering engine is the technical approach After Effects uses to process layers and effects to create the final result, and that’s what we’re looking at here.
When you render a composition in After Effects, you can twirl down an arrow in the render queue window and After Effects will tell you what it’s doing. It’s slightly misleading because it reports the layer number that it’s working on, but that doesn’t correspond to the layer number in the timeline. Instead, it’s just counting the number of layers that have been rendered for the current frame, usually beginning with the bottom layer of the composition. If your composition timeline has 10 layers in it, then the bottom layer in the timeline will be layer number 10. But if you’re checking the progress in the render queue, After Effects will report it as layer number 1, because it’s the first layer to be rendered.

The basic rendering process in After Effects is pretty simple, and yet it seems to be poorly understood. The critical thing to know is that when After Effects renders something, the entire process comes down to a simple operation that is repeated again and again: processing a bitmap image and combining bitmap images together.
Up until 3D layers were introduced with After Effects version 5, the rendering process was easy to explain. After Effects is based on layers in a timeline that are stacked from the bottom up, and this is how they are rendered.
When you hit “render” in After Effects, it looks at the composition and starts with the bottom layer. All masks, effects and other position, scale and rotation transforms are rendered, until the individual layer has been rendered, complete with an alpha channel for any transparent areas. The end result is always a bitmap image – a grid of pixels. The rendered frame is stored in memory, something referred to as the “image buffer”.
If After Effects only let you have one layer, then rendering that frame would be finished. But obviously the whole point of AE is to composite multiple layers together. So once After Effects has rendered the bottom layer in your composition, it moves up to the next layer that needs to be rendered. The same process is repeated – any masks, effects and other transformations are processed to produce the final result for that layer, including an alpha channel.
Now that After Effects has rendered two layers, it’s produced two separate bitmap images. The next step in the rendering process is fundamental to what After Effects does – it combines them together. The newly rendered layer is combined with the image buffer, using the alpha channel and any blending modes that might be selected.
After Effects has combined the bottom two layers in the composition together, with the result stored in the image buffer. The image buffer contains all of the work that After Effects has completed so far. The crucial thing to understand about the image buffer is that it no longer has any notion of individual layers. Once the bottom two layers in the composition have been rendered together, that’s all there is. Any individual attributes of the layers are gone. All After Effects knows is the end result – the image buffer. The image buffer is just a grid of pixels. It’s the Photoshop equivalent to “flatten image”.
For the sake of this example, lets assume the composition has 100 layers. After Effects processes the third layer, and combines it with the image buffer. This continues through the 100 layers in our timeline. Every time an individual layer is rendered it’s combined with the image buffer.
The image buffer is a single bitmap image which is the result of every layer that’s been rendered so far.
At any stage in the rendering process, After Effects is really only dealing with two things – the current layer being rendered, and the image buffer, which contains everything that’s already been rendered.
The image buffer is the secret to adjustment layers. An adjustment layer does not represent new content, such as a text layer or a video file. An adjustment layer is just a copy of the image buffer. The image buffer contains everything that After Effects has rendered so far, which is why adjustment layers affect every layer underneath them in the timeline. Any effects you’ve applied to the adjustment layer in the timeline are applied to a copy of the image buffer, and then re-combined with the original image buffer with masks, mattes and blending modes.
So, unlike a 3D application, After Effects doesn’t load up every layer in the timeline simultaneously. It doesn’t deal with a “world”. At any point in the rendering process, After Effects is only dealing with two images – the individual layer that it’s rendering, and the image buffer containing everything that’s been rendered so far.
Don’t look in that pre-comp!
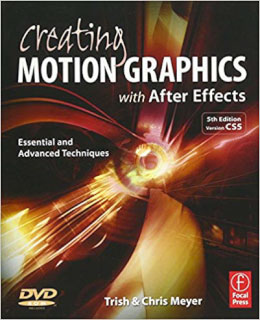
For the first few versions of After Effects – in fact, for most of the first 10 years – the rendering order in After Effects was pretty easy to understand. After Effects just started with the bottom layer and worked its way up to the top. The introduction of 3D layers made the rendering order more difficult to follow, especially when a composition has multiple groups of 3D layers interspersed with 2D layers. Understanding how After Effects deals with 2D and 3D layers is something that users learn with years of experience. It’s the topic of a dedicated chapter in the Meyer’s “Creating Motion Graphics” books.
When it comes to the topic of performance, it’s not critical to understand the exact rendering order of each layer in the timeline. The point – when considering performance and what After Effects is actually doing – is that no matter how your timeline has been built, when it comes to rendering, After Effects is only ever rendering one layer at a time. Each layer is rendered individually and then combined with the image buffer.
For an application that was designed to composite bitmap images together, the 3D layers work remarkably well. But while 3D layers can appear to cast shadows, transmit light and intersect with other 3D layers, each layer is still being rendered individually, before being combined with the image buffer.
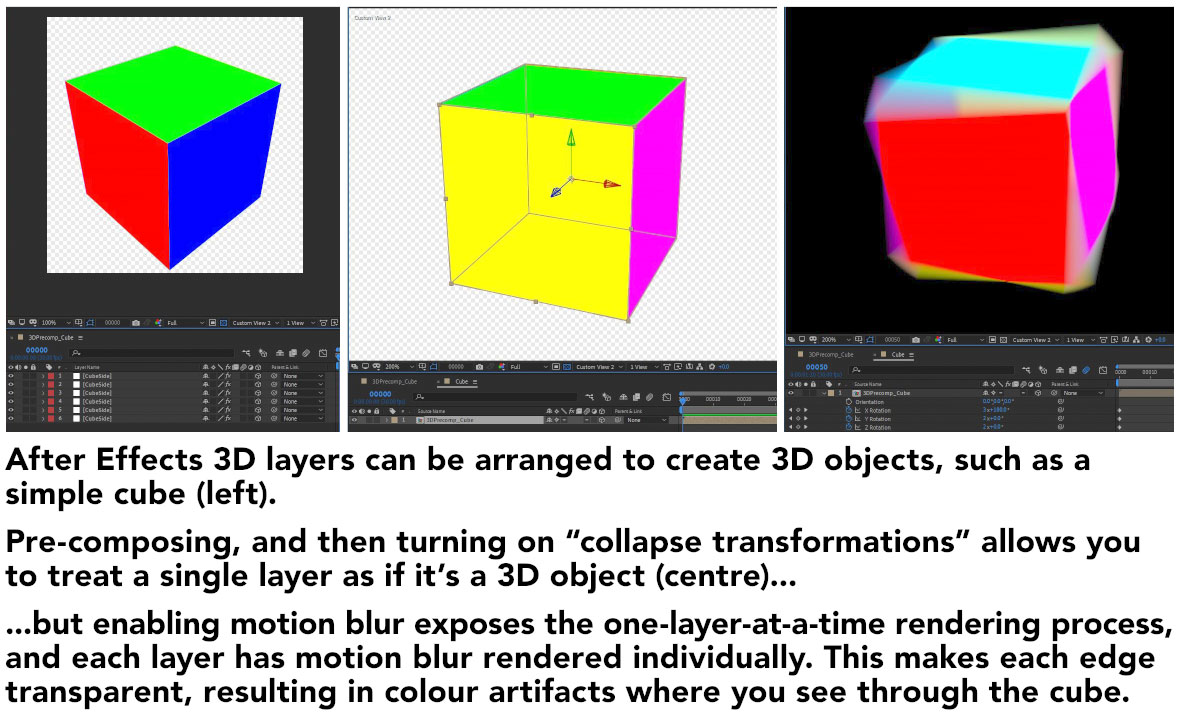
This one-layer-at-a-time approach to rendering can be demonstrated with a few 3D layers. The simplest example is to arrange 6 solids together to form a cube, and ensuring each solid is a different colour. By pre-composing the composition and turning on collapse-transformations, we have a single layer in After Effects that acts as though it’s a 3D cube. This “trick”, using collapse-transformations with 3D layers, is a well-known technique that’s been used by AE animators since 3D layers first appeared. I’ve demonstrated the technique in several of my other articles, and even used it to build a 3D city with over 18,000 layers.
However this approach is just that – a trick. The notion that there’s a 3D cube in After Effects is just an illusion, and we can expose the trick by turning on motion blur. If we animate the cube to move or rotate, then enabling motion blur results in blurry lines at the edges of the cube. These edges are evidence that – despite our composition looking like a 3D cube – After Effects is just rendering one layer at a time. After Effects never sees the cube as a single solid 3D object. It just sees a collection of layers, and it renders them one at a time, just as we outlined above. Because we’ve enabled motion blur, the movement of each layer results in blurry, transparent edges of each individual solid. As each layer is composited together, one at a time, these transparent edges reveal the different coloured layers behind them, resulting in visible seams.
Our fake 3D cube example is a reminder that layers in After Effects don’t exist in a “world”, even though we can fudge together 3D layers so it appears that way. Each layer in an After Effects composition is rendered in isolation. Even when we get into lights and shadows and other 3D properties, deep down After Effects is still rendering each layer individually, producing a bitmap image, then combining it with the image buffer. While the visible lines caused by motion blur are a clear limitation of the approach, on the bright side this allows 3D layers to have blending modes, such as add, multiply, overlay and so on.
It’s a daunting task to try and explain all of the intricacies of the After Effects rendering order, but the rendering order it’s not something that’s important when it comes to the issue of performance. Actually, the topic of the rendering order relates to the user interface, and how the timeline represents what will be rendered. What we’re doing is looking beyond the interface at the technique After Effects uses to produce a final result: it’s rendering each individual layer, one at a time. It’s just doing the same process, again and again. It renders a layer and combines it with the image buffer – over and over, until there are no more layers. The After Effects moves onto the next frame, until it’s finished.
Simple and repetitive, but not complex
In a relative sense – relative to a 3D renderer like Vray or Redshift – the After Effects rendering process is simple. After Effects combines bitmap images together. That’s pretty much it. It’s a simple process that is repeated again and again. Because the topic of performance raises comparisons with other applications and other rendering processes, it’s worth defining the idea of simple and complex rendering more clearly.
When working in a 3D application, there is a direct link between how complex the scene is, and how complex the rendering is. If the 3D world is simple, then the rendering is simple – and fast. Adding objects to a 3D scene makes the overall world more complex, which makes the rendering process more complex because these objects exist and interact with each other.
Unlike After Effects, there are many different 3D rendering engines available, and they all have various options which can make the rendering process more complex. Modeling diamonds and rendering them with reflections and refractions will take much longer than a simple flat coloured sphere. Hair and fur shaders – especially if you want wet hair and wet fur – can tax even the most powerful systems. Rendering algorithms such as global illumination and sub-surface scattering can also be quite slow. It’s possible to increase the complexity of a 3D scene to the point where a given computer may not be able to render it at all, because it doesn’t have enough RAM to store all the information about the ‘world’.
The rendering process in After Effects is fundamentally different to 3D apps because it doesn’t have the same notion of “complexity”. After Effects rendering doesn’t involve loading all layers and assets into memory and processing them together. An After Effects composition can have many layers, and the composition might be considered “complex” by the person who made it – but the rendering process will still only involve combining bitmap images.
Don’t be like Keith
The rendering process in After Effects is always just processing bitmap images. It’s just starting from the bottom and working its way up, one layer at a time, combining each new layer with the image buffer. This is a crucial point to understand for all future discussions about performance, so it’s worth emphasizing it a little. If you’re an experienced After Effects user, at some point in your past you’ve probably inherited a project from hell. Let’s assume it was made by Keith, whose enthusiasm for motion graphics isn’t quite matched by his ability.

Keith has created the most awful After Effects project you’ve ever seen. There are layers everywhere, keyframes everywhere. There are 2D layers mixed with 3D layers, a few cameras and lights, all mixed with the occasional adjustment layer. Video clips have been reversed and then time-remapped, there are track mattes with track mattes, even though that shouldn’t work. There are some expressions in the mix that he found on the internet, it looks like he’s experimented with some rigging and parenting, and then he’s imported a project template he bought from VideoHive and fudged the lot together.
You’ve got no idea what Keith has done, and at this stage neither does Keith.
But here’s the point.
Keith’s project, and his composition timeline, might look complex to an After Effects user. It might even appear so complex that it’s completely incomprehensible to an After Effects user. But this doesn’t mean that After Effects will render it any differently. The rendering process is not more complex. After Effects just does what it was designed to do, in a process that’s not too different from when After Effects was first released in 1993.
When you press the “render” button the basic process is always the same: one bitmap image is combined with the current buffer, then the next layer up, then the next, until it’s done. In After Effects, rendering can be long, slow and tedious for the user – but from a technical perspective After Effects is just doing a simple task, again and again.
Points of failure
The key difference that I’m emphasising between After Effects and 3D, is that rendering 3D involves loading up the entire “scene”, and calculating the interactions of everything in it. When working in 3D, adding more objects might result in a scene that is too complex for a given computer to render, or rendering specific passes such as refraction might be too slow to be useful.
Because After Effects does not render in the same way, and simply works through a composition one layer at a time, there’s no point at which adding a new layer suddenly makes the composition “too complex” for After Effects to handle. Trust me, I’m the guy who built a city in After Effects with over 18,000 layers.
I’ll pause for a second to acknowledge the cries of people who’ve had renders fail on them. Yes, it’s possible for After Effects compositions to fail during rendering. However the point is that unlike 3D, it’s not because the overall composition has suddenly become too complex. The cause will either be a single layer, or a 3rd party plugin. Broadly speaking, there are four reasons why an After Effects render might fail:
- After Effects layers cannot exceed 30,000 pixels in size. If you scale a layer up too much, or use a plugin like repetile to increase the size of a layer, you might run into the 30,000 pixel limit.
- The After Effects image buffer is limited to 2 gigabytes, and a single layer cannot take up more than 2 gig of RAM. If you’re working in 32 bit float mode, images above a certain size will require more RAM than this, even though they’re well below the 30,000 pixel size. The 2 gigabyte image buffer is not usually a problem for projects that are in 8 or 16 bit mode. As an example, a 12,000 x 12,000 pixel image in 32 bit float mode will need 2.1 gigabytes.
- The computer’s RAM is fragmented so that there isn’t enough continuous memory to store a frame. This is something that will be discussed in a future article, but this problem was largely solved when After Effects became a 64 bit application, with version CS 5.
- A 3rd party plugin has encountered a problem. In the context of this series, I’m not looking at the performance of 3rd party plugins, only After Effects itself.
After Effects does have certain technical limits, but the point I’m making is that these limits apply to an individual layer and not the overall composition. If a layer is too large, and is either scaled up beyond 30,000 pixels in size, or it takes up more than 2 gigabytes, After Effects can’t render it. But while this can be a problem for the user trying to render their work, the render isn’t failing because of the overall complexity of the project. It’s just a single layer that’s causing problems.
What’s next
The first version of After Effects was released in 1993, and I first time I used After Effects was with version 3 in 1997. After Effects was designed for a specific purpose, with specific features and goals in mind. Now that we have a very clear understanding of what After Effects does – it combines bitmap images together – we can look at how other aspects of technology have changed since 1993, what the implications have been for After Effects, and what’s so special about the latest release of After Effects: CC 2020.
This has been Part 2 in a series on the history of After Effects and performance. Have you missed the others? They’re really good. You can catch up on them here:
This is part 15 in a long-running series on After Effects and Performance. Have you read the others? They’re really good and really long too:
Part 1: In search of perfection
Part 2: What After Effects actually does
Part 3: It’s numbers, all the way down
Part 4: Bottlenecks & Busses
Part 5: Introducing the CPU
Part 6: Begun, the core wars have…
Part 7: Introducing AErender
Part 8: Multiprocessing (kinda, sorta)
Part 9: Cold hard cache
Part 10: The birth of the GPU
Part 11: The rise of the GPGPU
Part 12: The Quadro conundrum
Part 13: The wilderness years
Part 14: Make it faster, for free
Part 15: 3rd Party opinions
And of course, if you liked this series then I have over ten years worth of After Effects articles to go through. Some of them are really long too!

Filmtools
Filmmakers go-to destination for pre-production, production & post production equipment!
Shop Now