When you install After Effects, Adobe also installs a separate program that can vastly improve productivity. You already have it. It’s there on your hard drive, right next to the main After Effects program. Even if you already know about it, there’s a good chance you’re not using it. It’s a standalone After Effects rendering engine, usually called AErender, and if we think of it as part of After Effects then I don’t know of any other feature with more potential to improve productivity.
Such a bold statement poses obvious questions: what is it, why is it useful, how do I use it and so on. So let’s take a deeper look at AErender.
AErender dates back to version 4.1, released in 1999. It’s After Effects but without the user interface – it’s just the rendering engine. It enables After Effects projects to be rendered without opening up the full After Effects application and manually pressing the “render” button. Because AErender isn’t part of the main After Effects application, you wouldn’t know it was there unless you went looking for it.
If you go snooping around your hard drive, you’ll find two neatly named files: “Adobe After Effects” and “Adobe After Effects Render Engine”. These are shortcuts to the executable files which live elsewhere, in slightly different places for Mac and Windows users. The actual rendering engine is called “aerender”, and that’s what I’ll be referring to in this article. I’ll capitalise the AE to make it easier to read.
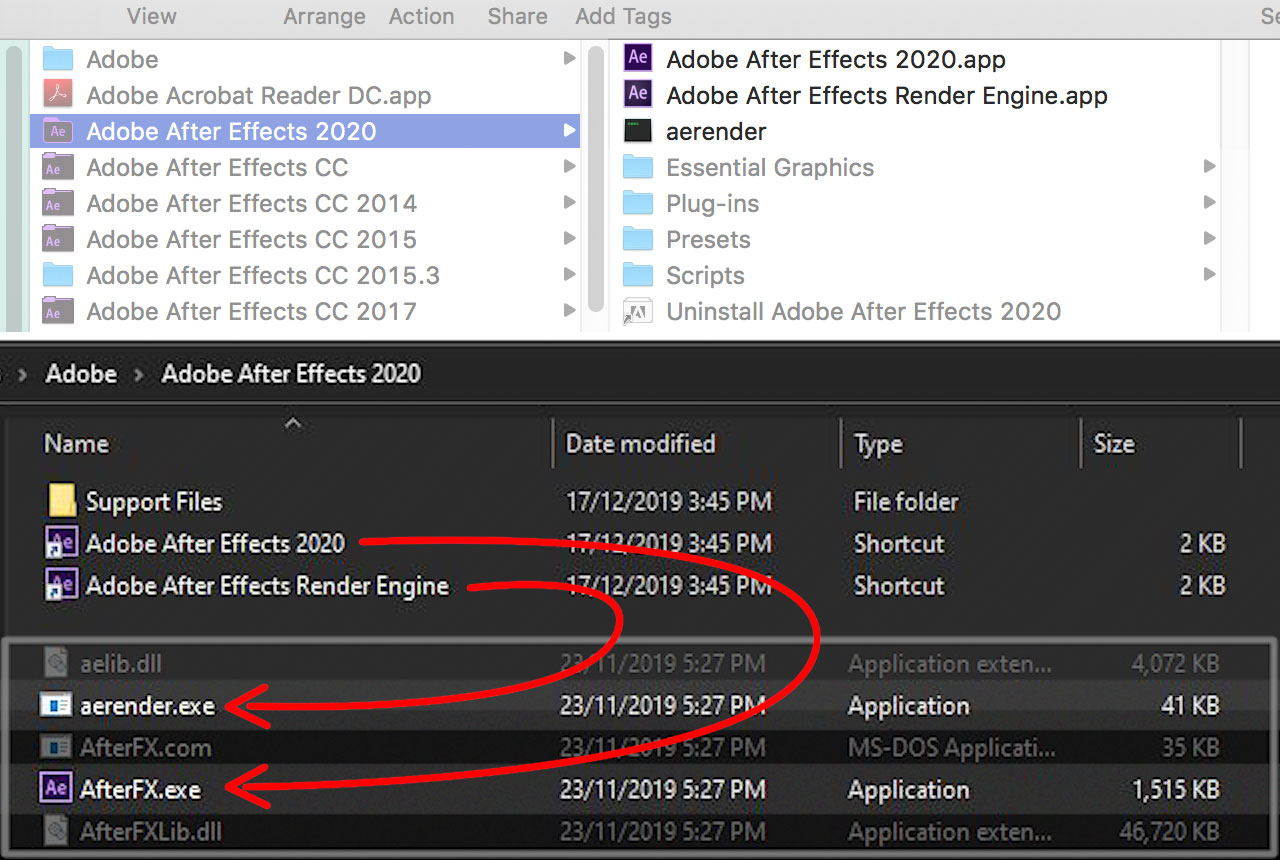
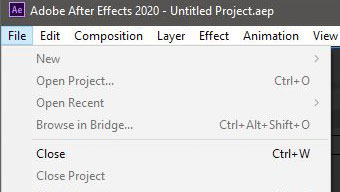
If you double-click on the “After Effects Rendering Engine” shortcut, you’ll see something that looks like After Effects starting up. But after the initial startup sequence you’ll only see the render queue panel, and all the menus are grayed out. You won’t be able to do anything except choose a watch folder (more about that later). If you open the AErender file directly, then a command line window will briefly pop up with a bit of text, and nothing else will happen.
This is pretty underwhelming, but AErender is so important that it’s worth clarifying exactly what we’ve got.
Getting more than you paid for
When you buy After Effects and install it, you’re actually getting two different versions. You get the “normal” version of After Effects with the interface we all stare at every day. It’s important to note that you’re paying for a license that allows you to run the full version of After Effects on two separate computers. But in addition to the main app, you’re also getting a separate, stripped down version that just contains the rendering engine.
One of the most significant aspects of the render engine is that it does not need a serial number. You can install as many copies on as many computers as you like.

You can build a render farm without having to buy additional copies of After Effects from Adobe.
Individual plugin developers DO have their own rules regarding render engine licenses, so if you’re thinking of setting up a render farm then you might need to buy more licenses for your plugins, but AErender itself is not restricted by Adobe. There are loads of developers selling plugins for After Effects and they all have different agreements for render farms. As an example: if you purchase the Trapcode suite from Red Giant, they’ll send you an additional 5 licenses to use on a render farm for free (just ask nicely). Other vendors offer render-only licenses at a lower price, and others don’t offer any concessions for render licenses at all.
What’s it for?
The concept of a render-only version of After Effects is easy enough to understand, so lets look at how it can be useful.
Originally – and we’re talking 1999 originally – the idea was to use separate machines for rendering. As previous articles in this series have pointed out, computers in the 1990s were not exactly powerful, and After Effects rendering could be VERY slow. Computers had enough trouble just running After Effects by itself, so once you hit the ‘render’ button you couldn’t really do much else apart from wait. While buying an expensive ICE card was one way to make rendering faster, another was to simply buy more computers and divide the rendering load between them. The idea was to work with After Effects on your main machine but load projects and render them on a second/third/twentieth machine using AErender, without having to buy another copy of After Effects from Adobe. This could even be automated by using the “watch folder” feature, Adobe’s version of an After Effects render farm.
But as hardware and software advanced since 1999, AErender became increasingly useful in another way: enabling users to render in the background, while continuing to work with After Effects on the same computer. Running multiple versions of After Effects on the same computer wasn’t really feasible when the average machine had less than 4 GB of RAM and a slow processor, but as we’ve seen in previous parts of this series, that changed pretty quickly.
So AErender provides us with two basic approaches to improving productivity – we can render projects on different machines without having to buy extra copies of After Effects, or we can render in the background while continuing to use After Effects on the same machine.
But… how?
If this all sounds good, then the next logical question is – how do we do it?
Because AErender doesn’t have a user interface, it’s not immediately obvious what to do with it, but there are several options. The easiest solutions require the purchase of 3rd party scripts.
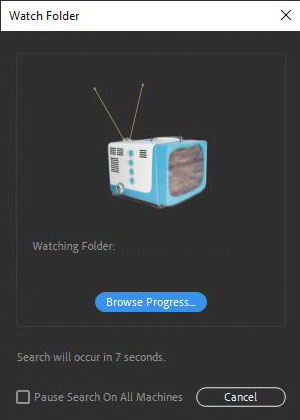
The original idea was to use a “watch folder”. Just queue up your renders in the render queue – as usual – and then save a copy of the project to a specified folder. The rendering engine versions of After Effects are pointed towards this folder, and they “watch” it for any new projects. Once your project is copied to the watch folder, it’s automatically rendered.
In 1999 this was a nice idea but it wasn’t always practical. Twenty years ago office networks weren’t as prevalent as they are today, let alone shared network storage. In practice, rendering across multiple machines usually meant collecting your project and manually copying it to a different computer – and even this was problematic when the largest storage option you had was a 100 megabyte ZIP drive. The whole collecting and copying process could easily take longer than any potential time saved rendering.
But once networks and shared storage became more common – and average network speeds jumped to 1 gig Ethernet – setting up a watch folder became much more feasible. Computers can be set to run the watch folder application on startup, so every time a machine is booted up the rendering engine will sit there quietly in the background until there’s something to do.
If you’re interested in setting up a watch folder, there are several tutorials available online, as well as detailed instructions from Adobe’s website. The main attraction of using watch folders is that they’re a built-in After Effects feature, and therefore they’re free. However as far as render farms go, watch folders are relatively primitive and limited.
Setting up a watch folder isn’t the only way to use the AErender application. Over the years the After Effects community has shared a number of other approaches to background rendering. Mac users can download a “droplet”, allowing them to just drag an After Effects project onto an icon and have it render in the background. Windows users can do something similar with BAT scripts.
In 2006, Gridiron software (no longer with us) released “Nucleo”, followed by “Nucleo Pro” – a commercial product that not only rendered in the background, but also pre-rendered layers and RAM previews. Nucleo Pro launched multiple instances of AErender in the background, and cleverly used them to pre-render compositions, precomps, RAM previews and even specific layers. RIP Nucelo.
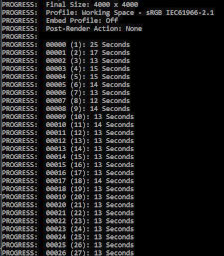
But perhaps the best known solution came from After Effects guru Lloyd Alvarez, who released a script called “BG Render” way back in 2006. Lloyd went on to found the “aescripts+aeplugins” website, and the current version of BG Renderer can be purchased there (the newest version is BG Renderer MAX). On a personal note, it’s the single most valuable script I have, and I struggle to work without it.
The original BG Render script (the very first version was free!) launched AErender in the background, opening up the current project and rendering whatever was queued up in the render queue. This was followed by the BG Renderer Pro version that included more advanced controls over memory, and could even notify you when renders were finished. The latest version has been re-written from scratch to support multiple core machines.
Let’s go shopping!
Nucleo first appeared in 2006, the same year that Lloyd released the first version of his BG Render script, and almost 15 years later there are now several 3rd party solutions to background rendering and managing render farms. Like all software the options vary in price and sophistication. Newer entrants to the After Effects rendering scene include fnord software with “Render Garden”, and Kinetic Portal’s “Render Boss”.
I’m not going to go through all available products and review or evaluate them, so if you’re interested in any of them just click on the links or google for more information. Toolfarm recently posted a summary as well, which includes several products I haven’t named here.
Render Garden is designed for smaller, simpler setups than full-blown studio render farms. Hence the name – it’s a garden, not a farm! Render Garden can utilize multiple cores to render in the background on the same machine you work on, and it can also distribute renders over a local network to multiple machines. It was created by fnord software, the same company that’s been responsible for EXR and Cryptomatte support in After Effects.
At the higher end of the spectrum, “Deadline” – by Thinkbox – is a widely used render farm management system for larger studios. Deadline is not specifically for After Effects. It works with pretty much any software that renders including 3D apps like Maya, Cinema 4D and so on. Setting up Deadline is a lot more involved than just copying a script to your After Effects folder, it works best with a dedicated server. Deadline runs through a centralized Mongo database that tracks all rendering tasks and machines – the feature list is far too long to be included here, but it’s designed for studios with dozens of machines and artists. One bonus of using Deadline is that the interface looks far more complex and intimidating than it really is, and if you ever want to give a producer the impression you’re working on something very complex, you can just stare at the Deadline monitor for a few minutes until they go away. Deadline is the most advanced render farm system that I’ve personally used, although it has similarly high-end competition from Smedge and Tractor.
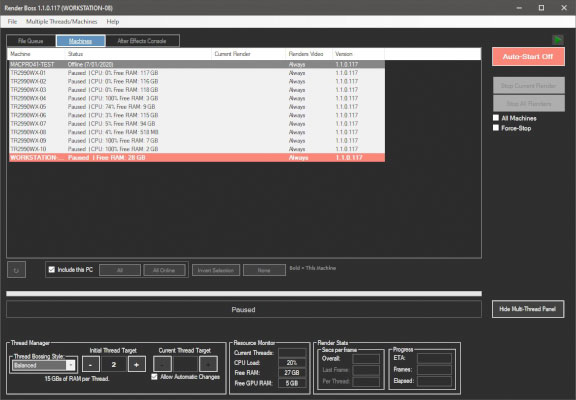
A newcomer to the After Effects scene is Render Boss, which is currently Windows only although a Mac version is in beta. At first glance, Render Boss looks like a slimmed-down version of Deadline, providing render management tools for multiple machines but only with After Effects. A notable feature of Render Boss is the emphasis on running multiple instances of AErender on the same machine, in order to fully utilize modern multi-core processors. Once again – if you want the full feature list then check out the website.
I haven’t listed every single After Effects rendering tool, but the main point is that all of the different options have one thing in common: they use AErender to do the actual rendering. The different options – droplets, bat files, script panels, and database driven tools like Deadline, Smedge and Tractor – are just managing the way the After Effects projects are distributed across computers or to the background. Once compositions have been queued and files have been copied, it’s AErender which is doing the actual rendering.
In current times, where CPUs are multi-core and it’s not uncommon for a desktop machine to have 32 gig of RAM or even more, background rendering with AERender is the simplest and easiest way to increase your productivity. Why wait for things to render when you can keep working? Even on a single machine, a tool like BG Renderer Max or Render Garden can easily produce renders 2 -3 times faster for less than $100.
Every rose has its thorns
Background rendering might sound great, but there are a few restrictions. Like any new technique it can take some time and experience to get the most from it and figure out the boundaries. Each approach, whether it’s using BG Renderer, Render Garden, Deadline or something else, will have it’s own idiosyncrasies.
The first step is to understand how these tools are increasing productivity. They all work by using AErender to render whole frames, either in the background or on a different computer. They’re not making After Effects itself run faster, and there’s no difference in the amount of time it takes to render a single frame. Productivity is improved by spreading the overall workload.
Normally, with the full After Effects application, if you have a composition that is 100 frames duration and you hit “render” in the render queue, your computer will sit there and render out all 100 frames. As long as it’s rendering, you can’t use After Effects for anything else. That’s how After Effects works by default. If you use a script like BG Renderer, you can render those 100 frames in the background and continue to use After Effects. Your productivity is improved because you’re not sitting around and waiting.
If your machine has multiple cores and enough RAM, you can run multiple instances of AErender on the same machine without any significant impact on the main After Effects application. If you run 4 copies of AErender then – in theory – the composition will render 4 times faster. Each AErender process might render 25 frames each. The time taken to render each frame will still be about the same, but as four frames are rendering at the same time the total rendering time will be whatever it takes to render those 25 frames. Taking this example to an extreme level – if you have a render farm with 100 machines, then each machine is only rendering a single frame. Your render will be finished in 1/100th of the time needed to render it on a single machine.
But the first thing to note is that you can’t render a single quicktime file with multiple versions of AErender, whether you’re background rendering on the same machine or rendering with multiple machines over a network. The big workflow change you need to make is to begin using image sequences instead. If you’re running multiple instances of AErender, they can’t all work together to write to a single quicktime file. They’re rendering individual frames, and so you need to save them as individual frames. There’s nothing wrong with using image sequences, and they have many advantages over quicktime files except when it comes to playing them back. At some point you’ll want a single file to play or need to deliver a ProRes to your client, and so there’s an extra step involved to convert your image sequence into a quicktime or MP4. If you’ve always rendered to quicktimes (or even AVIs!) then switching to image sequences can take some getting used to, but in general the benefits far outweigh the drawbacks. At some point in the future, Adobe will hopefully allow us to add audio to image sequences in Adobe Media Encoder, which will make things even easier.
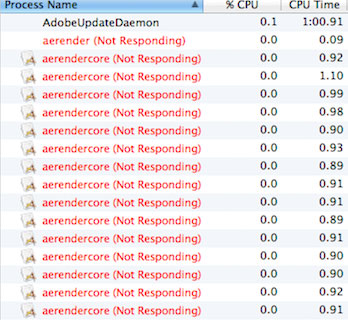
The more difficult thing to learn is simply managing all the extra instances of After Effects that are running. The problem is balancing speed with reliability. It’s certainly possible to run multiple instances of AErender on the same machine, but depending on the requirements of your project, you can reach a point where more rendering processes become slower overall. Pinpointing exactly when and why this is happening isn’t always easy, as it’s the same bottleneck problem that we looked at in Part 3. If you push it too far then background rendering can fail. You could shell out $3,990 for the brand new AMD Threadripper 3990x with 64 cores, but that doesn’t mean it will reliably run 64 instances of AErender.
Let’s taken an example where you have a decent machine with 8 processor cores and 64 gigabytes of RAM. If you leave one processor core and 8 gigabytes for the OS, then in theory you should be able to run 7 instances of AErender at the same time. Each instance would have it’s own processor core to run on, with 8 gigabytes of RAM. This sounds very reasonable, but as we looked at in part 3, the problem can be bottlencks in other parts of the system.
If the project has lots of large video assets in it, then each of those 7 renders will be reading huge amounts of information from the hard drive – or even the network. The hard drive, or network can quickly become a bottleneck that slows everything down. In practice, running 4 instances of AErender might be faster than running 7.
The same bottleneck problems can exist for networked render farms too. You might have the budget to go out and buy 8 Mac Minis, or Windows based NUCs to set up a small render farm. But if they’re all plugged into a cheap network switch, or reading files from a consumer level NAS such as a Drobo or Synology, then the storage and network restrictions will limit the speed at which everything can render. If 8 computers are all trying to read large video files through a slow network switch, then you might even crash the thing and stop everything. As we looked at in part 4, video files can get very large, very quickly. Having multiple machines reading and writing gigabytes of data can put the same load on network switches and storage that much larger enterprises encounter.
On an even simpler level, just the time needed to launch AErender and load the project needs to be considered. For very simple projects, it can take longer to launch a background render than it does to actually render it, and so once again the benefit of background rendering is negligible.
Conversely, if you have an After Effects project that is generating everything within After Effects – eg text layers, shape layers, even still images – then you might find that you can run more than 7 background renders simultaneously. In these sorts of cases, tools like BG Renderer Max and Render Garden can produce incredible results for a very low price.
It’s not possible to go through every scenario that every different After Effects user might encounter, and examine if and how background rendering might be useful. In general, using background rendering and render farms becomes something of a juggling act. But overall there are a few basic points that every After Effects user should know:
- If you have After Effects, you also have AErender
- You can render on the same machine in the background, and keep working with After Effects.
- You can install the rendering engine on as many machine as you like, without having to pay Adobe anything extra
- There is no cheaper or easier way to harness the power of multi-core machines
I’ve been careful in this article to use the term “productivity” instead of performance. They’re not the same thing. While background rendering and render farms are undoubtedly invaluable tools for productivity, in the next article we’ll look at how AErender was also the key to Adobe’s first major attempt at improving performance.
This is part 15 in a long-running series on After Effects and Performance. Have you read the others? They’re really good and really long too:
Part 1: In search of perfection
Part 2: What After Effects actually does
Part 3: It’s numbers, all the way down
Part 4: Bottlenecks & Busses
Part 5: Introducing the CPU
Part 6: Begun, the core wars have…
Part 7: Introducing AErender
Part 8: Multiprocessing (kinda, sorta)
Part 9: Cold hard cache
Part 10: The birth of the GPU
Part 11: The rise of the GPGPU
Part 12: The Quadro conundrum
Part 13: The wilderness years
Part 14: Make it faster, for free
Part 15: 3rd Party opinions
And of course, if you liked this series then I have over ten years worth of After Effects articles to go through. Some of them are really long too!

Filmtools
Filmmakers go-to destination for pre-production, production & post production equipment!
Shop Now


