If you’re reading this then you’re probably an After Effects user, and if you’re an After Effects user then you’re probably working in a creative industry. And if you’re creative – however loosely the term is applied – then there’s a good chance you’re not a huge fan of maths. This poses something of a problem, because Part 3 in this series on the history of After Effects and performance is all about numbers. Big numbers.
The problem with big numbers is that they tend to lose their meaning. While I love watching popular science shows, there’s a point at which millions blur into billions, and I don’t know how many zeroes there are in 1 trillion. Even smaller numbers can lack impact without a point of reference. Fair enough if the distance from Earth to Saturn is 1.2 billion kilometers and the distance to Neptune is 4.4 billion, they’re both a really long way away. But even the difference between 2,000 and 4,500 can catch you out if you’re not paying attention. Ancient historians like to point out that we live closer in time to Cleopatra than she did to the time when the Egyptian pyramids were built. This often surprises people because we just lump everything “ancient” together; Cleopatra and the pyramids both seem like something that happened a really long time ago and so we just mentally stick them in the same basket. But the way we think of Cleopatra as “ancient” is exactly how she – and those who lived in her time – would have thought of the pyramids. The difference between 2,000 years and 4,500 years is more than we might think.
This brings us back to After Effects. Some of the numbers I’ll mention below are so big they start to blur into one another, but the difference between them is very significant, and central to the topic of “performance”. After a while, a few extra zeroes here and there might not look like much, but they can translate into many seconds per frame of rendering time, and that can translate into hours – and days – overall. This is not an exaggeration. Further down I’ll give an example of a project I inherited that was initially taking 45 minutes per frame to render – in After Effects! By optimizing the project and the bitmap images it was using, I was able to get the rendering time down to about 10 seconds per frame. This is a HUGE reduction, and it all comes down to the way numbers can start to add up.
Skip to the end… actually no, we’re just beginning
For many readers, the notion of “performance” comes down to “what processor should I buy… what video card is the best” and so on. But that’s not what this series is about. We’re looking at the history of performance and After Effects, and looking at how the application has developed from its launch in 1993 to now. There are some very specific milestones that have shaped After Effects, and in future articles we’ll see how significant the years 2006, 2010, 2015 and 2019 were. But before we get ahead of ourselves, let’s jump back to the beginning.
In Part 2 I emphasized what After Effects actually does – it processes bitmap images. A bitmap image is just a collection of pixels. From its inception in 1993, After Effects was designed to combine bitmap images together, and that’s still what it does over 25 years later.
Those 25 years have seen a lot of changes. No one complains when their new computer is faster than their old one, or when you can buy several terabytes of hard drive storage for less than a hundred dollars. But at the same time that computer technology has advanced, the film and television industry has progressed too. Over the same 25 years that After Effects has been around, television has transitioned from analogue to digital, from standard definition to high definition, and now we have 4K knocking on the door. At this year’s NAB show it was impossible to ignore the prevalence of cameras that can capture 6K and 8K resolutions, and wide colour gamuts with high-dynamic range seem to be the next step.
The question for After Effects users is how the advances in computer technology have correlated to the changes in the video production industry. Has After Effects kept pace with the rest of the industry?
In Part 3 I’m going to be looking at some numbers, to illustrate the challenges facing the original After Effects rendering engine. In upcoming articles we’ll look at how these numbers relate to the demands on computer hardware, but to begin with we’re just going to get a feel for what we’re in for.
History with pictures: Where’s the window?
It’s a safe bet that everyone’s heard of Cleopatra, but it’s probably just as safe to assume that you haven’t heard of Clarissa. Clarissa was not an Egyptian Queen, it was a software program written for the Amiga computer with one purpose: to play back full-screen animation smoothly, without any additional hardware. The name “Clarissa” was actually written clariSSA, with SSA standing for “super smooth animation.”

Clarissa was developed at roughly the same time as After Effects – the early 1990s – although on the now-defunct Amiga platform. It was significant because at that time, playing back animation on a desktop computer was very difficult. The average desktop computer simply wasn’t powerful enough to process enough pixels for animation. Your average Mac and Windows machines would have been considered cutting edge if they could display colour pictures, but video was out of the question without expensive video cards – the desktop video revolution was just beginning. This is still a few years before Windows 95, and any readers who have no idea what an Amiga is will probably be just as surprised to see what Windows 3 looked liked.
Perhaps the best indication of where desktop video technology was at around 1993 is to look at Premiere. Adobe Premiere was launched two years before After Effects in 1991, and the first version could edit videos with a maximum size of 160 x 120 pixels. That’s about the same size as the icons on your desktop.
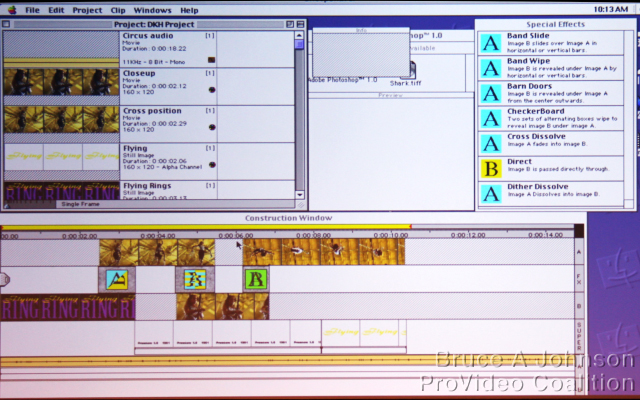
In this age where NAB is all about shooting 8K footage, and it’s not unusual for someone to be working with a 4K monitor, it’s easy to overlook how tiny that is. If we compare a modern, 4K desktop to the largest video that Premiere v1 could handle, we end up with a game of “Where’s the window…”
Speed Governor
In Part 2 I described the difference between the way that After Effects renders, and the way 3D applications render. After Effects only works with bitmap images, it renders them one layer at a time, and then combines them together. There’s no denying that rendering and processing images takes time, but this has more to do with the sheer number of pixels in an image and less to do with the complexity of the processing being done.
The speed at which After Effects renders a composition is broadly determined by four things:
- project bit depth
- composition resolution
- individual layer resolution
- number of layers in the composition
All together, these factors determine how long it will take After Effects to render, and depending on the content any one of these might have more of an impact on rendering time than the others. It’s easy for the numbers to add up very, very quickly. Understanding After Effects and performances means understanding how small changes to bit depth and resolution can have huge repercussions.
Numero Uno, Duo, Tre, Quattro
After Effects stores images using three colour channels: red, green & blue. In order to composite multiple images together, which is what After Effects does, an alpha channel is also needed – giving us the 4 RGBA channels that make up the heart of the After Effects rendering engine.
Each individual pixel on the screen represents 4 distinct numbers – one number for each channel.
A frame of HD video is 1920 pixels wide and 1080 pixels high – which gives us a total of 2,073,600 pixels in a single image. As each pixel is comprised of 4 channels – RGBA – we need a total of 8,294,400 distinct numbers. It doesn’t matter what the image is, After Effects just sees it as a stream of 8 million numbers.
When you apply an effect to a layer, the effect has to be calculated for every single pixel. Some effects will only look at the three colour channels, others might only process the alpha channel. But generally, even the simplest effects involve working through every single pixel of the layer. Let’s assume we have a HD size layer, and we want to apply a very simple brightening effect to it. All the effect is doing is adding a value of 10 to each pixel in the three colour channels. Taking a number and adding 10 to it is not exactly complicated – you don’t even need a calculator to work it out yourself – but repeating it for every pixel, across three colour channels in the image means you have to do it 6,220,800 times.
Of course After Effects doesn’t just work with single images. The whole point of After Effects is its ability to layer multiple images on top of each other, and to work with moving images. Once we start looking at video, and compositions with multiple layers, then the numbers really start to add up.
The future in numbers: It’s not good to be the King
There’s a well known fable about some guy who made a fortune with a chessboard, not by playing the game but by getting a King to pay him double for each square on the board. The first square of the chessboard only had one coin, the next had two, the next had four, then eight, then sixteen and so on. The King hadn’t done his homework, because continuing for all 64 squares on the chessboard would need more coins than there are atoms in the universe (not quite but close enough).
This fable is often used to demonstrate the power of exponential numbers, and how easily they can be underestimated. The King was fine for the first row of the chessboard, as after the first eight squares he was only up for 256 coins. By the end of the second row, he was up for 65,536 coins and was probably a bit surprised. By the end of the third row the bill was over 16 million, by the fourth it was over 4 billion, and by the end of the fifth row the number is so huge that I can’t figure out if it’s trillions or more.
The takeaway point is that when you start with a number and double it, then double it again for a bit, it starts out OK but spirals out of control very quickly.
Moving on from fables to After Effects, there are a few areas of After Effects where numbers have been doubling over time, and so it’s vital that we look ahead to see if this trend will continue. If we don’t stop and check the trend, then Adobe and After Effects users will end up facing the same problem as the King.
Some of the numbers to consider are the average image resolutions that AE users work with, the average bit depth of the images and the AE projects they’re used in, and the average amount of RAM in a computer. We should also consider the average speed of a CPU, but that’s more difficult to measure. These areas have seen significant changes since After Effects was released in 1993, so it’s important to see how these trends are continuing into the future.
None of this is news to Adobe, and they actually have a helpful page on their website which covers all of these details, although it’s primarily aimed at memory. In the context of overall After Effects performance, I’m going to focus more on the overall number of pixels being processed.
The King mentioned in the fable above was caught out by a number that doubled with each square on a chessboard, but when it comes to video and pixel resolutions, our numbers can do more than just double. When TV transitioned from standard definition to high definition, the vertical resolution roughly doubled, and the horizontal resolution by roughly 2 ½ times. Yet it’s wrong to think of a high definition video image as only being about twice the resolution of a standard definition frame. If we count the individual pixels, we’ll discover that a HD frame has about six times the number of pixels – it depends whether you compare it to a PAL or NTSC frame. That’s six times more numbers to process, which could easily equate to six times the rendering time.
Let’s examine the figures:
In 1993 video was “standard definition”, and in PAL countries this resolution was 720 x 576 pixels, and in NTSC it was 720 x 486 pixels. This gives us 414,720 pixels in a PAL frame and 349,920 pixels in NTSC.
By 2003 HDTV had been launched with a larger resolution of 1920 x 1080. As we worked out above, a single HD frame has 2,073,600 pixels. That’s exactly five times the number of pixels in a PAL frame, and 5.95 times more than an NTSC frame.

Ten years later again, and by 2013 4K video was clearly emerging. Another six years later, and at NAB 2019 it was clear that the main focus was on 8K.
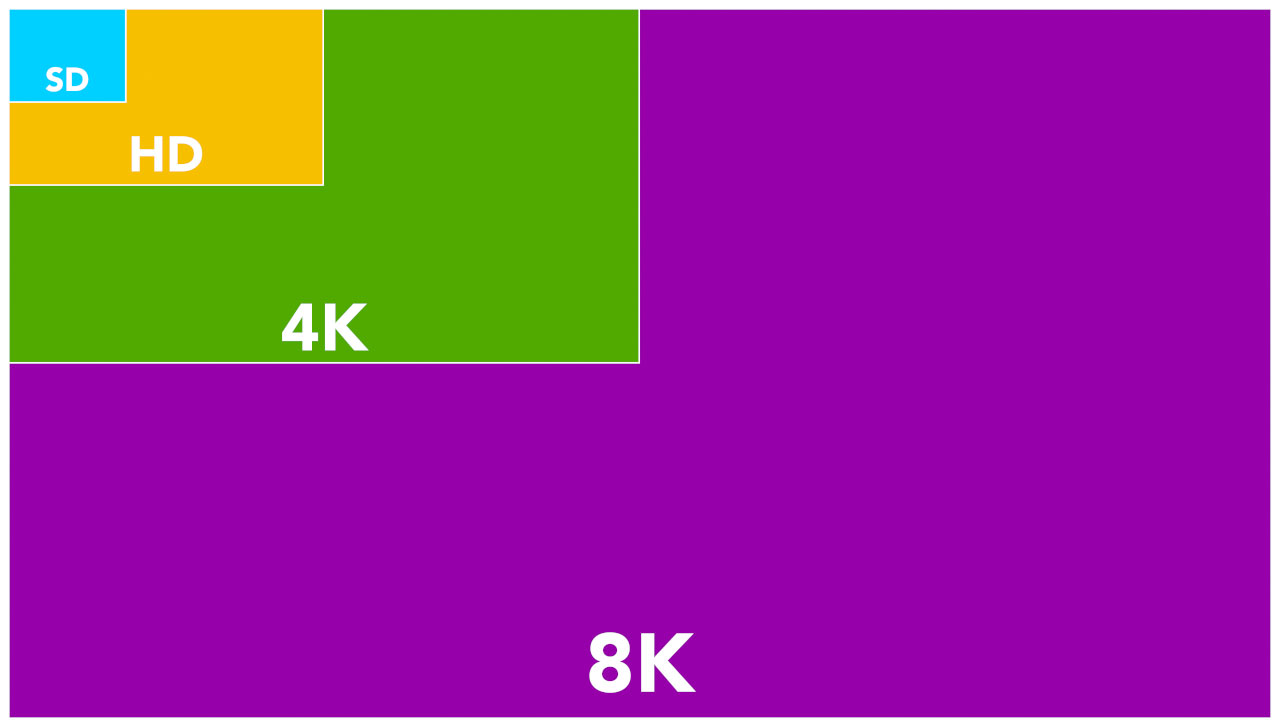
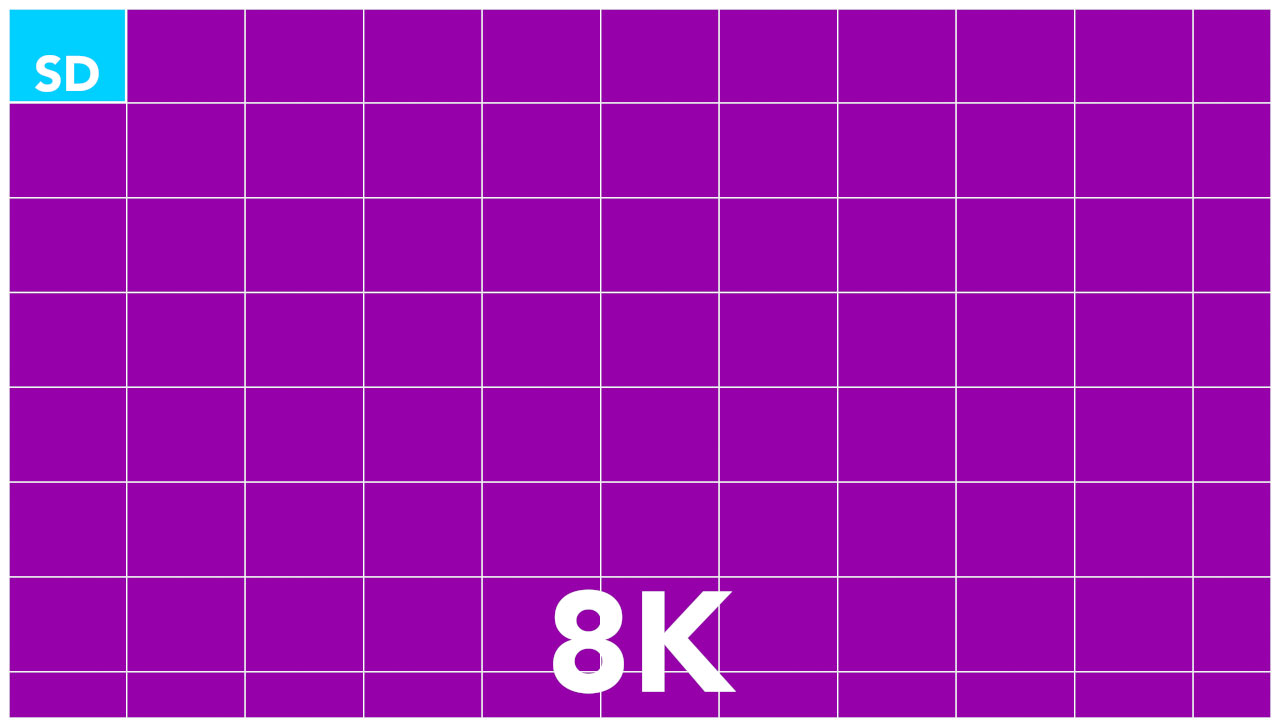
The difference between a frame that is 720 x 576 pixels (SD) in size to one that is 7680 x 4320 pixels (8K) is more than it sounds. You might be surprised to know that a single 8K frame is 80 times larger than an old PAL frame.
Don’t byte off too much
These numbers are referring to individual pixels, but as outlined above, in After Effects each pixel is comprised of four distinct numbers. In computing terms, numbers are a surprisingly complex topic, but to keep things simple I’m equating one number with one byte. A byte is comprised of 8 bits, and one byte can represent a number between 0 and 255. We’re so used to dealing with bytes that we tend to refer to them through abbreviations. Kilobytes became “K” – as in “My Commodore 64 has 64K of RAM”. Megabytes and Gigabytes have simply become “meg” and “gig”. If someone says their computer has 32 gig of RAM, we know what that means. I don’t think we’ve started abbreviating “terabytes” yet, but we’re surrounded by bytes, and a byte is the most basic number that computers deal with.
Conveniently, a byte was just the right size to store colour information in images without the human eye noticing any quality loss. By using one byte for each channel – red, green and blue – a total of 16 million colours can be represented. As a byte is made up of 8 bits, this is known as 8-bit colour.
When After Effects was launched in 1993, it only supported 8-bit colour. All processing and rendering was done using numbers between 0 and 255 – one byte each for the red, green, blue and alpha channels. Even today, it’s probable that the majority of After Effects users are working in 8-bit mode. We’re accustomed to seeing black identified as 0,0,0 and white as 255,255,255. Some file formats, like JPG and Targas, can only store 8-bit colour images.
Using 8-bit colour for images was fine for a long time, and the 16 million colours that can be displayed with 8 bits is slightly more than the human eye can perceive. But once creative people started manipulating and otherwise processing images, it became apparent that using only 256 numbers wasn’t quite enough. The most obvious problems were in gradients, which could display visible banding, but colour grading was also an area where the lack of fine detail in an 8-bit image became a problem.
In 2001, After Effects introduced the ability to work with 16-bit images. Instead of using one byte to store a number for each channel, it used two. While one byte can store a number between 0 and 255, using two bytes allows you to store a number from 0 to 65,535. By using 2 bytes for each channel instead of one, there’s more than enough precision for images to retain all their detail even through heavy processing.
The difference between 8-bit and 16-bit images is like the difference between measuring something in centimetres or millimetres. Overall, what is being measured doesn’t change. A table isn’t bigger if you record its size in mm instead of cm. However, by using mm you can record the size with much greater accuracy and any calculations you make will be more precise.
In 2006, Adobe introduced 32-bit mode – using four bytes for each colour channel. In simple terms, 32 bit mode allows highlight and shadow detail to be retained even if you can’t see it. Newer compositing tools such as Cryptomattes require the project to be in 32-bit mode, and working in 32-bit linear mode is the standard for high-end 3D compositing.
Jumping between an 8-bit, 16-bit and 32-bit image doubles the memory requirements each time. When we change between 8, 16 and 32 bit modes we are changing between using 1, 2 and 4 bytes for each colour channel. Before, we were just looking at the total number of pixels in an image. Even then the difference between a frame of PAL and a frame of 8K was huge – 80 times different. But once we start to consider the overall number of bytes needed, including the individual RGBA channels, and the additional bytes used in 16bit and 32bit projects, then the numbers start to get frightening.
Bytes for Bytes
Let’s revisit the frame sizes from above again, but this time we won’t just count overall pixels, we’ll count individual bytes.
A 720 x 576 PAL frame has 414,720 pixels. Multiply that by four (RGBA channels) and we have the number of bytes needed to store the image: 1,658,800. But if we’re working in 16 bit mode, and honestly every After Effects user should be, then we need twice as many bytes: 3,317,760 – over 3 megabytes. Switching to 32-bit float mode doubles the number of bytes needed yet again, and now we’re up to 6,635,520 – or over 6 megabytes.
Six megabytes might not seem like a big issue, but SD resolutions haven’t been the standard for almost twenty years. It’s a safe bet that in 2019 the majority of After Effects projects are created at HD resolutions, with 4K becoming more common. But it was impossible to ignore the prevalence of 8K video at this year’s NAB conference, so we also have to keep an eye on the future.
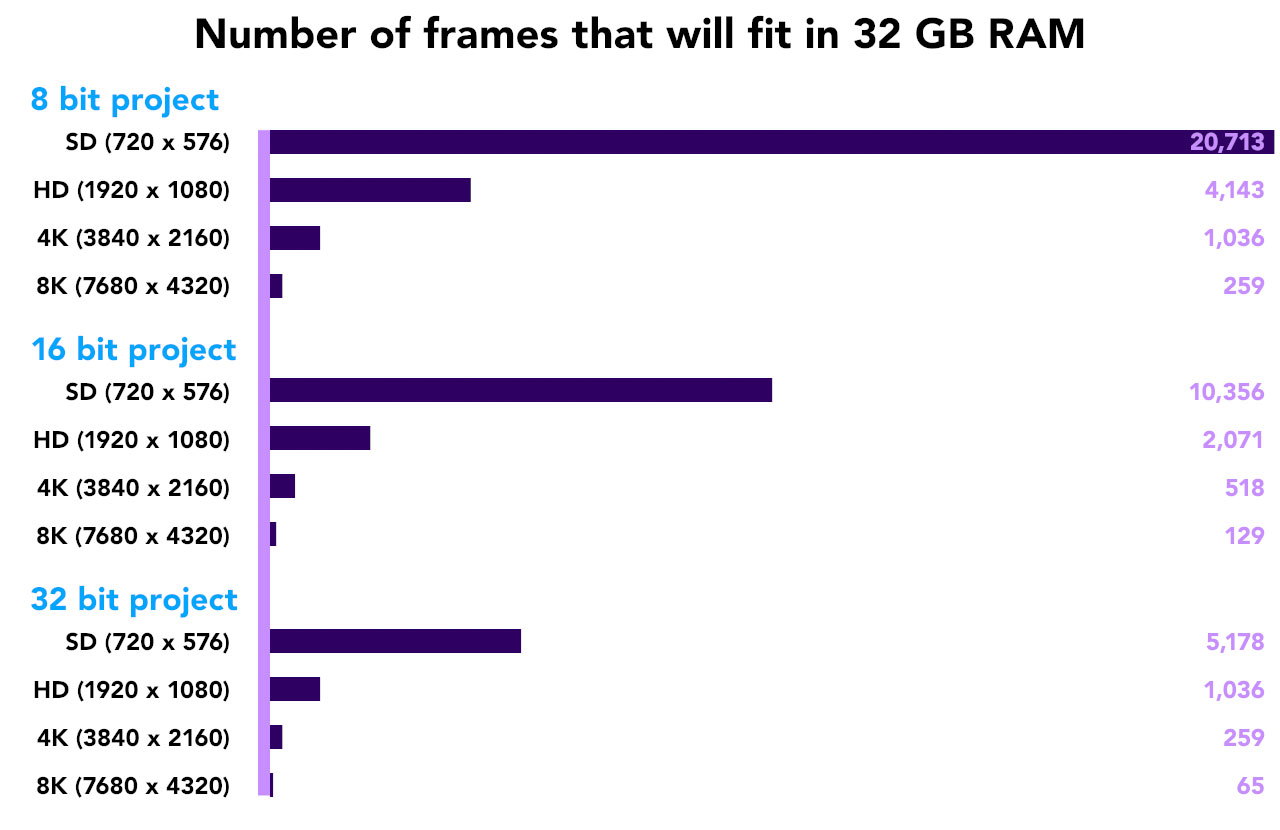
A single 8K frame (7680 x 4320 pixels) takes up 126 megabytes of RAM, for an 8-bit RGBA image. But if we want to work with HDR images, then a single 32-bit image will need over 506 megabytes, or half a gigabyte. Even in 2019, this is a scarily large number for one single frame of video. When we remind ourselves that videos need at least 24 frames to make a single second of animation, and that After Effects is a compositing application designed to combine multiple layers of video together, we can start to see a problem.
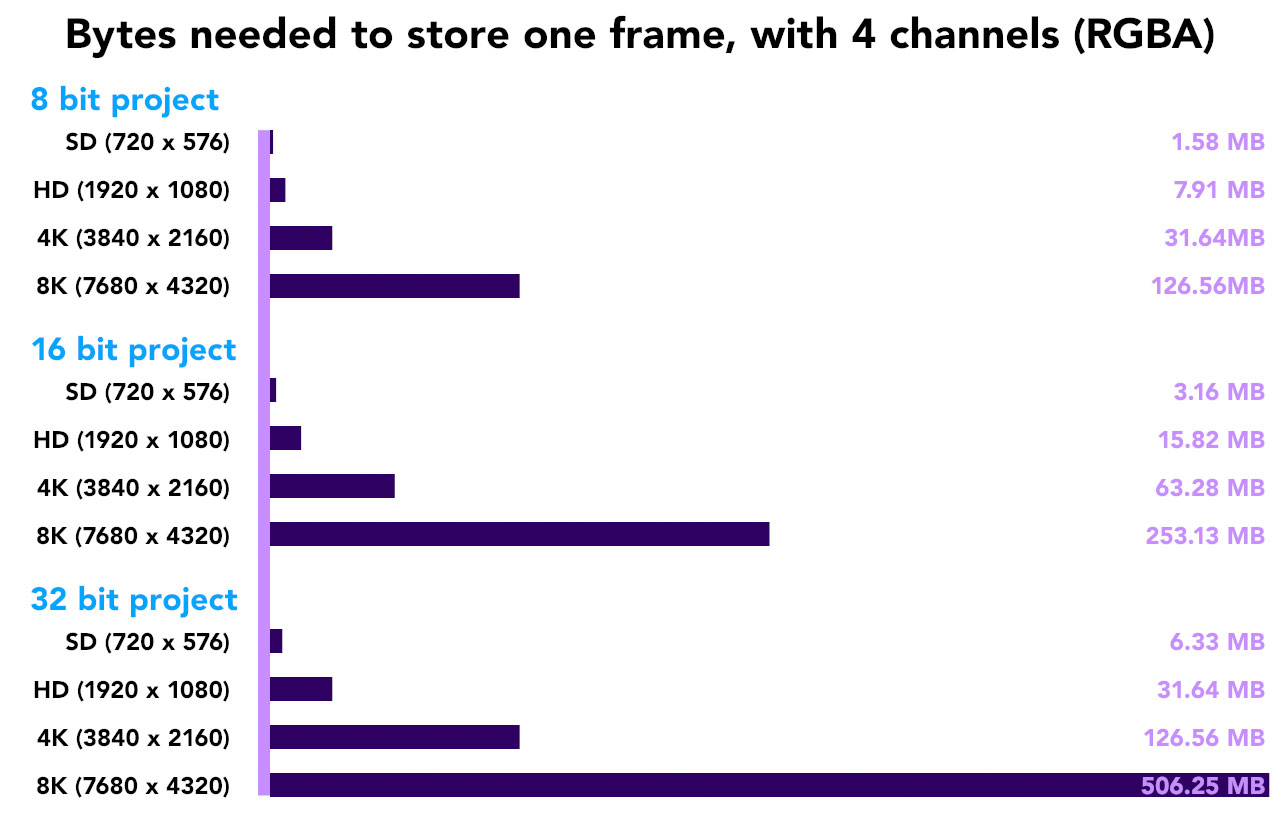
In terms of resolution, a single 8K image has the same number of pixels as 80 SD PAL frames. In terms of bit depth, a single 32-bit 8K image requires the same amount of RAM as 320 frames of 8-bit SD PAL. That’s a pretty big jump in resources. Does that mean that an 8K, HDR frame will take 320 times longer to render than a single 8-bit SD frame? It’s quite possible.
Our course, not every After Effects user is regularly compositing 8K images in 32-bit projects. Actually, I doubt anyone is. The most extreme After Effects project I’m aware of is Stephen Van Vuuren’s Imax film “In Saturn’s Rings”, which used 10K square comps at 16-bit resolution to deliver an 8K square master 42 minutes long. But at the other end of the spectrum, I’m aware of TV Networks that still create promos at standard definition, even in 2019. But just like the fabled Arabian King, if we don’t look ahead and think about where things are headed in the future, at some point we’ll find ourselves in deep trouble.
For an After Effects user who is still working with SD video today, After Effects will seem incredibly fast compared to 1993. But for anyone who’s working with the very latest 8K footage, it will feel much slower. 320 times slower, perhaps, or even more.
When you take into account the larger resolutions and higher bit-depths that have become more common since 1993, it’s difficult to generalize if After Effects is performing better or worse over time. Different users will have different experiences based on what they are using After Effects for. It’s worth noting that After Effects can create content without using any imported footage at all. Text, shape layers, solids, masks and plugins are all you need to create amazing motion graphics. Projects that are made without footage are freed from bandwidth and memory constraints, but even so rendering time can vary depending on exactly what plugins are being used.
Pixels from the real world
Looking at big numbers isn’t exactly fun, so here are a couple of real-world examples of how After Effects is directly affected by pixel sizes.
A few years ago, I posted an article which looked at the process used to create animations for the Sydney Opera House. A critical process in making the animation involved taking a single layer with many masks – in some cases over 1,000 – and separating each mask onto its own layer. Each individual layer was then animated. When I first tried this, each layer was the size of the original composition, even if the mask itself only took up a small amount of the screen. Rendering times were about 5 minutes per frame, which is a lot for After Effects – especially when your project is nothing more than solids, masks and the stroke effect. After Effects was wasting huge amounts of time by processing pixels that weren’t even needed.

By cropping each layer down to the size of the mask, there weren’t any redundant pixels wasting After Effect’s processing time. Render times dropped from about 5 minutes per frame to less than 5 seconds per frame, which made the project feasible. I’ve already written about this project in detail, so if you want the whole story then just click here.
But even more dramatic was a project I inherited several years earlier, which was possibly the worst After Effects project I’ve personally seen. While it’s not something that I’m going to share screengrabs of, it’s the perfect example of how pixels govern the performance of After Effects.
The project was an example of what is often called “2 ½ D”. The animation consisted of the After Effects camera flying through a 3D world, created in After Effects using 3D layers. Initially, I was asked to have a look at the project to see if I could fix some flickers and other glitches. But when I checked a render that had been going overnight, I was puzzled to see that it was taking about 45 minutes to render each frame. I assumed there was something wrong with either the computer, or the network, or some other technical glitch. I’d never seen After Effects take so long to render a frame (and I haven’t since, either…)
It didn’t take me long to realize that this wasn’t a technical glitch. The problem was the way the project had been built.
The artwork for the project had been created by a watercolour artist – ie. someone using real paint on real paper. Each component had been hand painted and then scanned into Photoshop. All of the elements had been assembled into one, single Photoshop file that was roughly 14,000 pixels wide and 9,000 pixels high. Even though it was flattened to a single layer, the file was well over 300 megabytes in size. This was over 10 years ago, and it was a lot. 300 megabytes for a single image is still a lot today.
When the original After Effects user started building the scene, they used the full size image in the timeline. Each element was masked out and then positioned accordingly in 3D space. The scene was made up of several hundred layers – every one of them was the same source layer with a different part masked out. In every case, even though the source layer was huge – 14,000 x 9000 – the visible area was only a tiny fraction of the overall layer.
When it came to rendering, After Effects had to process all of the pixels in the layer – even if it was just to mask out the visible area. It didn’t matter if the smallest feature in the timeline was only 50 pixels across, the full 14,000 pixels of the image were being processed. A huge amount of time was being wasted on rendering pixels that were never seen, or used. Over hundreds of layers this unnecessary time added up, resulting in our inconceivable render time of 45 minutes per frame.
Once I identified the problem, I was able to take the original artwork file and separate out each distinct element, cropped down to just the visible size and saved as a series of individual images.
While the original file may have been 14,000 x 9,000 pixels in size, some of the smaller features were less than 100 pixels in size. While it would have taken me a few hours to isolate all of the painted elements and then re-build the composition with the new, smaller layers, the rendering time dropped from about 45 minutes to less than 10 seconds. After Effects was no longer wasting time processing unnecessary pixels, and over many layers and many frames this added up to a huge time saving.
Full, half, quarter
The simplest way to improve performance in After Effects is to choose to work at half, or quarter resolution. It’s just a little drop-down menu at the bottom of the composition window. Looking at our examples above, we should expect that working at half resolution will render four times as fast, and rendering at quarter resolution will render 16 times as fast. While this might not always be the case, it’s worth remembering that you don’t always have to work at full resolution – especially if you’re working with 4K footage or larger, but you don’t have a 4K monitor to view it on.
In Part 1 of this series, I looked at the question “what is performance?”.
In Part 2, I examined the way the After Effects rendering engine works, and emphasised that After Effects is just combining bitmap images together.
In this article, we looked at how changes in those bitmap images, and the project bit depth in After Effects, can have huge repercussions on the amount of data that After Effects has to process. While computing hardware has advanced considerably since After Effects was launched in 1993, the technical demands of the film and television industry have also progressed. While it might not seem likely that we’ll all be working on 8K, HDR projects any time soon, the fact that the technology is being promoted so heavily means we have to be prepared for the future.
In the next article, I’ll be revisiting the many different After Effects users that I introduced in part 1, and look at how the projects they work on place different demands on different hardware components.
(NB. When I started calculating bytes and so on , I assumed that 1 kilobyte is 1024 bytes, and a megabyte is 1024 KB,and a gigabyte is 1024 meg. This irritates some people, who use 1000 instead of 1024. In the context of this article, it really doesn’t matter – but knowing that I’m using 1024 and not 100 might help explain the numbers.)
This is part 15 in a long-running series on After Effects and Performance. Have you read the others? They’re really good and really long too:
Part 1: In search of perfection
Part 2: What After Effects actually does
Part 3: It’s numbers, all the way down
Part 4: Bottlenecks & Busses
Part 5: Introducing the CPU
Part 6: Begun, the core wars have…
Part 7: Introducing AErender
Part 8: Multiprocessing (kinda, sorta)
Part 9: Cold hard cache
Part 10: The birth of the GPU
Part 11: The rise of the GPGPU
Part 12: The Quadro conundrum
Part 13: The wilderness years
Part 14: Make it faster, for free
Part 15: 3rd Party opinions
And of course, if you liked this series then I have over ten years worth of After Effects articles to go through. Some of them are really long too!

Filmtools
Filmmakers go-to destination for pre-production, production & post production equipment!
Shop Now