My previous Arri Alexa article showed you how the camera’s dynamic range responds to different ISO settings. In this shorter article I’ll show you why that’s useful and practical information.
All the world loves graphic examples, so let’s start off with one:
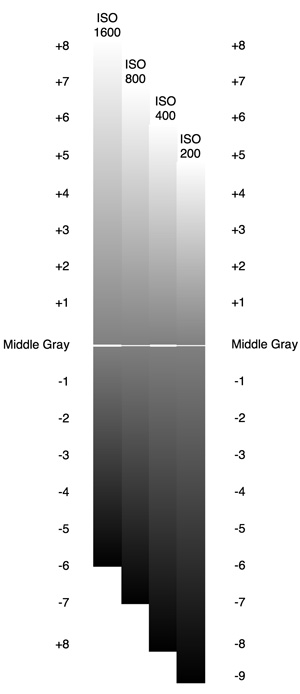
This graph shows how tones are allocated at four different ISO settings on the Alexa in LogC mode. The top of each column shows how many stops above 18% (“middle”) gray that maximum white (“clipping”) occurs, and the bottom of the scale shows where the signal dissolves into black (at the noise floor).
Arri says that ISO 800 is the “sweet spot” where there are an equal number of stops above and below 18% gray. That’s great to know, but that’s not always the most important factor when choosing an ISO setting. There are other considerations, such how much noise we can tolerate or how much highlight information we need to retain.
Looking at the above graph, there are a couple of thoughts that occur to me:
Highlight retention shrinks with noise reduction. The ISO’s that offer the least noise also have the fewest number of stops between 18% gray and maximum white. This means that ISO 200 might be a good choice for a low-key moody night interior where we need to see into the shadows, because there’ll be more stops of underexposure latitude available than at higher ISOs. There should be few, if any, bright highlights in the shot that need to retain detail, because there will be fewer stops of latitude between 18% gray and maximum white.
This setting might also be a good choice for green screen, where a low noise level is beneficial and highlights can be meticulously controlled. It’s probably not so good for harsh noonday exterior shots in the desert, where it may be advantageous to record a greater range of light tones than dark tones.
As highlight retention increases, noise increases. Ironically, ISO 800 should be a great choice when shooting day exteriors as we can comfortably retain highlights at up to seven stops above 18% gray-which is more highlight retention detail than any other camera on the market that I’m aware of. This can be especially important when shooting car spots, where highlight kicks tend to be a feature and not a mistake, and when shooting from interiors into day-lit exteriors.
ISO 400 might be a good compromise between retaining highlight detail and crushing noise, as we lose only one stop of highlight latitude while pushing the noise one stop farther down the scale from 18% gray toward black.
You may have noticed another effect that’s worth looking at in more detail: although the number of stops between 18% gray and maximum white vary depending on the ISO, the end points (white and gray) are always the same. The catch is that the distance between them varies. While a difference of one stop of brightness at ISO 1600 only covers 1/8th of the difference between 18% gray and white, that same stop is 1/5th of that distance at ISO 200. The same is true of shadow detail at various ISOs.
We can easily say that ISO 200 opens up shadows and compresses highlights because the camera allocates more stops below 18% gray than above, giving darker tones both more overall latitude and a longer tonal scale. Conversely, ISO 1600 compresses shadows and opens up highlights because more stops are allocated above 18% gray than below, allowing the highlights more room to breath.
So if you habitually expose flesh tones at one stop brighter than your spot meter reads (Zone 6), for example, LogC will record a brighter value at ISO 200 than it will at ISO 1600. And if you want a background to drop into blackness, you only need to underexpose it by five stops (reflected) at ISO 1600 whereas you’ll need to push it down three or four stops further at ISO 200.
Does this matter in the practical world? To some extent, yes: while you can place those values where you want them in a color grade, there may be more or less contrast separating those tones from others depending on the ISO you choose. For example, light skin tones might separate nicely from a bright background at ISO 800, where a change of one stop of brightness results in 1/7th the distance from middle gray to maximum white, whereas there will be less contrast between those two tones at ISO 200, where each stop results in steps that encompass 1/5th the distance from middle gray to maximum white.
Because geeks like graphic examples, and I am clearly a geek, here’s another graphic example:
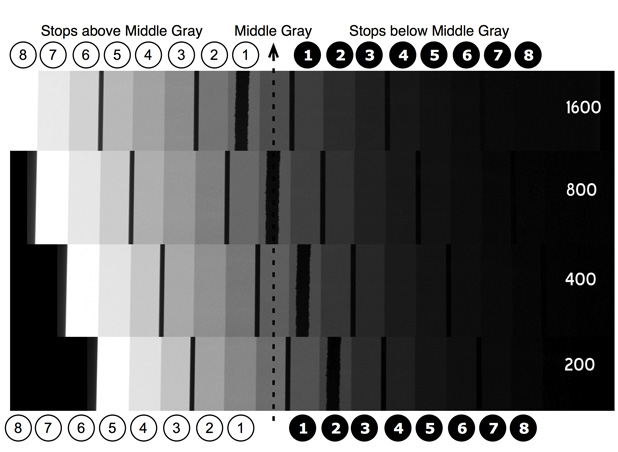
What I did was take the images of the DSC Labs 102db 17-stop latitude chart from my previous article and cut them up so that 18% gray is lined up at four different ISOs. The chip with the tape running down the center reflects 18% gray at ISO 800 and moves around depending on how the camera ISO changes, so I added a dotted line that runs vertically through the chart to indicate the 18% gray (45%) chip at each ISO.
I had to manipulate the charts a little in Photoshop as maximum white values in LogC vary depending on the ISO: highlights can reach 100% at ISO 1600 but max out at 85% or so at ISO 200. This maximum value for white ultimately doesn’t matter because LogC is meant only for storage and not for critical viewing: the first things that happen in a color grade are setting a black level and a white level, so white will simply be placed wherever the DP and/or colorist want it to be. That’s what I did here: using the Photoshop “Levels” tool I picked a maximum black, just below the darkest chip at the right side of the chart, as well as a maximum white, at the top left of the brightest chip.
Because of this manipulation this chart is not meant to be a true dynamic range guide. (For that, see this article.) Instead this chart is good for pointing out things like this:
Maximum white at ISO 200 occurs at 18% gray plus five stops. The chip that is white at ISO 200 is varying shades of gray at ISO 400, 800 and 1600.
18% gray minus five stops at ISO 1600 is near black, but looking down the chart we can see additional tonal detail in the dark tones as the ISO decreases to 800, 400 and 200.
A commenter to a previous article praised Alexa because he thought he could throw away his ND filters when shooting outside. That’s not the case, as these graphs indicate: when shooting HD nothing comes for free, and there are gains and penalties involved whenever you change the ISO setting on a camera that allows you to do so. While it may make intuitive sense to shoot day exteriors at ISO 200, you may be much better off shooting them at ISO 800 to retain highlight detail.The same could be true of a moody night interior, where ISO 200 will open up more shadow detail with less noise than ISO 800 will.
Keep in mind that this article addresses LogC only. Rec 709 will look much more normal at different ISOs because the stops at the top and bottom of the range are severely rounded off by Arri’s aggressive Rec 709 S-shaped gamma curve. Still, there will be differences in how much detail shadows and highlights hold at different ISOs in Rec 709 so it’s wise to use what I’ve outlined above as a predictor and observe what actually happens to extremes of exposure at different ISO settings in the field.
Oh-and just because another HD camera doesn’t have ISO settings doesn’t mean it’s not affected exactly the same way: -3db gain will offer less noise while compromising the camera’s ability to hold detail in extreme highlights, while +3db gain will result in more noise but also more highlight detail retention. Don’t take my word for it; try it out!
I will be working on an article shortly that shows that this strategy also works on the RED ONE MX. Stay tuned!
For more information about the Arri Alexa, please go to Arri Digital.
Thanks are due to Chater Camera, who provided an Alexa for this test series, and DSC Labs, who provided the test chart.
Art Adams is a DP whose brightness changes depending on his exposure to new technology. His website is www.artadamsdp.com.

Filmtools
Filmmakers go-to destination for pre-production, production & post production equipment!
Shop Now