With NAB 2013 just around the corner it should come as no surprise that Adobe has let their cat out of the bag by letting the world get a sneak peek at what’s coming in the next version quite a few of the Creative Suite applications that many video pros depend on. Premiere Pro, After Effects, Audition, Prelude and Speed Grade will all see updates. You’ll have to look around for some other posts about what’s new in the majority of those tools we I’m going to concentrate on the next Premiere Pro.
I’ve had just enough time to dig into this next version of Adobe Premiere Pro and check out some of the feature improves, both new and upgraded. Overall it’s going to be another solid release that continues Adobe’s vision of Premiere Pro being a top notch editor that can stand toe-to-toe with both Avid Media Composer and either version of Final Cut Pro. Does this release address every issue that FCP7 editors have been complaining about since many of them moved over? No. Does this release add a whole lot of feature improvements and additions that make the NLE better? Yes. Is there ever going to be a perfect NLE that editors won’t complain about? Well of course not. What fun would that be?
The Big Feature Additions to this next version of Adobe Premiere Pro
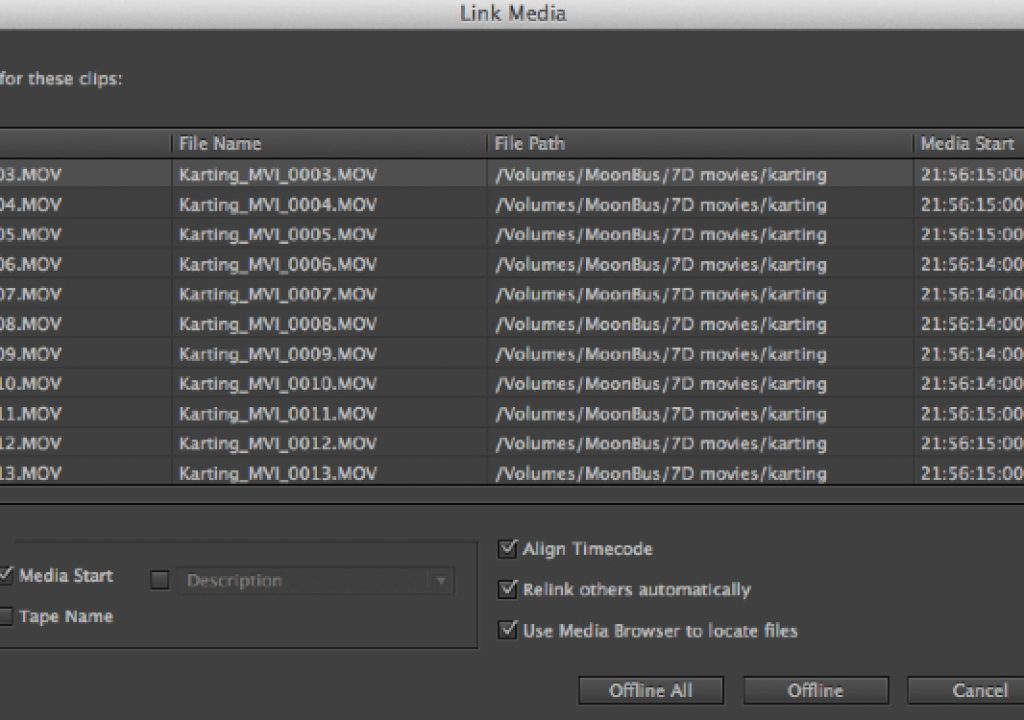
Media Management and a much improved Link Media option with Link and Locate
We have all complained that one of Premiere Pro’s main weaknesses was in the area of media management. It’s always been very FCP like in that it seems to be just a file name and file path that PPro has used for media management. The next version of PPro will come with something called Link and Locate.
This image shows something dramatically different from the old PPro dialog box for relinking media:
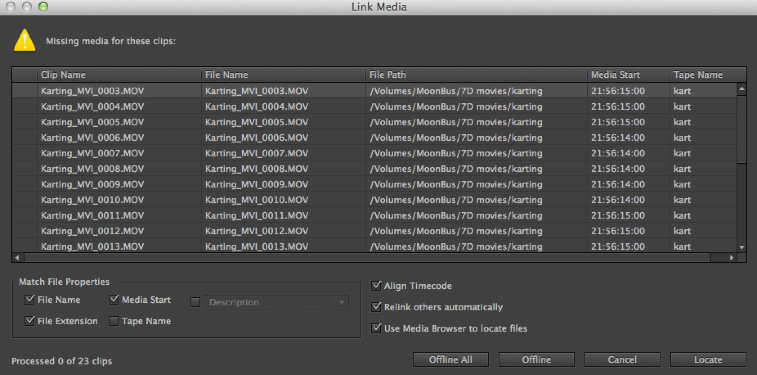
If you remember Link Media before you remember a generic Mac (or PC) dialog box that really didn’t help you very much at all. It’s now actually useful.
There’s a lot of things to dig into here so it’ll take some time working with this new version to discover all the new features in Link and Locate and what they mean. The first thing that I took note of was the new Match File Properties option. It’s also nice that the Link Media box will automatically pop-up if files go offline while working, which hopefully will never happen.
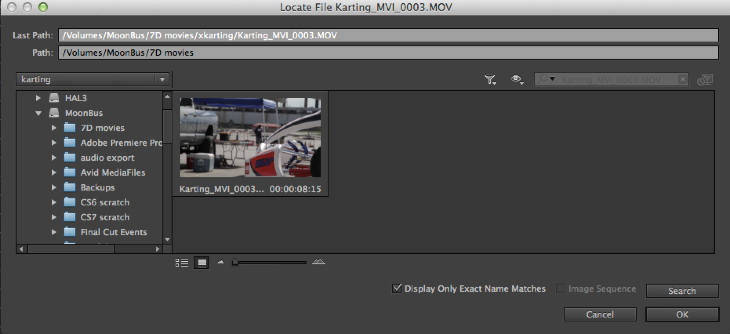
The addition of these parameters when relinking media means PPro isn’t looking just for a file path and a clip name. This is a good thing.
It still seems pretty dependent on file names, at least on the non-timecoded and tape named DSLR media I was testing with, but my bet is the more metadata you have the better the relinking experience … as it should be. Yet another reason to properly prep DSLR media before edit. But darn of PPro Next didn’t go a good job of relinking native 7D media right off the CF card.
A few bullet points that I noted while trying out this new Link and Locate feature.
• You’ll want to use the Media Browser to locate the files as that gives you Hover Scrub capabilities as you’re searching out the lost media. • If you don’t want to relink all the clips that are offline hit the Offline All button after finding your clip to leave the others offline. • If the Relink other automatically box was turned off after the last Link Media operation PPro automatically relinked the offline media when that box was checked back on during the next Link Media operation. • PPro tells you the Last Path where the clip you’re searching for was available and that’s going to be very helpful. • I’m not going to swear to it until doing further testing but Link and Locate seemed to have good success relinking some DSLR media where the name had been changed. • PPro still seemed to be going nuts on the audio .pek peak file generation as I was playing around with this new relinking as there ended up being like 5 or 6 .pek files for each of the clips I was testing.
I think it’s safe to say that this next version of Adobe Premiere Pro will be superior to all previous version when it comes to media management and relinking of media files so we can check probably check that one off the list.
Nudge clips up and down in the timeline
Oh what a glorious feature this is that we’ve had in Final Cut Pro since early in time. If you don’t quite get that heading of nudge vs move it means you can use just a keystroke move clips up or down a track at a time in the timeline. What a simple but fantastic feature this is that every NLE should have (ahem, Media Composer).

You’ll have to head to the Keyboard Shortcuts menu (which unfortunately didn’t get a redesign) to search out the Nudge Up and Down keys. They are there and a welcome addition.
It works on both audio and video, with single clips or multiple clips selected. If you attempt to move both audio and video and you hit the top or bottom of the timeline you’ll get a “media limit” error. This nudging of clips up or down will also create new video or audio tracks as you move them past the current amount of tracks.
Yep, that’s an Audio CLIP Mixer
One common PPro gripe has often been in the audio mixing choice the developers made … meaning that it is a track based mixing app and the audio mixer works on the overall track and not on a per clip basis. For clip mixing you had to use the rubber bands in the timeline. It was a different paradigm than most editors were used to. With this new version comes the Audio Clip Mixer
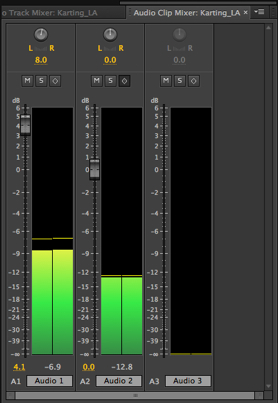
Check this common complaint off the list too as the next PPro will let us mix on a clip by clip level with something other than rubber bands … or Audition.
There’s not much to explain other than we now have a dedicated mixer for adjusting clip levels. The simple mixer has mute, solo and keyframe buttons as well as the expected pan knobs, level sliders and level meters for each track. Turn on the keyframe button and PPro will record those fader changes live in the timeline as you play back.
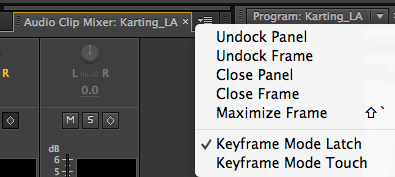
There’s even a Latch and Touch option for the new Audio Clip Mixer.
The Pros: it’s a clip based audio mixer which editors have wanted and needed for a long time. The Cons: It’s yet another window to take up space and integrate into your existing layouts. The Takeaway: No matter how it’s implemented clip-based audio mixing is a most welcome feature addition. I just don’t understand why it couldn’t be integrated into the existing Track mixer. You’re move Final Cut Pro X.
Lumetri (and an updated Speedgrade)
One big update to the entire Adobe video suite is happening with Speedgrade as it gets a new interface and general usability improvements. Over in PPro a new effect category appears called Lumetri. This new category of effects are looks designed to be dropped right on a clip or placed into an Adjustment Layer changing many clips at once.
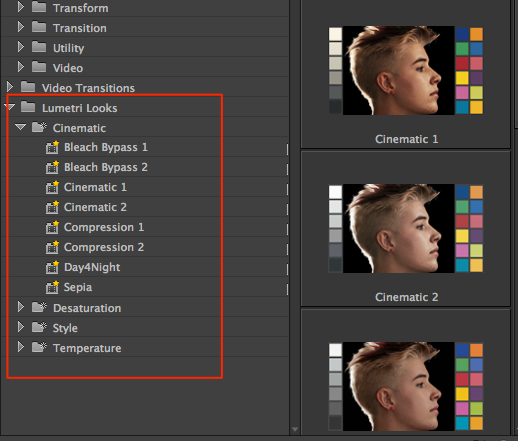
That's not Justin Bieber but a ton of pre-installed Lumetri looks will come in PPro Next.
While exact details are scarce as I write this the Lumetri effect appears to be PPro’s connection with the updated Speedgrade as Speedgrade can create these .look files that are the basis of the new Lumetri effect. It looks like a very intriguing connection between the two applications. Here's a look at a panel of the new SpeedGrade:
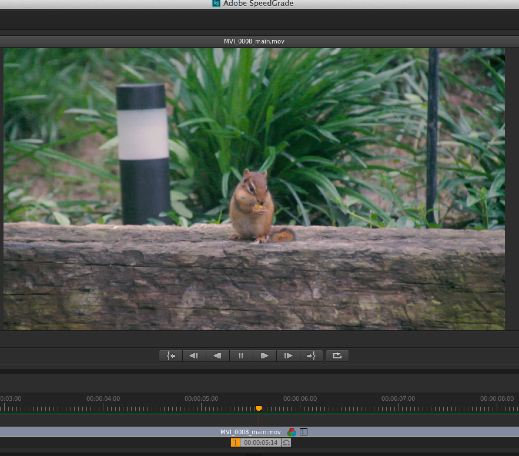
This isn’t an article about the new Speedgrade but my bet is this update might get a lot more users trying it out. The interface looks a lot more approachable for the new user … in fact it looked a lot like PPro when I saw some screenshots. Unfortunately I don’t think they’ve added curves.
A real, functional Paste Attributes
We all know how a good Paste Attributes function should work so there’s no need discussing that other than to show the updated function:
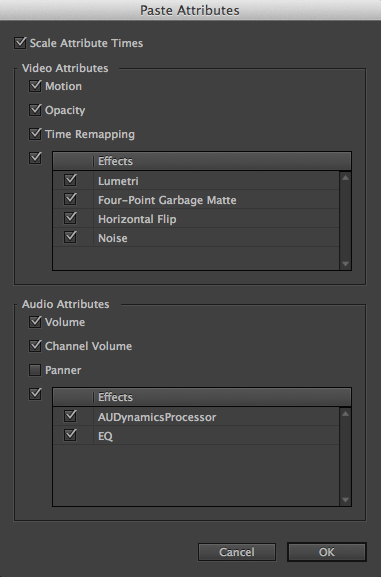
The selecting pasting of both filters and clip parameters is something on NLE should be without.
Next up: The Timeline Header / Track Panel gets a big reworking
Another Biggie: A Brand New Timeline Track Panel
Track targeting and patching gets reworked
You know that timeline track patching panel and all the other little things an editor needs to do at the top of a track-based NLE editing timeline? It all gets an update in this new PPro which is a good thing as track patching was always more trouble than it needed to be. There’s a lot of new stuff in the timeline track panel so it’ll take some work to figure it all out but here’s what I got from working with it in the time I’ve had to play with this new version.
The first thing you’ll notice when working is how much easier it is to target track assignments when patching from the Source monitor. You still click and drag to move the source patch on the left but PPro now basically ignores the patch on the right as the one on the left is the most important anyway. It’s when you right+click on the source patch you’ll see all kinds of new options:
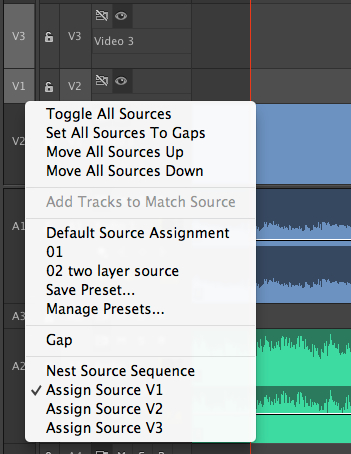
Don’t fear the large contextual menu as there’s good stuff in there.
Some of those new options are somewhat self-explanatory but you’ll have to play with this a bit to feel exactly how it works out. The option to reset the patch is nice (Default Source Assignment) as well as being able to target a track without having to click and drag (Assign Source). You can also see an option to Save Preset… and in the image above I’ve saved two different patching presets. My first thought was that this option seems to overly complicate things but then I thought about how often I seem to re-patch the same thing. On second thought I’ll take it.
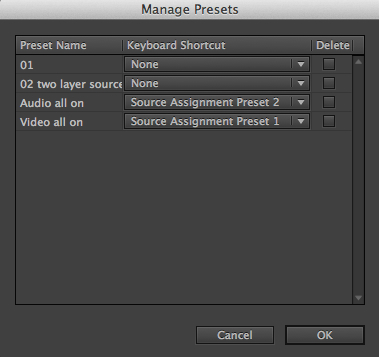
Managing all those patch presets you might save is easy. And a keyboard shortcut option means you can change those presets fast.
And then there’s Gap.
In the past PPro would, rather annoyingly, edit black into the timeline whenever you had a track patch heading number turned on regardless of whether there was media there to edit into a timeline. That “feature” is now gone and it has been replaced by the Gap command.
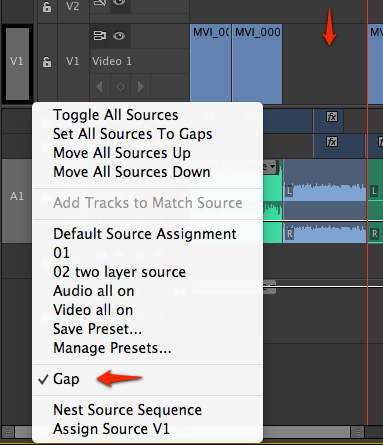
In the above image Gap is turned on for V1 but not A1. Notice the black outline around V1.
You can choose Gap independently of any other track. It’s nice to have that as an option now. Gap isn’t an actual piece of black video, like say a Slug in FCP7 or Filler in Avid Media Composer, it’s just a gap in the timeline. An important distinction as PPro has always had the ability to create a piece of Black Video.
PPro patching and track targeting now seems like it’s mostly all controlled on the Source side as turning on track targeting on the Program side doesn’t really do anything when performing edits … at least I can’t see what it does. But Program side track targeting does get its own options:
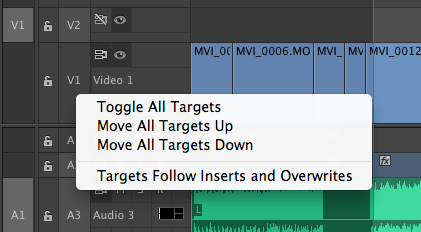
Customizable track headers
The other big thing you might have noticed is how different the track patch panel now looks.
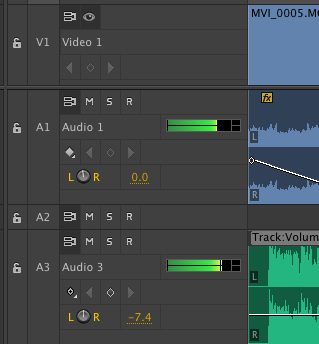
If you’ve complained about the track headings in other versions of PPro then it’s time to give the next version a look.
The most obvious change is the addition of audio meters at the heading of the audio track. Personally I think the M and S for Mute and Solo (the R is for recording) right from the audio track is the best addition as many editors will have the new Clip Mixer open more often than the Track Mixer which is where Solo and Mute used to reside.
But these new options might not be there when you first boot the next PPro as they are all customizable via a new track patch panel Button Editor.
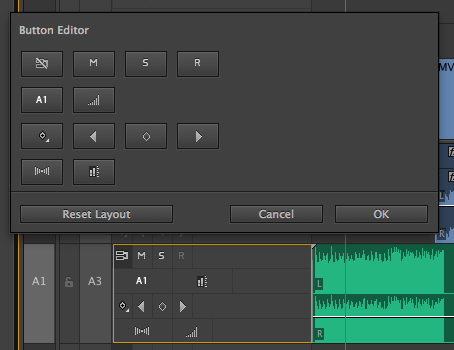
This button editor thing in PPro is popping up regularly now.
It’s there you’ll be able to add options like the Mute and Solo buttons, volume and balance controls and the audio meters.
If you choose to add everything then there is some dead space around the audio meters but you’ll be able to expand and contract the track heights with the scroll of a mouse wheel. And that’s when you might notice another long-held Premiere Pro feature being gone: the disclosure triangle to “open” a video track to see key-framing and a thumbnail.
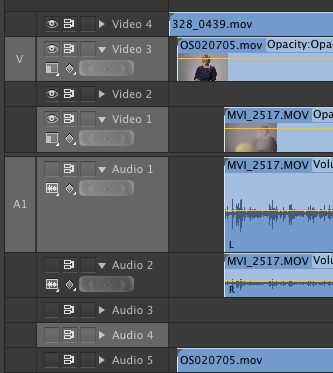
I can’t say I’m sad to see this go from CS6. I always thought it was a novel idea but after using other NLEs is always frustrates me to have to twirl the little triangles up and down all the time.
That feature has been in PPro for as long as I can remember but it’s gone as of this next version. Instead you can quickly change the track heights by scrolling the mouse wheel over the track headers. Yes you can click and drag the divider between but scrolling the mouse is much faster. Shift+scrolling (or shift+dragging) expands all the video or audio track proportionally. If you want those thumbnails back then a new little wrench button at the top of the timeline opens the Timeline Display Settings for a while wealth of new options.
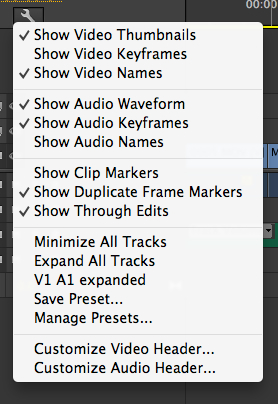
Again, don’t be afraid of a new, long menu option as options are a good thing as they mean the editor can customize the NLE to their liking. These new menus really are that complex if you take a moment to study them.
Here you’ll fine toggles for a ton of new features, many of which we’ll cover later in this article. But as far as timeline track displays go, the option to save your track heights is very important … and that’s something both Media Composer and FCP7 have had for a long time.
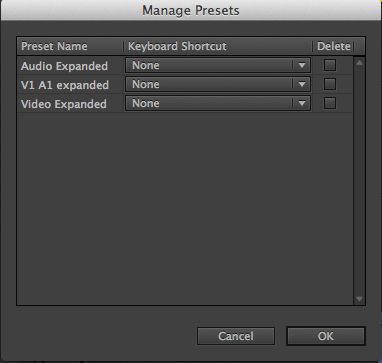
If you’re going to save presets then you’ve got to have a way to manage them.
This reworked track header for both audio and video is another welcome improvement that shows Adobe is listening to users as it really did need updating.
Next Up: Some Smaller but equally important features
Some of the Smaller (but equally important) Feature Additions
Multicam sync via audio
I think we could probably see this one coming so here it is: you can now attempt an auto-syncing of multiple camera angles via the clip’s scratch camera audio.
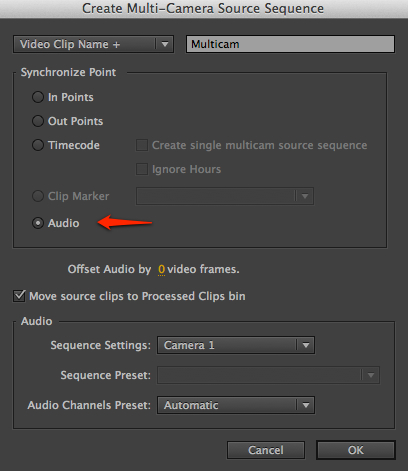
With this next version of PPro most all of the current NLEs will auto-sync via camera audio. Your move Media Composer.
There’s actually quite a lot of new options available when you Create Multi-Camera Source Sequence. Compare the new Adobe Premiere Pro Next dialog box above to the old one below.
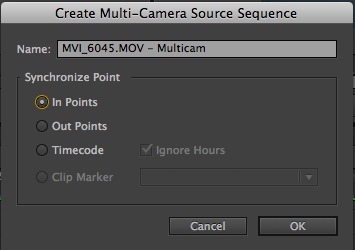
PPro CS6 contains a lot less options when syncing angle for multicam editing.
Through Edits … or Match Frame edits as they are known to some
If you have a clip sitting in your timeline and you make an edit you really need to see that those are subsequent frames on either side of the edit. Avid Media Composer has always called them Match Frame edits while Final Cut Pro called them Through Edits. FCP used little red triangle arrows to display.
PPro CS7 has taken not just the the FCP nomenclature but their symbol as well.
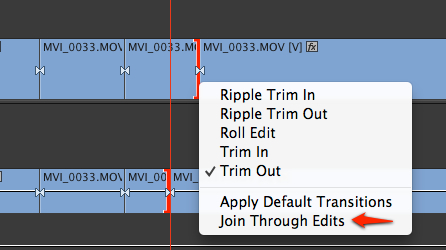
So they are while triangles instead of red. But they mean the same thing as in FCP7.
Add an edit and there they are. Through edits can be trimmed just like any good edit should. There’s even a command under the Sequence menu where you can toggle Through Edits on and off … though I can’t imagine why you ever would. And joining those Through Edits is just a click away as well. Check.
Dupe Detection
See those colored stripes at the bottom of these clips?
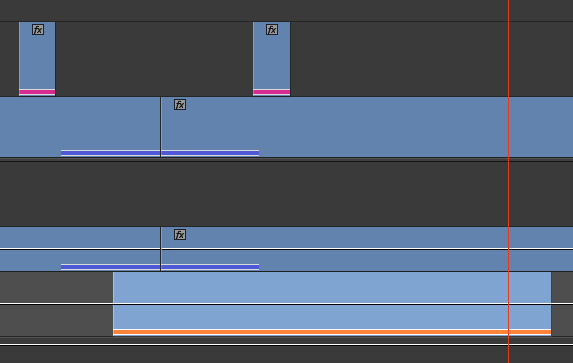
Colored lines on a clip in an NLE timeline can only mean one thing right? Oh, well besides extended markers that is.
That’s duplicate frame detection working on both audio and video clips; another of those NLE luxuries that it has often been hard to live without in PPro. While we don’t get the option of a right+click on the duped frames to show the other duplicates in the timeline or the option to jump to the other duplicates (I really wish we had that one) the image above is duped frames on native, non-time-coded H.264 DSLR media straight out of a 7D. Double check.
Fit Clip can now remember your choice
On the one hand I like the way PPro gives you a choice of options via a dialog box when you have 4 edits points defined and you went to make an edit. But on the other hand I get tired of it popping up way more than I want it. Now we can turn it off.
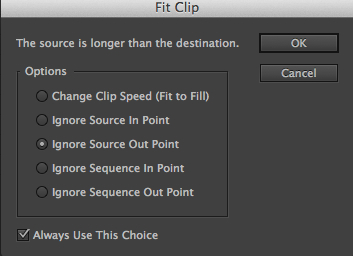
Goodbye annoying pop-up box.
There is the checkbox right in the Fit Clip dialog box but you can also get to that setting via Preferences > General:
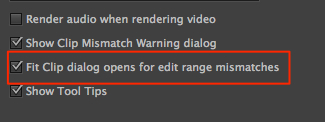
Unless you want to turn it back on because you liked that feature.
One click (or keystroke) to display audio waveforms in the Source
Another common PPro complaint has always been that it isn’t easy to see audio waveforms for your video clips in the Source viewer. FCP7 had the Audio tab always waiting to be clicked but PPro required a trip to a tiny pulldown menu. Not any more.
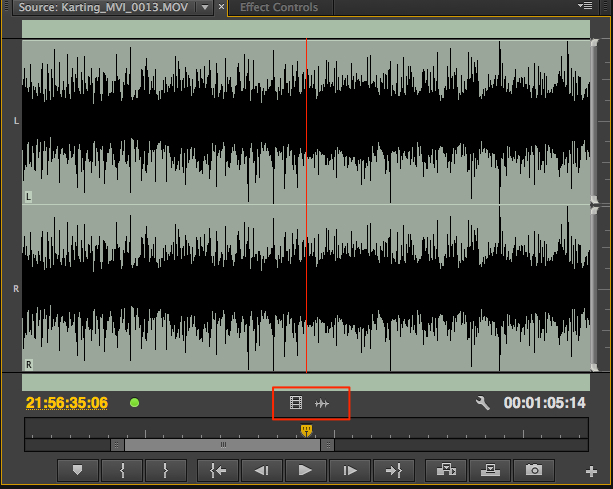
While you can still use the little clip and waveform icons to drag Source media to the timeline, clicking on the waveform icon will change the Source display to a clip waveform.
But this waveform toggle has always been mappable to the keyboard so I never understood what people were complaining about with this one.
Other little things I noticed about Adobe Premiere Pro *Next*
• The Razor Tool now snaps to the playhead when snapping is turned on. This was another common complaint I heard about CS6 that I didn’t quite understand as you could always just add an edit via the keyboard right at the playhead.
• The Adobe Premiere Pro Next documentation mentions “Industry-standard mezzanine codecs are built right in with Adobe Premiere Pro.” While it’s nice to see the mention of ProRes they also say “Support for encoding and decoding MXF- wrapped Avid DNxHD files is available on both Mac and Windows.”

That’s Media Composer DNxHD .mxf files imported right out of an Avid MediaFiles folder. The next PPro is able to find and play back the associated audio that goes with a clip (Media Composer places audio and video into separate files) as well as display the proper file name. Impressive.
• There’s quite a few more preferences including new options under General.
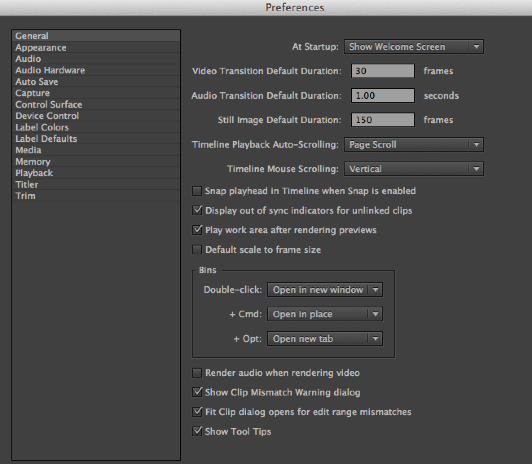
Study these preferences when this new version ships as there’s quite a few new options here.
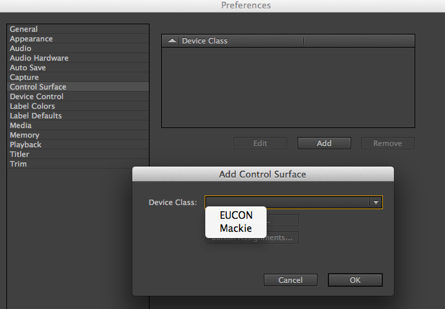
A preference for Control Surface reveals where PPro might be going for hardware controllers. Let’s hope that’s not just for audio mixing consoles but the Avid Artist Color grading panel as well.
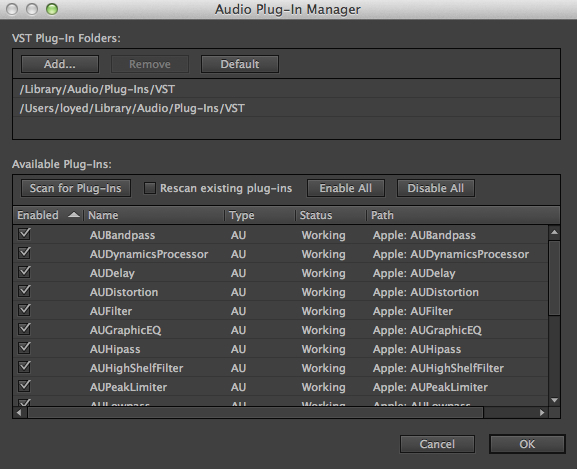
The Audio Plug-In Manager is also going to be a new way to organize audio plug-ins.
• There is now a button to toggle between editing a sequence into another sequence as a nest or as individual clips
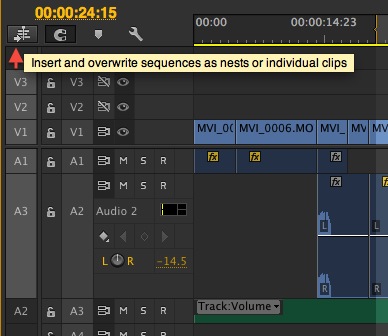
Notice all of the video tracks ready to edit into the timeline from the source side patch. Toggle that button and you'd then get a nested sequence.
Conclusion: Good.
While we don’t know any firm release date for this next generation of Adobe video products you can take advantage of an NAB Show special and save 40% of the Adobe Creative Cloud subscription. A Creative Cloud benefit is that you’ll get these new versions as soon as they are available. Find out more about all of the upcoming Adobe products at their Adobe NAB Reveal 2013 webpage. There will also be more to come with things like Adobe Anywhere that I have yet to test out.
So that’s the first big bit of NAB 2013 news for editor: The next generation of Adobe Premiere Pro is going to continue to vastly improve the product. There’s more to be discovered than just what is listed here so I’ll hope to test out this early version and see what else I can discover. No word on ship dates but that’s what NAB is all about right? Announcements, not necessarily shipments.

Filmtools
Filmmakers go-to destination for pre-production, production & post production equipment!
Shop Now