In this economy one has to stretch every production dollar as far as it can go. This doesn’t mean compromising on quality, though: keeping things simple can yield huge dividends. This includes knowing when it’s okay to shoot with available light, and when natural light needs a little help.
I got this job via my web site, which is always a nice boost to the ego (and a financial justification for its existence). I’d never worked with director Mark Holthusen or producer Jason Santos, but apparently the combination of my portfolio and the helpful notes I gave them about their boards paid off in the end. I have a habit of giving out a fair bit of advice when going over boards for the first time, and most of the time my comments impress the clients enough to get me the job. I don’t play my entire hand before landing the project, but I do try to be helpful and show that I know what I’m doing.
In this case that strategy paid off wonderfully, resulting in a second shoot with Mark and Jason: a music video for the macabre band The Tiger Lillies. This spot for the Commonwealth Club, our first project working together, was an exercise in budget-stretching, and by shooting with the RED and working simply with available light whenever possible we pulled it off.
The RED can be a huge pain to work with, but it also offers the opportunity to get away from the traditional three-chip depth-of-field-forever Rec 709 “baked-in” look that I’ve been battling since I started shooting HD. RED can add a lot of production value to an otherwise inexpensive project–as long as you have a great camera assistant and a very talented colorist on your side.
Here’s the 60 second version of the finished spot, soon to be running on cable TV and in movie theaters in California:
I’m only going to touch on the shots that required some lighting and grip work to pull off. The rest were shot with available light, always keeping the subject backlit if possible.
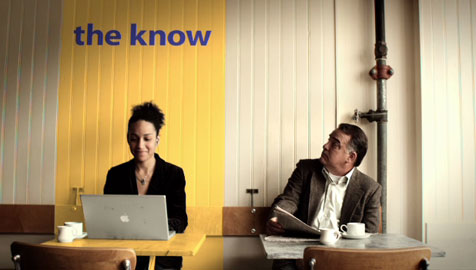
Here’s the first setup:
There’s a 1200w PAR out the window on the right side. It’s fairly high up so it can reach over the gentleman and light the woman as well. There’s a 4×4 frame of Opal diffusion in front of it, and although Opal is fairly thin it was just enough diffusion to smooth the light and blend it with the window ambience for a very soft feel.
A Kino Flo Image 80 was used as fill, and we only had one or two of the bulbs turned on. I chose the Image 80, which is an eight-tube flourescent fixture, as I was expecting the sun to come out at some point and I wanted to balance the fill quickly if it did. (The sun came out eventually, but not until we were done shooting this wide shot.)
You’ll note that I put the Image 80 on the same side of the camera as the key light. This “continues the wrap” of the key light around the subject and is a very pretty method of filling a scene. If I put the key on the other side I’d risk a fill shadow falling opposite the key, which is a great way to give away your lighting–and I hate my shots to look lit.
Plus I would have had only two tones on the faces: a bright side and a dark side. Filling from the key side creates at least three tones: key plus fill on the camera right side of the faces, fill on the front of the faces. and shadow on the camera left side. This creates the illusion that the key is one big light source, instead of two smaller ones.
Also, multiple shadows that fall the same direction are often a lot less distracting than multiple shadows that fall in opposite directions.
A note about my exposure methods: although I lived and died by my meter on the Tiger Lillies music video, on this project I strictly exposed to the right by opening up the aperture as far as I could without clipping a channel. This boosts the crucial picture information as far above the RED’s noise floor as possible, allowing for maximum color correction latitude in post.This is a very fast way to work with the RED.
My experience, though, is that while exposures to the right remain somewhat consistent within a scene, they vary wildly between scenes, which adds a bit more time to the color correction process, so I’m making a concerted effort to rely more on my meter than on the RED’s zebras and traffic lights for future projects. Consistency in exposure across the entire project means less money spent in post, which matters a lot in this economy.
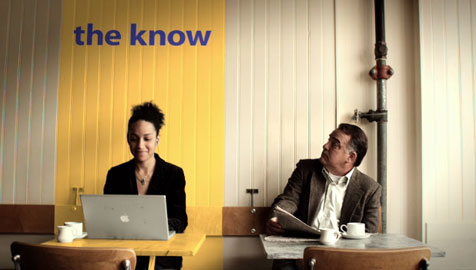
This shot is a post zoom-in:
I think this reframing would have worked better without the addition of the visual effect rotoscoping. The yellow “the know” was added in post, and the edges don’t look quite right to me. This seems to be a trend when working with composited edges on post-enlarged RED material.
Many people rave about the RED because they feel they can change the frame in post with impunity, but if there are any visual effects involved there’s usually a price.
This closeup was done in-camera:
Here you can see some of the effect of the “fill from the key side” technique. The camera right side of the face is mostly one tone, while the camera left cheek is another, and the camera left side of the face and the nose are a third. There’s a little bit of a reflection from the white wall on the gentleman’s head, but it’s not displeasing. The shadow on the wall was created in post using a Power Window. (This was colored by Chris Martin on a Da Vinci at Spy Post, San Francisco. He did a great job of making this white wall look interesting.)
Here’s a side angle of our lead actor:
I’m still keeping the fill on the “key” side of the actor even through the key is now mostly a backlight. It might be technically correct to key from the camera left side, as that’s where bounced light would actually come from in a situation like this, but I don’t find that to be aesthetically pleasing in every case: sometimes the shadow in the eye opposite the bounce source falls directly next to the highlight from the backlight/key, in which case the darkest part of the face is adjacent to the brightest part of the face. The high contrast can be cosmetically unpleasant.
The fill from the key side doesn’t really show here because of the ambient bounce light off the light. We did add some negative fill by taping black duvetine to the wall, but “proper” negative fill placement for this shot would have put the duvetine inside the frame, so we compromised.
Here’s the closeup of the woman:
All we needed for this shot was a blade to cut light from the PAR off the background. The blade is directly over her head.
Soft light from the direction of the camera can be quite beautiful, although I’ve had a lot of conversations with directors (although not with Mark) about what “flat” means. Flat, to me, says that there’s only one layer to the image, whereas this image isn’t flat at all: there’s a clear contrast difference between the foreground layer and the background layer. There are many ways to do “flat” lighting that is beautiful and still offers a feeling of three-dimensionality, so keep in mind that light from the direction of the camera does not automatically translate into “flat.”
After a cuppa joe our intrepid hero leaves the cafe and goes for a walk, where he stumbles across more and more people who are “in the know.” This closeup employs what I call “Dean Cundey” lighting:
When I was much younger I was a big fan of Dean Cundey’s cinematography, and in the mid-90s I had a chance to watch him work while shooting behind-the-scenes on the film “Flubber.” He tends to use a lot of cross backlight, while filling from a source below the lens of the camera, and it’s a very distinctive look. It did a little of that here, using a shiny board through diffusion to add a little interest to the front of this actors face and filling with a 4×8 bead board bounce below the lens. (Bead board is wonderful bounce material as it is perfectly matte, and doesn’t exhibit a specular hot spot the way shiny foam core does.)
During this sequence we had to stop and reset back focus. My camera assistant, Bruce McGregor, discovered that our Zeiss Super Speeds were no longer focusing where their focus marks said they should, and it appeared that the RED’s back focus drifted as the camera’s temperature increased. (This was a rare hot and sunny day in San Francisco.) The RED’s difficult back focus ring forced us to stop shooting for ten minutes in order to reset it.
In the following shot I’m filling from the key side once again:
It’s hard to see, but I’m filling over the top of the camera and from the left side of the lens using a shiny board through a 4×4 frame of 216. The sunlight here is a little harsh, as we were shooting under noonday sun, but filling from the key side wraps the key around in a very pleasing way. Filling from the right side would have resulted in a less natural, more lit feel.
We might have bounced some light into the crowd with a 4×8 bead board; I don’t remember for sure.
This shot, outside the Old San Francisco Mint in downtown San Francisco, was a tough one:
The crowd was created by moving a ten person group into different positions and stacking them together in post. This shot faces west and the sun backlit the clouds fairly severely. I used a ND .90 grad to bring down the sky a bit, but the sun won.
I shot some “cloud elements” later, after we finished shooting the crowd, by closing the camera’s shutter and capturing better exposed clouds. Had the budget allowed, the editor could have dropped the properly exposed clouds into the sky and replaced the blown-out clouds. I closed the shutter down instead of closing the aperture because a T-stop change would have changed both the depth-of-field and contrast characteristics of the lens, resulting in an element that may not have matched the wide shot.
This shot is a post resize of the previous shot:
It almost works. The diagonal slant of the building gives away that it’s a zoom-in to a wider shot using a wide lens.
At about this time we had to stop, once again, for ten minutes, to reset back focus. We’d been in the shade for about a half hour and as the camera cooled the back focus drifted again.
Everything else in this spot was shot under completely natural light, except for this one:
I decided I wanted to put some sparkle in the shoes, and since we were in shade it was easy to break out a 1200w PAR and a frame of diffusion and give them a little highlight:
It was easy to reflect a bright diffuse source in the tops of the shoes.
This spot should appear on cable and in movie theaters throughout California in the next few weeks.
Thanks are due to director Mark Holthusen, producer Jason Santos, camera assistant Bruce MacGregor and gaffer Gordon McIver.
Art Adams is a DP who prefers working “au naturale.” His web site is at www.artadams.net.

