Introduction
Since The Kid Stays In The Picture first showed off the parallax effect, it’s been a popular way to bring an image to life. While there are several different ways to pull it off, at its heart, you’ll need to find the right image to make this one work. Here, no matter if you prefer working with Adobe’s or Apple’s flagship animation apps, I’ll take you through the whole process step-by-step, so you’ll have one more way to make your clients happy.
As a quick summary, we’ll be:
- Finding the right image
- Separating the layers and filling in the gaps
- Importing into After Effects or Motion
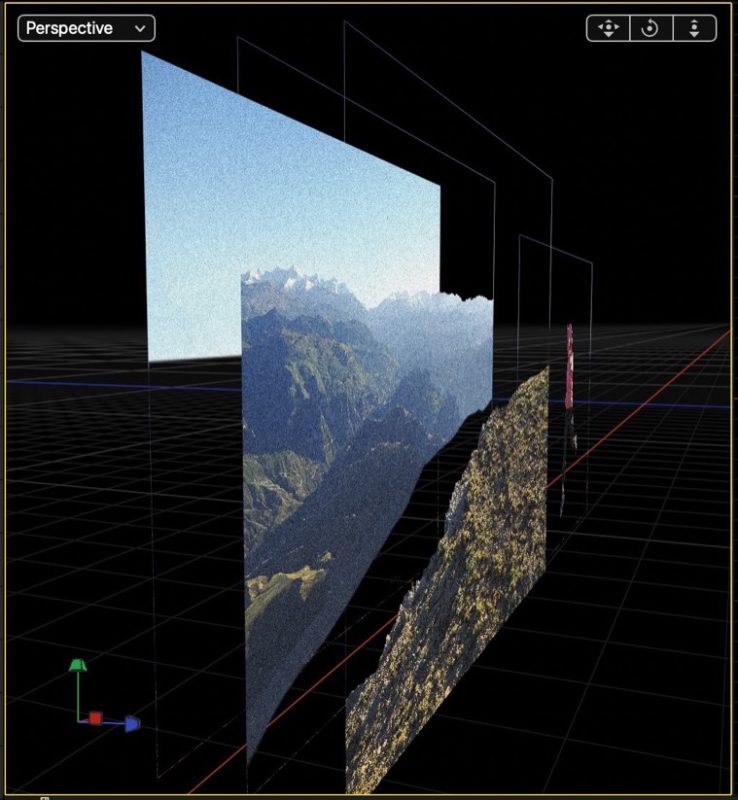
- Positioning the layers in 3D space
- Creating and moving a camera
- Finishing touches
Finding the right image
Ideally, you’ll have had a role in the process of creating the image you need to animate, because this isn’t something that works with every image. The most important thing you’ll need for this effect to work is three or more clearly separated layers: at least far away, mid-distance, and close up. Avoid flat color; each layer needs to have texture, or you won’t see the movement. (In fact, the sky here is a little bland.)
Avoid transparency, too — complex fly-away hair or a tray full of wine glasses are going to make this task much harder than it needs to be. You’ll also want a relatively deep depth of field, remembering that you can add bokeh back later, and a relatively high resolution, wider-angle frame is important, because you’ll be cropping in as you zoom.
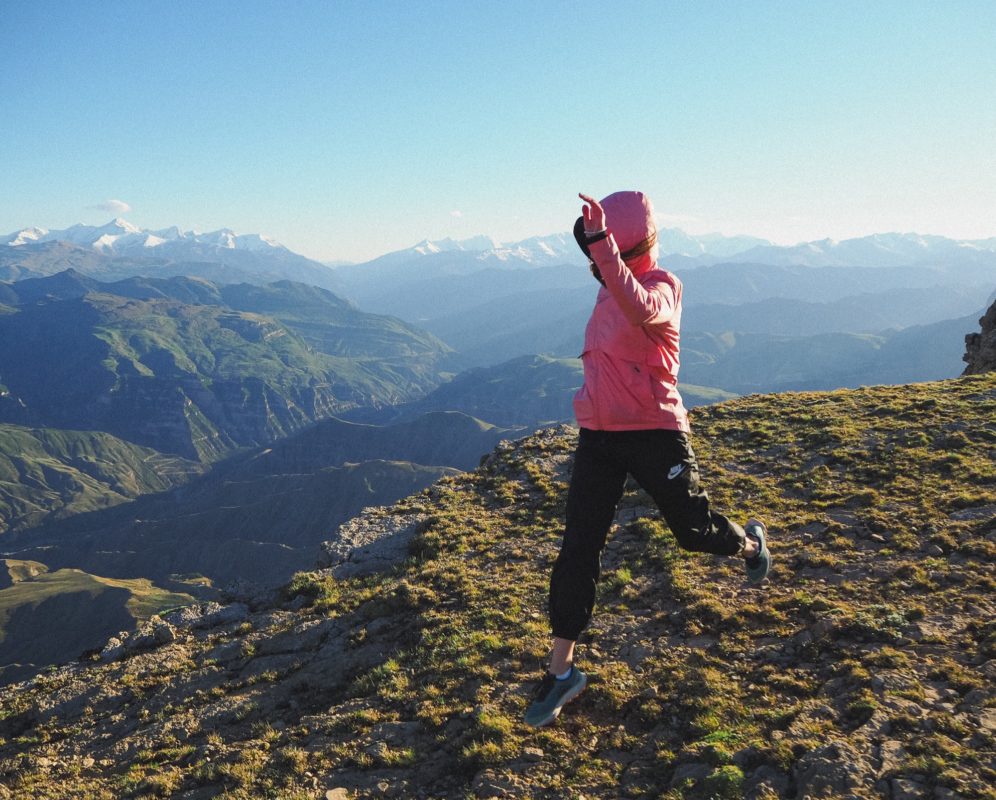
Here’s one image from pexels.com that fits the bill, and here’s another slightly more advanced option. Here, I’ll use the first image — thanks for sharing, Tatiana! Please download the original, full resolution image if you’d like to follow along with this tutorial.
For this image, I want four separate layers: the sky at the back, the mountains in front of that, then the foreground cliff, and finally the person jumping in front. Each layer needs to stand alone, with clean edges, any holes patched over, and there needs to be a little bit of overlap between layers, to allow for camera movement. For example, the sky should extend beneath the mountains. Time to get to it!
Separating the layers and filling in the gaps
With your chosen image in hand, you’ll want to open it up in Photoshop, Affinity Photo, Pixelmator Pro or your image editor of choice. More advanced apps have better features for subject and edge detection which can make this job easy, and Photoshop has an excellent Refine and Mask workflow too.
In Photoshop, I start with Select > Subject, which does a good job of finding the person,and then use Select > Select and Mask’s tools (especially the Refine Edge Brush Tool) to clean it up if necessary. At the bottom right of this workspace, I like to output to a New Layer with Layer Mask, to retain maximum non-destructive flexibility. It’s rare that you’ll make a perfect cutout on your first try, but that’s no problem if you’ve used layer masks. With a brush, paint the mask with black to erase part of a layer, or paint with white to unerase. Magic, and you just won’t need the Eraser tool any more.
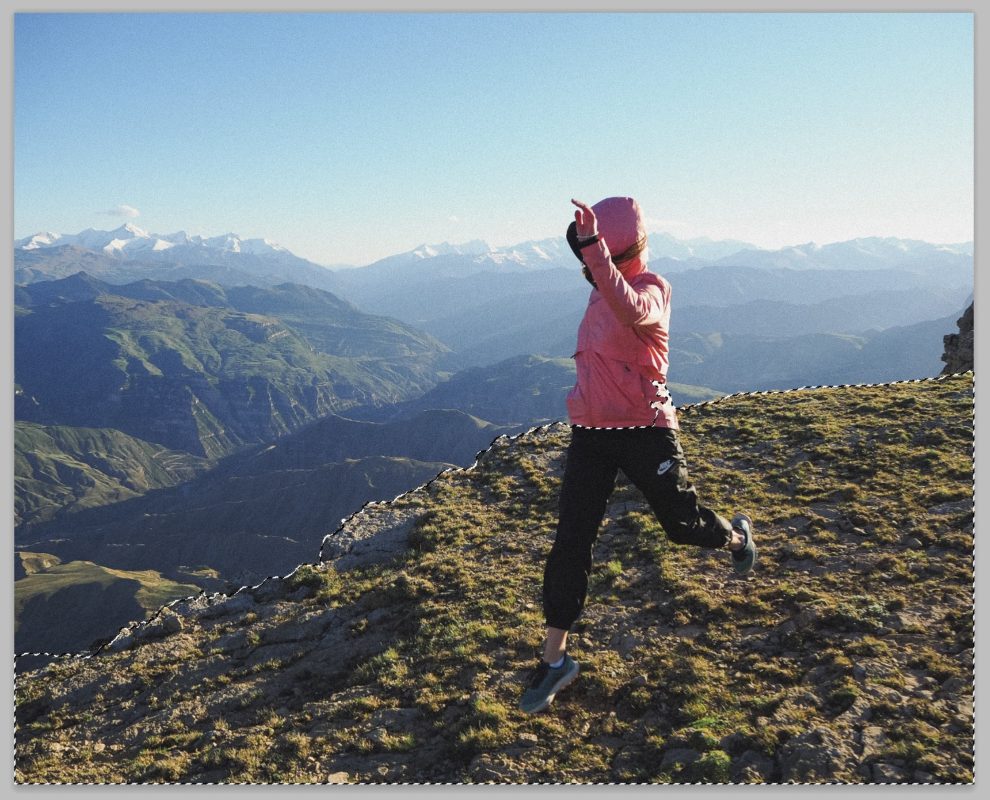
For the next layer back, click back to the original Background layer, then use the Quick Selection tool to paint over the cliff area. If too much is selected, just hold Option and paint an area out. When you’re close, use Select and Mask again to copy it to a new layer with another new layer mask. Since the legs of the person jumping are part of this area, you’ll need to patch them out later.
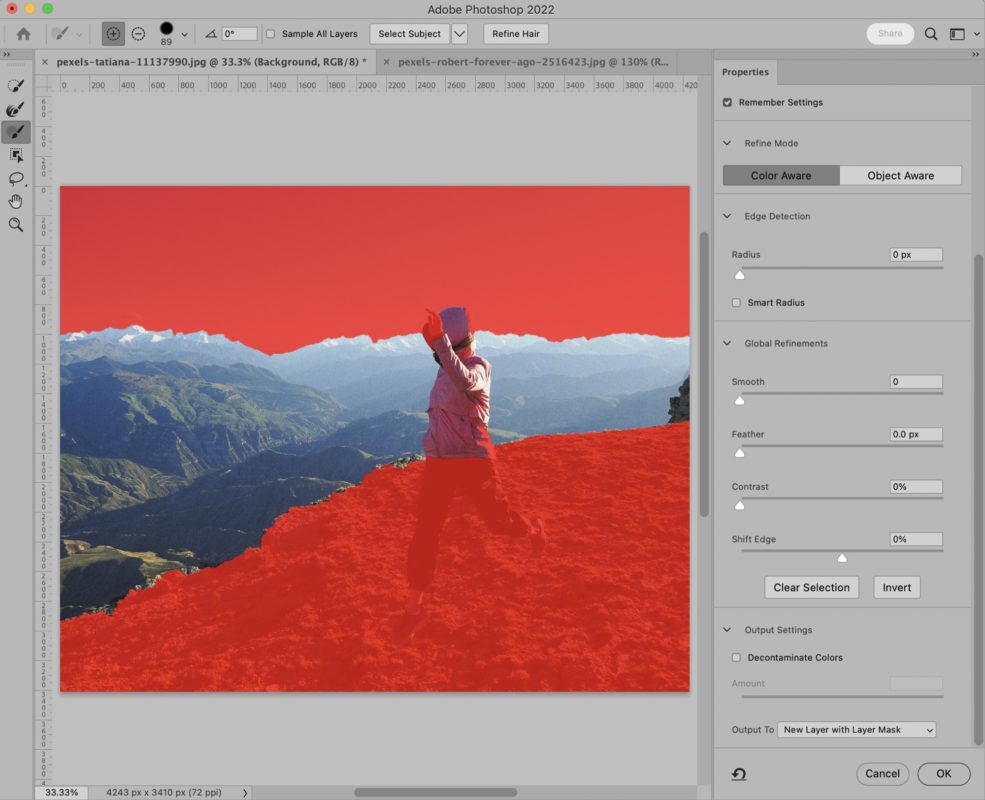
Repeat these steps to punch out the background mountains and the sky, for a total of four separate layers.
To patch over any problems and fill in any gaps, choose the Spot Healing Brush Tool, and work on each layer individually, hiding other layers. Paint over anything you don’t need, such as the legs in the cliff layer. In Photoshop, Spot Healing uses Contact-Aware Fill to come up with the new area (also called “inpainting” in other apps) but it’s not perfect. If it fails; try again, undo and try again, or use an older tool like the Healing Brush or even the Clone Stamp. Try to keep as much of the original image as you can, and don’t heal over areas you don’t have to. (Note, if you’ve been able to update to the very latest Photoshop, try using the new “One-click Delete and Fill” to get this job done.)
With each layer looking OK, you now need to extend the lower edge of the lower layers, starting with the sky layer at the back. Paint with white on the lower part of the mask to make more of the layer visible — this edge will be mostly hidden, so you can be a bit messy. With the new area visible, use the Spot Healing Brush Tool to extend the sky where the mountain range sits above it. Use the same technique to extend the lower edge of the background mountains where the foreground cliff sits on top.
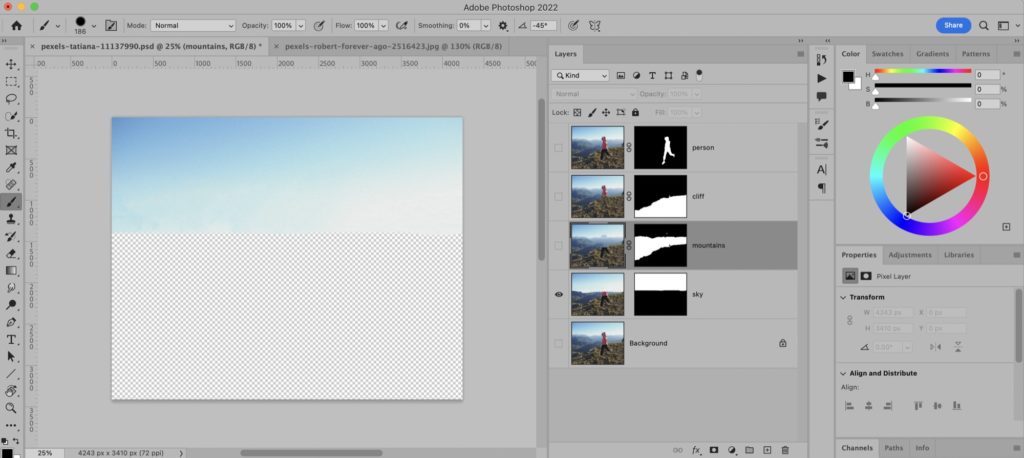
Finally, you’ll want to really inspect those edges, to make sure they’re clean, and to experimentally jiggle each one up and down a bit, to make sure that each layer truly is separated. If you need to clean up any edges, Select and Mask is the best way to finesse those masks. If you haven’t been using Photoshop, that’s fine — many other apps can create layer masks and export in Photoshop format.
Importing into After Effects or Motion
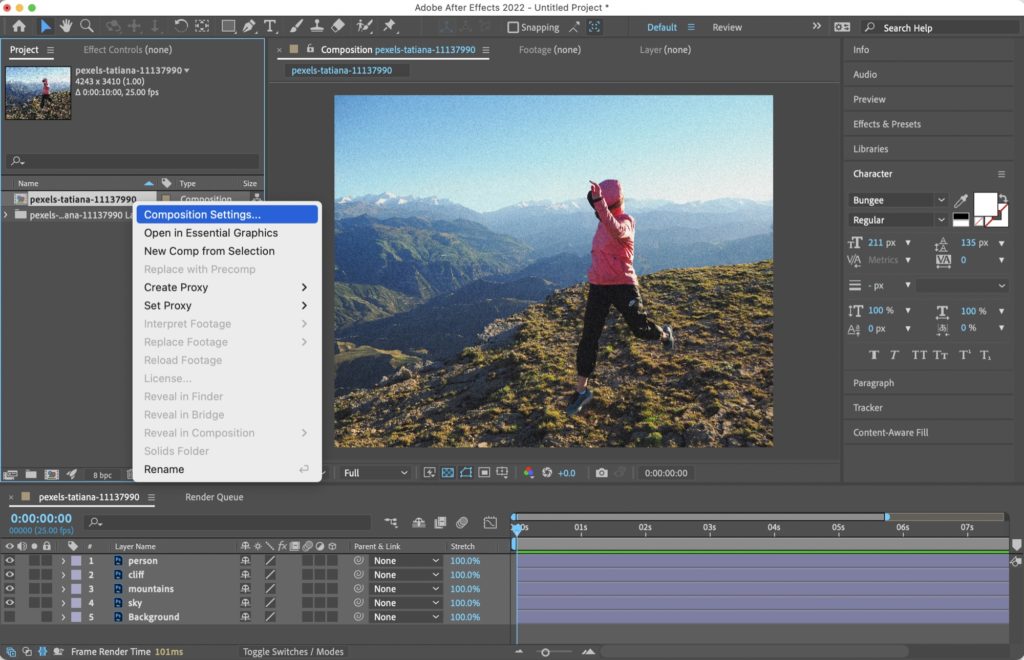
As After Effects understands layer masks, you can import the PSD directly into a new project as a composition. Once imported, you can right-click the composition, then change the resolution to your preferred frame size — UHD, 1080p, or a vertical format if you have to.
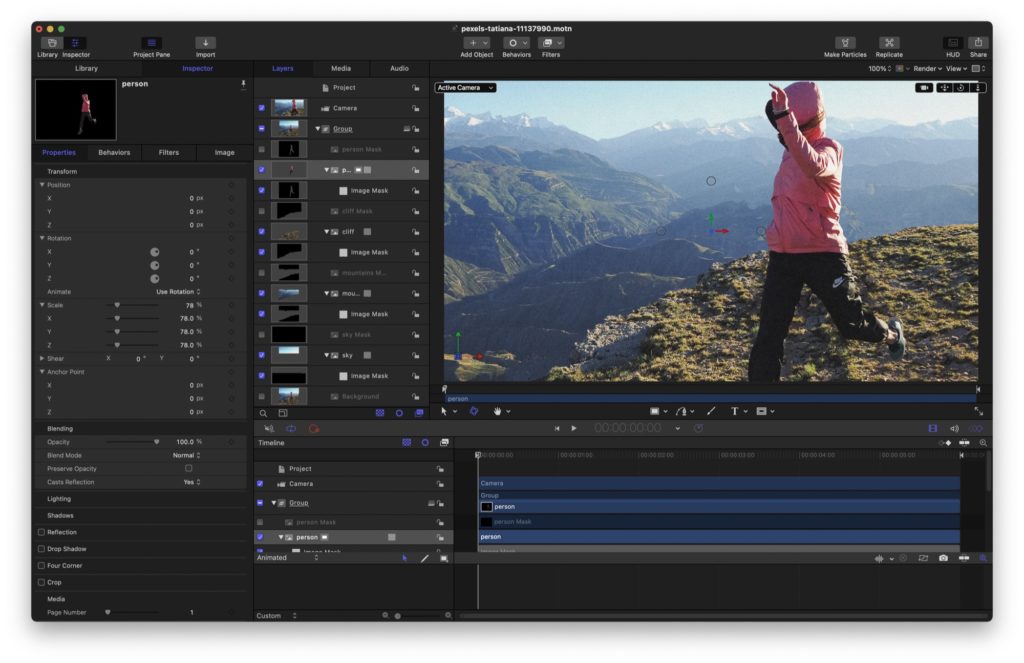
However, because Motion doesn’t understand layer masks, you’ll have to perform an intermediate step — and you have a few choices. If you have Pixelmator Pro, simply open the PSD, Export to a Motion Project, pick your frame rate, and it makes the file for you, keeping the masks editable. In Motion, all you need to do is change the frame size in Project Properties (⌘J).
Without Pixelmator Pro, you’ll need to prep the PSD for direct import into Motion. If you have Affinity Photo, you can open the PSD, then Export to PSD with the “PSD (Final Cut Pro X) preset to automatically flatten layer masks to each layer.
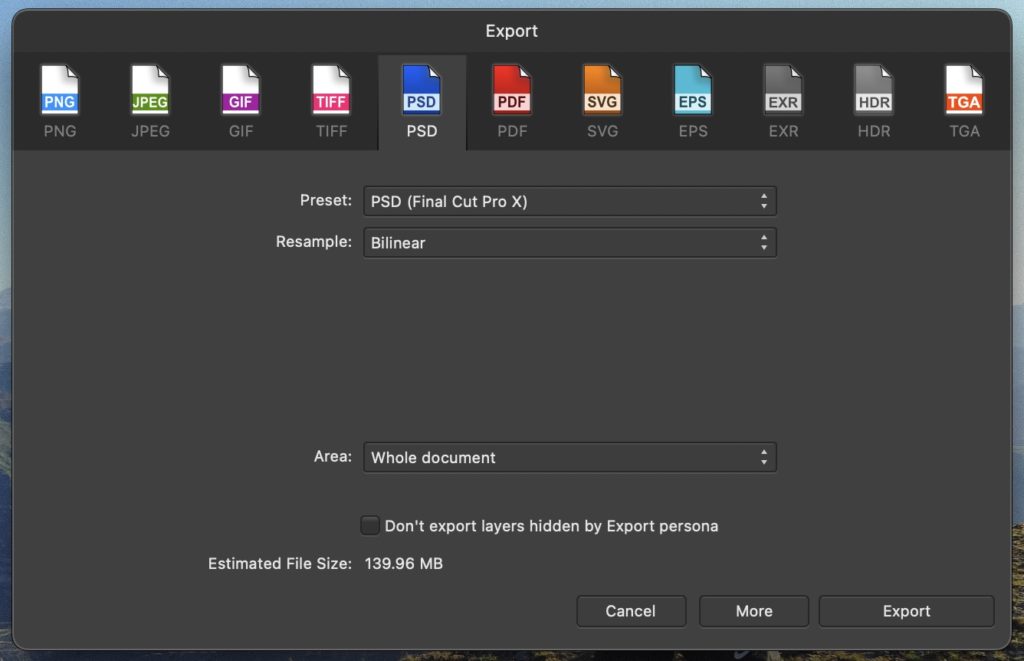
It’s possible to do this manually in Photoshop too — right click on each layer mask, choose “Apply Layer Mask”, then Save As to a new PSD, to retain your original layer masks in case you need them. Either way, you’ll now have a file with separate layers, but no layer masks. In a new Motion project with your chosen resolution and frame rate, choose Import, then answer All Layers on the interstitial dialog that pops up next.
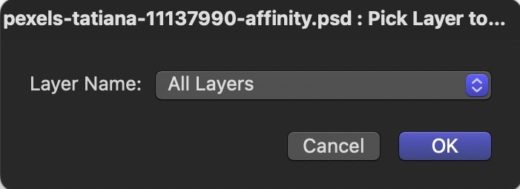
If you have imported a PSD file directly into After Effects or Motion, and you spot a problem with the image, the fix is easy. Edit the file, save, and it should update instantly in either After Effects or Motion. However, if you’ve exported to Motion through Pixelmator Pro, some changes are easier while some are harder. The good news is that you can adjust masking directly in Motion, because you can add additional masks and add or subtract from existing masks. The bad news is that if you need to do more retouching, you’ll have to re-export to Motion after making changes.
OK! You’ve got a multi-layered file in After Effects or Motion. Time to move things in 3D.
Positioning the layers in 3D space
As a rough rule of thumb, I like to separate each layer by 500px as a starting point, but feel free to adjust this to suit each image.
In After Effects, select all the layers in the timeline with ⌘A, then click the 3D column on one layer to switch them all to 3D. Press P to reveal Position properties, then ⇧S to add Scale. Deselect all.
First select the person layer, and set the third (Z) Position value to 500. Set cliff to 1000, mountains to 1500 and sky to 2000. These layers will get smaller as they get further away, but we’ll fix that in the next step.
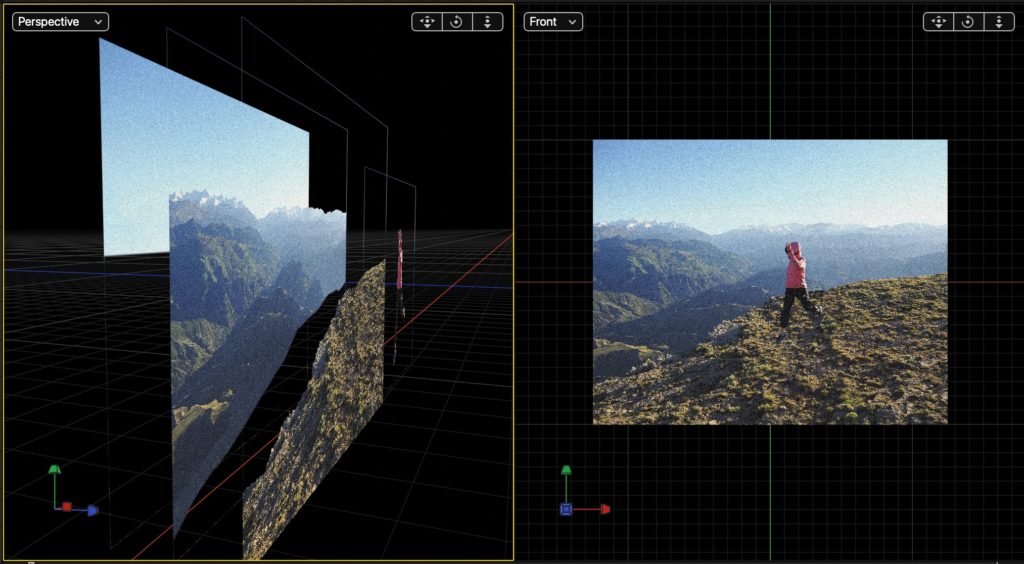
In Motion the steps are similar, although Z-space is flipped around, so you’ll use negative numbers to move objects away from you. To start, click the icon to the right of any groups to switch them to 3D. In the Inspector, choose the Properties panel, open out the Position values, then change Z to -500 for the person layer, -1000 for the cliff, -1500 for the mountains, and -2000 for the sky.
Creating and moving a camera
AE’s camera has an important switch at the top, between one node or two, and here we’ll be going for just one for simplicity.
In After Effects, create a new camera with Layer > New > Camera, choose One Node at the top, and press OK in the dialog that appears. The scale of each of your layers may now change, and it’s time to mess with them to make it look right. Revisit the Scale values of each, and increase the scale until it fills the frame pretty closely.
Select the camera and tap P to reveal its Position settings. With the playhead at the first frame in your comp, set up a starting position by dragging on each of these values so you’re at one side of the frame (try 860, 400, -2600). Press the Position stopwatch to record a keyframe at the first frame, then move the playhead to the other end of the comp and change these position values to make an additional keyframe at the camera’s final position. I’ve gone for 900, 440, -700.
Tap ⇧R to add Rotation to the camera’s options, then add two new keyframes on X Rotation: -5 at the start, and 4 at the end. That adds a subtle tilt to the camera move.
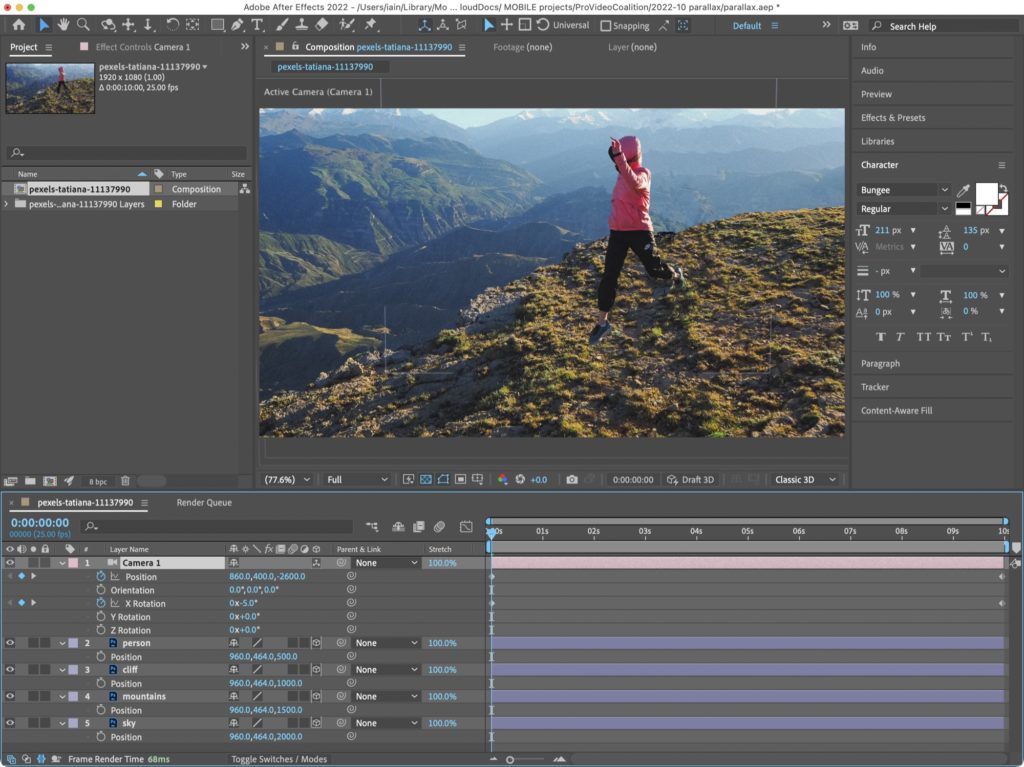
Setting keyframes manually is totally fine, but if you want a more free-form experience, you can select one of the three camera tools (Orbit, Pan, Dolly, press C to cycle through) and drag in the Viewer instead. Dragging the Orbit tool changes rotation, while the Pan and Dolly change position. While you’ll still use the stopwatch to record that first keyframe, it’s probably easiest to use these tools than to change numbers manually.
In Motion, choose Object > New Camera, and then fix the scale of each layer until it fits the frame. If you move between both AE and Motion, realise that the numbers won’t be the same as in After Effects, because Motion has groups, and each group has a scale of its own.
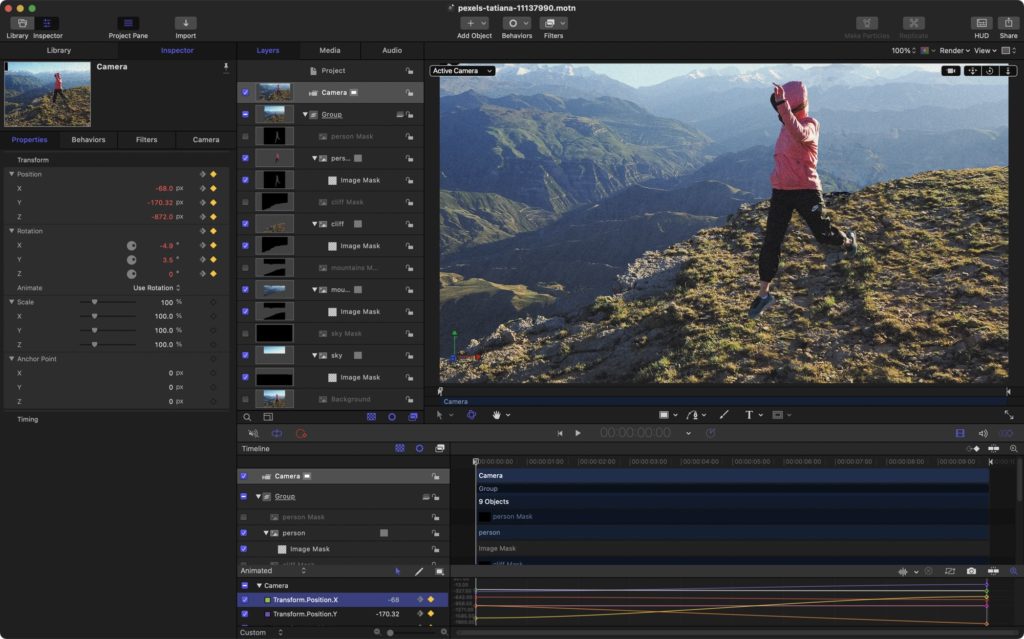
If you wish, you can set up keyframes (just like in AE, but with different numbers) to do the same job. At the first frame, lock in your starting position by lighting up the diamonds on the Camera’s Position and Rotation values, but as in AE, you’ll probably prefer to move the camera in a more interactive way. In Motion, the draggable camera orientation, position and zooming controls are in the top right of the Viewer, so drag on them directly to play with rotation and position. When the starting view looks good, move the playhead to the end and drag those controls again to set your final keyframe.
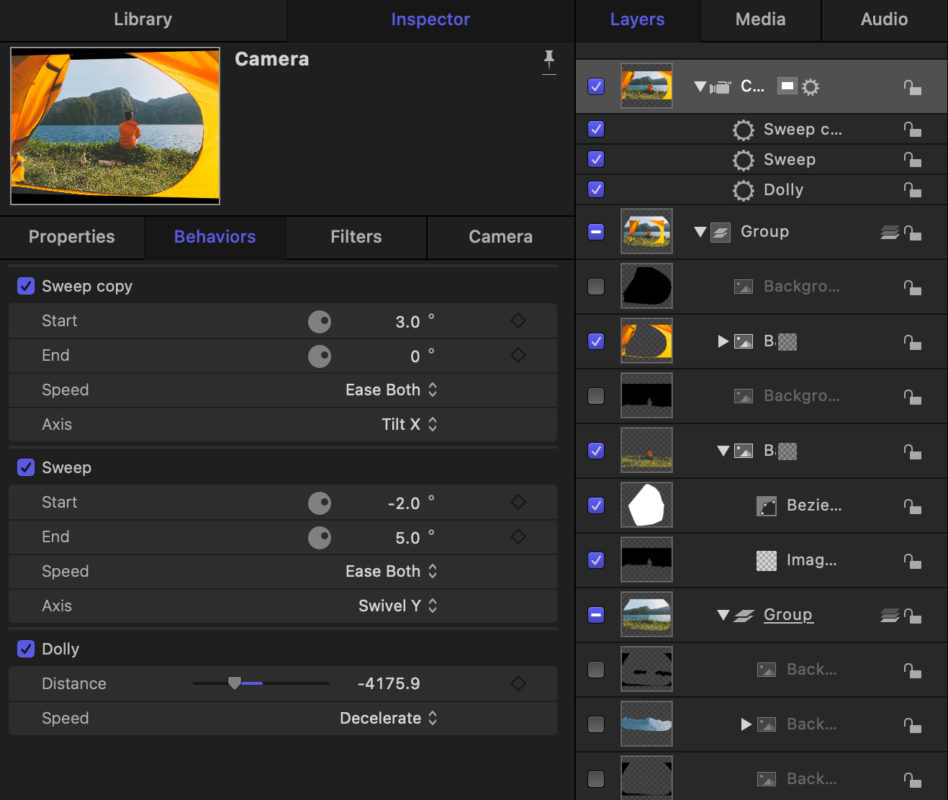
Motion does have many other ways to control the camera, including Parameter Behaviors and the Dolly, Sweep and Framing behaviors. Clever use of these can make it easier to build an animation, and, if you publish this animation as a Generator to Final Cut Pro, can give an editor the power to change the whole animation. Behaviors can be great, but keyframes still work well when you need precise, complex control.
Finishing touches
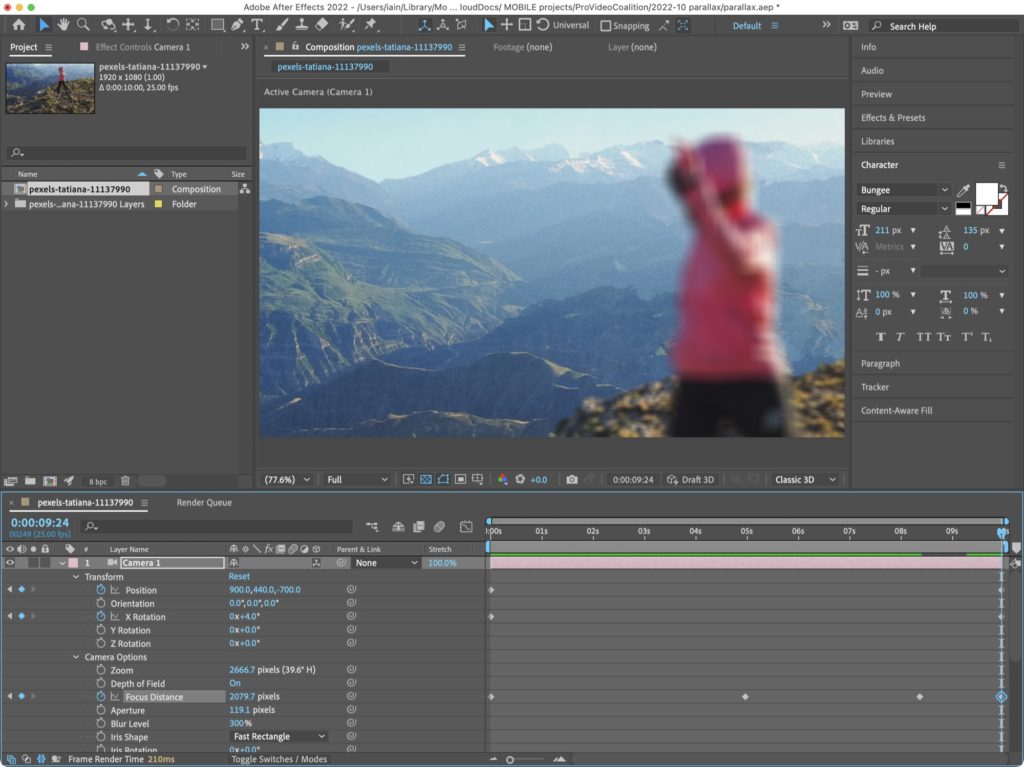
For a final polish, let’s add Depth of Field and some focus shifting. In AE, you’ll have to make sure the camera is applying enough blur in Camera Options — double-click the Camera and crank it to 300%. All you need to do then is to spin out the full camera controls, then keyframe the Focus Distance property to control whatever’s in focus at any one moment.
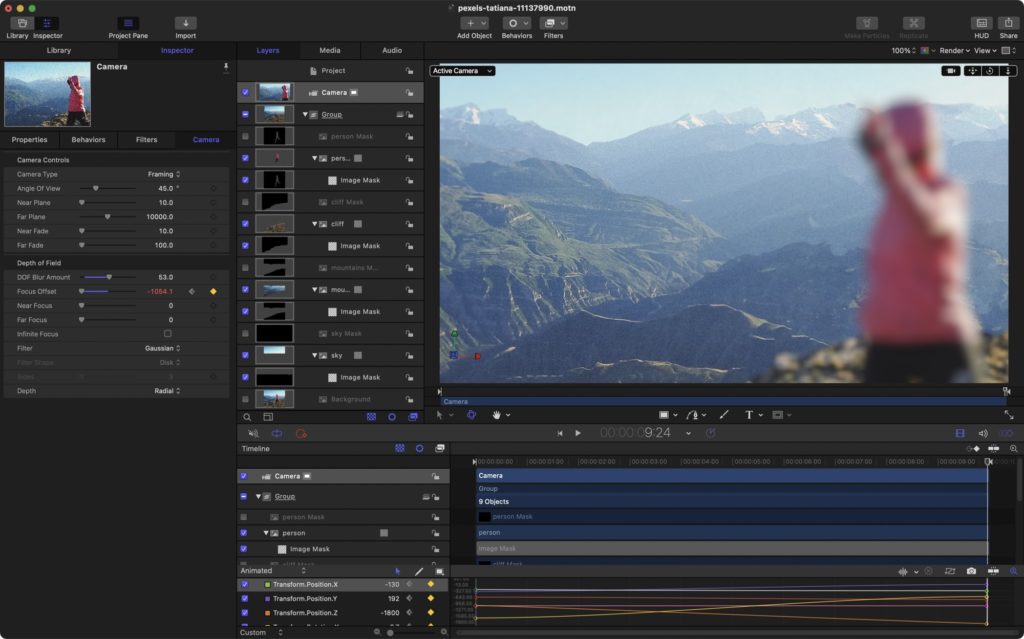
In Motion, it’s similar. In the Render menu at the top right of the Viewer, activate Depth of Field. In the Camera’s settings, turn up the blur (50 worked for me) and then keyframe the Focus Offset property throughout the animation, to control what’s in focus. Again, there are smart ways to do this with the Focus behavior, but keyframes work too.
It’s also worth experimenting with other moves — a sweep across, a close-up shot, a more subtle move with a stronger rack focus — there are plenty of good solutions. Make a few versions, export them all, and try them out in your NLE of choice. It’s possible to create multiple cameras and run them one after the other, so you don’t even need multiple timelines to make this work.
Conclusion
There are many ways to do this job well. In terms of apps, while Photoshop has the most comprehensive tools for the retouching work, Motion ends up being many times faster for the animation, able to play in real-time without rendering. You can do a lot more with any of these apps, but if you ever need to bring a still image to life, just think: How can I split this thing into 3D? You’ll find a way, and it’ll be fun.
Finally, if you can master this, you’ll soon want to actually move the layers around, not just the camera. But that’s another article, for another time.
Here’s the final video (from Motion).

Filmtools
Filmmakers go-to destination for pre-production, production & post production equipment!
Shop Now