Today on The Slanted Lens, I am going to walk you through batch processing RAW time-lapse images, and then how to create video sequences with those images. I am also going to talk about how to deflicker a time-lapse video when you shoot on Aperture Priority.
If you have not done so yet, I recommend that you check out my tutorial from September about shooting time-lapse photography at night. In this lesson, I will be processing the images I shot out at Mono Lake in northern California.
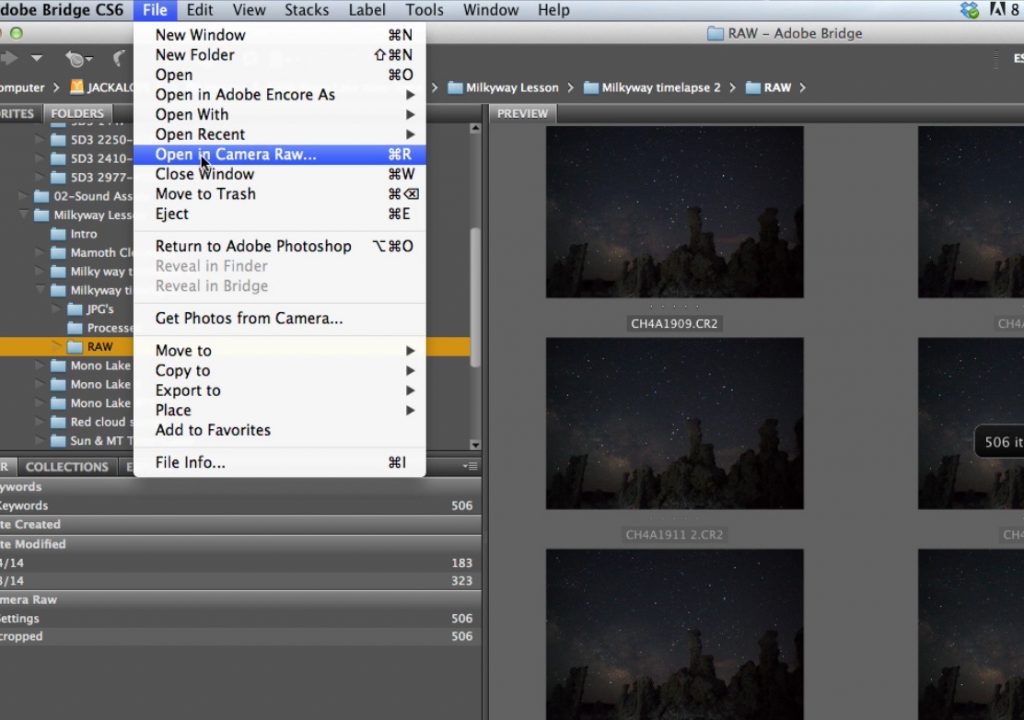
#1 First off, I am going to put all my RAW images in a folder, separate from any other images. I am going to open that folder in Adobe Bridge, then select File > Open in Camera Raw to open all the images. This is about 500 images that I am loading so it is going to take a little bit of time.
#2 Once the images open, you are going to edit your first image. If you had remnants of the sun setting in your first couple images, you may want to edit an image further along in your sequence because your colors will be different. I am going to start off by opening my exposure to about +60. I am going to play with the contrast a little, and I see that my image looks better with just a small bump to the contrast so I put it at +10. I will open the whites up a lot, putting the slider all the way at +45 and open the shadows up to about +25. Next, I will increase the highlights to +14 and add a little more contrast by increasing the blacks to +6. I like the clarity a lot so I am going to push that up a lot, somewhere in the +30-40 range. This makes the clouds a little more sharp and sharpens the objects in the foreground. I might bump up the vibrance a little but I am going to leave saturation alone.
#3 At that point I click the Select All button at the top left of the Camera Raw window, and then select Synchronize. This will take the changes I made to one image and apply them to all the images in the folder. Once all the images have processed, I am going to click Save Images at the bottom left of the window. I will save the images to a new folder inside the original, and label that folder Processed. I will select JPG for the format and maximum quality, then hit save. This is going to take some time so I usually start this process then walk away from the computer for a little while.
#4 Now that I have processed my images, I am going to turn them into time-lapse video. There are a couple different ways to do this but the one I prefer is to use Quicktime, it is fast and easy. In Quicktime, I will go to File > Open Image Sequence. I will navigate to the folder of processed images, click the first image in the folder and select Open. The program now asks you to select a frame rate for the video. I am going to start with 23.97 fps, but if that looks a little slow, I can always increase it. When the video loads, I will go to File > Export to export the video as a movie. This process will take maybe 20-30 minutes and when it is done, you will have your final video.
#5 We shot on manual exposure but if you are trying to track sunset into stars at night, you are going to have to shoot on Aperture Priority mode and let the shutter drag. In doing this, you will see a flicker in your final image sequence. You will need to use a deflicker software on the video. I recommend Granite Bay (http://www.granitebaysoftware.com).
This has been a lot of fun to be able to go out to Mono Lake and put together these time-lapse tutorials. My goal was to put everything together in two lessons so that you have the information you need to be able to find the Milky Way, go out and shoot a time-lapse, and then the post-process to put a video together. I hope you learned something and that you see how easy it is to do on your own.
Thanks for watching. Keep those cameras rollin’ and keep on clickin’!
-Jay P. Morgan

