There’s a good chance that HD has become a major player (or even the only format) in your work. With the latest incarnation of Final Cut Studio, Apple offers several ways to deliver HD. You can of course go back to tape or create downloadable and streaming H.264 files. Most requested though, is the ability to create Blu-ray discs.
While Blu-ray did not appear in DVD Studio Pro, it has made its way into Final Cut Studio. There are three locations you can access within Final Cut Studio to create a Blu-ray disc. You can choose File > Share in Final Cut Pro to export a sequence or selected items from the Browser. You can use the Share command in Motion to export the current project. You can also add one or more items to Compressor and create a disc using the batch template feature.

In this article, we’ll explore techniques from the Apple Pro Training Series book: DVD Studio Pro 4 (3rd Edition). You can find out more here
NOTE: Pay to Play
In order to create Blu-ray discs, you’ll need to equip your Mac with a third-party Blu-ray burner. If you don’t have access to a Blu-ray burner, you also can try creating an AVCHD disc by choosing your SuperDrive as the output device. Some Blu-ray players are capable of playing the AVCHD disc format. An AVCHD disc is a simple format that uses red laser media.
Creating a Blu-ray Disc with Compressor
With the addition of batch templates in Compressor 3.5, it is now possible to easily create and burn a simple Blu-ray disc (or a standard DVD) right from Compressor. You’ll find Apple-designed HD templates that you can use for your disc. In order to start the process of creating a Blu-ray disc, you need to configure Compressor to process an HD video file and then create the disc. To do this you’ll use a batch template to simplify and accelerate your workflow.
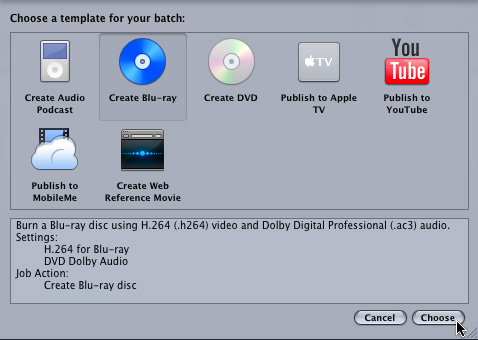
1. Launch Compressor by double-clicking its icon in the Applications folder or clicking its icon in the Dock. Compressor opens with the Batch Template Chooser visible and an empty placeholder batch. If you’ve chosen to hide it on launch or already have Compressor open, simply choose File > New Batch From Template.
2. Click the Create Blu-ray option in the Batch Template Chooser to select it.??? This template will create BD H.264 video and Dolby Digital Professional (.ac3) audio files. Compressor will then automatically burn them to a Blu-ray disc or an AVCHD disc.

3. Click Choose.??? Compressor applies a target to the placeholder job using the correct settings for a Blu-ray disc.
4. Locate a self-contained movie that you want to use and drag the file from the Finder to the placeholder job in the Batch window.
Customizing the Blu-ray Menu
While the Batch Template method is not a complete authoring solution (like DVD Studio Pro), it does allow for menu customization. You can choose from different menu templates and even swap graphic elements to customize a menu’s appearance.
1. Click the Inspector button to open the Inspector window.
2. Click the Job Action tab to customize the Blu-ray disc.
3. Click the Disc Template pop-up menu to access the installed menu templates. Compressor uses an open XML-based template format for its menus. This means that you can import third-party templates as they become available or even learn how to create your own here.
4. Compressor also offers four options for customizing the menu:
Title: Enter a title for the menu In the title field.
Background: You can select a background graphic for the menu.
Logo Graphic: You can place a logo graphic in the upper right corner of the menu. Supported file types include PSD and PNG files with transparent backgrounds.
Title Graphic: You can select a graphic to rest in the middle of the DVD menu as a thumbnail. This is a useful way to preview the image.
Outputting the Blu-ray Disc
Once you are satisfied with your design, it is time to burn the Blu-ray disc. In order to create a Blu-ray disc, you must have a compatible Blu-ray burner attached to your Mac and the appropriate optical media to burn to. If you don’t have a Blu-ray burner you can choose to create a disk image file (.img) that can be moved to another machine for burning using the Disk Utility application. You can also choose to create an AVCHD disc using the SuperDrive on your Mac.
Note: At this time, you cannot play any disc containing Blu-ray content on a Mac computer. You will need to use a standalone set-top box or video game system to check the disc.
2. Click the Submit button to submit the batch containing your job. A dialog appears where you can name this submission and set its priority.
3. Click the Submit button to start the encoding process and eventually the disc burning.
4. Click the Batch Monitor button to view the progress of the batch. Switch to the Batch Monitor application and click on the targeted cluster (usually This Computer) to see a detailed progress report about the job. When burning a disc, your Mac will prompt you to insert a blank disc at the appropriate time. Load the media into the correct burner. For Blu-ray use an appropriate third-party burner and for AVCHD use your SuperDrive.
Creating a Blu-ray Disc with Final Cut Pro
In addition to using Compressor to create a Blu-ray disc, you can also choose to export directly from Final Cut Pro (or Motion). When using Final Cut Pro, you can choose to use an entire sequence, or to use multiple clips in a bin.
Exporting Multiple Clips from a Bin
A common workflow often involves placing multiple clips onto a disc for a client review. This might be dailies from a film or commercial shoot or just multiple clips (such as sound bites) that you’d like feedback on. Let’s explore your options.
1. Have a Final Cut Pro project open with a bin and multiple clips.
2. Select a bin in the Browser window and choose File > Share.A new dialog opens asks you to specify how you’d like to share the clips.
4. In the Custom Name: field, enter the text Background Selects.
5. Check the box next to Add chapter markets at the beginning of each source. This will let the viewer quickly navigate between clips with their remote control. Click the Name markers with: pop-up menu and choose the Source Name option. Click the OK button to start the Share process. A new window opens that is similar to the Blu-ray batch template in Compressor.
6. Choose options for the Disc in a way similar to what you learned about customizing appearance with Compressor.
7. Click the Output Device pop-up menu and choose your intended target to create a Blu-ray or AVCHD disc.
Exporting a Sequence
While exporting several clips is very useful, you may also want to export a completed sequence that has been edited. Choosing to send a sequence also allows you to specifically place chapter markers and add additional comments to be used as subtitles.
1. In the Browser, double click a sequence to open it.
Note: You can use markers to create a subtitles stream. To make it easier to view markers and subtitles, click the View menu and choose Show Overlays.
2. Move your playhead to the start of a clip.Press the M key twice to add a marker open the Edit Marker dialog box. Enter your text as needed
3. Click the Add Chapter Marker button so the viewer can skip between clips.Click OK to close the Edit Marker dialog.
4. Select the sequence in the Browser and choose File > Share. The Share dialog opens and presents you with identical options as you saw at the start of the chapter. The option for including Chapter Marker Text as Subtitles should be selected by default.
5. When ready, you can click the Export button to create a new disc or click Cancel since you’ve already experienced the export option in the previous exercise.
Conclusion
Apple chose to include several easy ways to integrate Blu-ray into the Final Cut Studio workflow. These options are both fast and easy, yet do offer controls over customization. I’d recommend considering adding a Blu-ray burner to your workstation to harness the full power of Final Cut Studio. For more on Blu-ray and DVD, you can also pick up the new book on DVD Studio Pro.

