
One of the most daunting obstacles for motion graphics artists making the transition from 2D to 3D is animating the camera. In this month’s column, we’ll give a quick review of the two basic camera types you can animate in After Effects, plus reveal the easy-to-miss Auto-Orient Along Path option. Then we’ll show you how to build a simple “camera rig” for performing perfect camera orbit and spiral moves. In the next column, we will discuss approaches to building a more complex rig that allows the user to animate each axis independently, and show how this has been made much easier in After Effects 7.0 with a special Animation Preset plus the introduction of a new Graph Editor.
One Node, or Two?
By default, After Effects creates what is called a “two point” or “two node” camera. With this, you have two individual sets of position coordinates to manage: The Position coordinates, which is where the lens of the camera is placed in space, and the Point of Interest, which is where it is pointing to in space. As you change the Position values, the camera automatically rotates to always point directly at the Point of Interest. Indeed, you would be correct to think of this as a form of Auto-Orientation. (Note that the camera’s Rotation parameter are still in force with a two-node camera! Set them to 0 degrees to ensure you are looking at the Point of Interest; offset or animate them for special effects.)

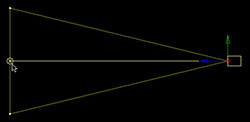
A two node camera is aimed using its Point of Interest and Position (left); note the line connecting the two in the Composition window (right).
Two node cameras work great when you have an object or point in space you always want to remain centered in the screen as you perform a dramatic camera move towards or away from it, or if you wish you had a moveable bulls-eye that the camera was always pointed at. Two node cameras become much more cumbersome when you want to travel through 3D space, as now you have to steer both the camera and where it’s pointing: Imagine trying to single-handedly drive one of those long ladder fire trucks that have independent steering wheels for the front and the back.
Although we are personally partial to two node cameras, many prefer “one node” cameras where you control the camera’s position and orientation directly. This is the more common default camera type in 3D programs, more closely mimics working with a real camera, and only has half as many position coordinates to keep track of.

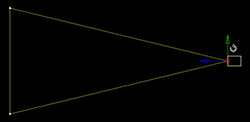
A one-node camera is aimed using is Position plus its Orientation and Rotation properties (left); note there is no line projecting straight from the front of the camera – just lines showing its Angle of View (right).
You can convert a camera in After Effects from two node to one node at any time by selecting it and then opening its Auto-Orientation dialog shown at the right using the menu item Layer > Transform > Auto-Orient (the keyboard shortcut is Command+Option+O on the Mac or Ctrl+Alt+O on Windows – that’s an “oh” for orientation, not a zero). Select the Off option and click OK. The camera will now snap to pointing wherever its Orientation and X, Y, and Z Rotation parameters tell it to. And that’s the flip side of using a one-node camera: After you change its Position, you then have to tweak its Rotation and Orientation parameters to re-center the object or point in space you wanted to look at. Which is easier to control – one node or two – will depend on your own experience, and the animation move you need to perform.
Auto-Orient Along Path
The middle option in the Auto-Orientation dialog – Orient Along Path – is also very interesting (and useful!). When you set up an animation for the camera, this is the easiest way to make sure the camera is always pointing along its path, making space flythroughs much easier. (In case you didn’t already know, normal layers can be set to auto-orient along their 2D or 3D paths as well.)
The one feature Orient Along Path does not take into account is “banking” where an object in flight – such as an airplane – rotates along its Z axis to lean into its turns. You will have to animate this yourself. Keyframe the camera’s Z Rotation so that the maximum bank angle is reached at or just a little before the middle of a turn. Return Z Rotation to 0 degrees when the camera is traveling straight. Set the interpolation for these keyframes to Easy Ease, or at least Auto Bezier, to smooth out the motion.
Orbit Rig
You may think from the description of the two-node camera that it would be perfect for orbiting around an object. However, it is difficult to make sure the camera is always the same distance from its Point of Interest, or to perform smooth push-ins or pull-outs while orbiting. Why? Because you have to tweak the Bezier curves for the camera’s Position path to form a perfect circle or spiral, which is much easier said than done. If you use the Orbit Camera tool in After Effects’ Comp window to position the camera, you may be fooled into thinking you are moving in a perfect arc, but the Position keyframe that will be created will have no memory of that arc – the camera will interpolate essentially directly between Position keyframes, causing the camera to pass closer to the object during the middle of the move.
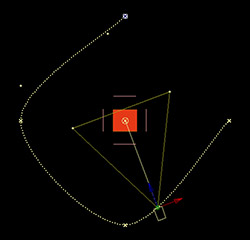
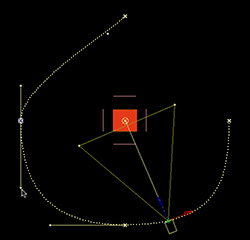
When you use the Orbit Camera tool to create keyframes, the camera interpolates more or less straight between points, passing closer to the object between keyframes (left). You can edit the path’s Bezier handles to create a better arc, but this can be tricky (right).
Null Objects and Parenting provide a simple solution to this problem. Find the coordinates in 3D space of the “hero” you want centered in your orbit. Create a Layer > New > Null Object (a layer that does not render), enable its 3D Layer switch, and give its Position the same coordinates as your hero. Create a new camera, and nudge it until it points in a straight line at your object. Set the camera’s Point of Interest to the same Position value as the hero and null.
Next, turn your attention to the Parent column in the Timeline window (if it is not visible, type Shift+F4 to reveal it). Click on the Parent popup for the camera, and set it to the null. The camera is now a child of the null. To orbit the camera, animate the Rotation parameters for the null: This will swing the camera around on the end of a stick, keeping it the same distance from the null object. To vary this distance, change the Z position value for the camera, while leaving the X and Y values alone. Animate the null’s Rotation and camera’ Z position together to create spirals.


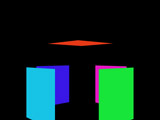
A camera rig build using parenting and null objects makes it easy to animate perfect orbits, spirals, and corkscrews.
It is also easy to use this rig to make the camera appear to ascend or descend while maintaining a perfect orbit or spiral. The simplest way is to animate the null object’s Y Position value. For best results, create two null objects when you set up an orbit rig. Parent the camera to the first null, and then parent the first null to the second null. Animate the Y Position of the first null to raise and lower the camera, and the Rotation of the second null to perform the orbit.
As fun as this is, it’s just the beginning of what you can do with cameras and null objects in After Effects. In the next column, we’ll turn our attention to creating and animating a more advanced rig.
The content contained in our books, videos, blogs, and articles for other sites are all copyright Crish Design, except where otherwise attributed.

Filmtools
Filmmakers go-to destination for pre-production, production & post production equipment!
Shop Now


