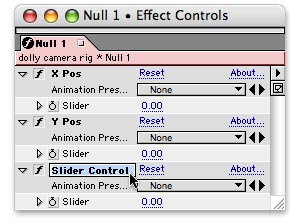
In the previous column, we discussed a handful of tricks and techniques which can be used in different situations to make it easier to animate the 3D camera in After Effects, including one node cameras, two node cameras, auto-orientation, and building a special orbiting camera rig using parenting and null objects. In this column we’ll show how to build a “dolly” rig for the camera in older versions of After Effects as well as the new version 7.0, plus give a quick introduction to the new Graph Editor also introduced in After Effects 7.0.
Dolly Rig
One of the complaints that professional users have had about cameras in After Effects through 6.5 is that you have to keyframe the X, Y, and Z Position values all at the same time. This makes it harder to craft some common camera moves, such as traveling forward with a constant speed in the Z dimension while performing more acrobatic moves up and down in the Y dimension (imagine a camera being pushed forward on a track, as a crane raises and lowers it): You wish you could have linear keyframe interpolation on the Z value, while easing into and out of Y value keyframes.
To more easily achieve this, you need to break up the position values of the camera into parameters you can animate independently. There are two ways to do this. One is to create a series of Null Objects – each dedicated to one dimension – and set up a parenting chain where they are all connected together with the camera at the end of the chain. Another is to attach the camera to a single Null Object, and control each parameter of the null’s Position using Expression Controls. We’ll demonstrate the latter, as ultimately it is easier to control due to having fewer layers to manage. A .zip archive of our AE 6.5 (and later) project is available by clicking here.
In a composition inside After Effects, create a Layer > New > Null Object, and enable its 3D Layer switch. Note its Position; it will default to the middle of the composition, such as 360,243,0 for an NTSC D1 comp. Then create a Layer > New > Camera, and set its Layer > Transform > Auto-Orient to Off to make it a one node camera. Set its Position to the same value as the null object. Then reveal the Parent column in the Timeline window, and set the parent of the camera to be the null object.

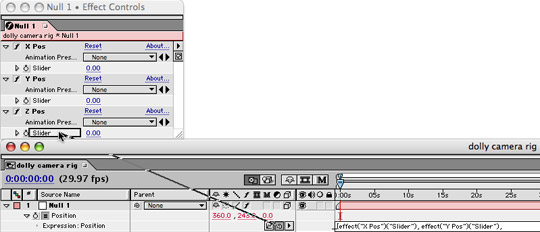
Back in the Timeline window, with the null object still selected, type P to reveal its Position. Option+click on Mac (Alt+click on Windows) on the stopwatch icon next to the word Position in the Timeline window to enable expressions; the expression will default to the word position (meaning the null’s Position is expressed to equal itself). With the expression text selected, type [ (left square bracket) and drag the pick whip tool (the curled-up icon) to the Slider value for X Pos. Then type a comma, and drag the pick whip to the Slider value for Y Pos. Type another comma, drag the pick whip to the Slider value for Y Pos (see the figure below).

Express the null’s Position property to follow your three sliders by using the pick whip tool. Start and end the expression with square brackets; type comma between pick whipping to the three slider values.
Finally, type a ] and click elsewhere in the window. Your expression text should now look like:
[effect(“X Pos”)(“Slider”), effect(“Y Pos”)(“Slider”), effect(“Z Pos”)(“Slider”)]
As Slider Controls default to a value of zero, the camera will now be in the center of the comp. Scrub (click and drag) the Slider values for each dimension to move the camera; keyframe them to animate the camera. To rotate the camera, you can use the Orientation and Rotation parameters of either the null or the camera itself. Note you can still open the Auto-Orientation dialog for the Null Object and set it to Orient Along Path, causing the null/camera combination to automatically rotate so that it is always aimed at a tangent to the path.
To see the null’s path in the Comp window, click on the Show Post-Expression Graph icon (the one to the left of the pick whip) for the null’s Position property. The drawback to this technique is that you will no longer have Bezier handles in the Comp window to tweak the camera’s path; you will need to do all of this with keyframe interpolations. To access those, in After Effects 6.5 or earlier, twirl down the arrow in the Timeline next to Slider for each of the null’s controllers to gain access to the Value and Velocity graphs.
After Effects 7.0
One of the reasons we’re so loyal to After Effects is the way its team keeps adding user-oriented production refinements in each update. Along these lines, After Effects 7.0 has an Animation Preset that helps build a dolly camera rig for you.
This will automatically add a custom expression control to the null with values for X, Y, and Z Position, plus the expression we detailed earlier (with the added feature – or nuisance, if you aren’t aware of it – of adding the null’s original position to the controller values; you can enter 0,0,0 for the null’s Position if you find this annoying). You now keyframe the effect’s X, Y, and Z Position values to move the camera. To rotate it, as before, animate the Rotation values for either the null or the camera.
Hand in hand with this is a major new feature in After Effects 7.0: the Graph Editor. Some users – especially those comfortable working in advanced 3D animation packages – have long wished that After Effects offered a more sophisticated way to edit value and velocity curves, including the ability to view multiple properties (even from multiple layers) overlaid in the same space.
To view how keyframed properties vary over time, select the layer or layers you want to view, and then click on the Graph Editor button along the top of the Timeline panel (the rightmost icon, just to the left of the time ruler). The area of the Timeline panel which normally displays the layer bars will be replaced by the Graph Editor (shown below). By default, all animated properties of the selected layer or layers will be displayed. To reduce clutter, properties which are not enabled for keyframing are not displayed unless you select their name.
A significant addition introduced in After Effects 7.0 was the Graph Editor, which allows you to view and edit multiple parameters as a set in the Timeline panel.
The graph lines are color-coded; in the case of position-oriented properties, X, Y, and Z values are correspondingly colored red, green, and blue (RGB). Multiple keyframes may be selected and manipulated as a group. Hovering your cursor over a graph line shows that property’s value at that point in time. There are numerous ways to customize the Graph Editor’s display; for example, if you enable the Graph Editor Set button for a property to the right of the Keyframe enable/disable button, that property will always be displayed even if the layer is not selected.
There will undoubtedly be a learning curve for many users as they adjust to the new Graph Editor. We’ll be using After Effects 7.0 in the next few columns, hopefully helping you become more familiar with its new interface and features.
The content contained in our books, videos, blogs, and articles for other sites are all copyright Crish Design, except where otherwise attributed.


