Capture One has been the professional photographer’s well-kept secret for a number of years. I am not a professional photographer and learned about it from a friend who is. We were discussing Apple’s Aperture and Adobe Lightroom and he said, “But there’s a better option.”
That option is Capture One from Phase One. (www.phaseone.com/en/Software.aspx)


There are three versions of the software: The basic version delivers quick, ready-to-deliver images with little fuss; the Pro Version, which I am reviewing here, and a DB (digital back) version for those using Mamiya and Leaf digital camera backs.
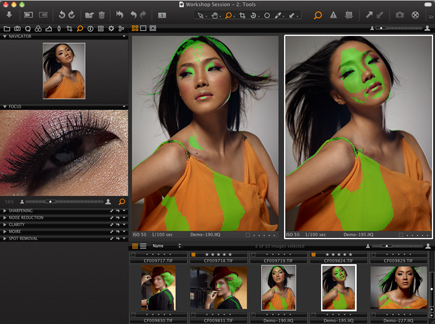
For me, there are a few things that really stand out about this software. The first is the clean, easy-to-use layout of the controls and UI. You can explore and figure out quite a bit of the software without referencing the manuals or “help” at all. The controls are easily arranged and grouped and customized for each user. The design and look is modern and easy to navigate and conducive to serious tweaking of high-end imagery.
I love the workspaces for things like “Focus Checking,” which allows you to move to a floating “focus checking window” to a specific spot and have it stay in that same spot through multiple images. If you’re in a hurry, there is a tab of Quick tools that provide the usual basic adjustments laid out for a series of quick touches to an image or series of images. And Capture One doesn’t limit itself to RAW. You can also do image enhancement on TIFFs and JPEGS. Exporting images can be done as TIFF, JPEG, JPEG Quickproof, or DNG. The exports can be done as 8 or 16 bit, with or without various compression schemes, color profiles and even their “open with” settings can be selected so that the resulting files are automatically opened with a specific application.
The second thing is the power of the tools that are provided. Every aspect of the image (not to mention the metadata) can be tweaked, down to correcting for specific lens deficiencies and “personalities” like vignetting or distortions. There are a lot of preset looks that can be applied, if you don’t want to tweak the particulars yourself. The color correction tools are definitely powerful, with a full range of options, depending on how you like to work, or which tools are best for a specific image. The tools are similar to many of the tools I’m used to in the video world or in Photoshop, but with little nuances that make them better and more powerful.
The Skin Tone tool is nicely designed and allows you to apply color corrections specifically to skin tones without affecting other parts of the picture. You can even save and name specific skin tones directly from one image and use them on other images. Skin Tone Enhancement also smoothes skin tones without affecting the detail of other critical areas of the photo. There is also a Focus Mask Tool, which places an overlay of color on the parts of the image that the software sees as being in focus. This can be helpful in choosing the correct shots in a series, to quickly identify which ones have the correct areas in critical focus, and also, when tethered, to focus critically. Even the thumbnails can have this overlay, allowing very quick review of a series of photos without having to zoom in on every shot to check for focus issues. Capture One can do very nice spot/blemish removal and has powerful built-in noise reduction as well. While Capture One doesn’t provide the ability to tweak an image at the granular level of Photoshop, it does have lots of tools, like creative vignetting, dust removal, and the other color tools I’ve mentioned here to be applied with little fuss and with greater efficiency.
The third thing that stands out to me is simply the workflow and ease of “developing” an entire shoot. The software allows you to create processing “recipes” that do most of the work for you. Simply applying these recipes to large groups of images provides great power and the chance to spend less time in front of a computer and more time with your camera. Every aspect of the workflow, from importing the image all the way through processing and printing or storing and archiving can be automated and batched, with specific images selected for more detailed work if needed. One of the nice features is that the importer works in the background, enabling you to start working on images without having to wait for the entire job to be imported first. This background processing extends to rendering, so you can work on other images while a previously tweaked image is processing away in the background. That’s a big time saver. And, though few people think metadata is sexy, Capture One deals with lots of metadata very efficiently, allowing you to save or add as much of it as you want including GPS data, and also easily determine what metadata you want or don’t want to include in the processed, output images.
Tethered Use
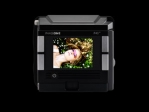
As a non-professional photographer, I don’t use tethered options much, but there are definitely some pretty cool ones. You can set the white balance of your camera from a grey card if you want, you can also adjust it from that white balance with a color wheel, like you would in video color correction or in Photoshop.
A very cool option in tethered shooting is the ability to overlay a pre-determined ad or editorial layout over the photo, live. You can view the live image cropped and formatted just like it will be seen in a print ad or web banner of whatever the final use will be, allowing you to make adjustments before the image is even captured. In the image above, I simply dragged the “fake ad” into the image well to the left and then, because the camera is tethered and is “live” under the image of the ad, I can compose the shot to perfectly work with the text without having to import and composite the image into the ad.
Also, Capture One has support for many cameras to be controlled directly from the software. It allowed me to control my Canon 5DM2 successfully, though not as well as the Canon tethered utility software allows, though that’s to be expected.
As with competing products, Capture One allows you to quickly create a “web contact sheet,” allowing you to easily prepare a large number of images for approvals by your clients.
Another benefit similar to Apple’s Aperture is the ability to quickly create and compare combinations of minor variations on the look of an image. By creating the quick variations, it’s easy to see the direction you want to take an image. Here’s a tutorial on how to do it and what it’s good for:
http://blog.phaseone.com/2010/11/18/multiple-variants/?like=1
Capture One is also very good about keeping in touch with its customers and providing interesting, well-produced, creative and technical tutorials that help you get the most out of their software. This is a critical piece of the puzzle with many pieces of software. I have often tried to push other manufacturers for more free training on their software. It should pay for itself on two fronts: less customer relations/tech support problems and an improved sense of how valuable the software is. Many times, users of software don’t realize how good their software actually is; because they only use a small portion of the software’s capabilities or power. Capture One definitely wants its users to see how to best implement all of the tools and abilities that are accessible in its software. I commend them for that.
If you are using Aperture or Lightroom and feel like you want something more, I hope you’ll check out Capture One. If you don’t have ANY image processing software, beyond Photoshop, then this may be the package for you.
Fricking Trade Commission Disclaimer: Yes. They gave me this software for free. Lots of people have given me stuff for free and have regretted it because I hated the free crap they gave me and wasted my time even looking at it, so free crap does not impress me. On the other hand, I liked this software, free or not, and wrote honestly about my opinions, unblemished by the free software. Can your slimeball Congressman say the same?


