As you are aware by now, we’re going through our book Creating Motion Graphics with After Effects 5th Edition (“CMG5” for short) and pulling out a few “hidden gems” from each chapter. These will include both essential tips for new users, as well as timesaving gems that experienced users may not be aware existed.
Chapter 13 covers the basics of working with 3D layers in After Effects and includes moving, rotating and animating layers in 3D space, offsetting their anchor point in Z, as well as auto-orientating layers along a 3D path. We also cover using the Composition’s 3D Views, View Layouts, and Axis Modes, along with the rendering order when mixing 2D and 3D layers. The article contains a few tips from that long chapter that you might have missed.
This is the first chapter in Part 4 – Cameras! Lights! Action!. The next three chapters will cover tips for working with Cameras, Lighting in 3D, and Parallel Worlds (more on mixing 2D and 3D layers, Photoshop Extended layers, and third-party 3D effects).


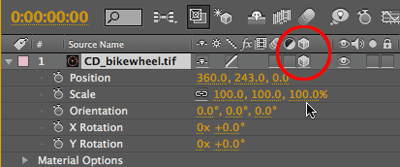
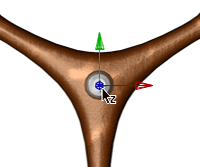
When you enable the 3D Layer switch (circled in red) for a footage item, it gains values for Z Position and Z Scale. The layer usually does not initially appear different in the Comp panel, except for the addition of a set of red, green, and blue axis arrows showing the X, Y, and Z orientation of the layer.
After Effects has implemented 3D space in a very flexible manner. Not all layers in a composition need to be in 3D; you can enable the 3D Layer switch just for those objects you want to add an extra dimension to, while keeping the others in familiar 2D space. You don’t need to add cameras or lights either; a composition has a default camera that provides a head-on view, and a default light, which illuminates all 3D, layers evenly regardless of their orientation. (Of course, you can add and animate cameras and lights; this is covered in the next two chapters.) However, with After Effects’ implementation of 3D, the objects do not have true depth, which does limit the illusion of 3D space (that’s why we call these layers “postcards in space”!).
Rotation versus Orientation

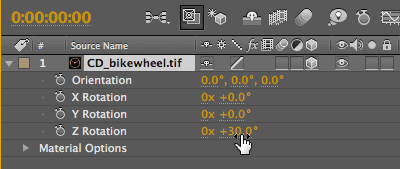
Why have two separate ways to rotate a layer? Because each animates differently. Rotation always goes through the entire range of values you request, while Orientation takes a shortcut to reach its final pose with a minimum amount of fuss. The Orientation values are also limited to one revolution – unlike Rotation, you can’t keyframe multiple revolutions with Orientation. In general, it’s better to use Orientation to “pose” a layer, and to use Rotation to animate it.
Although you can rotate a layer with the Rotate tool, there is a nasty glitch: If Y Rotation goes beyond +/-90 degrees, the X and Z values flip by 180 degrees (try it!). We recommend you scrub values directly in the Timeline panel.
3D Views & Shortcuts
It can be difficult to work in 3D with only a single 2D view. Fortunately, at the bottom of the Comp panel are two buttons to make life easier: The 3D View menu can show alternate views (it defaults to Active Camera), while the Select View Layout menu allows you to display show multiple views at the same time (it defaults to 1 View).
The default 3D View for a comp is Active Camera. Click on it and select an alternate view. The six orthographic views do not show any perspective, so all of the characters look the same size even though they are different distances from the virtual camera. The three Custom Views offer a quick way to view a scene from different perspectives, without having to create a camera first.
Click on the 3D View popup; you will get a menu with nine additional choices: six orthographic views (Front, Left, Top, Back, Right, Bottom) and three “custom” views. You can think of your layers as floating in a very large room, with the six orthographic views as being the view from each of the six surfaces of the room, and the custom views being temporary cameras or viewing positions inside the room.
The orthographic views often default to showing the layers too large (so they are on the pasteboard) or too small (so they are clustered in the center) compared with the black “background” area. (By the way, this rectangle in the background has no real significance except in the Active Camera view – in the other views it simply determines whether you see pixels when layers are at an angle, or whether you see a bounding box if layers are on the pasteboard.)
You can change the view’s zoom level two ways: The obvious one – and the one you don’t want to use – is to reduce the Magnification of the Comp panel. Why? Because if you reduce the Magnification for a view to 50% or 25%, the XYZ arrows for a layer become so small you will have a hard time selecting them! (The same is true for the icons for cameras and lights.) This makes working with 3D layers very frustrating!
Use the Camera tools to customize your views to better frame the layers you are working with. Here we have chosen the Unified tool, and are right clicking to select the Track Z tool that enables us to zoom in on the layers in Custom View 3.
We recommend you set the Magnification for all your views to Fit Up to 100%, and use the Camera tools (Orbit, Track XY and Track Z) to customize your view so that layers fit inside the view. Better yet, if you have a three-button mouse, select the Unified Camera tool (the camera icon). When the Unified Camera tool is active, you can left-click to temporarily activate the Orbit tool, middle-click for Track XY, and right-click for Track Z. (You may have to customize the preferences for the software that comes with your mouse to make the middle button work.)
Note that if you first select Share View Options from the Select View Layout menu, when you set the Magnification for any view to Fit Up to 100%, all the views will use that setting.
Once you fiddle around with the Camera tools, you’ll really appreciate this shortcut: To automatically zoom and center your view to see all of the desired layers, use View > Look at Selected Layers or View > Look at All Layers. If one of the Camera tools is selected, press F to Look at Selected Layers, and Command+Shift+F (Control+Shift+F) to Look at All Layers. (You might still find yourself zooming out a little as layers will fill the view right to the exact edge!) Note that if your 3D View is set to anything other than Active Camera (or any specific camera), these commands only alter your view (but does not move layers or the camera); if your 3D View is set to Active Camera or a specific camera, then these same commands move the camera.
So to summarize, when setting up your workspace for each 3D comp, your first job – before you start to animate layers – is to maximize each view so that the layers fill the view. That way, you can use the Fit Up to 100% Magnification option for all views and you will see each layer at its largest size and all the XYZ axis arrows (as well as camera and lights) will be easy to grab. We can’t stress enough how important it is to have a well-designed 3D workspace to reduce your frustration levels!
View Options
When you have multiple views open, by default the view with the Active Camera will RAM Preview. If you want to change this behavior, disable Previews Favor Active Camera from the RAM?Preview Options menu (above left). Each viewer also has an Always Preview This View switch in their lower left corner (above right). This latter switch is particularly useful if you have both the Comp and Layer panels visible, and want to always preview the Comp panel while working in the Layer panel.
Axis Modes
The Axis Modes determine if a layer’s axis arrows are oriented according to the layer’s local coordinates (the default), the comp’s overall world space, or the current view. To try these out, first rotate a 3D layer slightly askew in X or Y, then view the layer from one of the Custom Views.
(Radio image courtesy Classic PIO.)
In the figures here, the layer orientations are identical (tilted back in X and centered in the Comp panel) – only the axis modes change as you select each mode in the Tools panel. View Axis Mode is most useful when a layer (like a title) is centered in the view and you want it to move closer or farther away from the camera when the camera is looking at the world from an angle. Reselect the Local Axis Mode again when you’ve finished experimenting; otherwise you may forget what mode you were in and cause yourself a lot of confusion later on.
Mixing 2D and 3D Layers
Life gets a little more complicated when you combine 2D and 3D layers in the same composition. In short, 2D layers act as “render breaks” between 3D layers. Groups of 3D layers that are stacked between 2D layers in the Timeline panel are internally flattened down to a 2D result, as if they were in a precomp by themselves. The entire composition is then rendered as if it consisted only of 2D layers, with each group of 3D layers being treated as a single 2D layer in the middle of the stack.
It is all too easy to break up groups of 3D layers, meaning those individual layers can no longer interact with each other (such as intersecting or casting shadows from one to another). Inserting the following types of layers between 3D layers will break up their groups:
- Any 2D layer, with the exception of Null Objects.
- Any Adjustment Layer (Chapter 22), even if its 3D Layer switch is enabled. (The exception is an Adjustment Light (covered in Chapter 15).
- Any layer that has a Layer Style (Chapter 22) applied to it.
Inserting an adjustment layer between 3D layers will break them into separate groups, and stop them from interacting with each other. (Turning on its 3D switch will not fix this.)
Trish and Chris Meyer share seventeen-plus years of real-world film and video production experience inside their now-classic book Creating Motion Graphics with After Effects (CMG). The 5th edition has been thoroughly revised to reflect the new features introduced in both After Effects CS4 and CS5. New chapters cover the new Roto Brush feature, as well as mocha and mocha shape. The 3D section has been expanded to include working with 3D effects such as Digieffects FreeForm plus workflows including Adobe Repouss©, Vanishing Point Exchange, and 3D model import using Adobe Photoshop Extended. The print version is also accompanied by a DVD that contains project files and source materials for all the techniques demonstrated in the book, as well as over 160 pages of bonus chapters on subjects such as expressions, scripting, and effects.
We will be pulling a few “hidden gems” out of each chapter to share on ProVideoCoalition.com roughly every week. These will give you a taste for the multitude of time-saving tips, not-obvious features, little gotchas, and other insider knowledge you will find in CMG.
The content contained in Creating Motion Graphics with After Effects – as well as the CMG Blogs and CMG Keyframes posts on ProVideoCoalition – are copyright Crish Design, except where otherwise attributed.


