We’re going through our book Creating Motion Graphics with After Effects 5th Edition (CMG5) and pulling out a few “hidden gems” from each chapter. These will include essential advice for new users, plus timesaving tips that experienced users may not be aware of.
In the lengthy Chapter 21 we cover the basics of creating and editing text, including text along a path. We cover all aspects of how to use text animators to add sophisticated animation: animating text properties and Range Selectors, the various selector Shapes, animating characters in 3D space, and using the Wiggly Selector to randomize properties. We also touch upon other topics, such as creating outlines from text layers and integrating with Photoshop’s text engine.
Obviously, we can’t reconstruct a 30-page chapter here in a one-page blog post; a couple of these will assume some knowledge of how to animate text inside After Effects (or at the very least, how to create text and apply an animation preset).
Editing Photoshop Text
After Effects’ text engine uses the same core technology as Adobe Photoshop, and so there is some integration. Photoshop files including vector Text layers (not rasterized text) that are imported into After Effects as a Composition can be converted to an editable After Effects Text layer.

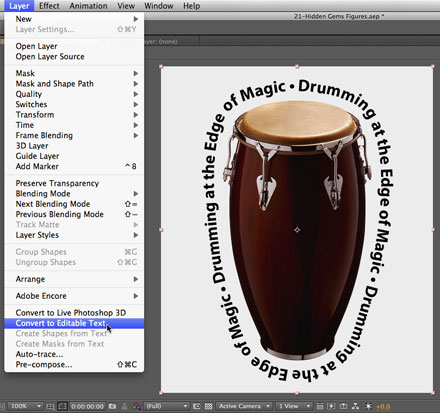
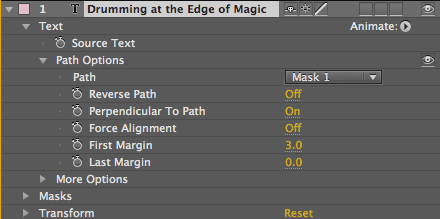
To make a Photoshop text layer editable in After Effects, first import the PSD (Photoshop layered file) as a Composition. Then select the layer in After Effects and use the menu option Layer > Convert to Editable Text (as seen at left). Now you can animate the type as if it originated in After Effects and apply presets or text animators to it (below).

Unfortunately you still can’t convert Illustrator text layers to editable text. A workaround is to export the Illustrator file as a PSD [File > Export > Photoshop (psd)] and then import this PSD file as a Composition in After Effects. The artboard size seems to be ignored, but you should be able to convert text layers to editable layers.
Browse Presets in Bridge
We cover Animation Presets in Chapter 25 of CMG, but it’s worth noting here that you can preview what text animation presets look like in Adobe Bridge, and then apply them. To try this, select a text layer and choose Browse Presets from either the Animation or Effects & Presets Options menu. This opens Adobe Bridge, placing you in the Presets folder. Double-click the Text subfolder, and you will see another group of subfolders showing the many different categories of text presets. Spend some time opening different subfolders and previewing their animations:
When you browse presets in Bridge, you will see a small animated preview movie on the right side. Double-click a preset to apply it to a selected layer in After Effects.
When you find one you like, double-click it; you will be returned to After Effects and the preset will be applied to your text layer. Of course, if you don’t need to preview presets first, you can apply them from the Effects & Presets panel by double-clicking their name or drag-and-dropping them onto your layer.
Click here to download additional text animation presets from Adobe’s After Effects Exchange.
Exploring animations presets is a good way to learn about the different effects you can get text animators. Of course, it helps to really understand text animators in depth to create your own animations from scratch (something we can’t cover in a short blog entry!), but the next four tips includes easy ways to customize a preset that might be close to what you like:
Randomize Order
Ease High and Low
Perhaps the least understood parameters in the Range Selector’s Advanced section are Ease High and Ease Low. These refine the shape between characters being fully included in the selection (the high point) and fully excluded (the low point).
The best way to understand how the ease controls work is to see how they affect characters as they animate. Select a text layer and apply a very simple preset, such as Text > Animate In > Drop in by Character and RAM Preview to get familiar with it. (Make sure the characters are not off-screen at the beginning of their transition.) In this animation, characters drop in to position from the top, so they are fully affected by the animator when they are higher in the comp (their “high” point) and transition to being unaffected by the animator when they land (their “low” point).
Adjust the ease parameters to affect the speed at which individual characters fall down into place. Setting Ease Low to 100% gives a soft landing.
In the Timeline panel, twirl down Text > Animator 1 > Range Selector 1 > Advanced and adjust the Ease High to 100% and RAM Preview; characters now ease away from their high point (where they are “most selected”). Undo, and try setting Ease Low to 100%; characters now fall gently down into position as they move toward the low point of their range.
Note that using Ease High and Ease Low is different than easing the Range Selector’s Start, End, or Offset keyframes (Chapter 4 of CMG). In that case, you are changing the speed that the range selector moves across the characters, without control over how each character behaves. This is still useful; for example, adding an ease in to the last keyframe of a text animation gives a sense of finality, and also forces the viewer to pause and ponder the last few characters or words.
Centering Text
In After Effects CS5 and later, to start a new text layer with the cursor exactly centered in the composition, double-click the Type tool. (In previous versions, select Layer > New > Text Layer to do the same thing.) You might want to also select the Center Text option from the Paragraph panel so the title will be centered on the cursor.
When characters are rotated and scaled in an animator group, they default to using their own baseline as an anchor point. If you’d like a text animator to animate around the vertical center of the text, there are two approaches: add the Anchor Point property to the text animator and adjust its Y value, or use the More Options > Group Alignment option and adjust its Y percentage value. Note that the Anchor Point method affects only characters that are selected, while the Grouping Alignment method affects all characters in multiple animators.
The Grouping Alignment values are based on a percentage of the text size (not pixels). This means you can change the type size without having to tweak these values. To vertically center the anchor point, try values for Y of -25% to -50. Note that in CS5 and later, the anchor point is now visible in the Comp panel as you adjust the Grouping Alignment (as well as any transform properties applied to a text animator). In previous versions it was difficult to know where the anchor point was located.
Per-character 3D
You can enable Per-character 3D for any text animation, even in a 2D comp.
The Per-character 3D option allows you to position and rotate the individual characters in a text layer through 3D space. Although you can enable Per-character 3D in a 2D comp, to get the most out of this feature you should be working in a comp that also has a 3D camera and lights (working in 3D was covered in Chapters 13 through 16 of CMG).
Per-character 3D simply adds to all the other tricks you can do with text animators and you can enable it to any preset you like. Note that not all text properties are affected by Per-character 3D (for instance, Blur, Opacity, Skew, Fill Color, and Tracking appear the same whether or not it’s enabled). However, Anchor Point, Position, Scale, and Rotation all will gain a third dimension: a Z parameter.
One trick you can do with Per-character 3D is enabled is create text that stands up on a path. To see this in action, select Browse Presets (covered earlier) and apply the 3D Rotate Around Circle preset from the Text > 3D Text folder. Press UU (two U’s in quick succession) to show all properties that have been changed from their default settings. This preset creates text on a path (a mask shape), enables Per-character 3D, and sets the X Rotation X to +90°. Clicking Reverse Path will draw the text on the opposite side of the path. To arrive at the orientation you need, use the layer’s regular Transform > Rotation controls. If you are in a 2D comp (with no camera), select View > Custom View 1 (from the bottom of the Comp panel) to view the layer with perspective.
It is important to understand that there is a big difference between enabling Per-character 3D for a text layer and merely enabling its 3D Layer switch: In Per-character 3D mode, each character is rendered as an individual element with its own 3D position and rotation offsets. Compare the text in the figure at left with the figure above: At left, the 3D Layer switch is on, but not the Per-character 3D option. This means the text elements exist only on a flat 2D plane, which can then only be animated as a whole in 3D space. The text will go around the rim of your circle – but not stand up along its path, as they do in the figure above. The individual characters also will not cast shadows on each other. View your 3D composition from different angles using multiple views to get a better understanding of how the layers interact. In this example, Per-character 3D and a mask path are used to curve text between layers. Footage courtesy Artbeats/Gears and Industry: Gears and Machines.
Trish and Chris Meyer share seventeen-plus years of real-world film and video production experience inside their now-classic book Creating Motion Graphics with After Effects (CMG). The 5th edition has been thoroughly revised to reflect the new features introduced in both After Effects CS4 and CS5. New chapters cover the new Roto Brush feature, as well as mocha and mocha shape. The 3D section has been expanded to include working with 3D effects such as Digieffects FreeForm plus workflows including Adobe Repouss©, Vanishing Point Exchange, and 3D model import using Adobe Photoshop Extended. The print version is also accompanied by a DVD that contains project files (CS5-only) and source materials for all the techniques demonstrated in the book, as well as over 160 pages of bonus chapters on subjects such as expressions, scripting, and effects.
We will be pulling a few “hidden gems” out of each chapter to share on ProVideoCoalition.com roughly every week. These will give you a taste for the multitude of time-saving tips, not-obvious features, little gotchas, and other insider knowledge you will find in CMG.
The content contained in Creating Motion Graphics with After Effects – as well as the CMG Blogs and CMG Keyframes posts on ProVideoCoalition – are copyright Crish Design, except where otherwise attributed.


