We’re going through our book Creating Motion Graphics with After Effects 5th Edition (CMG5) and pulling out a few “hidden gems” from each chapter. These will include essential advice for new users, plus timesaving tips that experienced users may not be aware of.
One of the richest areas for exploration in After Effects is its “effects” side. The variety of effects supplied with After Effects ranges from the extremely utilitarian to the extremely wild, each with anywhere from one to over 100 parameters you can adjust. In Chapter 22 of CMG, we start with an overview of how to apply and edit effects. We then move onto some more sophisticated tricks using effects, such as animating their Effect Point, using adjustment layers, exploiting mask paths, and adding blending modes. We end with Layer Styles: a powerful alternative to common effects such as bevels, glows and shadows, borrowed from Photoshop.
We’ll assume you know how to apply an effect to a layer using either the Effect menu or the Effects & Presets panel. If you need instructions, please consult Help > After Effects Help. Below are a few tips that may have escaped you:
Effect Points
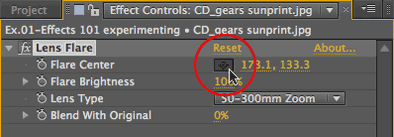
Several effects have specific points that they are centered around or that otherwise define the area the effect takes place over or between. Examples include the center of a lens flare or particle system effect, the center of a twirl, or the two points that define a lightning bolt. These are known as effect points and are represented by a crosshair icon in the Effect Controls panel.

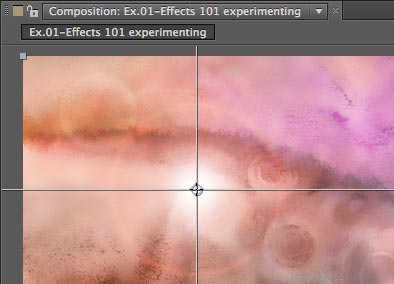
Effect Points are identified by a crosshair icon (circled in red) in the Effect Controls panel (left). They can be moved either by directly grabbing this icon in the Comp panel, or by clicking on this icon and then “placing” the crosshair center in the Comp panel (below left). Note that the effect point’s parameter has a value on the X and Y axes that is in relation to the layer, not the overall composition.

The effect point can also be moved directly in the Comp panel. To do this, you must first select the effect in the Timeline or Effect Controls panel; the effect point symbol will then appear in the Comp panel. It is identified as a small circle with a + symbol inside it (in contrast with the anchor point’s registration symbol). Now you can click and drag to edit its location.
While you can edit an effect point in the Comp panel and set keyframes, you can’t see the motion path it creates. Since the effect point has a value on the X and Y axes in relation to the layer (just like the Anchor Point), access to the motion path is in the Layer panel.
To see this in action, apply the Effect > Generate > Lens Flare effect to any layer, turn on the animation stopwatch for the Flare Center parameter, the create a few more keyframes so that the lens flare moves around the frame. Double-click the layer to open the Layer panel, and select the Lens Flare effect from the View menu (bottom-right corner). The motion path will now be visible (see figure). The spatial keyframes default to Auto Bezier, but you can edit the handles just like the motion path for Position (covered in Chapter 3 of CMG5). The Layer panel shows only the motion path; the result appears only in the Comp panel.
Masks as Paths
Several effects let you create an effect that follows the outline of a mask. The parameter you need to set is called Path – this tells the effect which mask path to look at. Examples of effects that can use a mask path include Generate > Audio Spectrum, Audio Waveform, Fill, Stroke and Vegas. In fact, some effects (such as Stroke) do nothing unless the Path popup points to a mask.
Generate > Audio Spectrum is set to follow the mask path we drew along the skyline in this footage (a), resulting in a fun animated outline (b). Footage courtesy Artbeats/Establishments: Urban.
An example of using mask paths for effects is demonstrated in the accompanying figures. We outlined the skyline of buildings with a mask. We then applied Generate > Audio Spectrum, set its Path popup to use our mask path, enabled it to Draw on Original (so we could see the original footage underneath), and set the Audio Layer popup to use a second audio layer. The result is an animated line that traces the skyline and bounces along with the music.
CC Composite
Many effects have a Blend With Original or similar parameter. This allows you to tone down the strength of an effect by blending together “before” and “after” versions of the image.
However, not all effects have this parameter. Also, Blend With Original is slightly misnamed; what it really means is “blend with what the image looked like right before this effect.” If you have more than one effect applied to a layer, the Blend With Original parameter for the later effects don’t reach all the way back to the original image.
Adjustment Layers
An alternative way to use effects is to apply them to adjustment layers (Layer > New > Adjustment Layer). All the layers below an adjustment layer in the Timeline panel are composited together, then the effects applied to the adjustment layer are applied to a copy of this composite. These two images – the original composite and effected version – are then blended together.
Any content in an adjustment layer is ignored. What is important is its alpha channel, as this determines which portions of the underlying composite receive the effects. A full-frame adjustment layer means the entire frame is treated. To apply effects to selected areas, you can crop the adjustment layer using masks and mattes; to blend in an adjustment layer’s changes at less than full strength, reduce its opacity. Blending modes further affect how the treated and untreated versions of the image are combined. You can also animate the adjustment layer as well as the applied effects.
Any layer can become an adjustment layer if you turn on its adjustment layer switch, although images with interesting alpha channel shapes work best. The original image will disappear, but effects applied to it will modify all layers below based on that layer’s alpha channel.
In this example, the title layer and goldfish image are both used as adjustment layers. Fish courtesy Getty Images; ocean footage from Artbeats/Monster Waves.
To practice this, turn on the adjustment layer switch for a title layer (the image will vanish – that’s okay). Apply Effect > Channel > Invert. The effect will be applied to the layer(s) below, using the title’s alpha channel to limit its area of effect. Try this also with an image with an interesting alpha channel. Multiple adjustment layers are rendered from the bottom up.
Effects and Solids
It’s common to think of effects as filters that treat an image. However, many effects – such as stroked lines and lens flares – create their own images. Although you can apply them directly to footage, it is usually more powerful to apply them to their own separate layer so that you can then perform additional compositing tricks. And the best layer to apply them to is often a simple black solid (Layer > New > Solid) that’s the same size as the comp.
To try this, apply the Lens Flare effect to a full-frame black solid. Make sure the Modes column is visible in the Timeline panel, and experiment with different blending modes to composite the effect on layers below: Screen gives the most natural look for lens flares and lighting effects; Add and Color Dodge give more blown-out looks.
As the lens flare now exists separate from the underlying image, you can apply additional effects to just the flare. For example, Effect > Color Correction > Hue/Saturation lets you change the color of the flare. If you do this while it is applied to the underlying image, this effect would alter both the flare and the image.
A lens flare applied directly to an image (above left) limits your compositing options. Instead, apply the effect to a black solid (left). Use the Screen blending mode to drop out the black background and change the flare color (above right) or add other effects. Footage courtesy Artbeats/Family Life.
Note that the black solid does not need to be the same size as the composition or underlying layers. You can gain extra flexibility by making the solid larger than your comp. This way, you can transform the solid (and therefore, the effects applied to it), including scaling or rotating it.
Bonus tip: If you need to render the black solid with an alpha channel to composite the effect in a different application, there is a trick: Apply the Channel > Channel Combiner effect to the black solid, change the From popup to Max RGB and the To popup to Alpha, then apply the Channel > Remove Color Matting effect. This converts the RGB levels of the image to corresponding amounts of transparency. (This is the equivalent of the “unmult” effects available from third parties.) Save these two effects as an Animation Preset whenever you need an “unmult” effect.
Trish and Chris Meyer share seventeen-plus years of real-world film and video production experience inside their now-classic book Creating Motion Graphics with After Effects (CMG). The 5th edition has been thoroughly revised to reflect the new features introduced in both After Effects CS4 and CS5 (click here for free bonus videos of features introduced in CS5.5). New chapters cover the new Roto Brush feature, as well as mocha and mocha shape. The 3D section has been expanded to include working with 3D effects such as Digieffects FreeForm plus workflows including Adobe Repouss©, Vanishing Point Exchange, and 3D model import using Adobe Photoshop Extended. The print version is also accompanied by a DVD that contains project files (CS5-only) and source materials for all the techniques demonstrated in the book, as well as over 160 pages of bonus chapters on subjects such as expressions, scripting, and effects.
We will be pulling a few “hidden gems” out of each chapter to share on ProVideoCoalition.com roughly every week. These will give you a taste for the multitude of time-saving tips, not-obvious features, little gotchas, and other insider knowledge you will find in CMG.
The content contained in Creating Motion Graphics with After Effects – as well as the CMG Blogs and CMG Keyframes posts on ProVideoCoalition – are copyright Crish Design, except where otherwise attributed.


