We’re going through our book Creating Motion Graphics with After Effects 5th Edition (CMG5) and pulling out a few “hidden gems” from each chapter. These will include essential advice for new users, plus timesaving tips that experienced users may not be aware of.
If you can copy and paste it, you can save it: That is the philosophy behind Animation Presets. Presets allow you to save static values or keyframed animations for text, masks, effects, layer styles, and transformations. These presets are saved to individual files on disk and presented in the Effects & Presets panel for later application to any layer in any project. You can later edit these values to suit their new application.
In addition to being able to create your own presets, Adobe provides hundreds of factory presets that include effects, text, and shapes. These include one of favorite presets, Behaviors; these allow you to animate layers without applying keyframes or expressions. This chapter also explores Brainstorm, which allows you to select any combination of effects, keyframes, and parameters and have After Effects automatically generate variations for you to check out. Below are a few tips from this chapter:
Saving a Preset
Perhaps the easiest way to learn about Animation Presets is to use them. Open an After Effects project that includes some interesting animated layers that you’d like to apply the same animation to another layer.
First select some properties (masks, effects, transformation, layer styles, and so on) in the Timeline. When you select a property name, all of its keyframes will be selected. By selecting the name of an effect, you’ll make sure you capture all of its parameters as well as any keyframes or expressions that have been applied. Remember you can only save attributes that you can copy and paste, so layer-based switches and popups – such blend modes or the status of the motion blur switch – cannot be included in your selection.
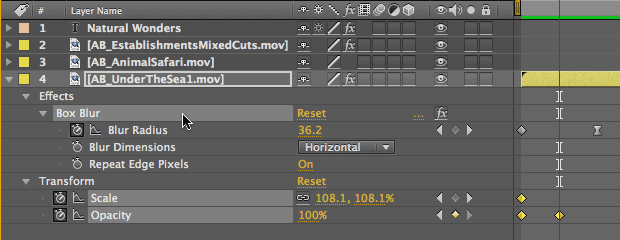
In the figure above, we revealed all modified properties by typing UU, then Shift+selected their names in the Timeline panel. Selecting an effect’s name will grab all of its parameters and keyframes, even though they are not highlighted.
There are several ways to save an Animation Preset; the following methods all have the same result – so decide which is the easiest for you to learn and remember. Most of these require the Window > Effects & Presets panel to be open and forward.
- Method 1: Select the menu item Animation > Save Animation Preset.
- Method 2: Drag one of your selected items to the Effects & Presets panel and release the mouse.
- Method 3: In the Effects & Presets panel, click on the page icon in its lower right corner.
- Method 4: In the Effects & Presets panel, click on the arrow in its upper right corner, and select Save Animation Preset from the Options menu that appears.
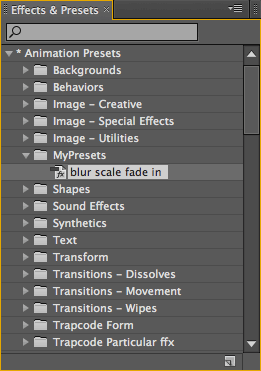
In all cases, you will be presented with a Save Animation Preset dialog. Enter a name that describes the animation, such as “blur scale fade in.ffx” for your preset, then click Save. (The file extension .ffx should be used for all presets. This extension will not appear in the Effects & Presets panel.) Try to use words in the name of your preset that you can be useful to search on later, such as “blur” or “tint” and so on.
In the Effects & Presets panel’s Options menu, make sure Show Animation Presets is enabled. Then twirl open the folder * Animation Presets, then twirl open the subfolder in which you saved them (see Where to Save Presets below). You should see your preset inside this subfolder.
Where to Save Presets
You can save a preset anywhere; the default is in the Adobe > After Effects CS5 > User Presets folder After Effects creates inside your main user documents folder. This makes your presets easy to find should you want to exchange them with others; the downside is that they don’t appear in Adobe Bridge alongside the Adobe-supplied presets. Personally, we suggest you save them inside the Adobe folder, which appears inside User Presets – this takes you into the Adobe After Effects CS5 > Presets folder.
You can create your own subfolders to keep your presets organized. Saving somewhere inside User Presets (or Adobe After Effects CS5 > Presets) will result in your new presets appearing in the * Animation Presets folder in the Effects and Presets panel. If you save them anywhere else, they won’t appear in this panel, although you can still open them from the Animation menu.
Applying a Preset
 To apply your preset to another layer, select it and type I to locate to its in point. This is important, because when you apply a preset that has keyframes, the timing of the keyframes is relative to the placement of the time indicator when you apply the preset.
Also, make sure you deselect any masks and effects you wish to leave unaffected! To give an example, if you have an effect selected, and the the preset you’re about to apply uses the same effect, the preset will replace the selected effect rather than add another instance of the effect. Shift+F2 deselects all masks, keyframes, and effects without deselecting the layer itself.
Just as there is more than one way to save a preset, there is more than one way to apply a preset. These include :
- Method 1: Select the menu item Animation > Apply Animation Preset. This will open a file dialog where you can locate the preset you want. This is the approach to use if the preset you need is not saved in the Presets folder (perhaps on a shared file server, for example).
- Method 2: Select the menu item Animation > Recent Animation Presets, and choose from this list any one of the last several presets you’ve created or applied.
- Method 3: Type Command+Option+Shift+F (Control+Alt+Shift+F). This will apply the last Animation Preset you saved.
- Method 4: In the Effects & Presets panel, double-click on the name of the preset (see figure).
- Method 5: Drag the preset from the Effects & Presets panel to the layer you want it applied to.
Yes, you could have just copied and pasted these parameters. The advantage of going the preset route is that you can easily apply this same set of parameters anytime in the future, in any composition or project, without the need to hunt down the original source layer.
If you don’t like a preset, it’s best to Undo rather than try to remove the masks, effects and other attributes you believe were applied – it’s too easy to miss something!
Note that unlike “styles” or “instances” in other applications, resaving an Animation Preset will not dynamically update layers that you had previously applied the preset to. If you need to create instances, check out the script ft-Effect Instance by Francois Tarlier, available from aescripts.com.
Expression Containers
Presets also remember Expressions – pieces of JavaScript code that tie parameters together – applied to the properties you copy, which makes presets a great tool for saving and reusing expressions. Expressions are covered in user-friendly depth in Chapter 37; the biggest gotcha here is if you save a preset with an expression that refers to another effect, layer, or comp by name, After Effects will complain when you apply this preset if it cannot find the same name it is looking for. You can usually just relink the expression to make After Effects happy again. When creating expressions, it helps to refer to generic layer names such as “Camera 1” or “Solid 1”.
Applying Presets from Bridge
In addition to being able to save and apply your own presets, After Effects ships with hundreds of ready-made presets for you to employ. Below we’ll use Adobe Bridge to explore and apply some of the hundreds of Text Animation Presets. Start by creating some text that you’d like to animate using the After Effects Type tool (if you don’t select a text layer, After Effects will create some dummy text for you).
Next, select the text layer, then choose Browse Presets from either the Animation or Effects & Presets Options menu. This opens Adobe Bridge, placing you in the Presets folder. Double-click the Text subfolder, and you will see another group of subfolders showing the many different categories of text presets. Click once on a preset to preview the animation in Bridge:
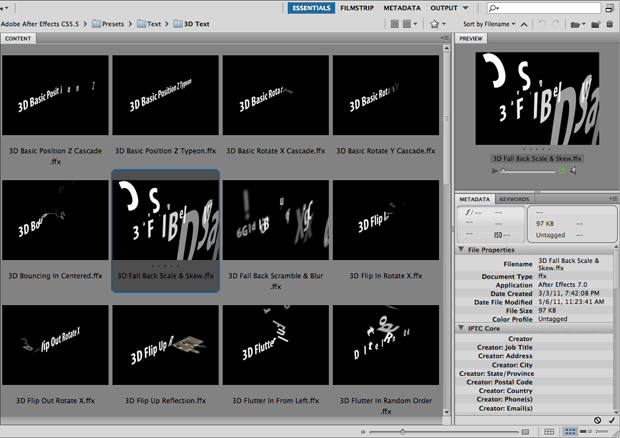
In addition to the presets that are bundled with After Effects (some of which are shown above), Adobe has posted over 300 additional Shape and 3D Text presets for After Effects on its Exchange website. Visit share.studio.adobe.com and go to the After Effects section to see all of what’s available.
When you find a preset you like, double-click it. You will be returned to After Effects and this preset will be applied to your text layer. RAM Preview. To figure out how it was created, type U to see which parameters are animated, or UU to check which parameters have been changed from their default values.
If you don’t like the animation, be sure to Undo to remove the preset and return to the original text, don’t just remove Animator 1 as you don’t know what else the preset changed! Press Home to return to 00:00 (remember: presets apply their keyframes starting at the current time). Return to Bridge and double-click a different one.
Since Animation Presets create normal keyframes, you can customize them any way you like by editing those keyframes – for example, by moving them closer together to speed up the animation, changing their values, adding eases (Animation > Keyframe Assistant > Easy Ease), or deleting keyframes or effects that aren’t needed or desired.
Experiment with applying more Text Animation Presets. Remember that presets add to properties and keyframes already applied; applying a preset does not delete one you applied before. For instance, try applying a preset from the Animate In folder at time 00:00, then later in time apply a preset from the Animate Out folder.
Behaviors
 One of our favorite categories of presets is Behaviors. These use a combination of effects and expressions to automatically animate a layer without the need for keyframes – instead, you set general values such as “move the layer in this direction at this speed.” Here’s a few of our favorites, as well as suggestions on how to preview them.
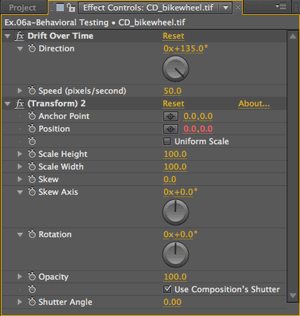
Create a comp with a few layers in it, and select a layer. In the Effects & Presets panel, twirl open Animation Presets > Presets, and twirl open Behaviors. Double-click Drift Over Time to apply it. RAM Preview; your layer will slowly drift. The Drift Over Time behavior is handy to apply to text layers so that the title doesn’t have to stop moving after it’s animated on.
The Effect Controls panel should have opened when you applied this preset (if not, press F3); at the top are the custom controls. The first effect contains the custom controls; the Transform effect does the leavy lifting thanks to expressions under the hood.
 Some behaviors can be combined. For example, double-click Behaviors > Fade In+Out – frames to add it to your currently-selected layer. RAM Preview; the layer will fade in and out at the ends of the layer without having to set any opacity keyframes. You can edit the Fade In and Fade Out Durations in the Effect Controls panel.
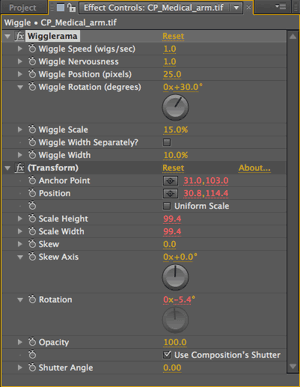
On a separate layer, apply Behaviors > Wigglerama. RAM Preview; now your layer wiggles its position, scale and rotation randomly, without having to write your own wiggle expression (which is discussed in detail in Chapter 37).
Note: The Wiggle and Scale Bounce Behavior animation presets do not get along with any layer that is continuously rasterized, including all text and shape layers. If you enable the Continuous Rasterization switch for a layer that has one of these Behaviors attached, they will transform around the upper left corner instead of their anchor point.
Also try out the Autoscroll behaviors; RAM Preview to see an endless succession of your layer repeated across your screen. The advantage of using Autoscroll instead of the Offset effect is that the speed can be set in pixels per second, and because the behavior uses Motion Tile it can also use the layer’s motion blur setting:

In addition to the Fade In+Out behaviors where you can define the fade times in frames or seconds, the Fade In and Fade Out Over Layer Below behaviors automatically adjust their fade times based on how much a layer overlaps the next one in the timeline.
Trish and Chris Meyer share seventeen-plus years of real-world film and video production experience inside their now-classic book Creating Motion Graphics with After Effects (CMG).
The 5th edition has been thoroughly revised to reflect the new features introduced in both After Effects CS4 and CS5 (click here for free bonus videos of features introduced in CS5.5). New chapters cover the new Roto Brush feature, as well as mocha and mocha shape. The 3D section has been expanded to include working with 3D effects such as Digieffects FreeForm plus workflows including Adobe Repouss©, Vanishing Point Exchange, and 3D model import using Adobe Photoshop Extended. The print version is also accompanied by a DVD that contains project files (CS5-only) and source materials for all the techniques demonstrated in the book, as well as over 160 pages of bonus chapters on subjects such as expressions, scripting, and effects.
We will be pulling a few “hidden gems” out of each chapter to share on ProVideoCoalition.com roughly every week. These will give you a taste for the multitude of time-saving tips, not-obvious features, little gotchas, and other insider knowledge you will find in CMG.
The content contained in Creating Motion Graphics with After Effects – as well as the CMG Blogs and CMG Keyframes posts on ProVideoCoalition – are copyright Crish Design, except where otherwise attributed.

Filmtools
Filmmakers go-to destination for pre-production, production & post production equipment!
Shop Now